
Have you ever tried logging in to your Raspberry Pi via SSH and were denied because the IP address couldn’t be found? Do you have to scan your network every time you connect to find your local IP address? If the IP address of your Raspberry Pi changes all the time, it’s because you’re using a dynamic IP address. If you want your Pi to have an IP address that doesn’t change automatically, assign it a static IP address. With a static IP, you can be sure that the same IP will work each and every time.

In this tutorial, I’ll show you how to configure a static IP address using a clean installation of Raspbian Jessie and Raspbian Jessie Lite. There are pros and cons to each type of IP though, so let’s first talk about why you would want a static IP over a dynamic IP.
Static IP vs. Dynamic IP
Dynamic IP
Dynamic IP’s are good to use if you’re concerned about security. If a hacker gets access to your IP address, you’ll be less vulnerable to attack since your IP changes frequently. A dynamic IP can change every time you log in, or only at certain intervals. A program installed on your network router called the dynamic host configuration protocol (DHCP), automatically changes and assigns new dynamic IP addresses to computers on your network.
Static IP
A static IP (as you could probably tell by the name) is one that doesn’t change. This makes it more reliable when using services that depend on a stable internet connection, like online gaming, VOIP, or remote desktop applications. With a static IP, you’ll be able to use the same IP address every time you connect to your Pi.
Setting up a Static IP on the Raspberry Pi
Before starting, make sure you’ve already set up and configured a way to access the command prompt. Check out our tutorials How to Set Up WiFi on the Raspberry Pi and How to Set Up a Raspberry Pi Without a Monitor or Keyboard to see how to do that if you haven’t already.
In this tutorial we’ll set up static IP’s for both WiFi and ethernet connections. If you only need one or the other, just omit the code below for the connection you don’t need.
Find Out Your Network Information
The first step is to find out your default gateway IP. This is the local IP address of your network router. The computers on your network use it to communicate with the router and access the internet. If you already know what it is, just skip this step. If not, do continue…
Power up and log into your Raspberry Pi via WiFi or ethernet, then enter route -ne at the command prompt to see your network routing information:
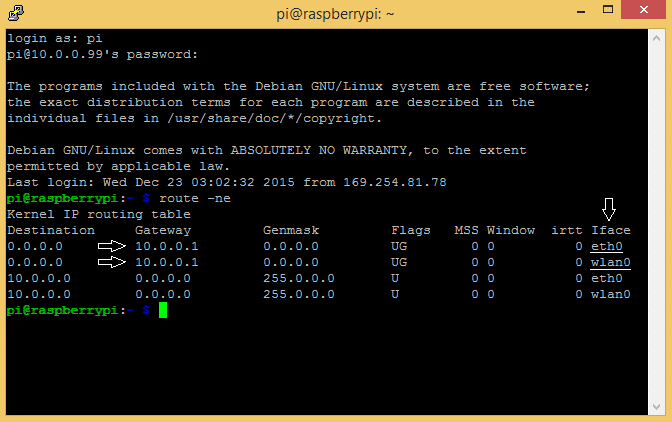
Under the “Gateway” column, you can see your default gateway IP (10.0.0.1 in my case). The “Iface” column lists the names for each connection – ethernet (eth0) and WiFi (wlan0). Write down your default gateway IP, we’ll need it in a minute.
Now we need to find out the IP addresses of your domain name servers. Your Pi sends the domain names you enter into your browser (i.e. www.google.com) to domain name servers, which convert the domain names to IP addresses (i.e. 8.8.8.8). Your Pi then uses the IP address to access the website’s server.
Enter cat /etc/resolv.conf at the command prompt to find the list of domain name servers:
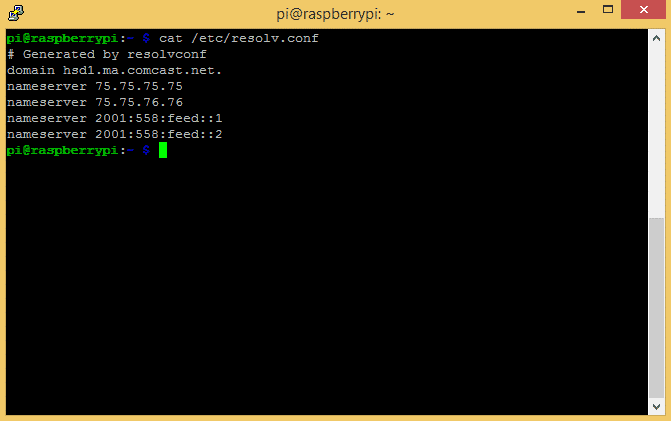
Copy these IP addresses to a text editor on your PC or write them down for later.
Configure the Network Settings
Now we’re ready to configure the network settings. By default the Pi is configured with a dynamic IP address. To assign it a static IP address, you need to add your static IP, default gateway IP, and domain name servers to the dhcpcd.conf file.
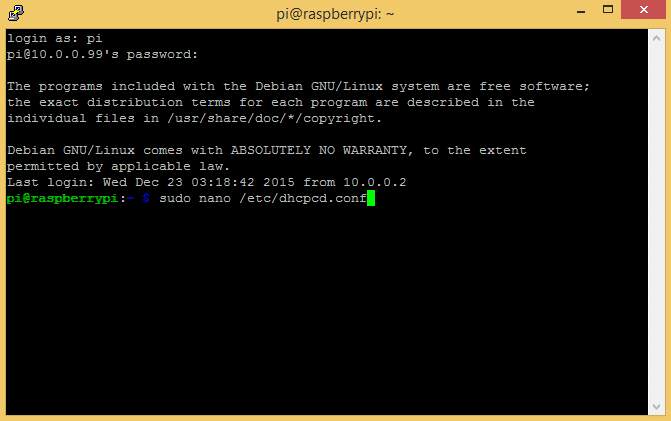
At the command prompt, enter sudo nano /etc/dhcpcd.conf to edit the dhcpcd.conf file:
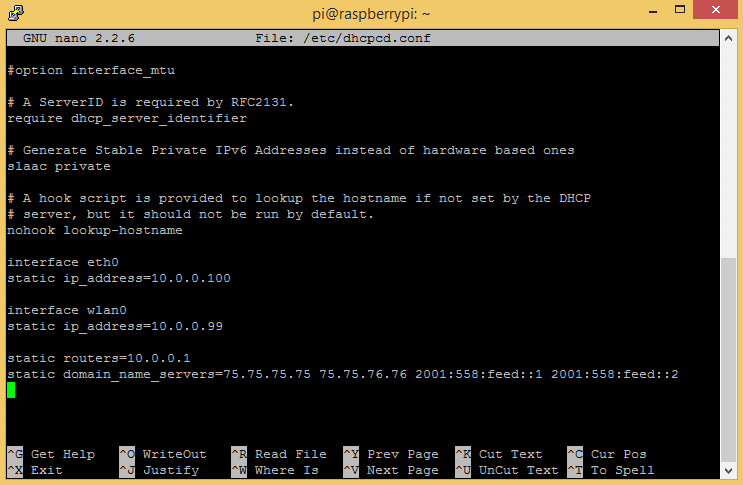
Now, without changing anything else in the file, add this code at the bottom of the dhcpcd.conf file, replacing the IP addresses with your own IP addresses found above:
interface eth0
static ip_address=10.0.0.100
static routers=10.0.0.1
static domain_name_servers=75.75.75.75 75.75.76.76 2001:558:feed::1 2001:558:feed::2

interface wlan0
static ip_address=10.0.0.99
static routers=10.0.0.1
static domain_name_servers=75.75.75.75 75.75.76.76 2001:558:feed::1 2001:558:feed::2
static ip_address: This is the static IP address you’ll use to SSH or remotely connect to your Pi. Take your default gateway IP (found in the steps above), and change the last number to any other number between 0 and 255.static routers: This is your default gateway IP address.static domain_name_servers: These are the IP’s we found in the resolv.conf file above. Separate each IP with a single space.
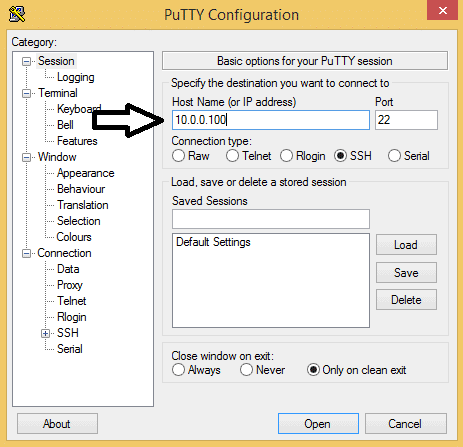
For example, my default gateway IP address is 10.0.0.1. To get the static ip_address for my ethernet connection (eth0), I replaced the 1 with 100 to get 10.0.0.100. To get the static ip_address for my WiFi connection (wlan0), I replaced the 1 with 99 to get 10.0.0.99. I’ll use these IPs to log in to my Pi from now on.
The file should look like this (with your own IP addresses):
Once you’ve replaced the IP addresses in the example code with your own IP addresses, press Ctrl-X and Y to exit and save the dhcpcd.conf file. Now enter sudo reboot to reboot the Pi. Log in with your new static ethernet IP or static WiFi IP:
To check that everything is working correctly and the Pi has access to the internet, let’s ping Google. Enter sudo ping www.google.com at the command prompt:
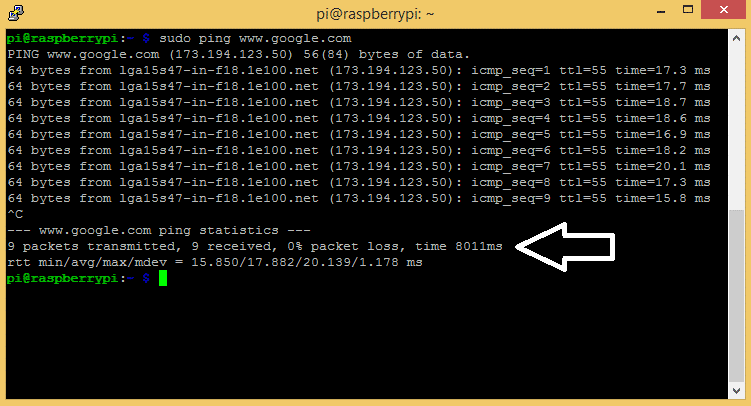
Press Ctrl-C to stop the pinging. If the connection is successful, you’ll see the packets that have been sent and received. If your connection isn’t successful, you will get a “Network is unreachable” error:

You should probably test the connection by pinging Google with both ethernet and WiFi static IP’s.
You can watch me set this up step by step in this video:
Now that you have a static IP set up, your Pi’s connection to the internet will be a lot more reliable. But another really useful way to connect to your Pi is with a direct ethernet connection to your laptop or desktop. A direct connection is extremely fast and stable. If you connect to your Pi via SSH a lot, I would definitely recommend setting this up. Check out our article, How to Connect to a Raspberry Pi Directly with an Ethernet Cable to learn how.
Thanks for reading! Let me know in the comments if you have any questions about setting up your static IP, and I’ll do my best to help. And be sure to subscribe! We send out a quick email each time we publish new articles.


Great article. Just a few weeks too late for me as I finally figured it out…
It can be as simple. Lots of articles about fixed ip on the web, read at least 10 of them. All of them wrong or at least outdated (no jessie). Yours worked in no time. Mni thanks for that!
Thanks a Lot on How to setup static ip address, I looked few web site and most had wrong information.
Thank you, many “so called current” info on this on the web but all seem outdated, this is 100% correct. Thank you again.
works fine in setting static address but when trying to ping Google I get “unknown host http://www.google.com” If I comment out the added lines the ping works fine I use TightVNC to connect to the PI – router address is 192.168.1.1
@JarJarGeek Very nice guide, I would use this for server, but for general Pi;s I find avahi-deamon more flexible.
When i type in the cat for either files or even sudo nano it either says that te file or directory doesn’t exist or the document comes up blank (implying that it doesn’t exist).
i am using a raspberry pi 3 and am using the latest raspbian os as of may 15th 2016.
please help that way i don’t end up having to set my pi up every time i want to use it.
thanks.
nevermind. got it working.
had to share this on my @RebelMouse. Thank you! https://t.co/6mLwym7uQO
When I tried this it fails to connect. I think the problem is in the static router address. As per your instructions I came up with 0.0.0.0…
pi@VIDraspberrypi:~ $ route -ne
Kernel IP routing table
Destination Gateway Genmask Flags MSS Window irtt Iface
0.0.0.0 192.168.1.1 0.0.0.0 UG 0 0 0 wlan0
169.254.0.0 0.0.0.0 255.255.0.0 U 0 0 0 eth0
192.168.1.0 0.0.0.0 255.255.255.0 U 0 0 0 wlan0
Any ideas?
Thanks!
Oops… rebooted a second time and now ALL works!
THANK YOU FOR WRITING (AND VIDEO RECORDING) SIMPLE, CONCISE AND UP TO DATE INSTRUCTIONS!!!!!!!!!!!
will this allow graphics from a python program running on pi like pygame? or is the screen functionality merely a window into the terminal?
How will you ensure that the DHCP won’t assign this address to another device?. If my understanding is correct the DHCP does not know about this static IP and can therefore assign it to something else. If this happens there will be an IP conflict. is there anyway out of this ?
Most dhcp servers will try to ping address before assigning it to a client. But if your static IP device is switched off, the address still may be used by dhcp, and conflict will happen when you switch it on.To avoid this, you have to exclude address from your dhcp server’s address distribution range. Or you can make a reservation for that address in dhcp. In some cases reservation is even an alternative to static IP.
How can I set network mask to? Because this way it gives me mask of 255.0.0.0 which is not correct in my case,
Also I need to set additional classless route for 10.10.0.0/16 via another gateway.
In fact I don’t need static address. If I do, I’d rater prefer to setup a dhcp reservation. I came to your article finding solution to a problem I have: My raspbian jessie / pi3B does not get default gateway from DHCP. It receives normaly everything else – IP address, default domain, dns and ntp servers, additional classless routes but not default gateway! What can be wrong? The DHCP server is Windows 2012 R2, if that does mater.
With Raspian Jessie (2016/09/23) a need to add “routers” and “domain_name_servers” BOTH under eth0 and wlan0:
interface eth0
static ip_address=192.168.x.x/24
static routers=192.168.x.x
static domain_name_servers=x.x.x.x
interface wlan0
static ip_address=192.168.x.x/24
static routers=192.168.x.x
static domain_name_servers=x.x.x.x
Thanks for the update! I’ll add this to the post.
i share with you a video on youtube how to configure your ip from dhcp to static.
https://www.youtube.com/watch?v=3uixbMXZeNs&t=4s
When i run “sudo ifdown wlan0, sudo ifup wlan0” i get “ifdown: interface wlan0, not configured”. what is the fix for this ?
Amazing! Its truly amazing article, I have got much clear idea concerning from this piece of
writing.
wicd-curses
Hi, we have the products of raspberry pi and arduino components, and very interest in working with you.
How do i make it so the ip is the same on any network?? Working on a project and need a way to ping the pi on any network it goes to.
Great article, thank you so much for explaining each of the lines in the dhcpcd.conf file. so many articles tell you to “just add this” without explaining what it means and why. Led to me following several and losing SSH access to the pi until I reverted it.
Doesn’t get much easier that that. Thanks.
Thanks, confirming this worked for me using Raspbian Buster in January 2019
Thank you so much, this helped me a lot. May 2020
I have set static IP in Pi and check by ping and it is working fine but when I enter static IP in putty for ssh getting network error connection time out. I have checked SSH is enabled in pi as well. Can anyone please help me why getting this error?
Worked like a charm. Thank you!
Hello
Your tutorial is really helpful. But I have a problem. It seems that I have mistype my static IP address so I can’t connect with my RPi.
The static ip_address should be “192.168.1.xxx” but I typed it “192.168.201.xxx”
Is there any way I could fix it? Thank you
I am having a strange issue where my resolve.conf file keeps resetting upon reboot or shutdown and I have to do the setup again!!!
The requirement for the static IP is because I am running my own VPN server with OpenVPN and the client I am using on the other end for connecting is Orbot for PC.
I don't want to start from scratch hence the reset is not a choice. I did try changing the user and also chmod to 775 giving full permissions or locking it down, without much luck. Any guidance is appreciated.