A class is a collection of functions and variables that can be used to perform specific programming tasks. In Arduino programming, a class is basically the same thing as a library.

A class is like a template that lets you reuse code without having to type it over and over. For example, say you needed to make 20 documents that all had the same font, header, and margins. It would be too time consuming to change the formatting of all 20 documents individually. Instead you could make a template document with the right font, header, and margins, then add the text and save it as a separate file.
Classes are like that template document. Classes are templates of code for what are called “objects”. Think of a class as the template document, and the object as the individual document. Objects let you access the functions and variables inside of a class. An object is sometimes called an “instance” of a class.
Watch the video for this tutorial here:
Blinking LEDs Without Classes and Objects
To demonstrate how useful classes and objects can be, take a look at an example project that blinks two LEDs at different rates without using classes and objects.
Here are the parts you will need for this project:
The wiring diagram for the project is shown below:
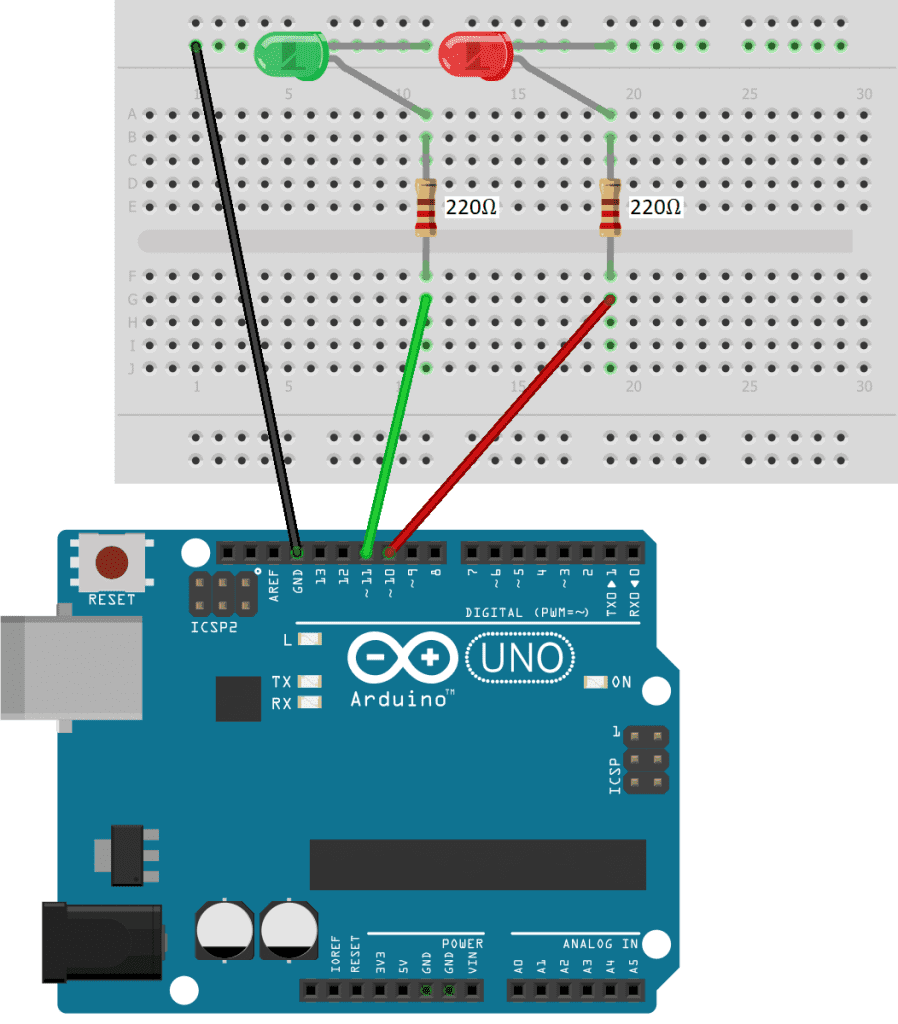
This sketch will make the green LED blink on and off for two seconds and the red LED blink on and off for one second:
int redLED = 10;
int greenLED = 11;

void setup() {
  pinMode(redLED, OUTPUT);
  pinMode(greenLED, OUTPUT);
}

void loop() {
  digitalWrite(greenLED, HIGH);
  delay(2000);
  digitalWrite(greenLED, LOW);
  delay(2000);

  digitalWrite(redLED, HIGH);
  delay(1000);
  digitalWrite(redLED, LOW);
  delay(1000);
}
Explanation of the Code
At the top of the sketch we declare variables for the redLED and greenLED pins.
In the setup() section, we set the pin mode for each LED pin as an OUTPUT.
In the loop() section, we digital write the greenLED high, delay for 2,000 milliseconds, digital write it low, then delay for another 2,000 milliseconds.
Next we digital write the redLED high, delay for 1,000 milliseconds, digital write it low, then delay for another 1,000 milliseconds.
This is a lot of code for a task as simple as blinking a couple LEDs on and off. We can make this program a lot smaller with classes and objects.
Blinking LEDs With Classes and Objects
Let’s see how to blink the LEDs in the sketch above with classes and objects. We’ll start by writing the code for the class, and later we will create objects in the sketch to access the code inside the class.
To make an Arduino class, we need to create two files – a header file and a source file. We’ll write the sketch that uses this class later, but now let’s start writing the header file.
The Header File
The header file is where the class is declared. It is also where the functions and variables used inside the class are declared. Let’s walk step by step through how to write a header file.
The first piece of code needed in the header file is called an include guard. The include guard prevents program errors if the library is accidentally included more than once in the sketch:
#ifndef MyClass_h
#define MyClass_h
// code goes here
#endif
You can name the header file anything you want but in this article it will be named MyClass. The header file needs to be saved with .h extension. In #ifndef and #define, the name of the header file needs to be followed by _h.
Next we need to include the Arduino.h library. Arduino.h is the core library that contains all of the Arduino’s built-in functions. Including it in the header file makes those functions available for use in the class:
#ifndef MyClass_h
#define MyClass_h
#include "Arduino.h"
#endif
Now we can define the class. To define a class, write class followed by the name of the class:
#ifndef MyClass_h
#define MyClass_h
#include "Arduino.h"
class MyClass {
// class code goes here
};
#endif
The name of the class in this example is MyClass. The code for the class goes inside the curly brackets.
The functions and variables inside a class can be public or private:
#ifndef MyClass_h
#define MyClass_h
#include "Arduino.h"
class MyClass {
public:
private:
};
#endif
The public and private keywords are known as access specifiers. Public functions and variables can be used inside the sketch, but private functions and variables can only be used inside the class.
Every class needs a special function called a constructor. The constructor defines what will happen when an object is created. When we write the sketch for this project, we’re going to create an object for the green LED, and another object for the red LED. The constructor will tell the Arduino what to do when we create those LED objects.
We’ll write the actual code for the constructor when we define it in the source file, but we still need to declare it in the header file. Since the objects will be created in the sketch, the constructor declaration needs to be public, and have the same name as the class. The class in this example is called MyClass, so the constructor declaration will be MyClass():
#ifndef MyClass_h
#define MyClass_h
#include "Arduino.h"
class MyClass {
public:
	MyClass();
private:
};
#endif
In this example project we will have two LEDs connected to the Arduino so we need to set the pin mode of each LED pin as an OUTPUT. When we write the code for the constructor in the source file we will put the pinMode() function inside it. The pinMode() function takes a pin number as the first parameter. We need to pass that pin number along to the constructor so that the pinMode() function can use it. To do that, we declare an int variable called pin inside the parentheses of the constructor declaration:
#ifndef MyClass_h
#define MyClass_h
#include "Arduino.h"
class MyClass {
public:
	MyClass(int pin);
private:
};
#endif
Now we need to declare the function that will make the LEDs blink. Functions inside classes are declared the same way they’re declared in sketches. First write the return type. This function isn’t going to return any values, so the return type is void. Then write the name of the function. Let’s call it myFunction():
#ifndef MyClass_h
#define MyClass_h
#include "Arduino.h"
class MyClass {
public:
	MyClass(int pin);
	void myFunction();
private:
};
#endif
Since this function will blink LEDs it would be nice to have control over how fast the blinking happens. We can do this by passing a variable to the myFunction() function that will define the length of the delays. When the function is used in the sketch it will have a parameter that will set the length of the delay.
Let’s declare a variable in myFunction() to store that parameter and call it blinkRate:
#ifndef MyClass_h
#define MyClass_h
#include "Arduino.h"
class MyClass {
public:
	MyClass(int pin);
	void myFunction(int blinkRate);
private:
};
#endif
Now, whatever argument is used in the myFunction() function in the sketch will be passed to the function’s code in the source file.
The myFunction() function will need to know the pin numbers the LEDs are connected to, so we need to declare a variable to store them. The pin number variable will only be used inside the function so it will be declared as a private variable. The naming convention for private variables is with an underscore before the variable name. So let’s declare declare a private variable called _pin:
#ifndef MyClass_h
#define MyClass_h
#include "Arduino.h"
class MyClass {
public:
	MyClass(int pin);
	void myFunction(int blinkRate);
private:
	int _pin;
};
#endif
This is all the code we need for the header file.
To save the header file, navigate to Documents > Arduino > Libraries. Create a new folder with the same name as the class (MyClass in this example). Save the header file in this folder. The header file needs to be saved with a .h extension. In this example, the header file would be named MyClass.h.
The Source File
The source file contains the actual code for the functions, and defines what will happen when you create an object. Let’s walk through the process of writing a source file.
The source file needs to have the same name as the header file but with a “.cpp” extension.
The first thing to do is include the Arduino.h library so we can use the Arduino’s built in functions like pinMode(), digitalWrite(), and delay():
#include "Arduino.h”
#include "MyClass.h"
MyClass::MyClass() {
}
Then we need to include the header file we just wrote. We do that the same way we include all classes, with a #include followed by the name of the header file in quotation marks:
#include "Arduino.h”
#include "MyClass.h"
MyClass::MyClass() {
}
Now we can write the constructor definition. This code will be executed every time an object is created in the sketch. The constructor definition starts with the name of the class followed by two colons. In this example, the class is MyClass. The two colons are called a scope resolution operator. After the two colons is the name of the constructor that we declared in the header file. The constructor needs to have the same name as the class. So the constructor’s name is MyClass():
#include "Arduino.h”
#include "MyClass.h"
MyClass::MyClass() {
}
The objects we create with this class are going to represent Arduino pins connected to green and red LEDs. Each time an LED object is created, the pinMode() of each pin will need to be set as an output. To do that, we need to pass the Arduino pin number connected to the LED to the constructor by declaring a variable called pin inside the MyClass() constructor:
#include "Arduino.h”
#include "MyClass.h"
MyClass::MyClass(int pin) {
}
Inside the constructor all we need to do is set the pin modes of the LED pins. The pin number stored in the pin variable will be passed to the constructor when the object is created, so we set the pin mode with pin, OUTPUT:
#include "Arduino.h”
#include "MyClass.h"
MyClass::MyClass(int pin) {
	pinMode(pin, OUTPUT);
}
Remember the private _pin variable we declared in the header file? Now we set that equal to the public pin variable we declared inside the MyClass() constructor. We’ll see why we want to do this in a minute:
#include "Arduino.h”
#include "MyClass.h"
MyClass::MyClass(int pin) {
	pinMode(pin, OUTPUT);
	_pin = pin;
}
But now let’s write the function that will make the LEDs blink. To define a function, first write the return type of the function. The function in this example will not return any values so it’s return type is void.
Then write the name of the class to which the function belongs. In this example, the function will belong to the MyClass class. Next, include the :: scope resolution operator followed by the name of the function. We already declared the myFunction() function in the header file, so we can use that:
#include "Arduino.h”
#include "MyClass.h"
MyClass::MyClass(int pin) {
	pinMode(pin, OUTPUT);
	_pin = pin;
}
void MyClass::myFunction(){
}
The myFunction() function will have a parameter that sets the duration of the LED blinks. We declared a variable in the header file called blinkRate to store that value, but we also need to declare it here in the source file inside the parentheses of myFunction():
#include "Arduino.h”
#include "MyClass.h"
MyClass::MyClass(int pin) {
	pinMode(pin, OUTPUT);
	_pin = pin;
}
void MyClass::myFunction(int blinkRate){
}
This will create a parameter for the myFunction() function. Now when we call the function in the sketch we can pass it an argument. In this example, the argument will be the blinkRate variable.
Now we can include the code to make the LEDs blink. It’s the same basic code that is usually used to blink LEDs:
#include "Arduino.h”
#include "MyClass.h"
MyClass::MyClass(int pin) {
	pinMode(pin, OUTPUT);
	_pin = pin;
}
void MyClass::myFunction(int blinkRate){
digitalWrite(_pin, HIGH);
delay(blinkRate);
digitalWrite(_pin, LOW);
delay(blinkRate);
}
First we digital write the private _pin variable high. In the constructor, the private _pin variable was set equal to the public pin variable. So when the LED object is created, the pin number will be stored in the public pin variable and passed to the constructor. That pin number will also be stored in the private _pin variable, and be passed on to the digitalWrite() function.
The delay duration will be set in the sketch and stored in the blinkRate variable, so we use blinkRate as the argument of the delay() function. Then we digital write the private _pin variable low and delay again by the blinkRate.
Ok, that’s all we need for the source file.
To save the source file, navigate to Documents > Arduino > Libraries. Save the source file in the folder that was created for MyClass. The source file needs to have the same name as the header file, but with a .cpp extension. In this example, the header file would be named MyClass.cpp.
Now let’s write the sketch.
The Sketch
In Arduino programming, classes are treated just like libraries, so we can include the MyClass class in the sketch the same way libraries are included:
#include <MyClass.h>To use the functions that were defined in the class, we will need to create some objects. We are blinking two LEDs, so we will have one object for the red LED and one object for the green LED.
To create an object, write the name of the class, then the name of the object. Objects can be named however you want. In this example we are creating a redLED() object for the red LED, and a greenLED() object for the green LED. Each object is called through the MyClass class:
#include <MyClass.h>
MyClass redLED(10);
MyClass greenLED(11);
When we defined the MyClass constructor in the source file, we passed the public pin variable to it. So now we can use the Arduino pin number as the argument of the object and that pin number will be passed to the constructor. In this example, the constructor will then set the pin mode of pins 10 and 11 as outputs.
Now we can write the loop() section.
We are going to blink the red LED and green LED with the myFunction() function that was defined in the source file. To use functions from a class or library, write the name of the object, a period, then the name of the function you want to call:
#include <MyClass.h>
MyClass redLED(10);
MyClass greenLED(11);
void setup(){
}
void loop(){
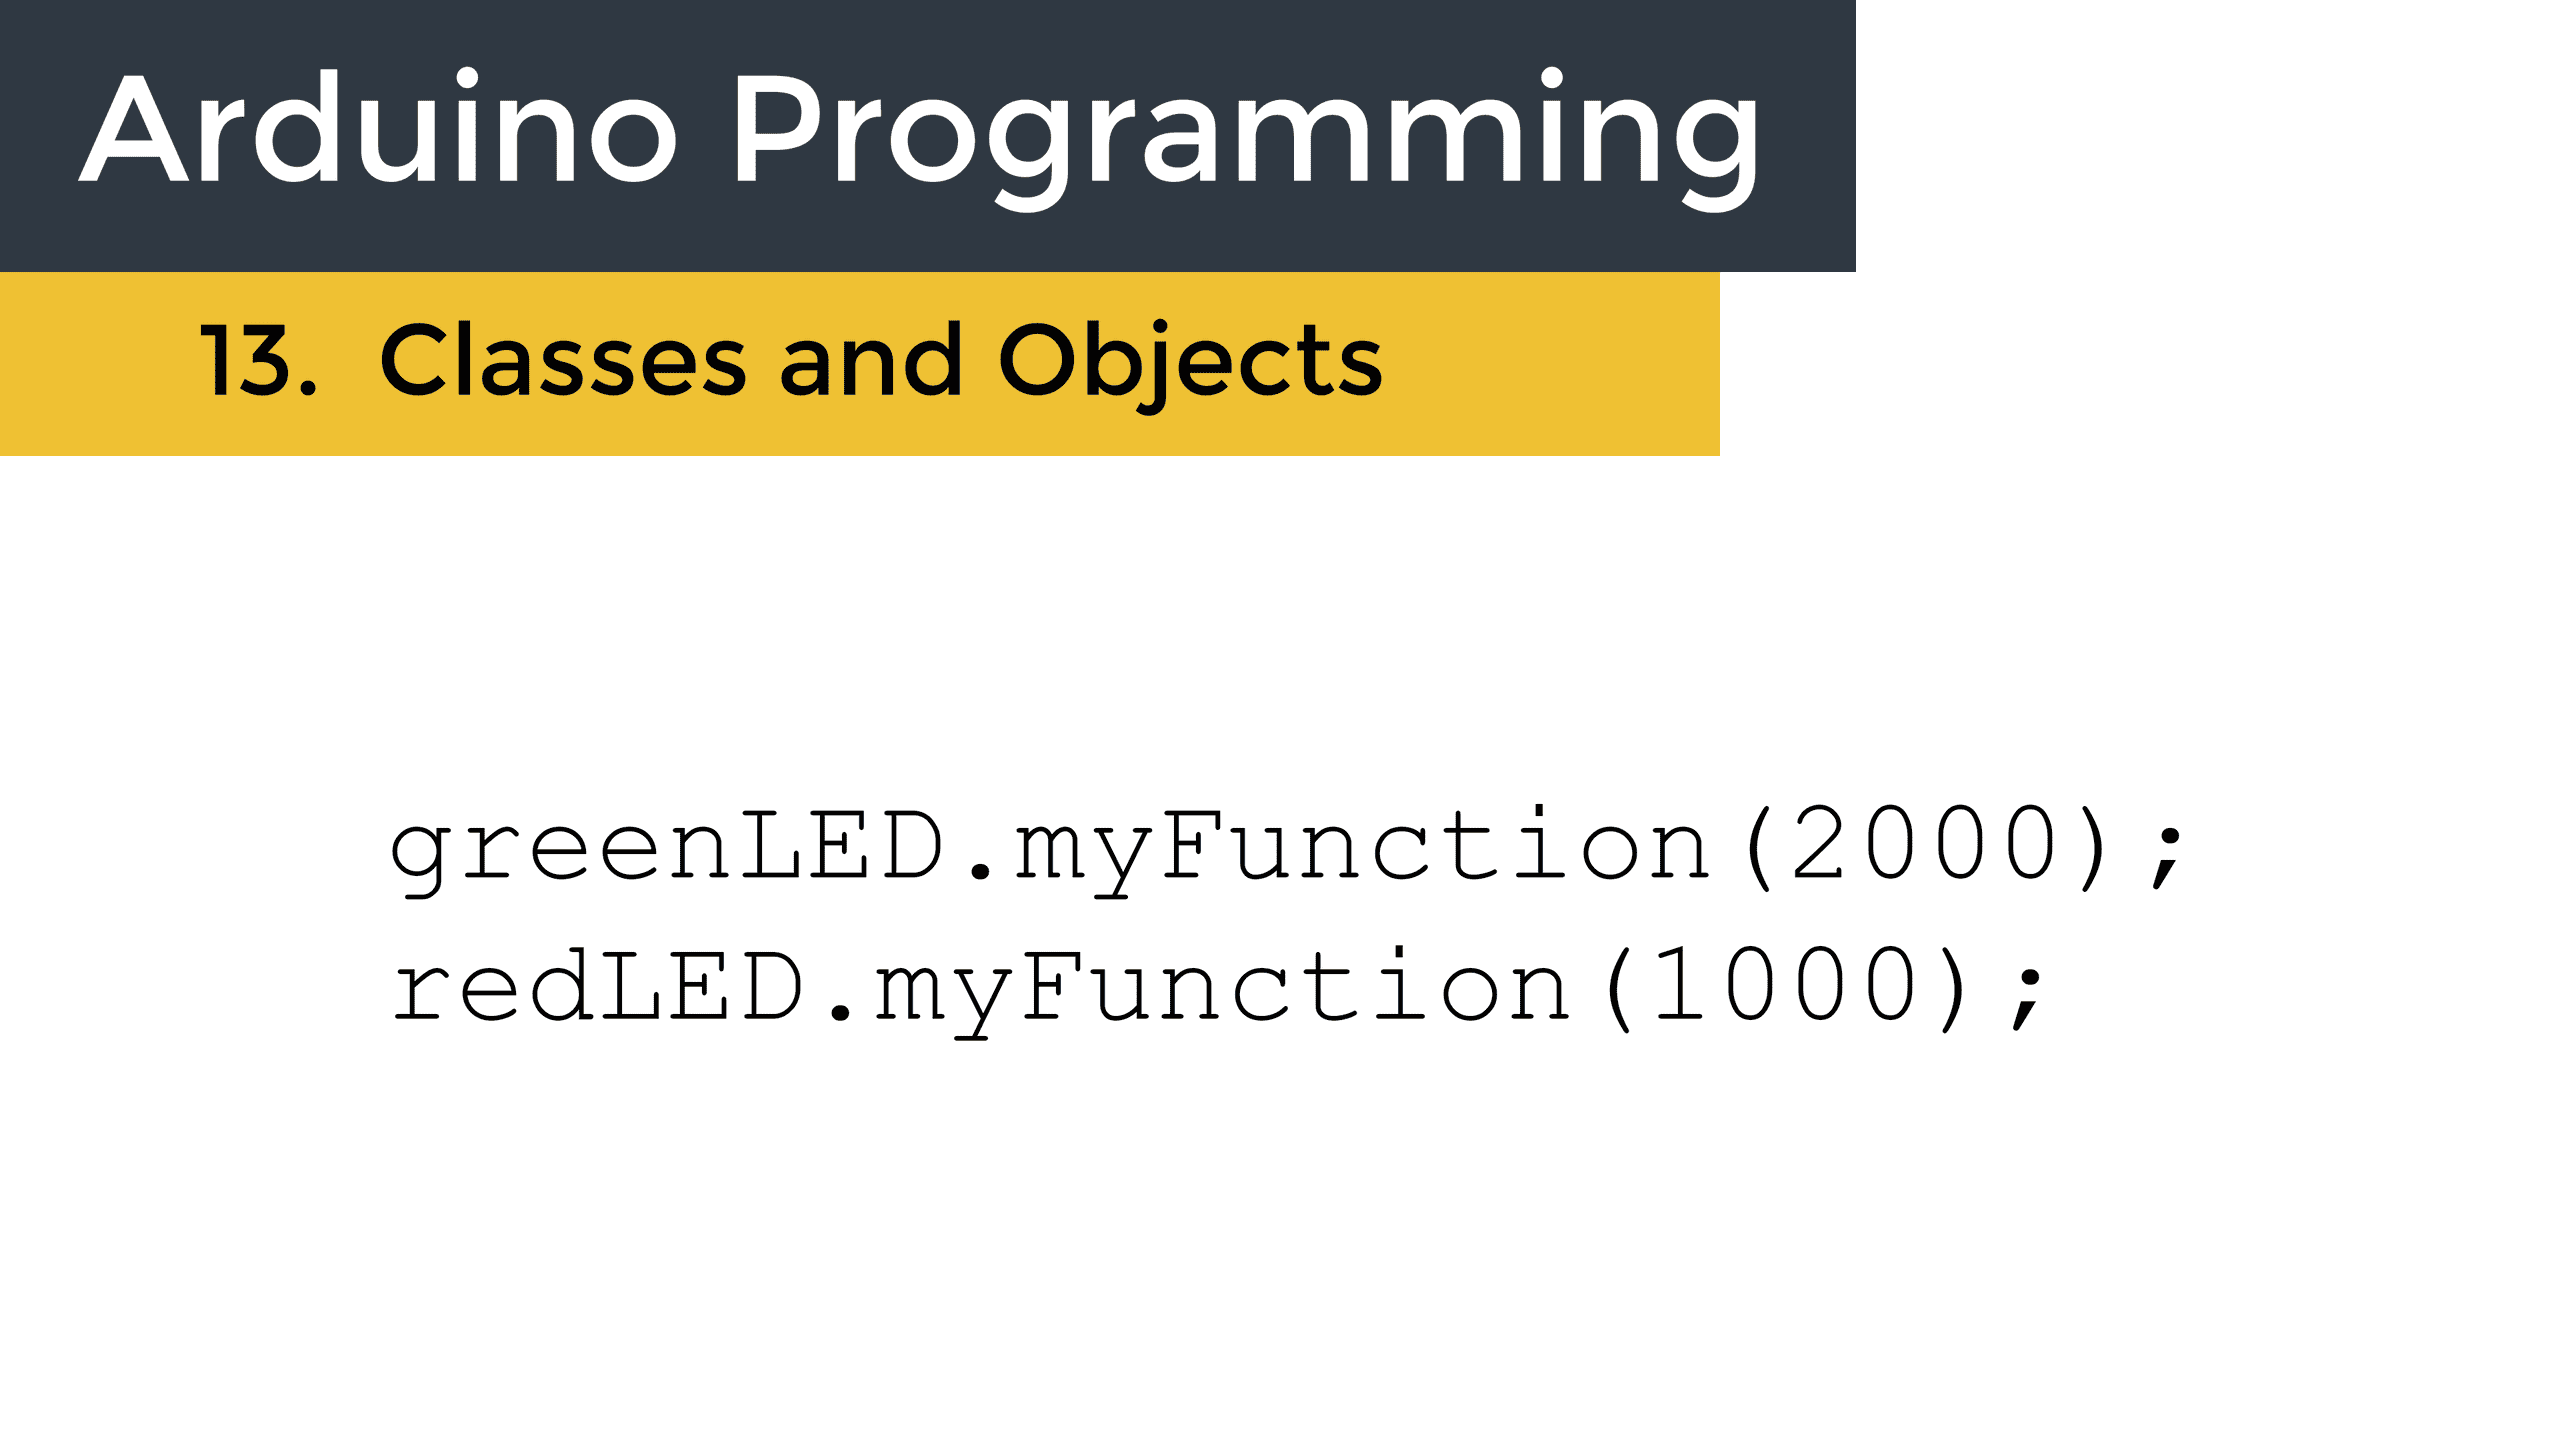
greenLED.myFunction(2000);
}This will call the myFunction() function from the MyClass class and apply it to the greenLED object.
When we defined the myFunction() function we passed it the blinkRate variable to it to control how fast the LEDs will blink. With 2000 as the argument, the delay() inside the myFunction() function will delay for 2,000 milliseconds.
Now we just need to call the myFunction() function on the redLED object. The red LED will blink on and off for 1,000 milliseconds:
#include <MyClass.h>
MyClass redLED(10);
MyClass greenLED(11);
void setup() {
}
void loop() {
  greenLED.myFunction(2000);
  redLED.myFunction(1000);
}
The great thing about using classes and objects is that you can re-use the same functions on multiple objects. This makes your code simpler, more efficient, and easier for others to use as well.
After you upload the sketch, you should see the red LED flashing on and off once per second and the green LED flashing on and off every two seconds.
Hope this article makes it easy for you to use classes and objects on the Arduino. If you have any questions, be sure to leave them in the comment section below…


Excellent explanation, as all your tutorials I’m following quite a time
Probably the clearest explanation I’ve ever read for creating Arduino C++ classes. Thank you.
Thank you!
This is the article I was looking for to understand the right programming way.
Happy to hear it helped Roberto!
Excellent tutorial. Thanks !
Glad you liked it!
Hi, thanks for the step by step explanation. Would this code work using python? Or, if not what would be the python equivalent? Thanks….
Regards,
Howard
Hi Howard, the example code above is specific to the Arduino. Arduino code is mostly C++, but with some Arduino specific functions as well. The concepts of classes and objects are the same for Python (and any other object oriented programming language), but the syntax will be different.
El mejor artículo para entender las clase y objetos.
Muchas gracias
Hi: Love your lessons but I’m having trouble with this one. I’ve copied your code I think exactly but I get an error. I’m unable to save the .cpp as an extention; it show up as part of the name. I hope you can help.
Here is the error message.
Generating function prototypes…
“C:\\Program Files\\WindowsApps\\ArduinoLLC.ArduinoIDE_1.8.51.0_x86__mdqgnx93n4wtt\\hardware\\tools\\avr/bin/avr-g++” -c -g -Os -w -std=gnu++11 -fpermissive -fno-exceptions -ffunction-sections -fdata-sections -fno-threadsafe-statics -Wno-error=narrowing -flto -w -x c++ -E -CC -mmcu=atmega328p -DF_CPU=16000000L -DARDUINO=10816 -DARDUINO_AVR_UNO -DARDUINO_ARCH_AVR “-IC:\\Program Files\\WindowsApps\\ArduinoLLC.ArduinoIDE_1.8.51.0_x86__mdqgnx93n4wtt\\hardware\\arduino\\avr\\cores\\arduino” “-IC:\\Program Files\\WindowsApps\\ArduinoLLC.ArduinoIDE_1.8.51.0_x86__mdqgnx93n4wtt\\hardware\\arduino\\avr\\variants\\standard” “-IC:\\Users\\Robert Gillespie\\Documents\\Arduino\\libraries\\MyClass” “C:\\Users\\ROBERT~1\\AppData\\Local\\Temp\\arduino_build_860406\\sketch\\class_objects.ino.cpp” -o “C:\\Users\\ROBERT~1\\AppData\\Local\\Temp\\arduino_build_860406\\preproc\\ctags_target_for_gcc_minus_e.cpp”
“C:\\Program Files\\WindowsApps\\ArduinoLLC.ArduinoIDE_1.8.51.0_x86__mdqgnx93n4wtt\\tools-builder\\ctags\\5.8-arduino11/ctags” -u –language-force=c++ -f – –c++-kinds=svpf –fields=KSTtzns –line-directives “C:\\Users\\ROBERT~1\\AppData\\Local\\Temp\\arduino_build_860406\\preproc\\ctags_target_for_gcc_minus_e.cpp”
Compiling sketch…
“C:\\Program Files\\WindowsApps\\ArduinoLLC.ArduinoIDE_1.8.51.0_x86__mdqgnx93n4wtt\\hardware\\tools\\avr/bin/avr-g++” -c -g -Os -w -std=gnu++11 -fpermissive -fno-exceptions -ffunction-sections -fdata-sections -fno-threadsafe-statics -Wno-error=narrowing -MMD -flto -mmcu=atmega328p -DF_CPU=16000000L -DARDUINO=10816 -DARDUINO_AVR_UNO -DARDUINO_ARCH_AVR “-IC:\\Program Files\\WindowsApps\\ArduinoLLC.ArduinoIDE_1.8.51.0_x86__mdqgnx93n4wtt\\hardware\\arduino\\avr\\cores\\arduino” “-IC:\\Program Files\\WindowsApps\\ArduinoLLC.ArduinoIDE_1.8.51.0_x86__mdqgnx93n4wtt\\hardware\\arduino\\avr\\variants\\standard” “-IC:\\Users\\Robert Gillespie\\Documents\\Arduino\\libraries\\MyClass” “C:\\Users\\ROBERT~1\\AppData\\Local\\Temp\\arduino_build_860406\\sketch\\class_objects.ino.cpp” -o “C:\\Users\\ROBERT~1\\AppData\\Local\\Temp\\arduino_build_860406\\sketch\\class_objects.ino.cpp.o”
Compiling libraries…
Compiling library “MyClass”
“C:\\Program Files\\WindowsApps\\ArduinoLLC.ArduinoIDE_1.8.51.0_x86__mdqgnx93n4wtt\\hardware\\tools\\avr/bin/avr-g++” -c -g -Os -w -std=gnu++11 -fpermissive -fno-exceptions -ffunction-sections -fdata-sections -fno-threadsafe-statics -Wno-error=narrowing -MMD -flto -mmcu=atmega328p -DF_CPU=16000000L -DARDUINO=10816 -DARDUINO_AVR_UNO -DARDUINO_ARCH_AVR “-IC:\\Program Files\\WindowsApps\\ArduinoLLC.ArduinoIDE_1.8.51.0_x86__mdqgnx93n4wtt\\hardware\\arduino\\avr\\cores\\arduino” “-IC:\\Program Files\\WindowsApps\\ArduinoLLC.ArduinoIDE_1.8.51.0_x86__mdqgnx93n4wtt\\hardware\\arduino\\avr\\variants\\standard” “-IC:\\Users\\Robert Gillespie\\Documents\\Arduino\\libraries\\MyClass” “C:\\Users\\Robert Gillespie\\Documents\\Arduino\\libraries\\MyClass\\MyClass.cpp” -o “C:\\Users\\ROBERT~1\\AppData\\Local\\Temp\\arduino_build_860406\\libraries\\MyClass\\MyClass.cpp.o”
C:\Users\Robert Gillespie\Documents\Arduino\libraries\MyClass\MyClass.cpp:1:10: error: #include expects “FILENAME” or
#include “Arduino.h�
^~~~~~~~~~~
Using library MyClass in folder: C:\Users\Robert Gillespie\Documents\Arduino\libraries\MyClass (legacy)
exit status 1
Error compiling for board Arduino Uno.
To save the file with a .cpp extension, save the code in a text file first. Then close the file and rename it with a .cpp extension from Windows. Make sure the option to show file name extensions is checked in the Windows explorer.
Thanks a lot for your excellent explanation. Do you have tutorials on YouTube for this? I would love to follow them on YouTube. Thanks
I found my error. An exclamation point did not copy as intended. I had this happen before in the Weka courses. Thanks for looking to anyone who did. I apologize.
Ok glad you got it working
Could this be the best, most straightforward, easy to understand introduction to programming classes in the history of object-oriented programming? Perfect for cross-trainers from C to C++!
Thanks!
Is Delay() still blocking when used in classes? If so you may get weird unexpected effects with trying to blink two LED’s at the same time at different rates unless like here the timings are exact multiples of each other?
I think I am missing something very basic. I have written and save the header(.h) and source files (.cpp) but I cannot figure out how to get IDE to recognize and include it.
My class files are in a separate folder from my sketch:
TestClass.h
TestClass.cpp
I use #include but when I compile I get “TestClass.h: No such file or directory”
I tried the library manager, but there is no option to choose a file on your computer (unless it is a .zip file); I also tried copying the class files to the libraries folder, and the sketch folder, but still the same issue. I am sure i am missing something basic, but cannot figure it out.
Hello
Could someone take a look at my code for a library I am trying to write? here is a Dropbox link to my code.
https://www.dropbox.com/sh/fc0b1wnzvtzpfnu/AADWq7444mx2qQeqT2vzw8Mna?dl=0
I can figure out why I am a “not declared in this scope” error!!!
There is no need to include Android.h in MyClass.h. There is no usages in your class header, so you should only include it in the .cpp. Currently you are including Android.h in both the header and source files, this is redundant :)
As a complete novice (and rather elderly), the nice thing about the sketch that doesn’t use classes and objects is that the code is all in one file.
While I appreciate that, as a tutor, you have to show the right way to do things (with a separate .h file), I think that I would better appreciate the economy of effort, and the use of classes and objects, if you could include an intermediate step where the code for using a class and objects is initially placed within the single sketch.
I would suggest you start with creating subroutines that you can call from within your “loop”. This is easy to do. You should already know “void setup()” and “void loop()”. You can create your own function in the sketch using void, then calling it from loop, or setup. for example
void setup()
{-your setup code}
void loop()
{myfunction(); //this will call the subroutine “myfunction()” defined below
}
void myfunction()
{- your subroutine code}
You need to be careful of variables, if you want to use the variable in both the loop and myfunction, they have to be declared outside of all routines (global variable)
Once you have figured out the above, you can put it on another tab in your sketch, i.e. Add tab and put myfunction() on the new tab. The new tab get saved as a separate .ino file that you can copy and paste (e.g. using windows explorer) into the folder with a different sketch and it should show up when you open the sketch.
Thank you, Brad. I’ll give it a go. Thanks for explaining about tabs. And, rightly or wrongly, I tend to use global variables a lot.
I hope that you managed to get the IDE to recognise your .h file.
I drove myself mad by foolishly trying to write the header and source files on the Arduino IDE before realising that they needed to be done on a normal text editor like notepad. I wish you had explained this obvious point for slow-witted guys like me. Otherwise this was a very useful article. Also there is a wrong type of ” at the end of the first line of the source code.
HUGE respect for the step-by-step explanation, you’re a great, great teacher.
I followed three other guides and none of them made sense until I read through yours. Thanks for giving some background explanations.
Thank you very much for your time in explaining this.
This is brilliant. I was looking for an explanation on how to set up classes for Arduino and got the added bonus of the clearest explanation I’ve ever seen on the purpose and use of .h and .cpp files. Thank you so much.
This is great, than you!
Is it possible to “blend” between two instances of the same Class?
For example, if a “blinkingRate” Class affects the blinking rate of an LED. My sketch has two different modes: Mode_1, uses class blinkingRate to control a LED with fast blinking; In Mode_2, class blinkingRate controls it to blink slowly. I switch modes by clicking a button.
Switching modes changes the blink rate instantly, but is it possible to cross fade over a defined period of time (say, 1sec) from Mode_1 to Mode_2. Which in turn would fade between the two class instances?
I got this working to cross fade between two separate functions, but can’t figure out how to do this with classes. Any help or links to tutorials or what such a procedure would be called for further googling, would be greatly appreciated. Thank you.
This is great! Thank you!
I’ve been learning Arduino language by examples & the Arduino language reference (https://www.arduino.cc/reference/en/). So when I saw a constructor definition I looked for the “::”, but found nothing. I guess the reference assumes a knowledge of object oriented programming.
Anyhow, Googling “Arduino syntax ::” brought me here and all is good.
Fantastic tutorial!!!
Neat, concise and complete as a tutorial should be!
Thank you very much, sir ;-)
This is a great help. I was getting lost in the jungle and my C# knowledge didn’t help. I appreciate your time and effort to help people like me get started.