The BMP180 barometric pressure sensor is a great sensor that can be used to predict the weather, detect altitude, and measure vertical velocity. It’s perfect for weather stations, remote controlled vehicles, weather balloons, and lots of other projects. It’s an extremely sensitive sensor too. As you’ll see in a minute, it can detect changes in altitude of just a few inches.

In this tutorial, I’m going to show you how to setup the BMP180 on an Arduino, so you can measure barometric pressure, and altitude from the ground or from sea level.
But before getting into the details, let’s get some background on barometric pressure and how the BMP180 works.
Watch the video for this tutorial here:
What is Barometric Pressure?
Barometric pressure (also known as atmospheric pressure), is the pressure caused by the weight of air pressing down on the Earth. Imagine a column of air rising from the Earth’s surface to the top of the atmosphere. The air in the atmosphere has mass, so gravity causes the weight of that column to exert pressure on the surface.
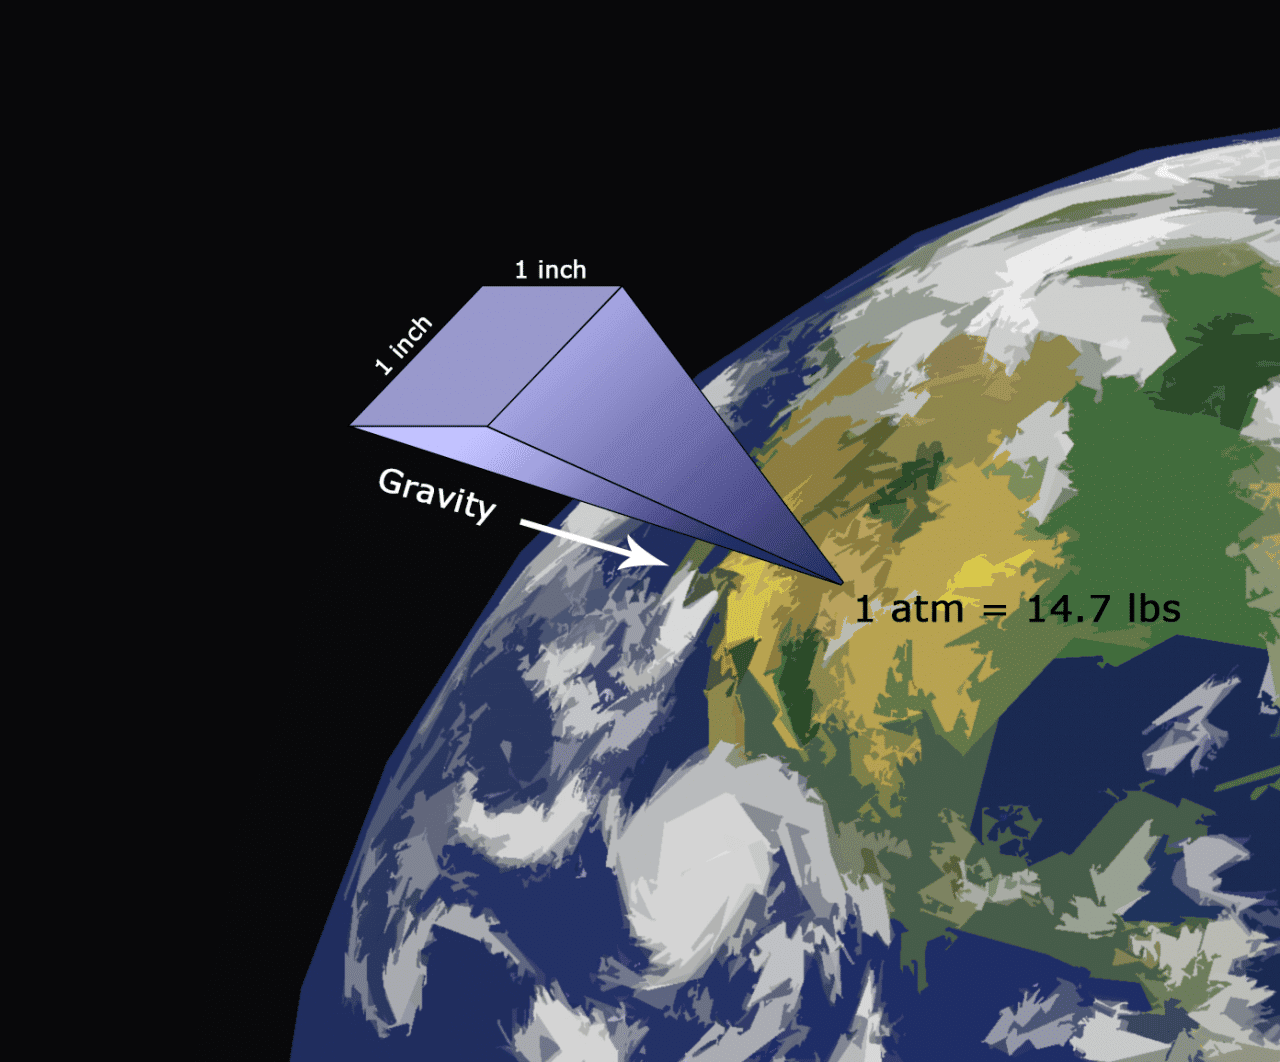
The pressure created by a 1×1 inch column of air reaching to the top of the atmosphere is defined as one atmosphere (atm) of pressure. This column of air weighs 14.7 pounds, which is why one atm equals 14.7 pounds per square inch (psi).
The SI unit for pressure is the Pascal (Pa). One Pascal is defined as one Newton of force per square meter. The BMP180 outputs pressure readings in Pascals, but they are converted to hectoPascals (hPa) by the software library we’re going to use. You can use the table below to convert from hPa to some other common units of pressure:
| Unit | 1 hPa = |
| Pascal | 100 Pa |
| Newtons per square meter | 100 N/m |
| Atmosphere | 0.000986923 atm |
| Bar | 0.001 bar |
| Millibar | 1 mbar |
| Millimeters Mercury | 0.750063755 mmHg |
| Torr | 0.750061683 torr |
| Pounds per square inch | 0.014503774 psi |
How the BMP180 Works
The BMP180 is a piezoresistive sensor that detects pressure. Piezoresistive sensors are made up of a semiconducting material (usually silicon) that changes resistance when a mechanical force like atmospheric pressure is applied.
The BMP180 measures both pressure and temperature, because temperature changes the density of gasses like air. At higher temperatures, air is not as dense and heavy, so it applies less pressure on the sensor. At lower temperatures, air is more dense and weighs more, so it exerts more pressure on the sensor. The sensor uses real-time temperature measurements to compensate the pressure readings for changes in air density.
The BMP180 outputs an uncompensated temperature (UT) value and an uncompensated pressure (UP) value. The temperature measurement is taken first, followed by a pressure measurement. This flow chart outlines the steps the sensor takes when performing a measurement:
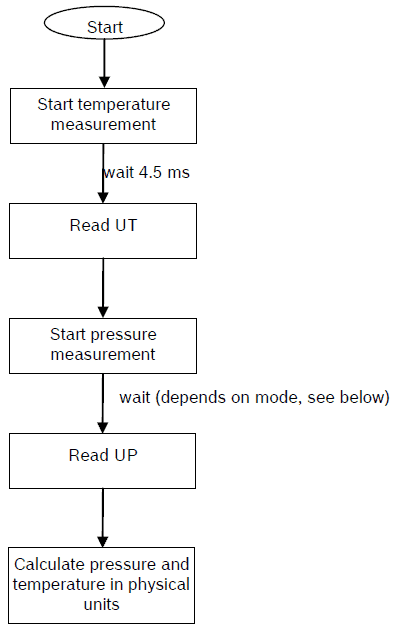
The BMP180 has a 176 bit EEPROM that contains 11 different calibration coefficients that are unique to each sensor. These, along with the UP and UT, are used to calculate the true barometric pressure and temperature. True pressure and temperature are calculated using fairly complex algorithms:
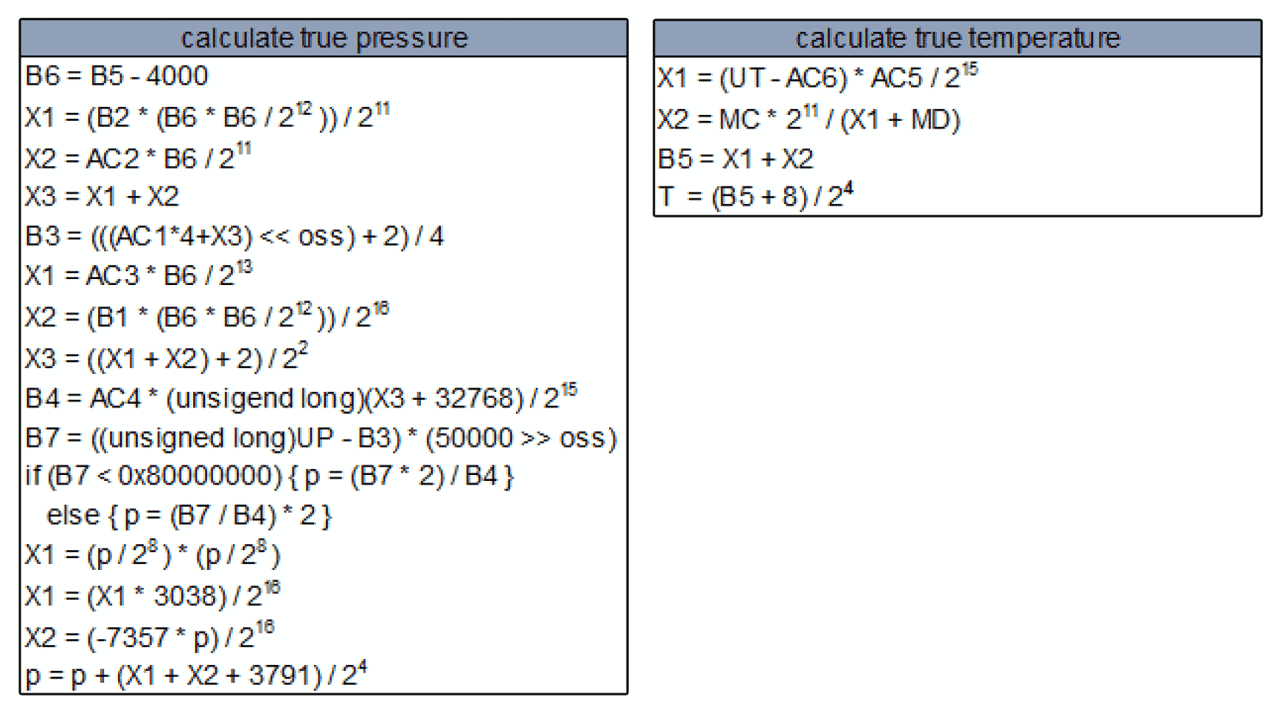
This math is performed by the library we’re going to use, so we don’t need to code it into the sketch.
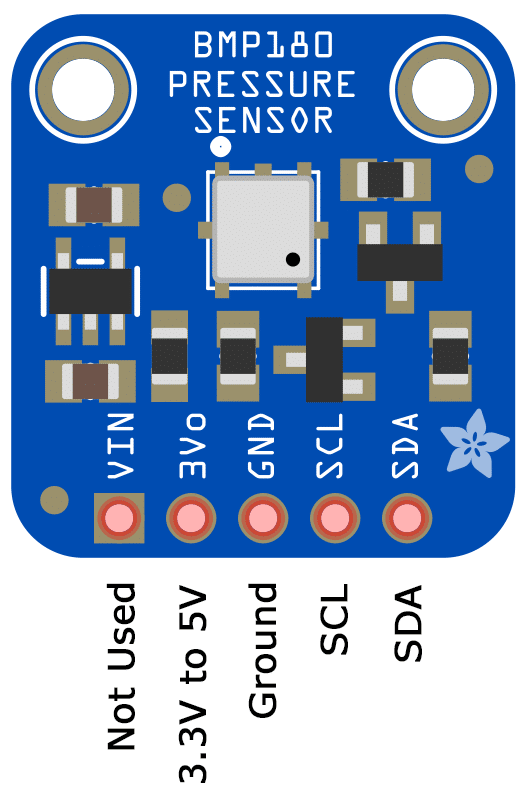
The sensor I’m using in this tutorial is a breakout board from Adafruit that uses the Bosch BMP180 Barometric Pressure Sensor chip:
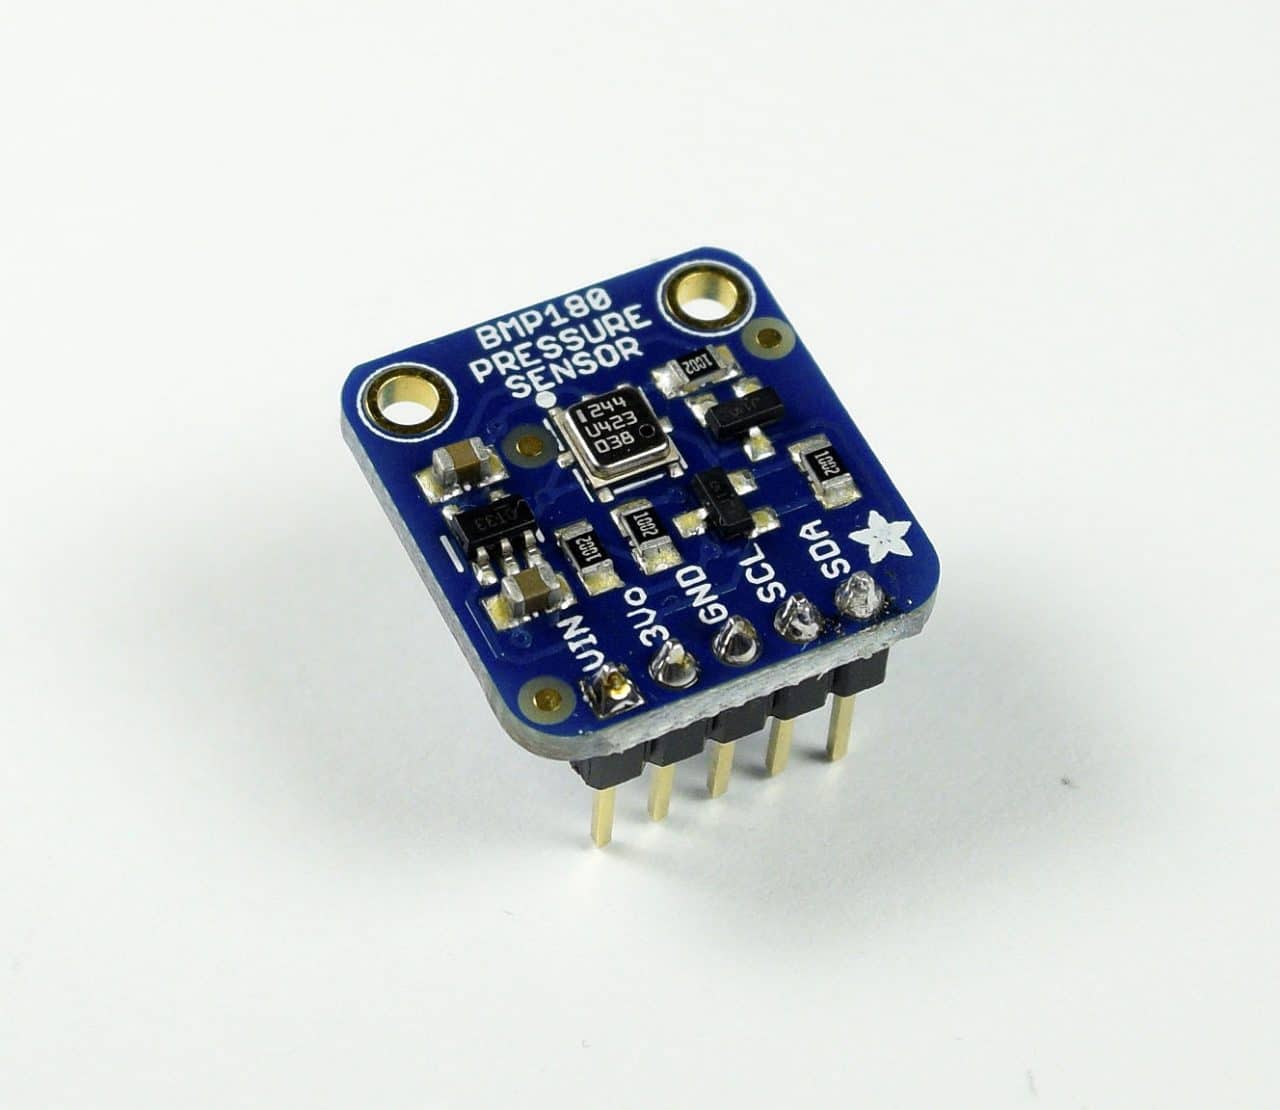
The Bosch BMP180 runs on 3.3V, but many breakout boards have a voltage regulator and an I2C level shifter so you can power it with either 3.3V or 5V.
This diagram shows the pinout of the BMP180:
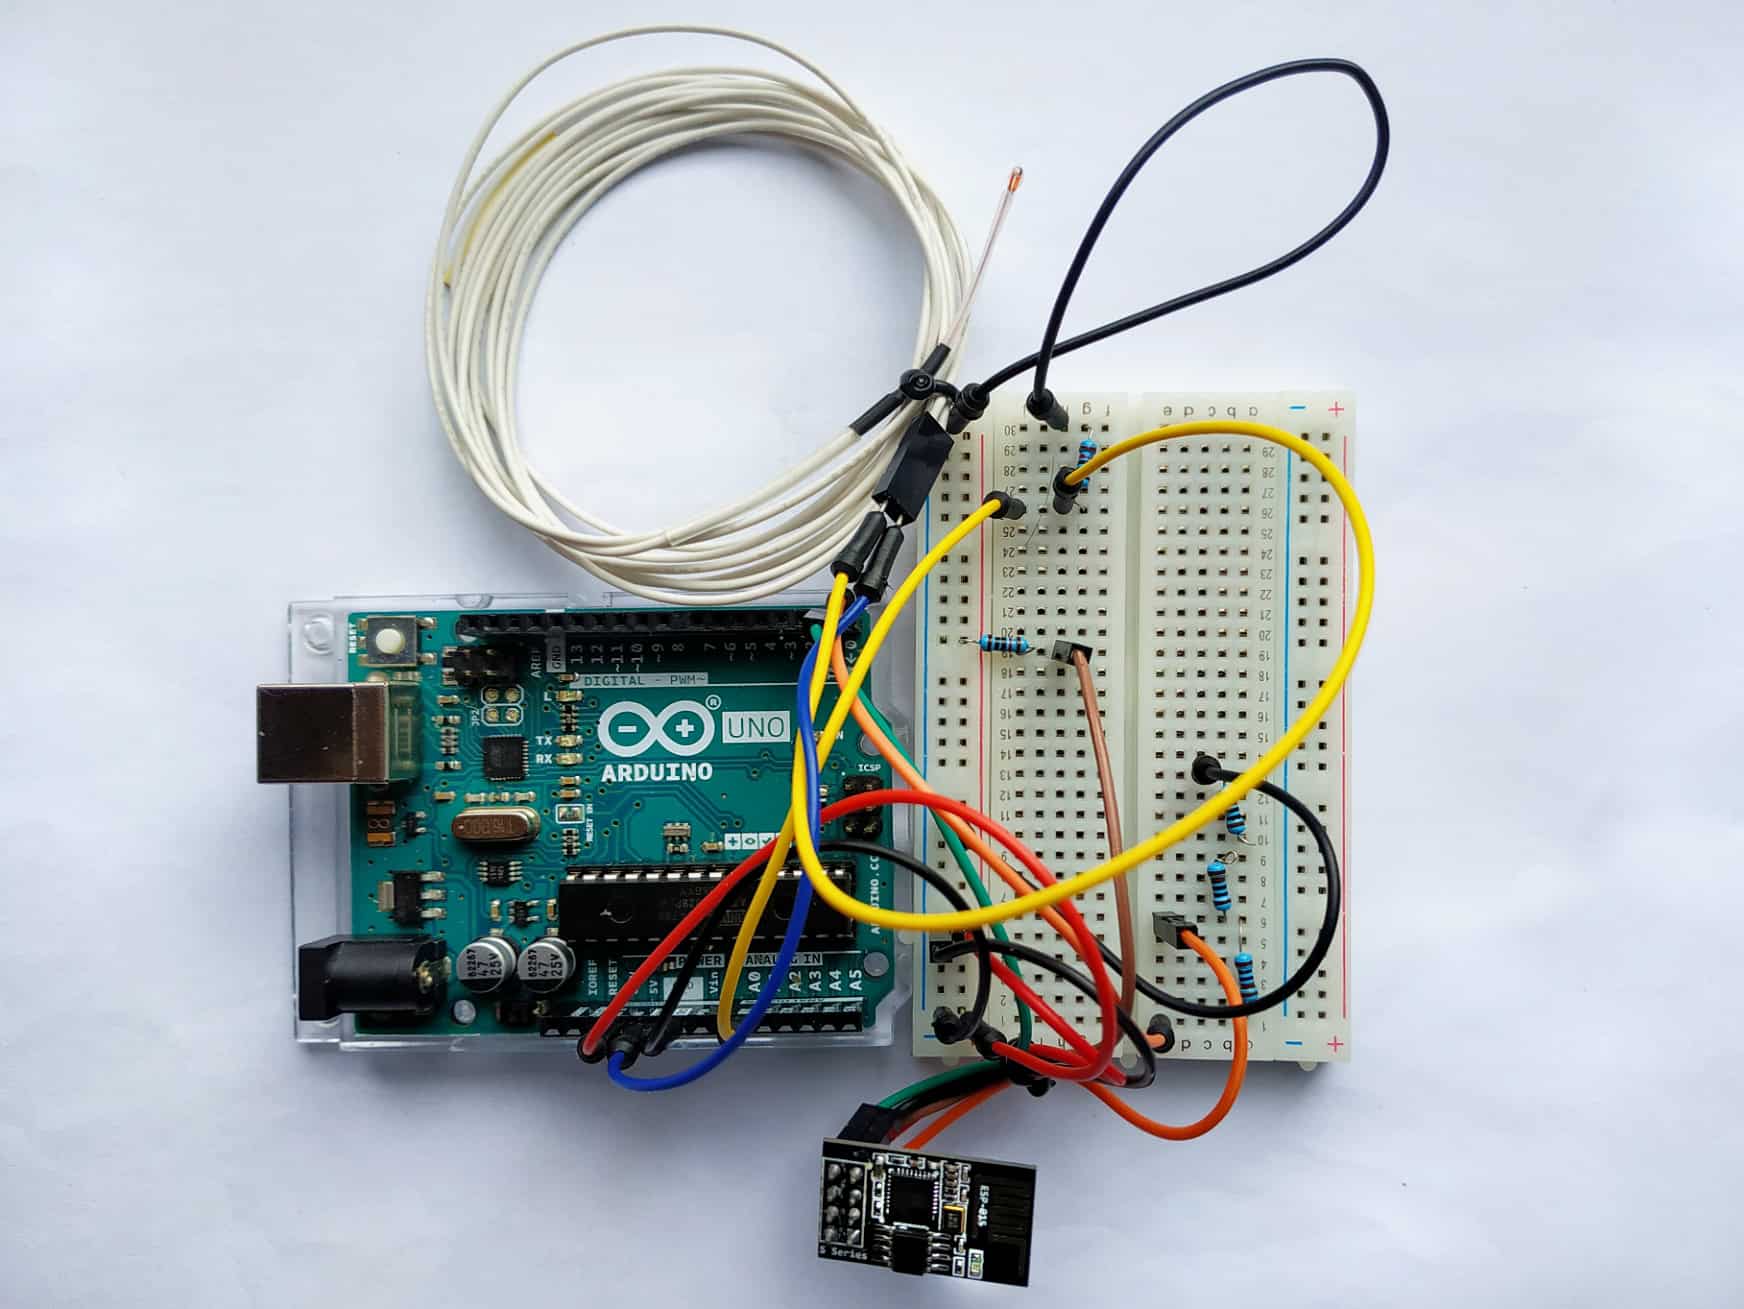
Connecting the BMP180 to the Arduino
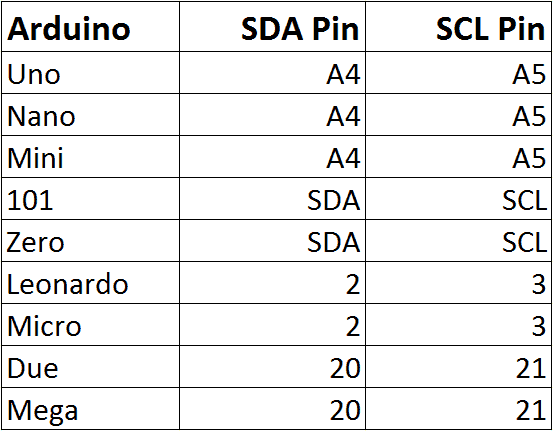
The BMP180 communicates with the Arduino over I2C. The Arduino’s I2C pins (SDA and SCL) are different depending on which Arduino you have. Check the table below to find the I2C pins for some common Arduino boards:
For an Arduino Uno, the connections will look like this:
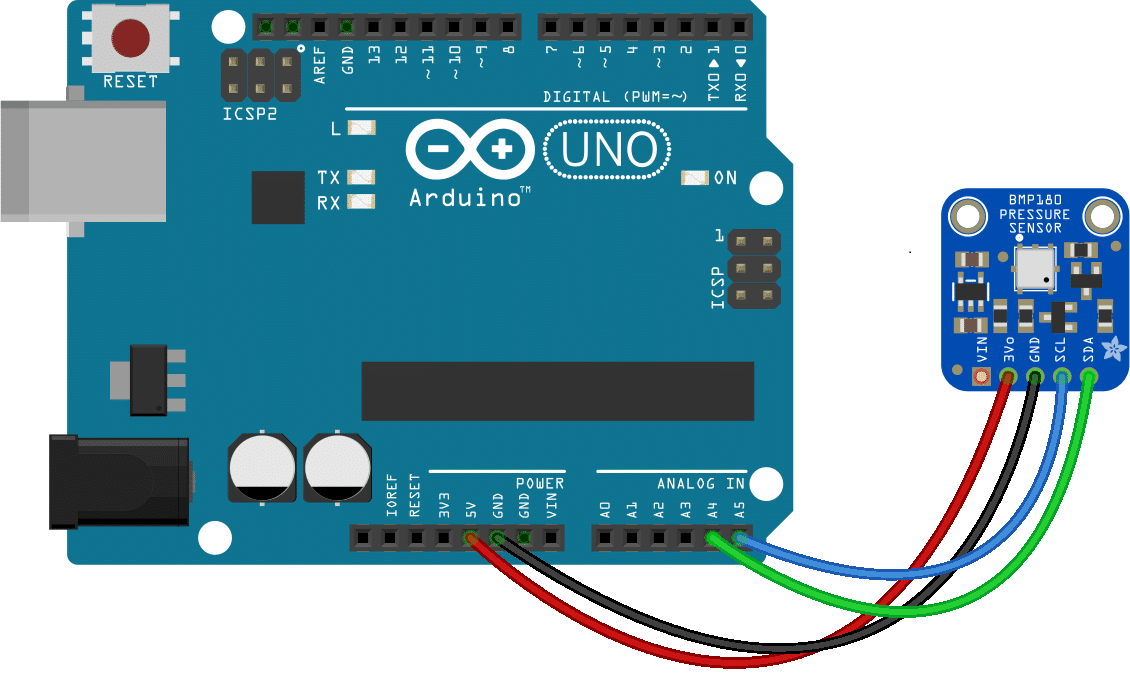
I’ve connected the BMP180 to the 5V pin in this example, but you can power it from the 3.3V pin as well.
Installing the BMP180 Library
Before we start programming the BMP180, download and install the library. I’m going to use a really useful BMP180 library from Sparkfun. It takes care of all the math for calculating the true temperature and pressure readings, as well as the math for calculating altitude.
You can download a ZIP file of the library from this link. To install it, open up the Arduino IDE, go to Sketch > Include Library > Add Library, then select the ZIP file you just downloaded.
Using Barometric Pressure to Predict the Weather
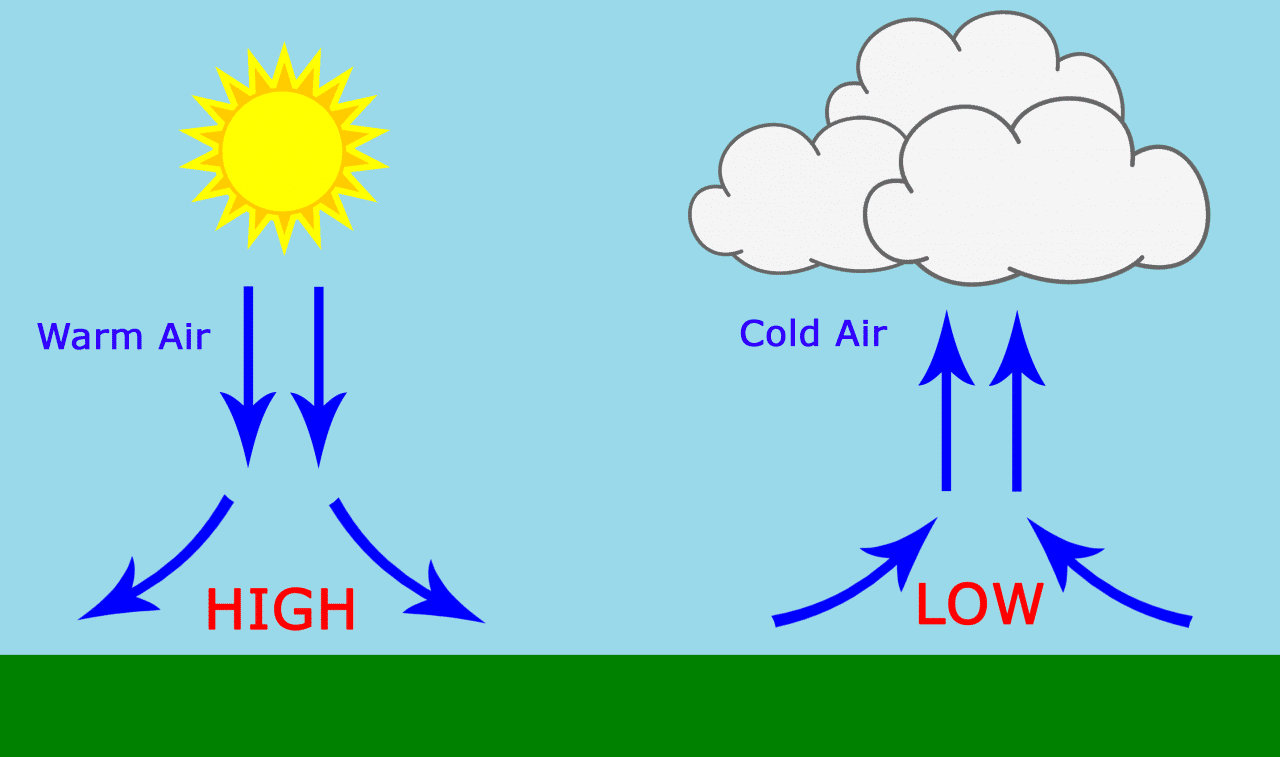
Changes in barometric pressure can be used to predict the weather. A falling barometric pressure is caused by a mass of air rising from the Earth’s surface. The vacuum created by the rising air mass forms a low pressure area on the surface. As the air mass gets higher in altitude, it cools down and compresses. This condenses water vapor in the air, forming rain clouds. It usually brings wind too, because the surrounding air on the surface flows into the low pressure area.
A rising barometric pressure is caused by a mass of air in the upper atmosphere falling to the Earth. The weight of the falling mass presses down on the surface, increasing the air pressure below it. The air mass gets warmer and expands as it gets closer to the surface. The warm expanding air is usually low in humidity, which prevents cloud formations. Rising barometric pressures usually indicate that warm, sunny weather is coming.
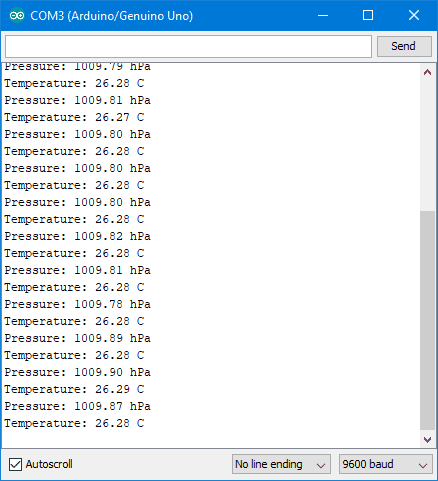
Output Pressure and Temperature to the Serial Monitor
This sketch will print the barometric pressure and temperature to the serial monitor:
#include <Wire.h>
#include <SFE_BMP180.h>

SFE_BMP180 bmp180;

void setup() {
  Serial.begin(9600);
  bool success = bmp180.begin();

  if (success) {
    Serial.println("BMP180 init success");
  }
}

void loop() {

  char status;
  double T, P;
  bool success = false;

  status = bmp180.startTemperature();

  if (status != 0) {
    delay(1000);
    status = bmp180.getTemperature(T);

    if (status != 0) {
      status = bmp180.startPressure(3);

      if (status != 0) {
        delay(status);
        status = bmp180.getPressure(P, T);

        if (status != 0) {
          Serial.print("Pressure: ");
          Serial.print(P);
          Serial.println(" hPa");

          Serial.print("Temperature: ");
          Serial.print(T);
          Serial.println(" C");
        }
      }
    }
  }
}
Try moving the sensor up and down, and you’ll see the pressure value change. The sensor is really sensitive!
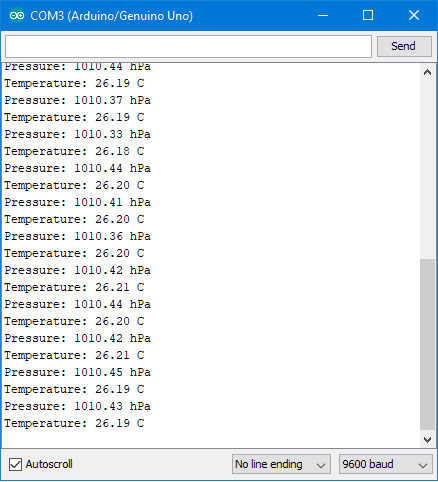
This is the barometric pressure at your current location and altitude. Barometric pressure will change according to local weather conditions, but it will also change depending on your altitude. In order to compare your readings to weather stations at different altitudes, and readings from news and weather reports, you have to adjust this reading to remove the effect of altitude. All barometric pressure values reported by news and weather stations add a certain amount of pressure to the readings to make it appear that the measurement was taken from sea level. If you’re building a weather station, you’re going to want to adjust your readings too.
The Sparkfun library has a function called sealevel(P, A) that does this for you. You just need to provide the altitude (from sea level) of your current location. In the sketch below, enter your altitude (in meters) on line 6:
#include <Wire.h>
#include <SFE_BMP180.h>

SFE_BMP180 bmp180;

int Altitude = 5; //current altitude in meters

void setup() {
  Serial.begin(9600);
  bool success = bmp180.begin();

  if (success) {
    Serial.println("BMP180 init success");
  }
}

void loop() {

  char status;
  double T, P;
  bool success = false;

  status = bmp180.startTemperature();

  if (status != 0) {
    delay(1000);
    status = bmp180.getTemperature(T);

    if (status != 0) {
      status = bmp180.startPressure(3);

      if (status != 0) {
        delay(status);
        status = bmp180.getPressure(P, T);

        if (status != 0) {
          float comp = bmp180.sealevel(P, Altitude);

          Serial.print("Pressure: ");
          Serial.print(comp);
          Serial.println(" hPa");

          Serial.print("Temperature: ");
          Serial.print(T);
          Serial.println(" C");
        }
      }
    }
  }
}
The altitude of my current location is only 5 meters so the difference is small, but it does have an effect on the pressure:
Explanation of the Code
First we create an object called bmp180:
SFE_BMP180 bmp180;
To initialize the BMP180 sensor and download the calibration coefficients, we need to call the begin() method. On success it returns a non-zero value:
bool success = bmp180.begin();
Following the flow diagram shown earlier, we first use the startTemperature() method to start a temperature measurement. On success it also returns a non-zero value:
status = bmp180.startTemperature();
Then we wait for at least 4.5 milliseconds, and use getTemperature(T) to receive the value and store it in the variable T:
status = bmp180.getTemperature(T);
The startPressure() method sends the command to start the measurement of pressure. We provide an oversampling value as parameter, which can be between 0 to 3. A value of 3 provides a high resolution, but also a longer delay between measurements. A value of 0 provides a lower resolution, but is faster. The function returns the number of milliseconds the Arduino needs to wait before reading the pressure value from the sensor:
status = bmp180.startPressure(3);
Then we use the getPressure() method to read the pressure value and store it in the variable P:
status = bmp180.getPressure(P, T);
Notice that we also pass it the variable T, since the pressure calculation is dependent on the temperature.
Using Barometric Pressure to Measure Altitude
Barometric pressure changes depending on the altitude of the sensor. At lower altitudes, there is more air above the sensor, so the pressure is higher. At higher altitudes, there is less air above the sensor, so the pressure is lower. A change of 1 hPa of atmospheric pressure corresponds to a change in altitude of about 8 meters. In this next example, we will use the BMP180’s pressure data to get an accurate measurement of altitude.
Watch the video for this part of the tutorial here:
Altitude can be calculated using the international barometric formula:

Luckily the library performs this calculation, so we don’t need to worry about doing this math in the sketch.
The atmospheric pressure at your current location will be measured by the BMP180. The atmospheric pressure at sea level is the atmospheric pressure at your current location, adjusted to remove the effects of altitude. It can be found with one of two ways. The most accurate way is to use the BMP180, which I’ll explain how to do below. Another way is to get it from an online map like this one.
Altitude Relative to Sea Level
This sketch tells you the altitude at your current location relative to sea level. You need to insert the atmospheric pressure at sea level for your current location on line 5 where it says:
float Po = 1013.0;
#include <Wire.h>
#include <SFE_BMP180.h>
SFE_BMP180 bmp180;
float Po = 1013.0;
void setup() {
Serial.begin(9600);
bool success = bmp180.begin();
if (success) {
Serial.println("BMP180 init success");
}
}
void loop() {
char status;
double T, P, alt;
bool success = false;
status = bmp180.startTemperature();
if (status != 0) {
delay(1000);
status = bmp180.getTemperature(T);
if (status != 0) {
status = bmp180.startPressure(3);
if (status != 0) {
delay(status);
status = bmp180.getPressure(P, T);
if (status != 0) {
alt = bmp180.altitude(P, Po);
Serial.print("Altitude: ");
Serial.print(alt);
Serial.println(" Meters");
}
}
}
}
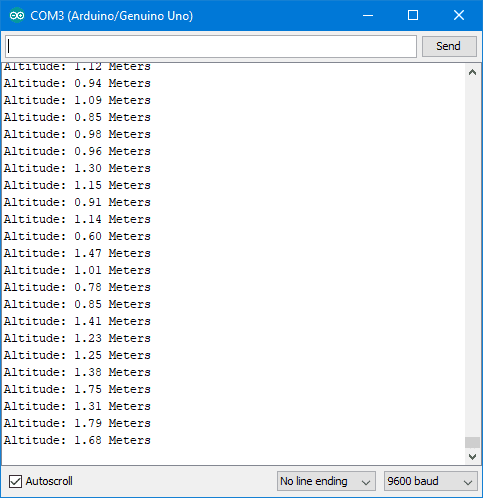
}Open the serial monitor, and your current altitude relative to sea level will be displayed:
Altitude Relative to the Ground
For projects like altimeters, you want to know the altitude of your sensor relative to the ground. To do this, you need to use the atmospheric pressure of your current location instead of the sea level pressure. Use the pressure and temperature sketch to get your local atmospheric pressure. Then insert that value into line 5 of the altitude sketch.
For example, if you measured a local atmospheric pressure of 1011.5 hPa, you would change line 5 of the altitude sketch to:
float Po = 1011.5;
Finding Sea Level Pressure for Your Area
The most accurate way to find the sea level pressure at your current location is to use the BMP180 to measure it. The resulting value can then be inserted into the altitude sketch for a more accurate elevation measurement.
Sea level pressure can be calculated from the international barometric formula, rearranged to solve for sea level pressure (P0):

The atmospheric pressure at your current location will be measured by the BMP180. To get the altitude of your current location, you can use a smartphone app, or search an online elevation map.
The sketch below outputs the sea level pressure at your current location to the serial monitor. Input your current altitude on line 5 where it says:
float alt = 5.0;
#include <Wire.h>
#include <SFE_BMP180.h>

SFE_BMP180 bmp180;
float alt = 5.0; // Altitude of current location in meters

void setup() {
  Serial.begin(9600);
  bool success = bmp180.begin();

  if (success) {
    Serial.println("BMP180 init success");
  }
}

void loop() {
  char status;
  double T, P, seaLevelPressure;
  bool success = false;

  status = bmp180.startTemperature();

  if (status != 0) {
    delay(1000);
    status = bmp180.getTemperature(T);

    if (status != 0) {
      status = bmp180.startPressure(3);

      if (status != 0) {
        delay(status);
        status = bmp180.getPressure(P, T);

        if (status != 0) {
          seaLevelPressure = bmp180.sealevel(P, alt);

          Serial.print("Pressure at sea level: ");
          Serial.print(seaLevelPressure);
          Serial.println(" hPa");
        }
      }
    }
  }
}
That’s about it. Hopefully this article helps you get the BMP180 hooked up to the Arduino. Let us know in the comments if you have any questions, and also let us know what projects you’re building!


Excellent document! Thank you.
One suggestion: update this for the newer BME/BMP280
Very nice article!
Need to monitor rate of change of barometirc pressure and in addition, to alert when rate of change is rapid, i.e. approaching storm.
Could have arrows on display?
some calculus required? Oct 30, 2018
Perfect work you have done, this internet site is really cool with superb info . What do you think about this here
karen millen dresses http://www.karenemillen.com
Mean sea level pressure (MSLP) is the pressure at sea level or (when measured at a given altitude on land) the center pressure reduced to sea level, assuming an isothermal layer at the center temperature.
https://science-hub.tech/air-pressure-at-sea-level-low-pressure-system/
I have the task of measuring water depth using a bmp280 sensor. please direct how I make it?
You have made a rather complex piece of technology very easy to implement! Thank you. I am using a DHT22 on an Arduino Uno. If I add the BMP180, how would I manage the two serial ports? Would I need two Arduinos in a box, one to manage each sensor? Thanks, Bob.
Hey,
thanks for this tutorial but i have some troubles with my BMP-180, with your programm the temperature in my room is nearly 296°c and i’m deep in the ocean (-700 meters) and thats quite the same thing whicherver programm i use. i’m beginner wih that kind of stuff. do you have any idea about how i can solve that ? thanks !
This is by far the best tutorial I have seen so far.
However, please help me in customizing the sketches to suit my application. I need to determine my current Altitude w.r.t Sea Level. Your sketch for this is quite OK, but it requires the value of Po to be filled in manually. Your last sketch, “Finding Sea Level Pressure” is again self-sufficient. I understand that the Sea Level Pressure is the same as Po, so is there no way in which we could combine the two sketches to form one which automatically gives the current Altitude without having to determine the Sea Level Pressure manually every time?