In a previous post, we saw how to set up WiFi on the Raspberry Pi and how to wirelessly connect to it via an SSH client called PuTTY. PuTTY is a great way to access the command line, but you can’t use it to access the desktop. In this tutorial, I’ll show you how to access your Raspberry Pi’s desktop or command line from anywhere in the world. After setting up a remote desktop connection, you’ll be able to access your Pi from you iPhone, iPad, or laptop from anywhere with an internet connection.

We’ll do this by first setting up a remote desktop application on the computer you want to access the Pi from. Then, we’ll set up a port forward on the router the Pi is connected to, so it can be accessed from other computers outside of your home network. You’ll need to have access to the Pi’s command prompt, and also know the local IP address of the Pi. See this tutorial if you need help with that.
Update! Raspbian Jessie operating systems released after 9-23-16 now come with the Pixel desktop. Pixel uses a different remote desktop service than earlier Raspbian desktop versions, so I’ve created separate sections for setting up both…
Setup for Raspbian Pixel Desktop
Use this section if your Raspbian OS was released after 9-23-16…
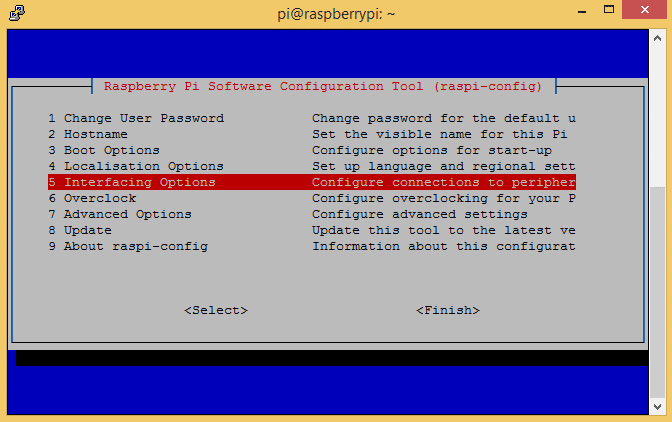
RealVNC server is included in Raspbian Jessie releases after 9-23-16. All we need to do on the Pi is enable VNC in the raspi-config menu. Enter sudo raspi-config at the command prompt to access it.
Then select “Interfacing Options” from the menu:
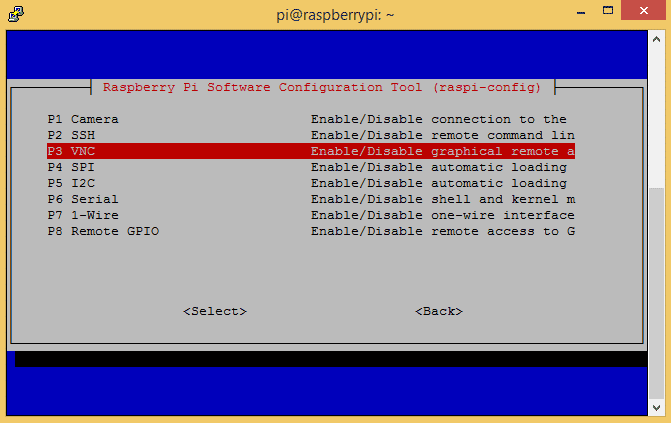
Then select “VNC”, to enable VNC:
Now reboot the Pi with sudo reboot.
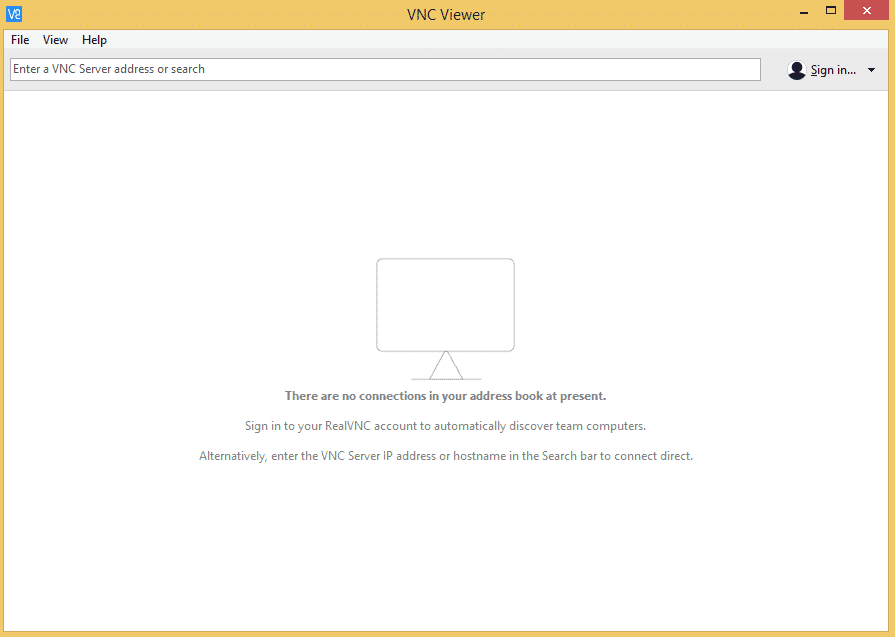
Next we need to install RealVNC Viewer on the computer you want to access the Pi from. Download RealVNC Viewer here and open the .exe file. It’s a portable application, so you don’t need to install it:
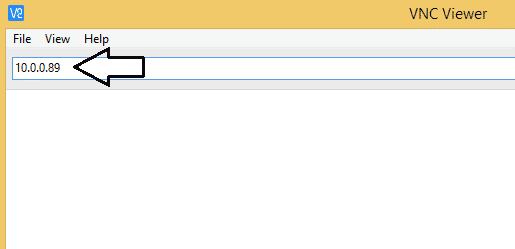
If you know the IP address of your Pi, enter it into the address bar at the top of the window. If you don’t know it, you can find it with Advanced IP Scanner.
Now press Enter and you’ll be prompted for the Pi’s username and password:
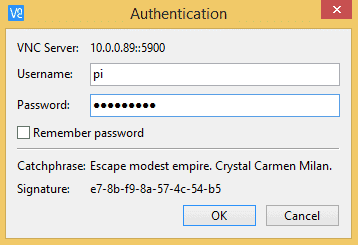
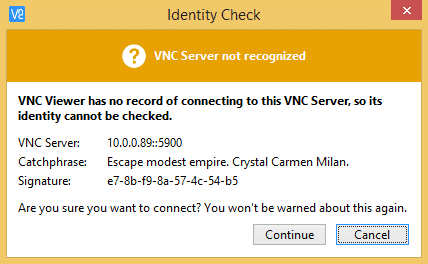
If this is the first time connecting to the Pi with RealVNC, you’ll get a security warning. Just press Continue to get past it:
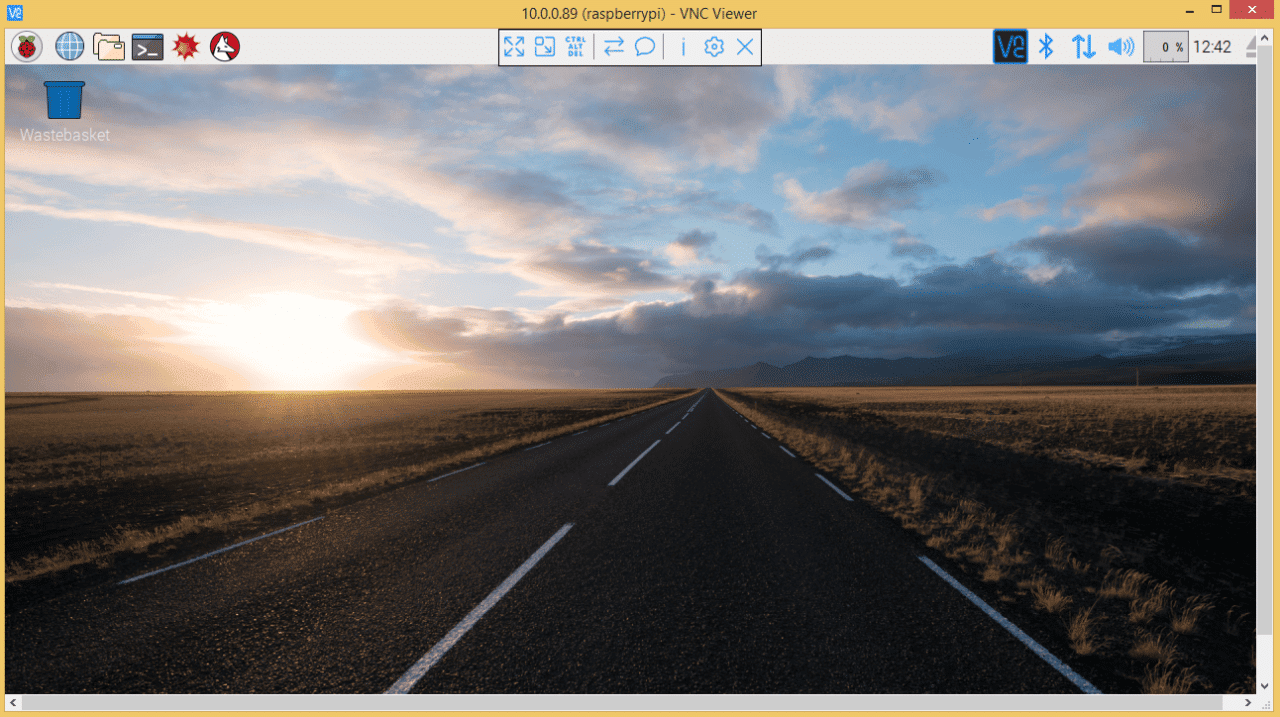
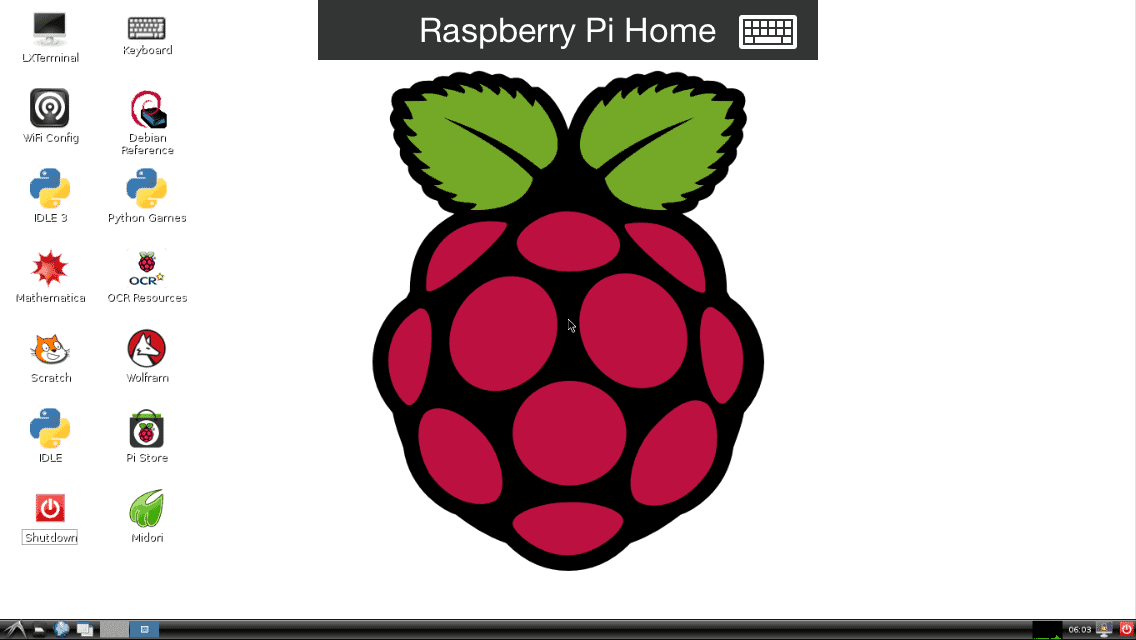
The Raspbian Desktop will open up in a VNC Viewer window:
Setup for Older Raspbian Desktops
Use this section if your Raspbian OS was released before 9-23-16…
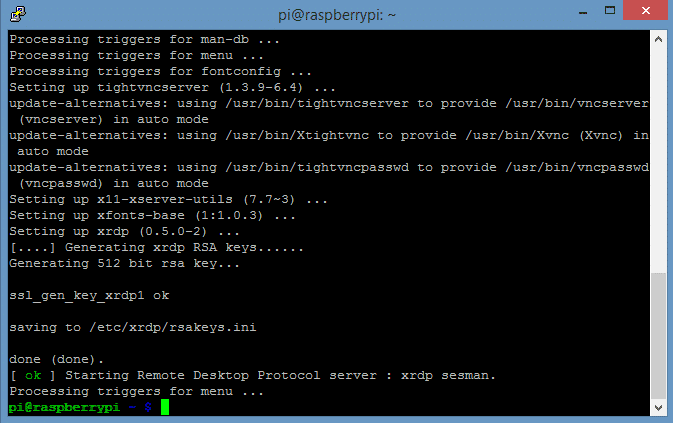
Older versions of Raspbian don’t include RealVNC, but we can install a similar service called XRDP that works well too. Log into your Raspberry Pi with PuTTY, and enter sudo apt-get install xrdp to install the XRDP service:
That’s all you need to do on the Raspberry Pi side.
Now, on your Windows computer, open up the Remote Desktop Connection application. This is a Windows app, so it should already be on your computer. Now enter the local IP address of your Raspberry Pi:
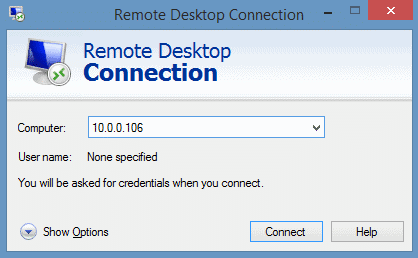
Click connect, and you’ll be prompted to enter the Pi’s username and password:
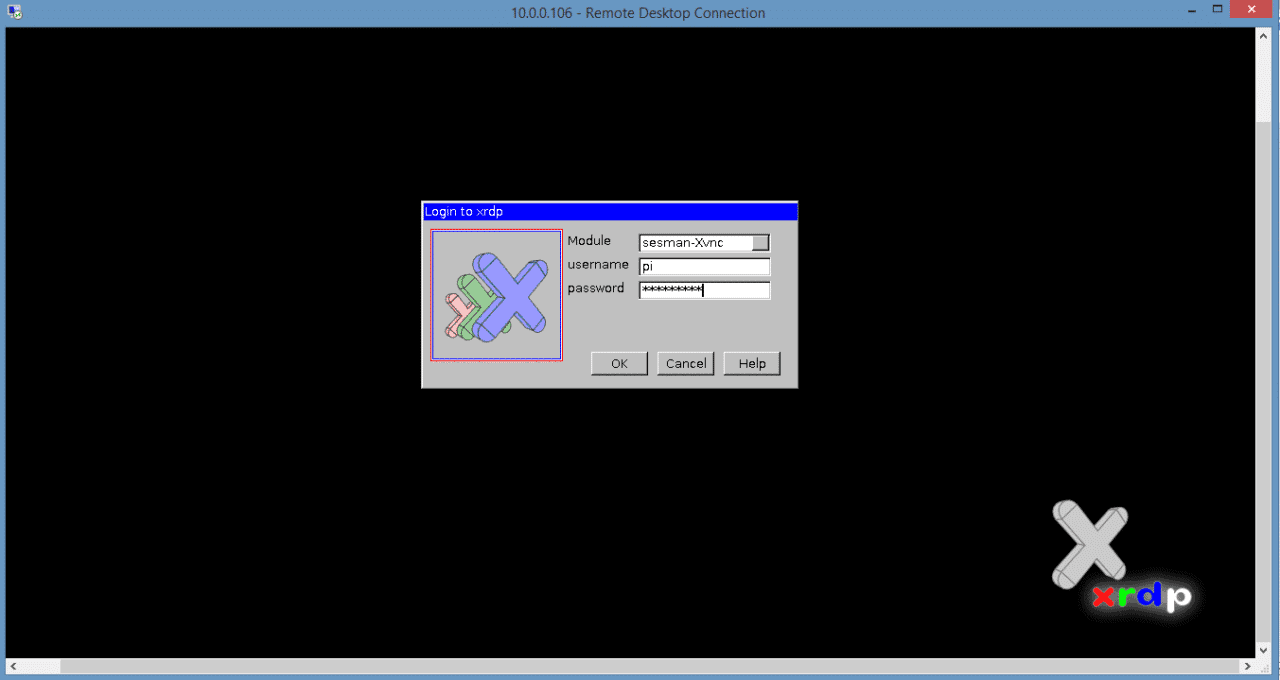
If you haven’t changed it yet, the username is pi and the password is raspberry.
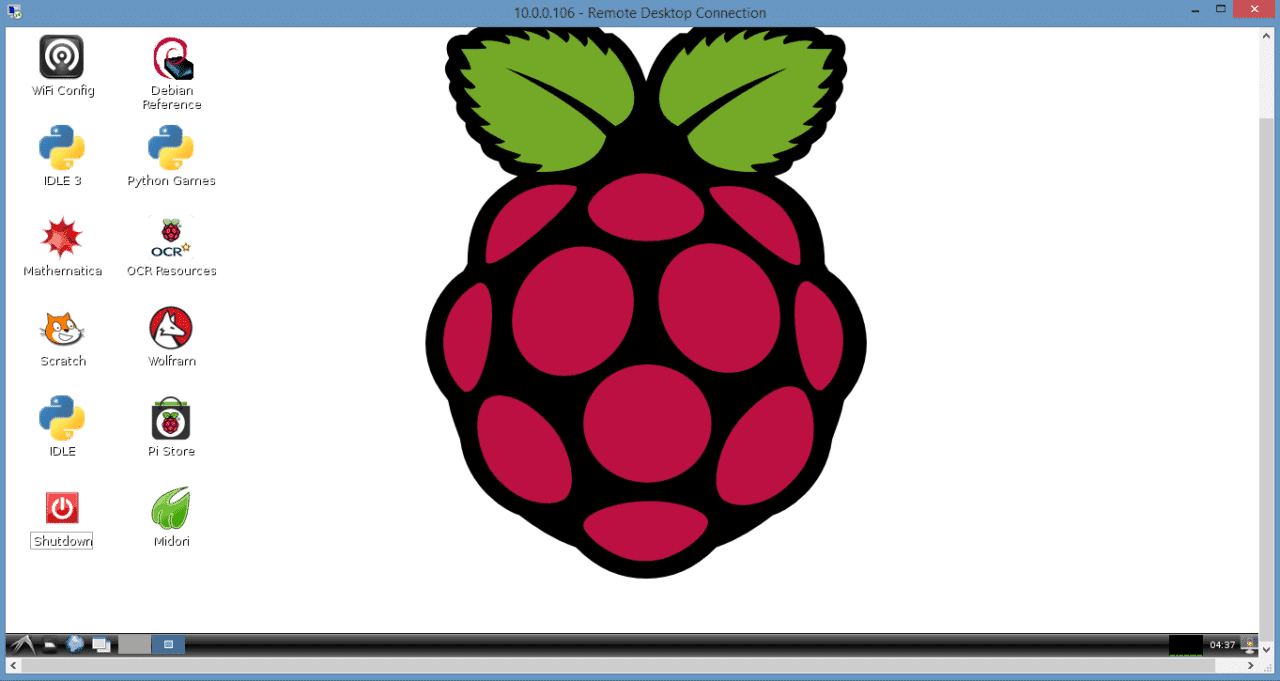
Click “Ok” and you’ll be logged into the Rasbian desktop:
Configure for Access Outside Your Home Network
The remote desktop connections above are great and work well as long as you only connect to the Raspberry Pi from your home network. However, it won’t work outside your home network. To connect to your Pi from other computers outside of your home network, you need to forward a port in your router’s configuration settings. This will tell your router to send the connection to the Pi’s local IP address whenever you connect to a port from outside of your home network.
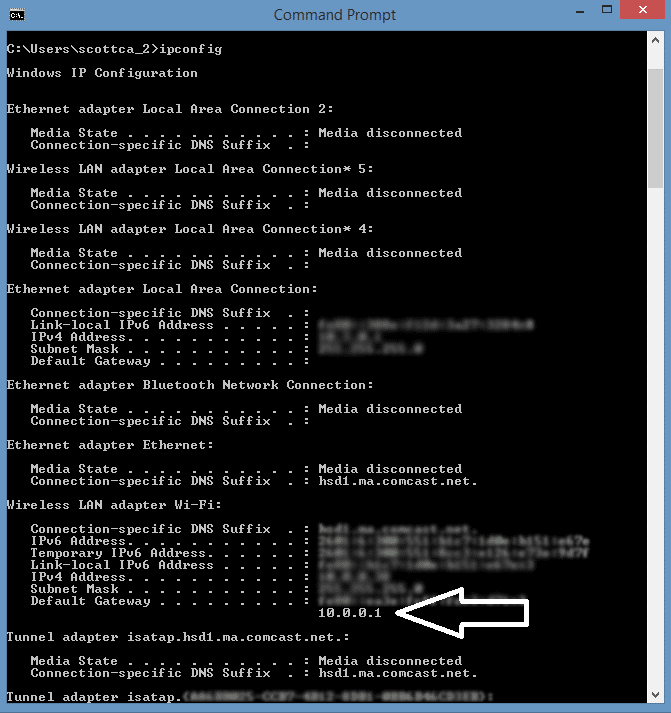
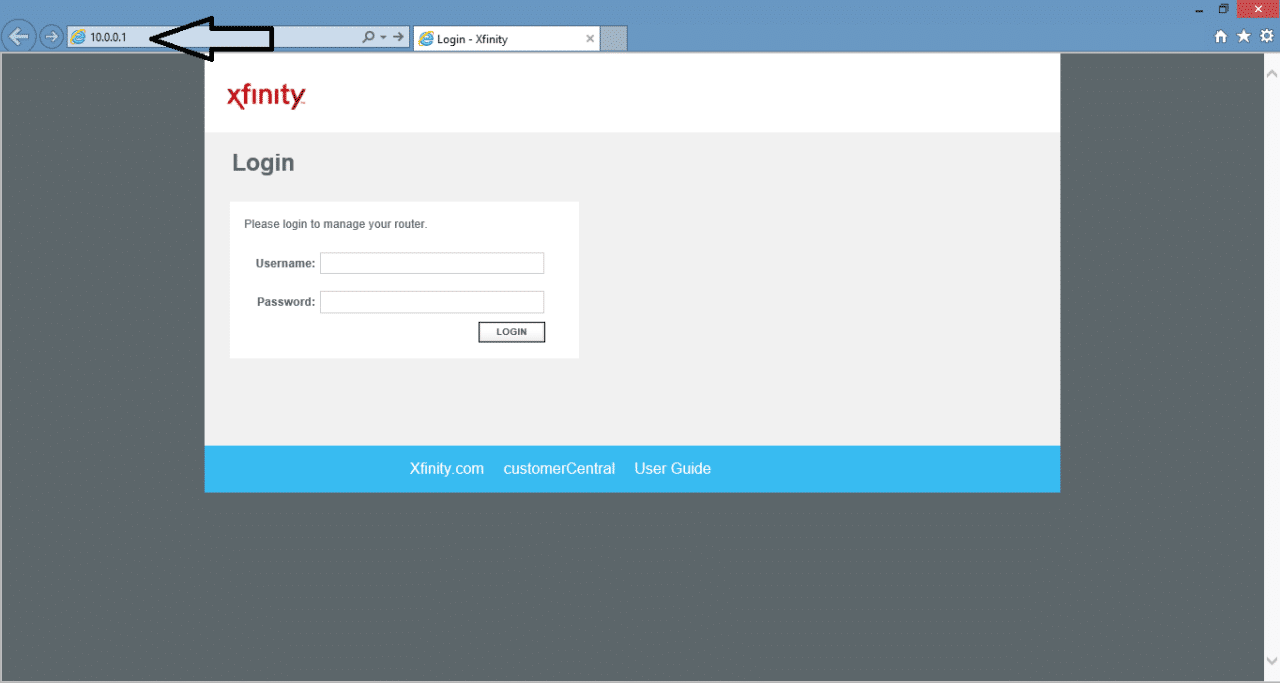
To do this, enter your router’s configuration menu by entering the default gateway IP address into the search bar of your internet browser, in my case it’s 10.0.0.1.
If you don’t know what your default gateway IP address is, you can find it by opening up the command prompt in Windows, and entering ipconfig:
Then login to your router’s configuration page. If you don’t know the username and password, try admin for the username and password for the password:
Once you’re inside your router’s configuration menu, look for a setting that says “Port Forwarding”. It may be under advanced settings:
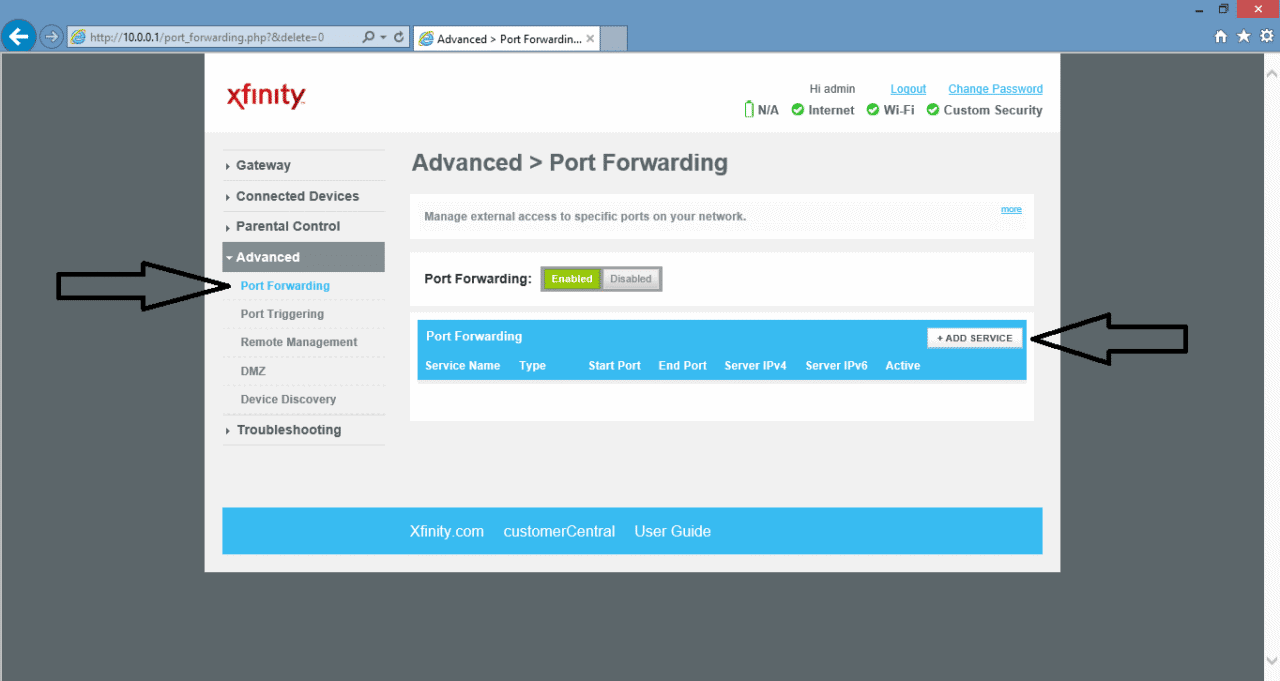
In my case, I click “Add Service” to add a new port forward. Your case may be different depending upon which type of router you have. Consult your user manual or search online for instructions pertaining to your specific router model. Once you’ve figured out how to add a new port forward, enter the details of the connection:
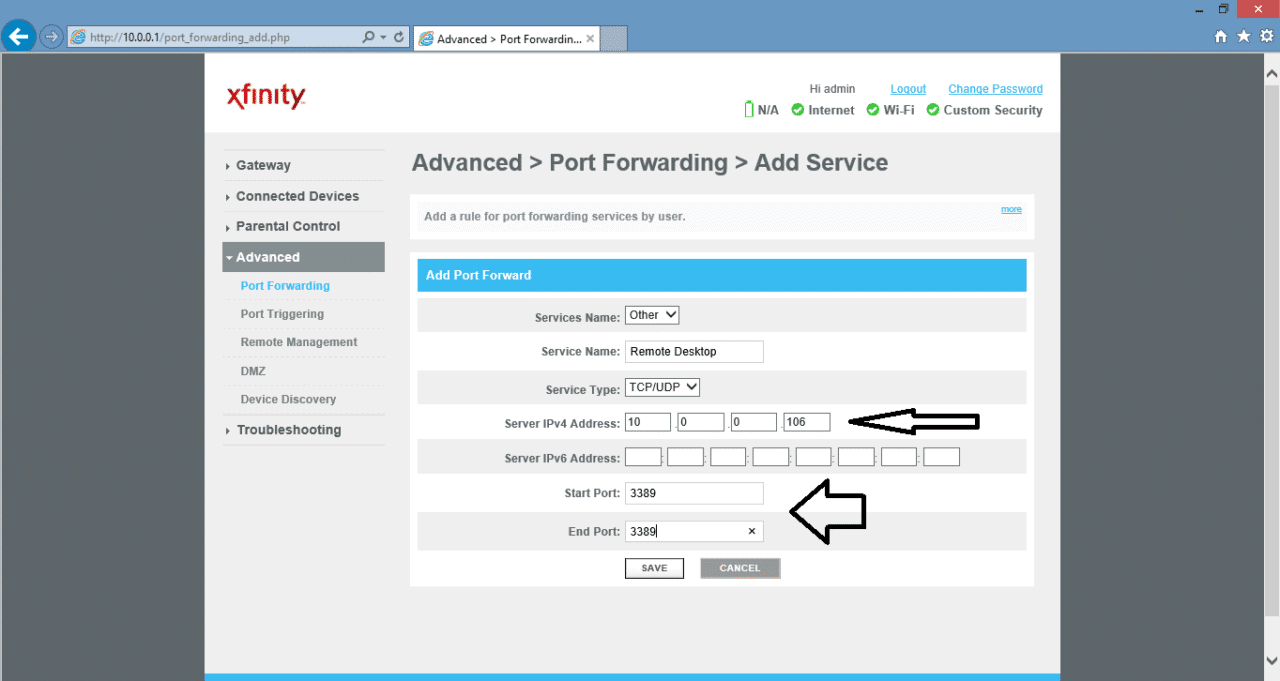
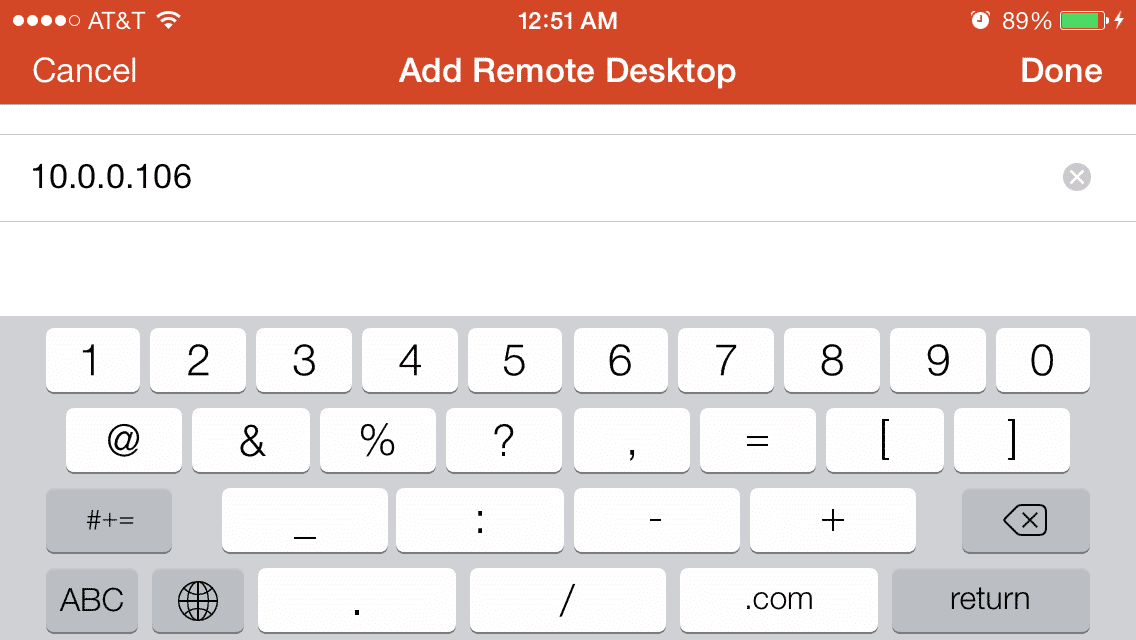
The “Service Type” should be TCP/UDP. Where it says “Server IPv4 Address”, enter the local IP address of your Raspberry Pi (in my case it’s 10.0.0.106). Now enter which ports need to be forwarded. For the Windows Remote Desktop App, we need to forward port 3389. Enter 3389 as both the “Start Port” and the “End Port”. Click save to save the connection.
Now we need to find your router’s public IP address. Just Google “what’s my IP” and you can find sites that will tell you for free:

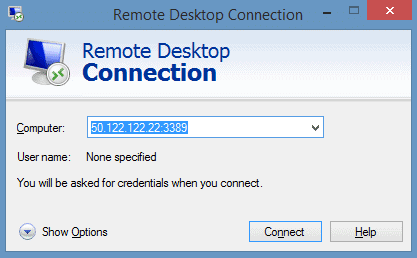
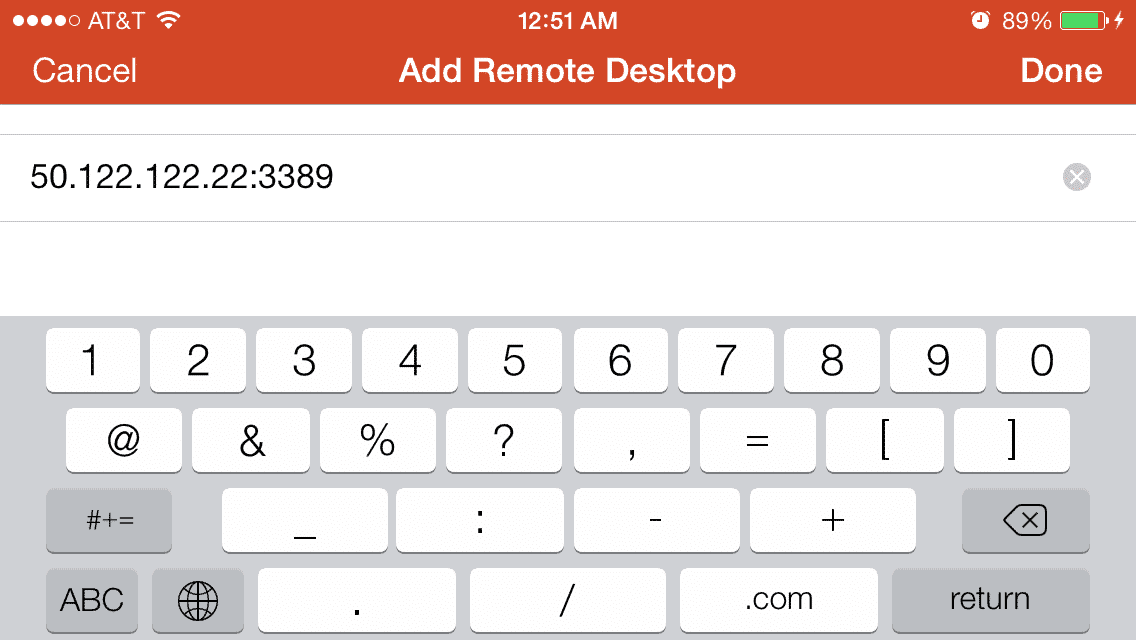
Write this down, then open up the Remote Desktop Connection application in Windows. In the “Computer” field, enter your router’s public IP address, followed by a colon and the port forwarded in the above steps. For example, if your public IP is 50.122.122.22, and you forwarded port 3389, you would enter 50.122.122.22:3389 here:
Using this address you’ll be able to connect to your Raspberry Pi from anywhere outside of your home network.
Remote Desktop from iOS Devices
The Windows Remote Desktop App is perfect if you want to access the Pi from a Windows machine, but if you use an iOS device, you can install the Microsoft Remote Desktop App, “RD Client” and access the Raspbian desktop from your iPhone, iPad, or Mac. The set up is easy:
Add a new connection:
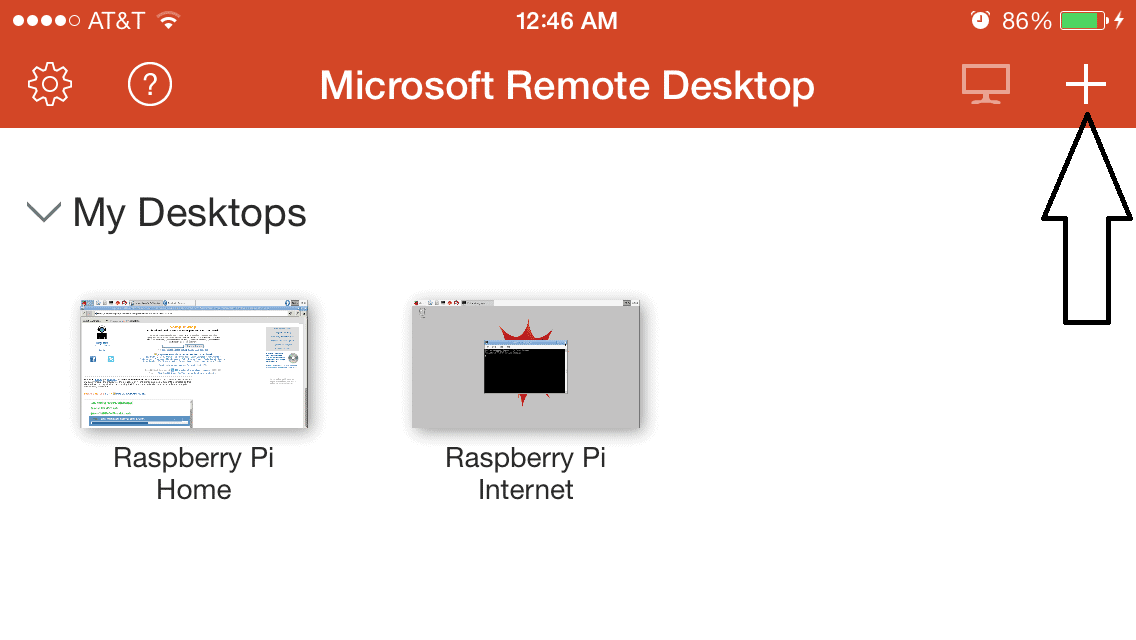
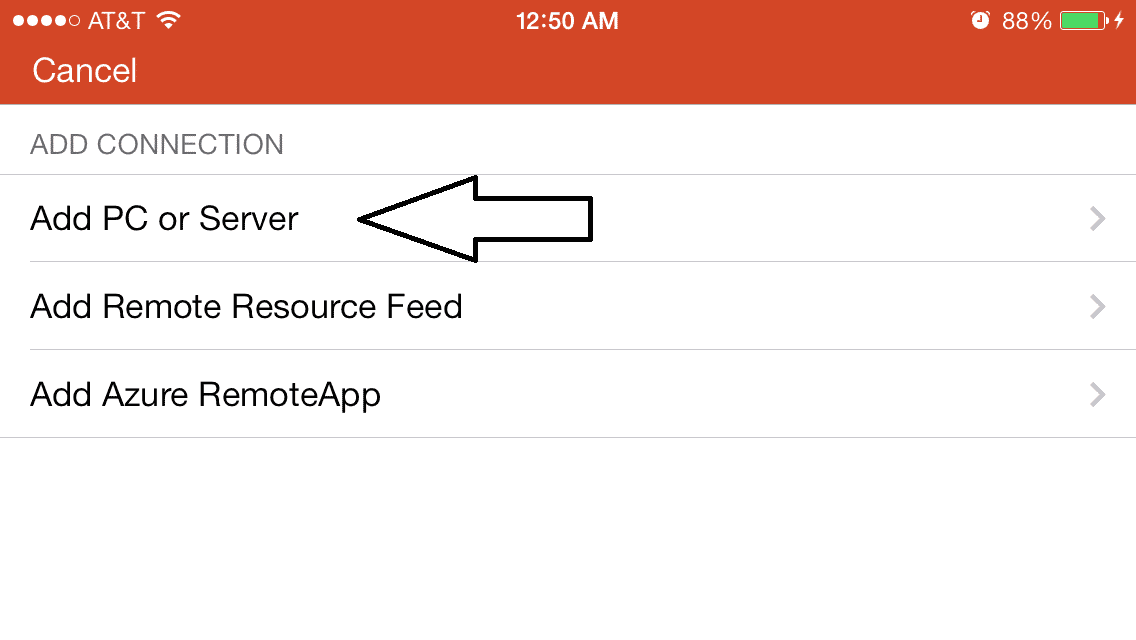
Select “Add PC or Server”:
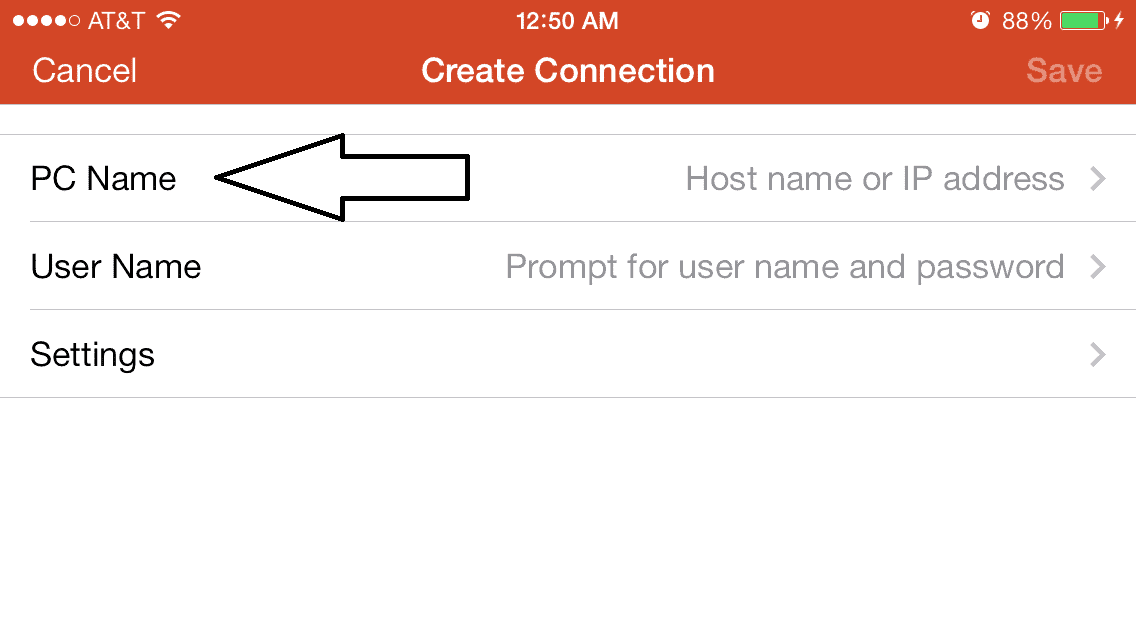
Select “PC Name”:
Enter your home router’s public IP address and the port you forwarded:
Then make another connection with the local IP address of your Pi:
Tap “Done” and select the connection you want to use:
You’ll probably want to create two connections. A connection with the Pi’s local IP address can be used when you’re on your home network. Another connection with your router’s public IP address and forwarded port can be used when you’re away from home.
Here’s a video showing you how to set up everything in the post above:
That should about cover it, but if you’re having trouble setting anything up, just leave a comment below and I’ll see if I can help. And don’t forget to subscribe if you’d like to see more tutorials like this one!


I’d like to be able to copy/paste between pc and pi. Can’t seem to get it to work on rdp to the pi, tho it works when connecting to another PC.
Any ideas?
Filezilla client software,, that enable you to transfer files between windows 7 and Raspberry
Wonderfull! It works great! How does this work in ubuntu?
I use raspbian wheezy, the code to activate what is it?
Very nice! Thank you! Now I wonder if there is some way to get what the external IP address is from outside the network, in case it changes.
Hi, you have to Try https://www.upswift.io/ They have the best Raspberry Pi remote web access and monitor tools I ever used for free.
Including remote access over the internet (external ip).
use ddclient and no-ip.com for non-fixed ip address.
Any way to list old sessions and kill them, I’ve logged in a few times and disconnected abruptly.
Great article for Windows users. There’s another useful article for those who want a bit more from their remote desktop tool when connecting to Raspberry. It would be interesting to see how they compare. Take a look: https://www.nomachine.com/tips-on-how-to-set-up-your-raspberry-pi-for-remote-access-via-nomachine
thank you for a beginner who ‘s try to learn Linux it is a plus.
thank you for your time
Bruno
Hello,
Is there anyway considering we know only local ip address of the pi as it will be give to the user and I don’t know anything about the Pi network. How can i get access to pi after giving to end user for any program update i want to do in secured way!
I have 2 PC and the RPi all connected on the same network. I use to remote access RPi from my first PC, but now that I got the hang of it, I try accessing it on my 2nd PC. I usually run a monitoring program on the RPi, running 24/7, using the first PC. But when I access the RPi using my 2nd PC, I cannot see the Application that I left running when I remote access it using the first PC. I was expecting to continue my session where I left of in the first PC, since I am using the same username. How can I do this?
I have the same problem, please help?
Is there a way to limit the devices that are able to connect to the pi through this remote connection? Something like a mac address or ip filter? I feel that it might be rather insecure if opened to every user without limitations?
Hi,
I was trying to connect my rasberry pi 2 using remote desktop connection, however when I enter the user name and password on the xrdp terminal still it will lead me to the command line interface. Also I already run the command sudo raspi-config to enable to boot to gui mode, but still I’m stuck on CLI.
Please help.
Thanks,
Noli
Very nice, even a dumo like me could follow it! Now going to see if I can make it work from an Android Tablet
Nice Article but i am getting blank screen instead of login prompt window. Help me in this regard.
Thanks in advance
could you solve this problem please??
Hi, I have the Microsoft RD app running well apart from the IPad keyboard doesn’t work properly. Any ideas how to correct this?
Cheers
Very good tutorial. Well done and thank you very much.
so i did everything and got the local remote desktop to work, but as soon as i try and connect through the public ip address, it doesnt connect… i dont have start and end port, i have wan and lan ports in my router. idk if this makes a difference… please help!
Hi, I have tried connecting to two different Raspberry Pi’s from a macbook and an iPad using the Microsoft Remote Desktop. Both Pi’s were connected to the wireless network as the macbook and iPad, but would only connect remotely if they were wired in with an ethernet cable regardless of whether the ethernet or wifi IP address was used to remote in. I cannot understand why this should be, but it makes the whole thing pointless for me since I want to remote in to the Pi so it can be a wireless robot!
Any ideas?
Thanks
After installing xrdp, I cannot see debian screen while remoting into raspberry pi from a Windows system or locally. Any suggestions?
I am connected to the RPi GUI from my Win10 machine via wifi and Windows Remote Desktop just fine.
However, if I window (i.e. less than full screen) the Remote Desktop window, I cannot get the RPi GUI to rescale to “fill” the smaller window. It wants to stay full size and I have to scroll to see bits that are outside the Remote Desktop window. Any way that I can do this – that is, see the full RPi GUI in a windowed Remote Desktop?
3rd tutorial I have run through in the past 2 hours, each worked perfectly. Love your work.
very usefull article, thanks for sharing, im a noob in raspi and very helped with your article, thanks a lot
Hi,
First, these tutorials are fantastic! thanks a lot!
So, thanks to the tutorial, the set-up of my RPI3 went well, and I have the shell working. However, I have a problem connecting the remote desktop – I see the “connecting to…sesman connected OK..login successful…” but then I get “error – problem connecting”.
my Pi is connected using both Lan and WiFi.
I saw quite a few others complaining of this, but can’t figure out what to do.
Any help would be appreciated!
Thanks,
Gideon
Same here…
Anyone with a solution??
Would be highly appreciated!
Thanks,
Felix
Got the solution!
sudo apt-get install tightvncserver
sudo apt-get remove xrdp
sudo apt-get install xrdp
afterwards it works without any problems (for whatever reason…)
Best wishes,
Felix
Thanks Felix, Now I’m able to connect. Just wondering why we needed tightvncserver; also why did other articles skip that software. Anyhow for now I got what I wanted, this is some research for future… :-)
Thanks a lot for your solution, but I still cannot fix it. It’s “error – problem connecting”. Please help me!!!!
Step-1] Download –> x11-apps_7.7+4_armhf.deb , x11-session-utils_7.7+1_armhf.deb , xbase-clients_7.7+7_all.deb , xbitmaps_1.1.1-2_all.deb , xfonts-base_1.0.3_all.deb and move all these in /var/cache/apt/archives.
Step-2] Now download xrdp_0.6.1-2_armhf.deb in /tmp
Step-3] dpkg -i /tmp/xrdp_0.6.1-2_armhf.deb
Open Remote Desktop and type IP, Username and Password.
Done.
Use sudo while installing.
Epic! I’ve been at it for 4 hrs. This certainly worked. Thanks!
Thanks Felix -lifesaver got my sanity restored now!!
Thanks – worked a treat and stopped me going around in circles :)
thank you for your solution
I get succesful after your procedure
Mizu
Thank you for the tutorial very useful.
Let’s assume we build a webpage on the raspberry.
Can we access it from our cell phone remotely (different network) and directly using for example Chrome?
By directly I mean this way: Chrome -> pubic address/port/webpage etc.
Indirectly would be connecting to raspberry through VNC mobile app to launch desktop and then use web browser -> local network address/webpage
Thank you.
Radmin is one of the best remote control applications that I’ve ever used. By using it, I can now easily access and control other PCs from my home and office. I am currently using it for my educational and work purposes. It is not only good but best. http://www.radmin.com/
I have setup a pi2 using wtware and it works weel. Only thing I cant get going is using a usb stick on the user side.I log onto Server 2012 and then needs to use a usb stick. Any suggestions ?
Thanks alot. It was very helpful.
I suggest DWService, works great. https://www.dwservice.net/en/download.html
how to use dwservices i mean i have no steps available to use it and check on the dashboard.
I like xrdp using microsoft remote desktop much better than realvnc. One must purge realvnc from the raspian jessie OS in order to use xrdp. Instructions are available on the raspberrypi.org site in the blog where vnc is discussed on the new Raspian.
Thank you, thank you, thank you for such an amazing article! i had originallly been using an HDMI monitor but it malfunctioned a while ago (connection issues?) and I couldn’t seem to get it up and running again. Several months later I started researching on how to make the Pi work without a monitor and happened to stumble across your article – an absolute lifesaver! It’s very detailed and organized, perfect for a beginner, and I prefer the Remote Desktop over VNC. The Pi is up and working now! Thanks!
I find xrdp much easier to set up and it performs better than realvnc
I have used both xrdp and vnc and much prefer xrdp–just to let you know.
Hello,
i found this link:
http://www.raspberryanywhere.com/
Perhaps it can be of some help. I’v been using the service from several weeks and it works great!
The link provide a simple software teamviewer like to access your raspberry board anywhere you are.
Furthermore, you can use your usual SSH client; they just provide a virtual address to connect to your board
via SSH or HTTP . It worths a try for sure!
I tried the XRDP and Windows Remote Desktop Connection. It works perfectly except that I don’t see the CURRENT RASPBERRY PI’s DESKTOP. What I see on my Window’s computer is a NEW RASPBERRY PI’s DESKTOP. It’s as if I just booted another PI. So, I opened windows and folder on the Windows computer to see if it matches my screen to the PI’s screen. It DOES NOT not even 1%. So, what am I missing or doing wrong. Please, help or point me in the right direction. Thanks,
You can access Raspberry Pi desktop with a remote desktop connection using tools like logmein, R-HUB remote support servers, teamviewer etc. They work well.
I much prefer XRDP: easier to set up and works very well.
Hi,
while authenticating the VNC server , its not accepting the default raspberry pi username and password. any suggestions?
Can I access more than 50 pi’s using this desktop remote method for free or do I need to get some sort of license?
where do i find my home router’s ID? I don’t know your instructions well
Any idea why I can’t connect remote desktop to pi when away from the network? Did the directions perfectly. Times out far as I can tell.