In a previous article, we connected an ESP8266 WiFi transceiver to the Arduino and sent an email when the reading from a thermistor crossed a threshold value. In this article we are going to make the Arduino and ESP8266 send a text message when a passive infrared (PIR) sensor detects motion.

IFTTT
Since we are going to use IFTTT again, let’s first have a short refresher.
IFTTT (If This Then That) is a free web platform that connects devices and services such as Gmail, Twitter, Instagram, Dropbox, Fitbit, Amazon Alexa, and Google Assistant. It weaves these services in a way that Instagram can use the functions of Dropbox.
IFTTT works just like a standard if statement– if this condition is triggered, then do this action.
To accomplish this, IFTTT uses Applets. Applets are programs that use a trigger to carry out events. An Applet can do things like posting regular tweets about the weather or sending an SMS notification whenever someone opens a particular door.
To integrate IFTTT with the ESP8266 WiFi module, we need webhooks. Webhooks is a service that triggers events via HTTP requests.
A simple webhooks system works like below:
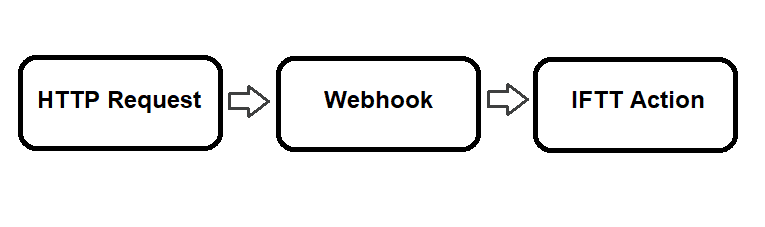
The initial trigger of a webhooks system is an HTTP request. These can be set off by a tactile switch, digital button, sound level, temperature threshold, and the likes. To create a web request to trigger webhooks, you need to have the key and event name. The key gives webhooks authentication to your IFTTT account while the event name specifies the action to be triggered when a condition is met. Without one of these two, there is no way to know whose and what action there is to trigger.
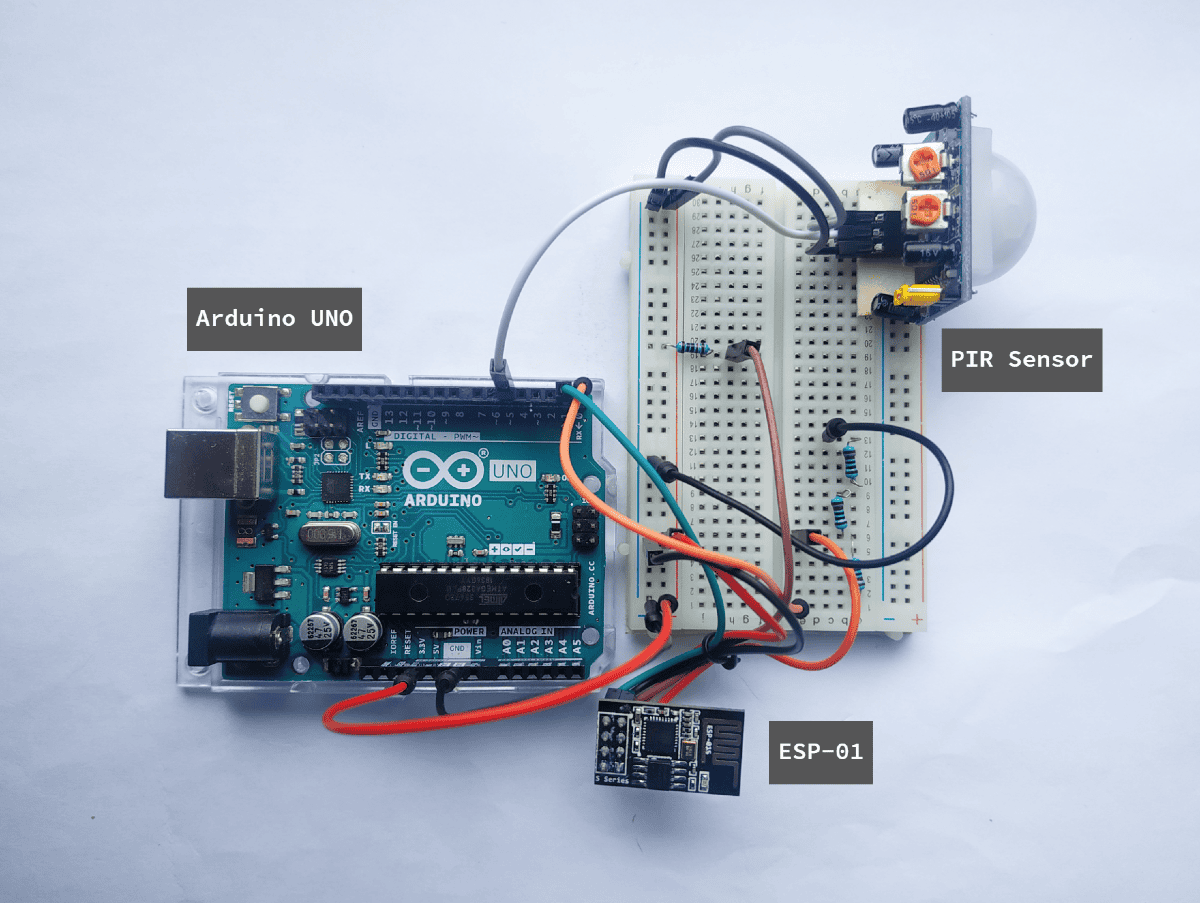
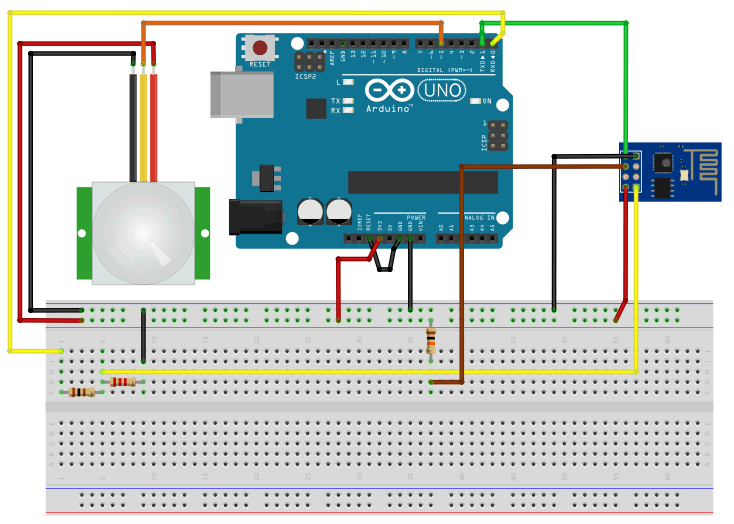
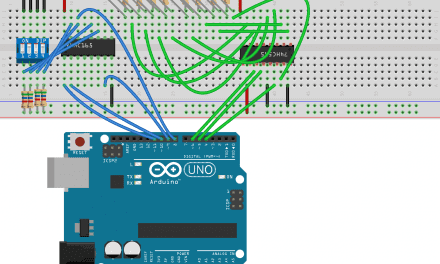
Preparing the Hardware
For this project, we are going to interface a PIR motion sensor with Arduino UNO then transfer the digital signal to the ESP8266 module. A PIR sensor, also known as Passive Infrared Proximity Sensor, is a digital sensor that gives off a HIGH pulse when it detects motion. The ESP8266 module is configured to send a GET request to IFTTT when the signal is HIGH. The GET request triggers the applet, which then sends an SMS to your device.
In order to do that, we need the following components:
- Arduino Uno
- ESP8266-01 WiFi module
- PIR motion sensor
- 3 x 1 kΩ resistor
- 1 x 10 kΩ resistor
- Jumper wires
- Breadboard
If you want to learn more about the Arduino, check out our Ultimate Guide to the Arduino video course. You’ll learn basic to advanced Arduino programming and circuit building techniques that will prepare you to build any project.
Setting Up IFTTT
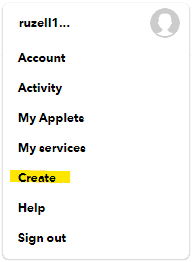
First, go to the IFTTT website and create an account.
Once logged in, go to the top right toolbar on your homepage and select create. Logging in will direct you to a page where you can start creating an Applet.
Then, set a condition by clicking “+ This”.

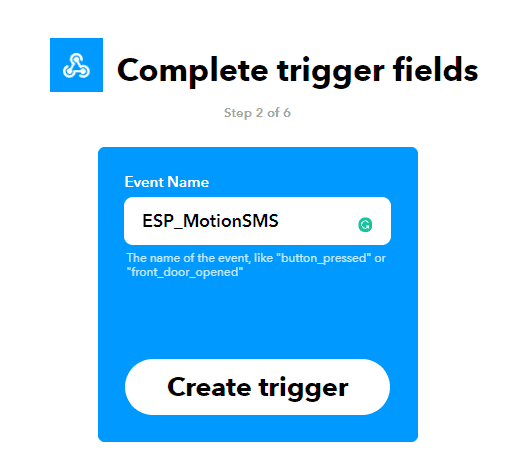
Next, search for “webhooks”.

Under webhooks, choose to receive a web request. Click create trigger after naming your event.
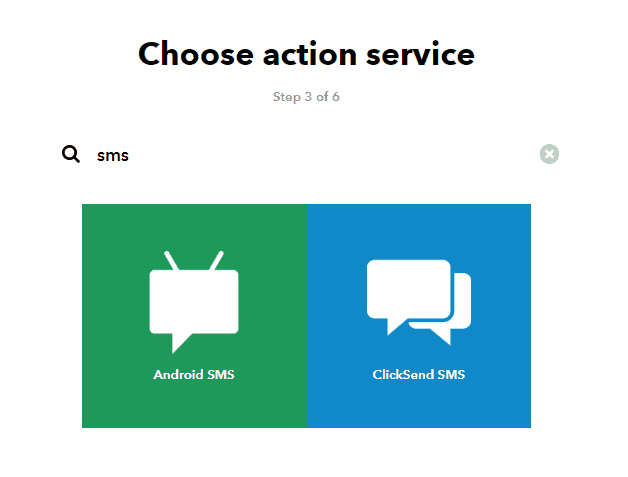
Now to set the action, click “+ That”.

This time we search for SMS. Unfortunately, IFTTT discontinued support for direct SMS using webhooks. Right now, the only way we could make this work is by installing the IFTTT app on an android device or using a ClickSend account. In this tutorial, we are using the former.
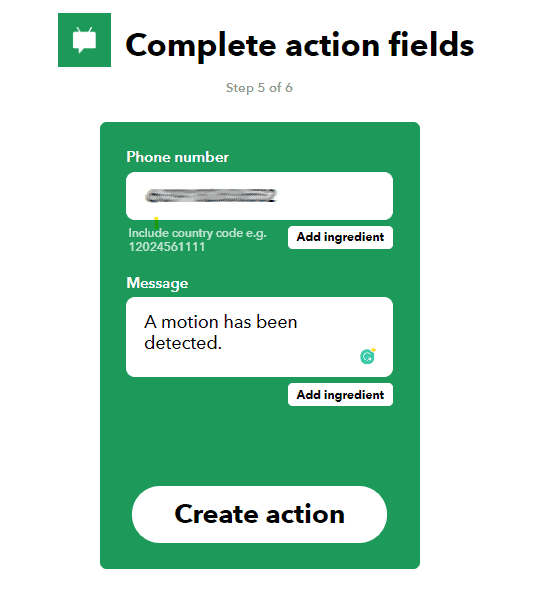
Lastly, write the content of the SMS. There are convenient variables you can use to compose your message: EventName which contains the name of the event; OccurredAt which displays the date and time when the event is triggered, and; Value that can include any number you want to send to the IFTTT server.
Check whether you have put the correct details.
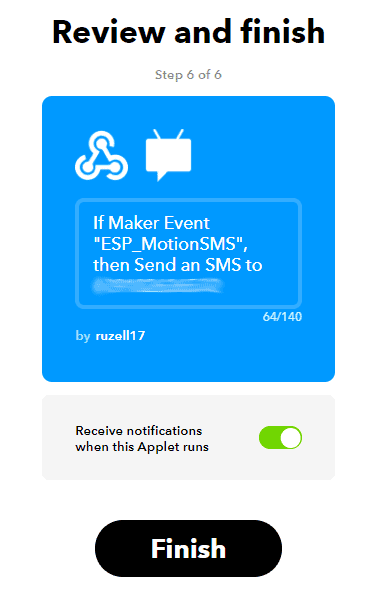
The applet is now ready. Now to enable your android device for the SMS notifications, search IFTTT in Google Playstore and install.
After installing, log in with your IFTTT credentials to pair with your account.
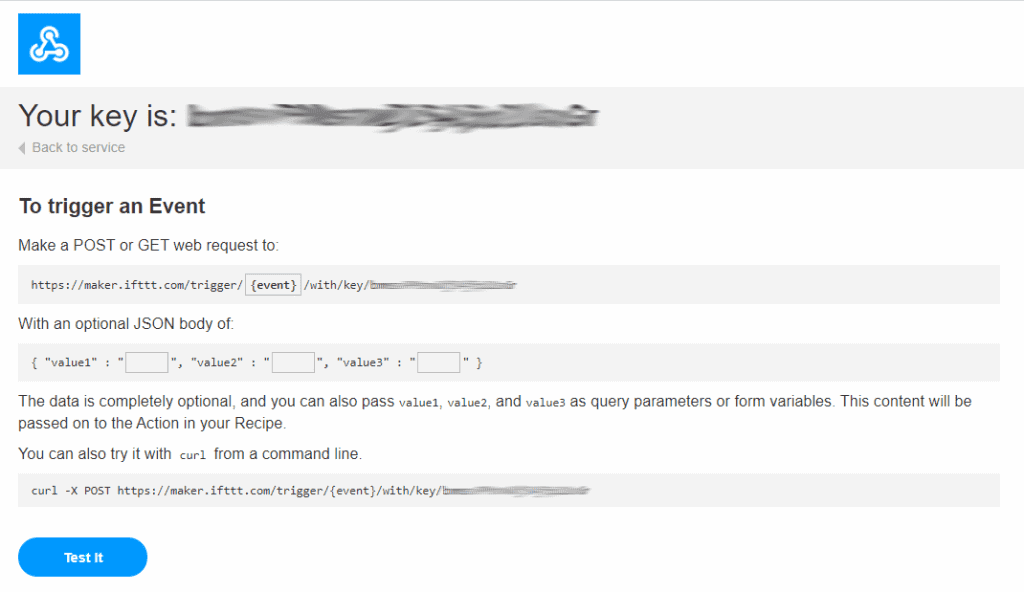
Acquiring the Key
To trigger the Applet recipe, we need the key along with the event name on our HTTP request. To obtain your unique IFTTT key, go to the homepage and search for webhooks on the top-left search bar. You can find webhooks under services.

Now on the webhooks page, click the Documentation link at the top-right corner of the page.
Finally, a page that contains your personal key, and the complete web request for your event appears. This key is unique to every IFTTT account. By including the event name with it, you can trigger an IFTTT action via webhooks. Now let’s proceed with our code.
Code for the Arduino
#include "SerialTransfer.h"

SerialTransfer myTransfer;
int status;

void setup()
{
  Serial.begin(115200);
  myTransfer.begin(Serial);
  pinMode(5, INPUT);
}

void loop()
{
  status = digitalRead(D5);
  myTransfer.txObj(status, sizeof(status));
  myTransfer.sendData(sizeof(status));
  delay(100);
}
Code for the ESP8266 Module
#include <ESP8266WiFi.h>
#include "SerialTransfer.h"

SerialTransfer myTransfer;

const char* ssid     = "Wifi Name";
const char* password = "WiFi Password";

const char* resource = "https://maker.ifttt.com/trigger/YOUR EVENT NAME HERE/with/key/YOUR KEY HERE";
const char* server = "maker.ifttt.com";

void setup() {
Serial.begin(115200);
pinMode(D5, INPUT);

  WiFi.mode(WIFI_STA);
  WiFi.begin(ssid, password);

  while (WiFi.status() != WL_CONNECTED) {
    delay(500);
  }

  myTransfer.begin(Serial);
}

void loop()
{
  if(myTransfer.available())
  {
    int status;
    myTransfer.rxObj(myFloat, sizeof(myFloat));
    if (status==1)
    {
        WiFiClient client;
        client.print(String("GET ") + resource +
                        " HTTP/1.1\r\n" +
                        "Host: " + server + "\r\n" +
                        "Connection: close\r\n\r\n");

        int timeout = 5 * 10; // 5 seconds
        while(!!!client.available() && (timeout-- > 0))
        {
        delay(100);
        }
        while(client.available())
        {
        Serial.write(client.read());
        }
        client.stop();
        delay(10000);
    }
  }
}
Code for NodeMCU
#include <ESP8266WiFi.h>

const char* ssid     = "Wifi Name";
const char* password = "WiFI";

const char* resource = "https://maker.ifttt.com/trigger/YOUR EVENT NAME HERE/with/key/YOUR KEY HERE";
const char* server = "maker.ifttt.com";

int status;

void setup() {
  Serial.begin(115200);
  pinMode(D5, INPUT);
  Serial.println();
  Serial.print("Connecting to ");
  Serial.println(ssid);

  WiFi.mode(WIFI_STA);
  WiFi.begin(ssid, password);

  while (WiFi.status() != WL_CONNECTED) {
    delay(500);
    Serial.print(".");
  }

  Serial.println("");
  Serial.println("WiFi connected");
  Serial.println("IP address: ");
  Serial.println(WiFi.localIP());
}

void loop()
{
  status = digitalRead(D5);
  delay(500);
  Serial.println(status);
  if (status==1)
  {
    WiFiClient client;
    client.print(String("GET ") + resource +
                      " HTTP/1.1\r\n" +
                      "Host: " + server + "\r\n" +
                      "Connection: close\r\n\r\n");

    int timeout = 5 * 10; // 5 seconds
    while(!!!client.available() && (timeout-- > 0))
    {
      delay(100);
    }
    while(client.available())
    {
      Serial.write(client.read());
    }
    client.stop();
    delay(10000);
  }
  else
  {
    return;
  }
}
Code Explanation
To send the digital signal to the ESP8266 module, we use the SerialTransfer.h library. You can download it from here.
These are the important lines we’ve used from the library:
SerialTransfer myTransfer– creates a SerialTransfer instance called myTransfer.myTransfer.begin(Serial)– starts serial communication using baud rate Serial.myTransfer.txObj(status, sizeof(status))– creates an object specifically made for status.myTransfer.sendData(sizeof(status))– sends status in a packet right for its size.myTransfer.rxObj(status, sizeof(status))– receives status from the sender.
Next, using const char*, we concatenate strings to contain your WiFi name, password, web request URL, and the IFTTT maker server. Then, using WiFi.mode(WIFI_STA, we declare the ESP8266 module as a station to prevent it from getting defaulted into other modes. With WiFi.begin and myTransfer.begin, we initialize WiFi connection and serial communication, respectively.
The main loop uses an if statement that returns when the signal is LOW or sends a GET request when the signal is HIGH. Sending a GET request to your IFTTT event URL triggers the applet. Consequently, this sends the SMS notification to your android device.
We added a 10 seconds delay before the device checks for a HIGH pulse again to prevent overloading your IFTTT applet. Sending too many requests may get your applet disabled, or worse, your account banned.
I’ve added a bonus code if you’re using a NodeMCU development kit. With NodeMCU, you don’t need to employ serial communication to send the digital signal from the sensor. Instead, you can use the serial monitor to check if your output is consistent with your code.
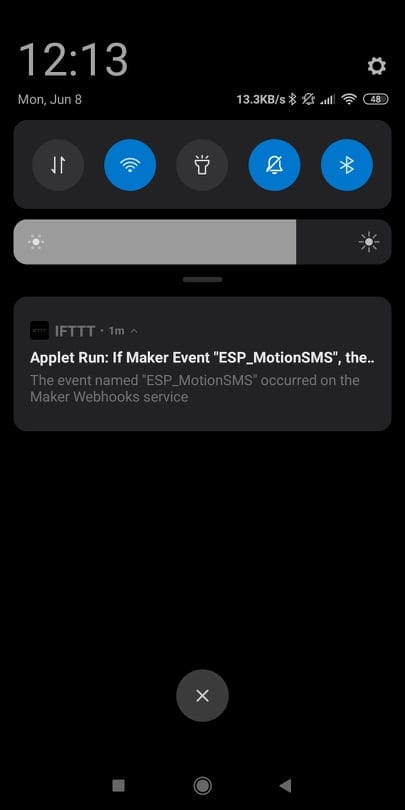
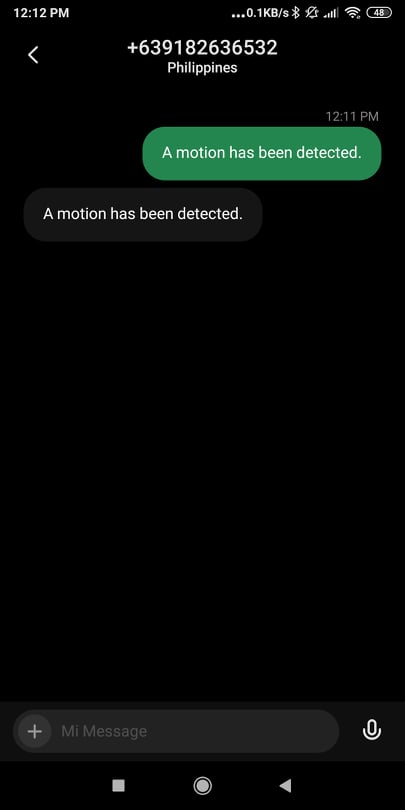
Demonstration
To test the project, I waved my hand to the PIR sensor. My hand is about 3 feet away from it. After a couple of seconds, I got a notification from the IFTTT app then an SMS shortly after.
Be sure to leave a comment below if you have any questions!


Hi, I am using a developer board that has built-in wifi. Would I use the NodeMCU code for that or do I need to download each of the arduino and ESP8266 separately using the dipswitches for each?
Hello, your project’s great. i wanna do a project similar yours. but i want to ask something. i have arduino uno and esp8266-01. your project has arduino uno and esp8266-01 too. You have shared codes for arduino uno, esp8266 and nodemcu. (i dont have nodemcu) I dont’ understand How can i load the code?. The codes for arduino uno doesn’t have wifi name, passwords and IFTTT codes. Arduino uno’s code has 12 lines. Please help me, because i need this too much. thank you a lot
Can we set up the circuit exactly like this and load both the arduino code and the esp code, or are there any cables that we need to remove while loading the circuit codes? Please answer me, i need it too much.
Hello, when i try to compile the esp8266 code at first it shows that d5 was not declared, changed it to jus 5, now there is an error that MyFloat was not declared in this scope.
example of how I think he wants it to be
float myFloat;
myfloat = analogRead(A0);
myTransfer.rxObj(myFloat, sizeof(myFloat)); // he is passing a value here
Did you get a response or work out the answer here as I can see how the given code can generate these errors.
Did you make this code work eventually as I can see how the given code gives errors.
WiFiClient client;
const int httpPort = 80; // adding this to his code made it work for me
if (!client.connect(server, httpPort)) { // I also added this as well
Serial.println(“connection failed”);
return;
}
client.print(String(“GET “) + resource +
” HTTP/1.1\r\n” +
“Host: ” + server + “\r\n” +
“Connection: close\r\n\r\n”);