The Raspberry Pi comes with an on-board 802.11n Wireless LAN adapter, which means that it’s no longer necessary to purchase a separate WiFi dongle. It’s also quite a bit easier to set up. In this tutorial, I’ll show you how to set up WiFi from the command line or from the Raspbian desktop.

You will need access to the Pi’s command prompt or desktop. If you have a monitor and keyboard, that’s as simple as plugging everything in. If you don’t have a keyboard and monitor and are setting up the Pi headless, check out this guide to see how to access the command prompt from another computer.
Configure WiFi from the Command Line
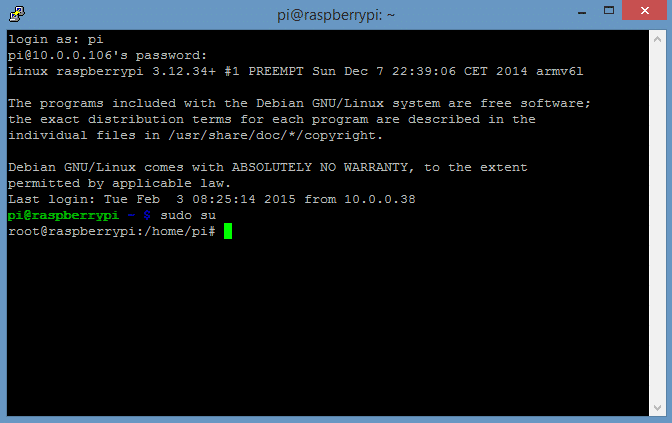
Log in to the Pi with PuTTY or another SSH client.
You probably already know the name of the WiFi network you want to connect to, but if not, enter this at the command prompt:
sudo iwlist wlan0 scan
This will generate a list of all wireless networks available in your area. The name of the network is given on the line that says “ESSID”:
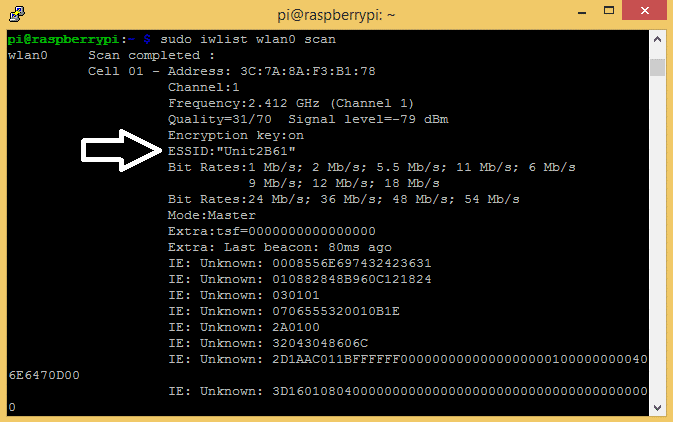
In my case the WiFi network is named “Unit2B61”.
Now we need to add the WiFi name and password to the wpa_supplicant.conf file. Enter this at the command prompt:
sudo nano /etc/wpa_supplicant/wpa_supplicant.conf
If the file already has the lines below, just edit them. If not, add them to the bottom of the file:
network={
ssid="SSID"
psk="WIFI PASSWORD"
}
Change “SSID” to the name of your WiFi network, then enter your WiFi password where it says “WIFI PASSWORD”:
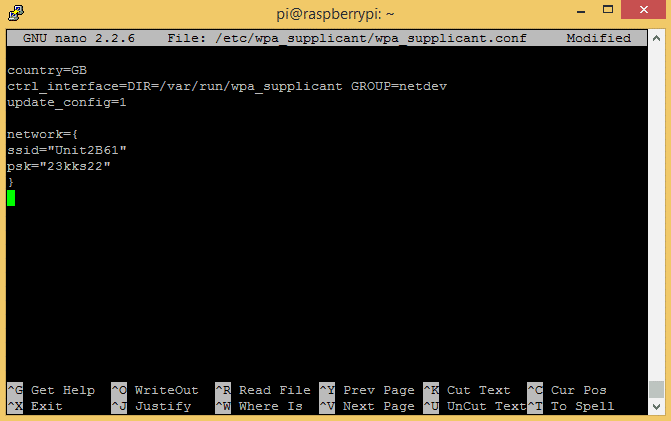
Press Ctrl-X, then Y to save and exit.
Now enter this to start the WiFi adapter:
sudo ifdown wlan0sudo ifup wlan0
If that doesn’t start it, you may need to restart the Pi with sudo reboot or sudo poweroff.
If you’re setting this up via SSH and an ethernet connection to your router, the local IP address will be different for the WiFi network. You’ll need to scan the network with Advanced IP Scanner or another way to find the new local IP of the Pi when it’s connected to WiFi. Then you can use this new IP to connect via PuTTY.
Configure WiFi from the Desktop
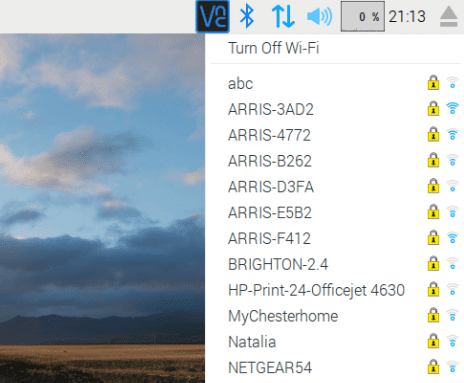
If you have a monitor and keyboard and already have access to the Raspbian desktop, setting up WiFi is even easier.
Just click the button with the up and down arrows in the upper right hand corner of the desktop:
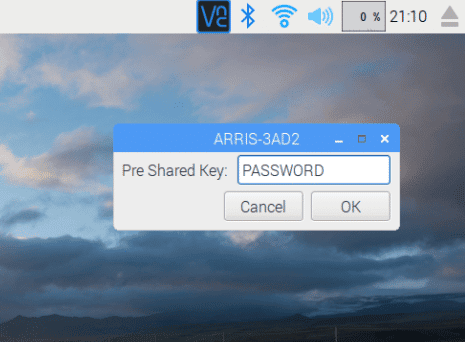
Clicking “Turn On WiFi” will bring up a list of available networks, which you can click on to connect to:
You’ll then be asked for the “Pre Shared Key”, which is just the WiFi network password:
Next Steps
If you’re setting up the Pi headless via SSH, and you want to access the Raspbian desktop, you’ll need to set up a remote desktop connection. Follow this tutorial to see how to do that:
How to Access the Raspberry Pi GUI with a Remote Desktop Connection
That’s about it! Let us know in the comments if you have any questions about setting this up. And be sure to subscribe to get an email whenever we publish new tutorials like this one!


I’m having trouble with putty, errors such as ‘connection refused’ and other times ‘connection timed out’. I have checked the IP address of the pi connected to my router, played around with the settings on putty with no avail. Please help!
Putty connects to the Pi out of the box, so you shouldn’t need to change any settings after installing it… Is this the first time you’re connecting to it? If so, there are some steps you need to take before setting up WiFi. See this article on setting up the Pi headless: https://www.circuitbasics.com/raspberry-pi-basics-setup-without-monitor-keyboard-headless-mode/
Basically, SSH is disabled by default on recent versions of Raspbian, so you need to enable SSH via raspi-config, or add an empty file named “SSH” to the root partiton.
after getting a new ip address and connected to putty,if i remove the ethernet cable it is not working
Hey can i ask something?
If i set my pi to my house wifi can it access other wifi also (provided i set it to access it in the same way) or once it is set will it wirelessly access only one wifi?
I have connected on Raspbian via the button in the top right hand corner, enter my password and it connects then drops after a minute or two.
I have switched off the power management setting – sudo iwconfig wlan0 power save off and that doesn’t fix it either.
It doesn’t seem to offer the option to save my password either. I have a laptop in the same room and that doesn’t drop connection so I know it’s not that. Any suggestions?
Also. I opted for both OS’s that come pre-installed – Raspbian and Libre or Lilec or whatever it’s called, the Kodi friendly OS. When I load that up I just get a black screen. Am I missing something? Do I need to download kodi?
Thanks!
thaxx uuu soo so much buddy , you made my day
I have Raspberry Pi B+ 3 and when i hit arrows it says no Bluetooth why!?
I have Pi3 with Fedora Server 30 and I want to connect to the hidden wifi network or hidden SSID.
How I can do this easily?
I want my Fedora Server to connect to the hidden wifi network at boot and connect to hidden wifi network automatically.
Simply wish to say your article is as astonishing.
The clearness in your post is just excellent and i could assume you are
an expert on this subject. Fine with your permission let me to
grab your feed to keep updated with forthcoming post.
Thanks a million and please carry on the enjoyable work.
Thanks for sharing. We provide full support for all your Arlo devices, including guidance for your netgear extender setup . So if you are having issues with connecting to the Wifi or configure settings on the Arlo app, then contact us using our live chat services or our email. You can also call us using our customer support phone number.
Thanks for sharing.
instead of blue arrows it shows grey arrows with a x at the end and i cant connect to any wifi
very nice thanks
HI ADMIN,
MY WIFI IS NOT CONNECTED WITH MY hp printer AND LAPTOP, AFTER USING THIS INFORMATION PROVIDING IN YOUR BLOG M ENABLE TO CONNECT. THANX FOR SHAESRING SUCH USEFULL INFORMATION.
First, we will see the steps required for setting up WiFi on Raspberry Pi 3 using the Command Prompt (using SSH Connection). This type of setup is needed only if you setup Raspberry Pi in Headless Mode i.e. without monitor and keyboard.