
Servos are useful pieces of hardware that can be found in radio-controlled vehicles, industrial applications, and robots. Servos are perfect for any project where you need to control the position of an object.

In this tutorial, we will learn how to setup servos on the Raspberry Pi by building an example project that uses a graphical user interface to control the positions of four SG-90 servo motors.
How Servos Work
To understand how servos work, take a look at the internal structure of a servo:
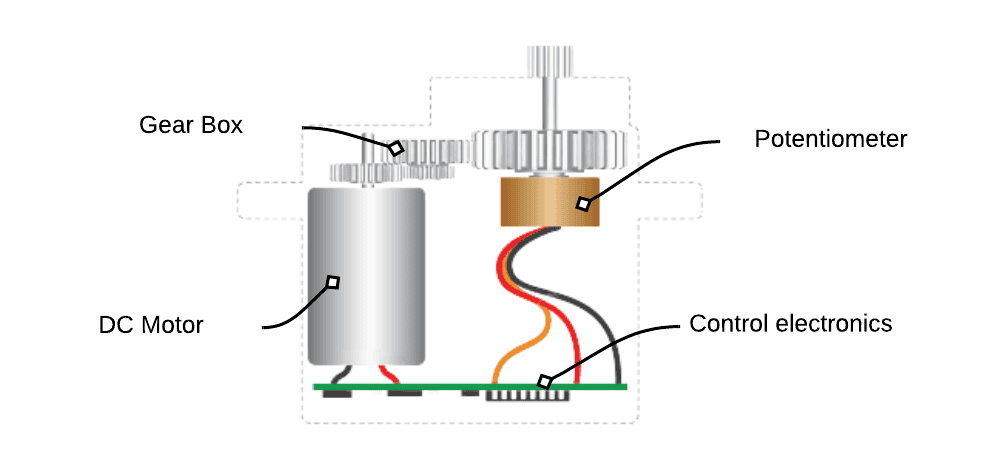
The diagram above shows the various components of a servo. Servos have a DC motor, a gearbox, control electronics, and a potentiometer.
Unlike DC motors that spin continuously in one direction, servos allow precise control of the angular position of the motor shaft between 0° and 180°. To achieve this, we make use of a feedback loop, as shown in the diagram below.

The user enters the desired position of the servo shaft by sending a pulse width modulation signal to the servo. The target position signal is then interpreted by the motor controller, which will turn the shaft. Next, the position of the shaft is measured by the potentiometer, and the result is fed back to the motor controller. The difference between the original input signal and the feedback signal is used to set the motor current in the next cycle of the feedback loop. As the difference between the two signals gets smaller, the position of the sensor shaft gets closer to the desired position
How to Power Servos
The SG-90 micro servo draws roughly 650mA of current, which is more than the Raspberry Pi’s GPIO pins can provide. The best solution is to use an external power supply to provide the current to drive the servos. A good technique is to power the servos with a 9V battery. The 9V battery can provide enough current for at least four servos.
How to Set the Position of a Servo
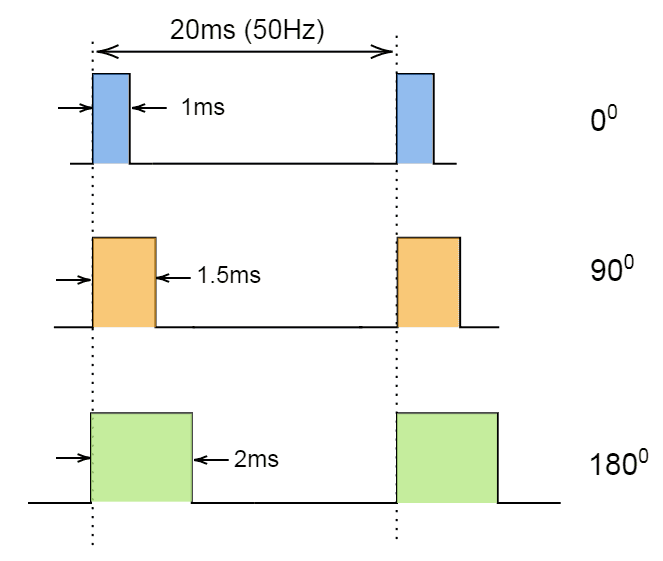
The position of a servo motor is set by adjusting the length of the high pulse (the pulse width) in a pulse width modulation signal. The servo typically accepts a 50Hz pulse width modulation signal frequency. As we can see in the diagram below, a 1ms pulse width gives a servo angle of 0°, 1.5ms pulse width moves the servo to 90° and finally, a 2ms pulse width will set the servo at 180° .
How to Connect a Servo to the Raspberry Pi
Connecting servos to the Raspberry Pi is easy. In this project we are going to connect four SG-90 micro servos to the Raspberry Pi and control the position of each servo with a graphical user interface.
These are the parts we will need:
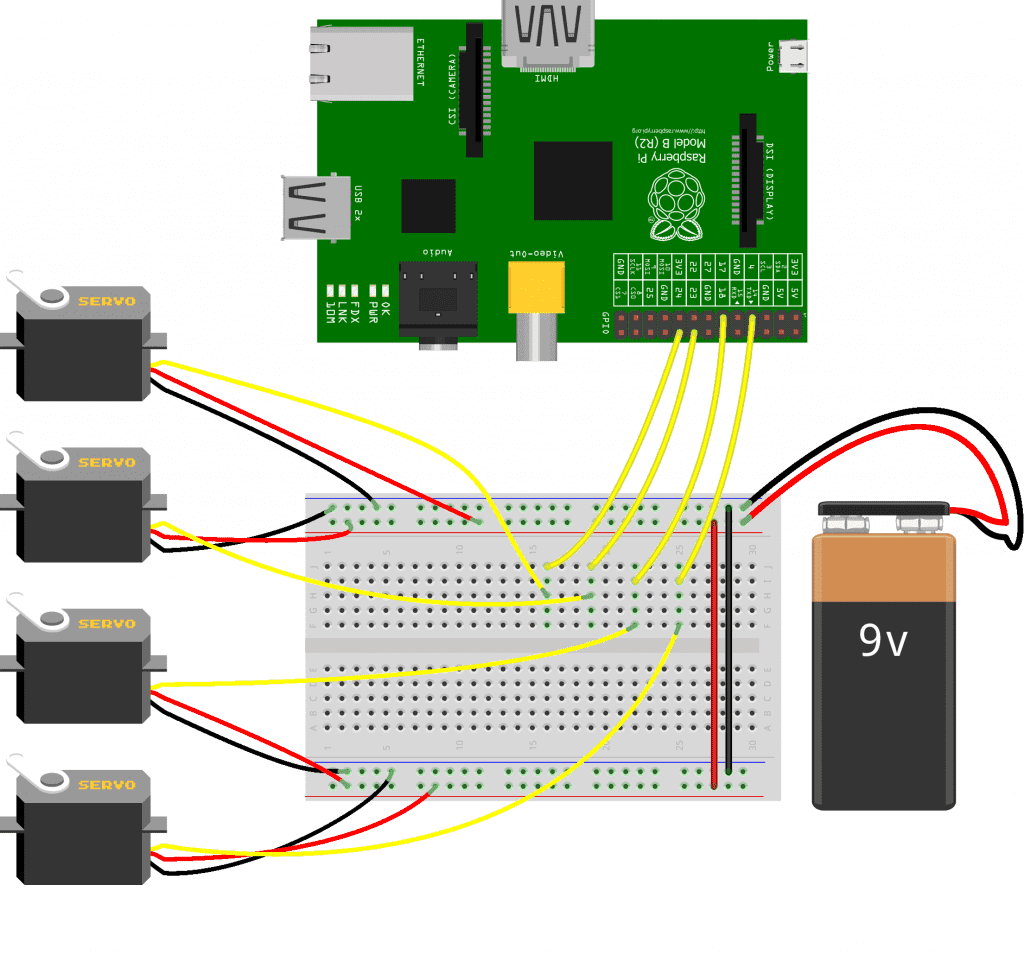
Once you have all of the parts, connect the servos to the Raspberry Pi following this wiring diagram:
SG-90 Servo Pins
The SG-90 servo motor has three wires. Each wire has a particular function, described in the table below:
| Red wire | 5V power input pin |
| Brown wire | Ground |
| Orange wire | Pulse width modulation signal input pin |
How to Program the Servo With Python
In the Python code below, we will use the AngularServo class from the gpiozero library to generate the pulse width modulation signals that control the servos.
We are also creating a simple GUI (using guizero) to control the position of the four servos individually.
Copy the code below into a text editor on the Raspberry Pi and save it as a file named “servoGui.py”:
from gpiozero import AngularServo
from guizero import App, ButtonGroup, Text

app=App(title="Servo_GUI", layout="grid")
s = AngularServo(17, min_angle=-90, max_angle=90)
s1 = AngularServo(23, min_angle=-90, max_angle=90)
s2 = AngularServo(24, min_angle=-90, max_angle=90)
s3 = AngularServo(4, min_angle=-90, max_angle=90)

def update_text():
    s.angle = int(choice.value)
    print("motor1: ", s.angle)
    s1.angle = int(choice1.value)
    print("motor2: ",s1.angle)
    s2.angle = int(choice2.value)
    print("motor3: ",s2.angle)
    s3.angle = int(choice3.value)
    print("motor4: ",s3.angle, "\n------------------------------------------------")

choice =ButtonGroup(app, options=["-90", "-45", "0", "45", "90"], selected="-90",command=update_text, grid=[1,2])
choice1 =ButtonGroup(app, options=["-90", "-45", "0", "45", "90"], selected="-90", command=update_text, grid=[2,2])
choice2 =ButtonGroup(app, options=["-90", "-45", "0", "45", "90"], selected="-90", command=update_text, grid=[3,2])
choice3 =ButtonGroup(app, options=["-90", "-45", "0", "45", "90"], selected="-90", command=update_text, grid=[4,2])

Text(app, "M1",grid=[1,1])
Text(app, "M2",grid=[2,1])
Text(app, "M3",grid=[3,1])
Text(app, "M4",grid=[4,1])
app.display()
Code Description
At the top of the program above, we initialize our app with this line of code:
app=App(title="Servo_GUI", layout="grid")Next, we create four servo motors, s, s1, s2, and s3 with this code:
s = AngularServo(17, min_angle=-90, max_angle=90)
s1 = AngularServo(23, min_angle=-90, max_angle=90)
s2 = AngularServo(24, min_angle=-90, max_angle=90)
s3 = AngularServo(4, min_angle=-90, max_angle=90)
The def update_text() function checks the value of the selected radio buttons and sets the motor direction using those values. This function only accepts integers, so we change a string to a numerical value with this code:
s.angle = int(choice.value)This line of code creates a radio button so that a user can select the desired servo angle from one of five different positions. This code is repeated four times in the program above – once for each button group:
choice =ButtonGroup(app, options=["-90", "-45", "0", "45", "90"], selected="-90",command=update_text, grid=[1,2])Run the Python program above by entering the following command into the Raspberry Pi terminal:
sudo Python3 servoGui.pyIf all goes well, you will see the following on your GUI:
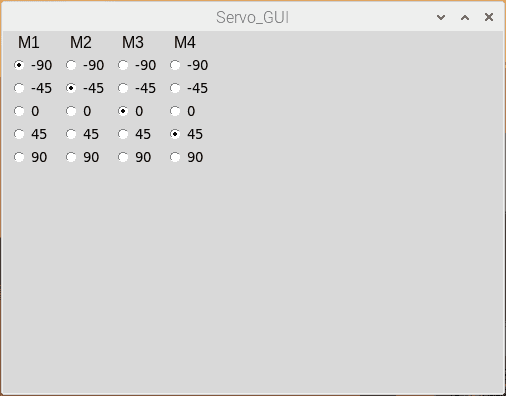
A set of radio buttons is used to control the positions of four servo motors from -90° to +90° in 45° increments.
A Better User Interface
The Python code below will simplify the menu by changing the radio buttons to sliders for each servo:
from gpiozero import AngularServo
from guizero import App, Slider, Text

app=App(title="Servo_GUI", layout="grid")
s = AngularServo(17, min_angle=-90, max_angle=90)
s1 = AngularServo(23, min_angle=-90, max_angle=90)
s2 = AngularServo(24, min_angle=-90, max_angle=90)
s3 = AngularServo(4, min_angle=-90, max_angle=90)

def update_text():
    s.angle = int(slider.value)
    print("motor1: ", s.angle)
    s1.angle = int(slider1.value)
    print("motor2: ",s1.angle)
    s2.angle = int(slider2.value)
    print("motor3: ",s2.angle)
    s3.angle = int(slider3.value)
    print("motor4: ",s3.angle, "\n------------------------------------------------")

slider =Slider(app, start=-90, end=90, command=update_text, grid=[1,2])
slider1 =Slider(app, start=-90, end=90, command=update_text, grid=[2,2])
slider2 =Slider(app, start=-90, end=90, command=update_text, grid=[3,2])
slider3 =Slider(app, start=-90, end=90, command=update_text, grid=[4,2])

Text(app, "M1",grid=[1,1])
Text(app, "M2",grid=[2,1])
Text(app, "M3",grid=[3,1])
Text(app, "M4",grid=[4,1])
app.display()
This is what the GUI will look like:
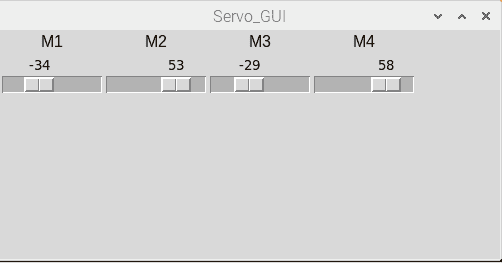
Hope this article has helped you figure out how to setup servos on the Raspberry Pi. Let us know in the comments below if you have questions about anything!


An excellent article showing how Servos work.
Personally, I would never use the RPi to control servos . I use either a Servo HAT or the UNO – thus reducing the large CPU overhead.
The Arduino is great for controlling servos as well. But one benefit of using the Raspberry Pi to control servos is that it is easier to network. The Raspberry Pi can be configured as a webserver, allowing you to control the servos remotely from a webpage.
Then use a Servo HAT if wanting to use a RPi……otherwise tprogrammed servo control would eat up the RPis resources. Idafruit has a SERVO HAT. As I wrote above, I would connect an UNO to the RPi and use the UNO as a Servo server…
Hi,
Very interesting.
Got a typo error in the paragraph “How to set the position of a servo”. Read 180 degrees intead of 1800.
Thanks for pointing that out! It’s been corrected.
Shouldn’t there be a ground lead from the Pi to the servo breadboard as well?