Recent advances in information and communication technologies have given rise to a new style of computing. In this era, external users can access capabilities such as on-demand data storage and computing power over the internet. This is commonly known as cloud computing.

In this tutorial, we will discuss the process of writing data to the cloud. We will then use an Arduino Uno, a DHT22 humidity and temperature sensor, and the ESP8266 WiFi module for writing data to the cloud. We’ll also touch on the basics such as the cloud, ThingSpeak, sending and graphing data to ThingSpeak, and setting up triggers and actions. Finally, we will build a project to demonstrate these concepts.
The Cloud
Not so long ago, hard drives, CDs, and floppy disks were the main data storage devices. However, this was disadvantageous for several reasons. Firstly, you would need to buy many external devices for backing up your data, which leads to additional costs. Secondly, an increased amount of data generated by users requires more processing power, which costs more money and requires service and maintenance resources. On the other hand, the cloud comes in handy, as it consists of collecting data centers that can be accessed through the internet. They offer services such as email, data storage, data processing, and data retrieval, which can be performed from anywhere in the world. The cloud addressed the shortcomings of external storage devices by giving users the capability to manage online resources for themselves. Now users can just rent the storage space and online services they need.
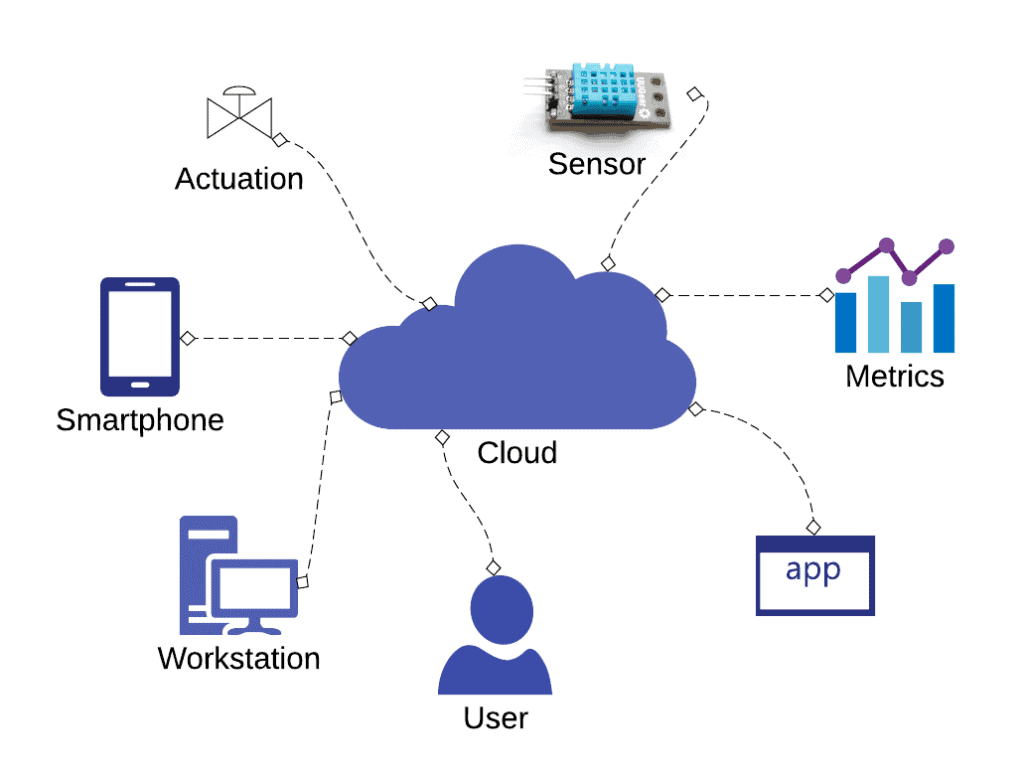
The diagram above demonstrates the concept of the IoT cloud. In general, computing, storage, and databases are handled by third-party entities on remote data centers instead of the user’s devices or infrastructure. The same files can be accessed from any device via the internet. Additionally, users are allowed to create and manage their accounts. The top cloud platforms available on the market today include:
- Amazon Web Services
- Google Cloud Platform
- Microsoft Azure
- IBM Bluemix
- Alibaba
The Internet of Things (IoT)
This brings us to another interesting topic—the Internet of Things, commonly known as simply IoT. This is an emerging field of technology where devices or objects have the ability to connect and transfer data over a network without human intervention. These objects or things have sensing capabilities, and they have unique identifiers for addressing and communication. To transfer data from the devices over the internet, cloud computing provides the infrastructure for that data to travel to its destination. Over the years, vendors have created many connected devices, and in the same vein, a lot of IoT cloud platforms have been developed. Examples of IoT cloud platforms include ThingsBoard, ThingWorx, IBM Watson IoT, Node-RED, Thinger, and ThingSpeak.
For this article, we will focus on ThingSpeak.
What is ThingSpeak?
ThingSpeak is an IoT and cloud platform that enables things or physical devices to connect to the cloud. The HTTP and MQTT communication protocols provide a connection between things and the cloud. The platform allows registered users to collect, display, analyze, make inferences, and act on the data. ThingSpeak was released to the market by ioBridge, and it now has support from MATLAB, thus, giving user access to advanced data analytics tools. Users can visualize their sensor data using MATLAB’s several built-in plots or display data in gauges, charts, or custom plots.
What ThingSpeak can do with Sensor Data
ThingSpeak allows users to analyze and visualize their sensor data. Besides simply visualizing your sensor data, the platform has built-in features that allow you to process your data. That is to integrate, convert, calculate new data, and develop IoT applications. Further tools enable data interchange between ThingSpeak and web apps or social media platforms.
How to Connect the Arduino to ThingSpeak
In this tutorial, we will use an ESP8266 WiFi module to connect our Arduino to the internet. But before we do that, we need to verify that our WiFi board works well, and there is no better way to test that other than the traditional “Hello World” program. This step is necessary to illustrate how the process of programming the ESP8266 works and ensure that the chip is operating correctly.
For this project, we would need the following components:
- Arduino Nano
- ESP8266 WiFi module
- ESP8266 breadboard adapter
- Jumper wires
- Breadboard power supply
- 9V battery
- 100 Ohm resistor
- 250 Ohm resistor
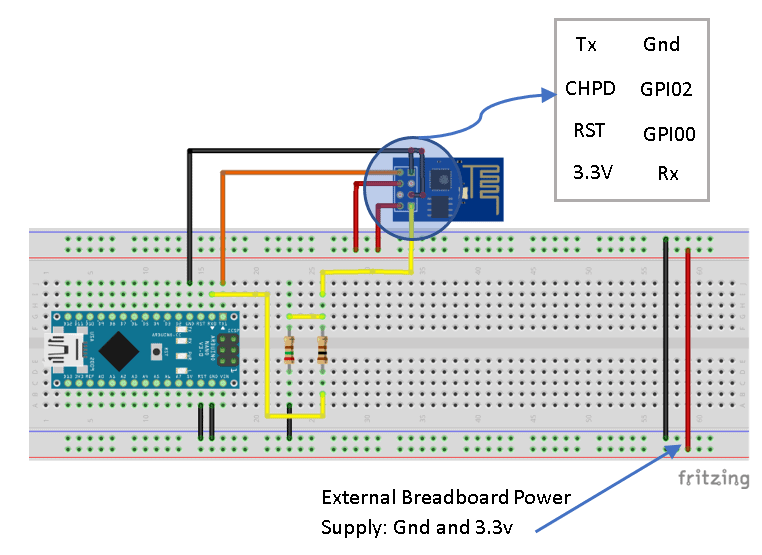
An external power source is essential because it provides the necessary power required by the ESP8266 WiFi operations. According to the datasheet, the ESP8266EX IC requires about 140mA to transmit, which, unfortunately, the Arduino Nano cannot provide. So, to ensure reliable programming and operation of the ESP8266 module, I highly recommend incorporating an external breadboard power supply to meet the WiFi module’s power requirements.
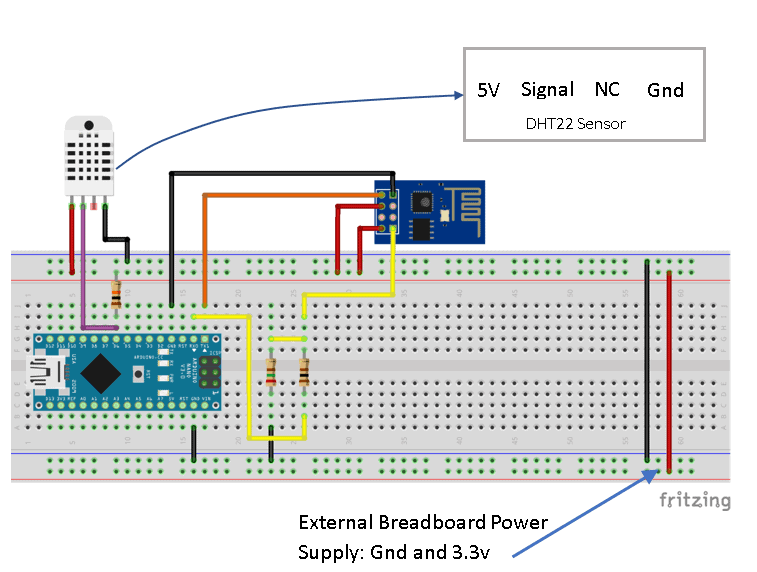
Once you have all of the components, connect everything together following the wiring diagram below:
To learn more about the Arduino, check out our Ultimate Guide to the Arduino video course. We teach Arduino programming and circuit building techniques that will prepare you to build any project.
Arduino Program
First, upload a blank sketch on our Arduino. In this tutorial, we are using the Arduino Nano. So we need to choose the correct board and take note of the correct serial port before uploading the bare-minimum sketch. This is to ensure that no program is running on our Nano.
void setup()
{

}

void loop()
{

}
Second, upload the ESP-AT command firmware on the ESP8266 WiFi module. This step is only necessary if you have loaded a different firmware on the ESP8266 while testing the module. This firmware allows us to send AT commands to the WiFi module and in turn, the module responds with the necessary output. Take note that the Arduino’s RST pin is connected to the ground. This is to ensure that we program the ESP instead.
ESP8266 Program
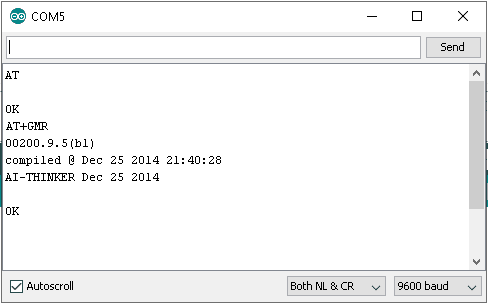
From this link, we can find the ESP8266 flasher tool and the AT firmware. Extract the zip file and run the executable esp8266_flasher.exe tool. Select the serial port of your Arduino, navigate to the firmware file ESP_8266_BIN0.92.bin, then press download. After successfully writing the AT command firmware, open the Arduino’s serial port and send the “AT” command. If all is well, the module responds with an “OK” status. We can also send an “AT+GMR” command to query the module’s firmware version. A full list of the AT commands is available here.
After successfully testing the ESP8266 (ESP8266 Hello World), the next step is to connect the Arduino to ThingSpeak:
- Register and create an account on ThingSpeak. Alternatively, you can use your existing MATLAB login credentials if you use MATLAB.
- Since we are going to log temperature and humidity data, create a new channel with two field labels – Temperature and Humidity.
- Obtain the WRITE API Key. We are going to need it for writing data to our ThingSpeak channel.
How to Send Sensor Data to ThingSpeak
To send sensor data to ThingSpeak, we first need to build another circuit with the Arduino and the ESP8266. These are the parts you will need:
- Arduino Nano
- ESP8266 WiFi module
- ESP8266 breadboard adapter
- Jumper wires
- Breadboard power supply
- 9V battery
- 100 Ohm resistor
- 250 Ohm resistor
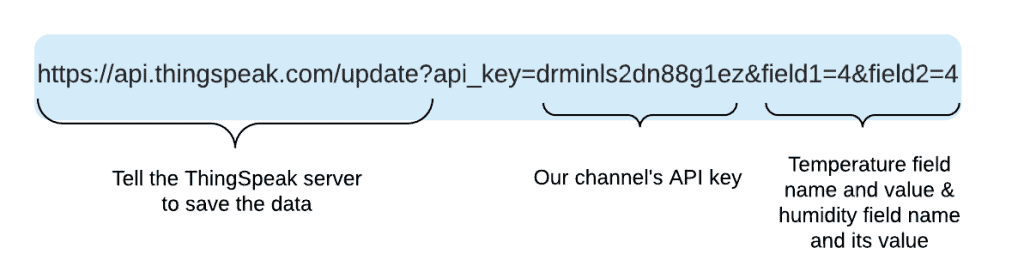
It is relatively easy to send sensor data to our ThingSpeak channel—all we need is our channel’s write API key and the sensor values. For this tutorial, since we are going to send two variables (temperature and humidity), we need to have two fields—field1 and field2. Then, encapsulate all these variables into a single URL, which we can send ourselves by typing this into a web browser:
https://api.thingspeak.com/update?api_key=drminls2dn88g1ez&field1=4&field2=4
Another way of sending this URL is through devices that can use AT commands. These are instructions that microcontrollers or any embedded devices use to control any AT compatible transceiver.
How to Graph Sensor Data on ThingSpeak
In this article, we have mentioned that we can use ThingSpeak to collect, visualize, and analyze our sensor data. Now that we have collected our data from the DHT22 sensor, we need to visualize it. ThingSpeak offers us the ability to either use the built-in visualization plots or create our own custom plots. In this section, we use the following MATLAB code to create our own visualization graph. We are going to plot the temperature variation and the humidity variation on the same plot for comparison.
To graph our sensor data on ThingSpeak, click on the MATLAB visualization tab, and select the custom (no starter code) radio button. You will be directed to an online editor. Copy and paste the MATLAB code below to create a custom visualization plot.
readChannelID = 1109284;
fieldID1 = 1;
fieldID2 = 2;
readAPIKey = 'BYW217LCLBT8UCSA';

[data1, time1] = thingSpeakRead(readChannelID, 'Field', fieldID1, 'NumPoints', 30, 'ReadKey', readAPIKey);
[data2, time2] = thingSpeakRead(readChannelID, 'Field', fieldID2, 'NumPoints', 30, 'ReadKey', readAPIKey);

yyaxis left;
plot(time1, data1,'-*','LineWidth',2)
ytickformat('%.2f')
ylabel('Temperature [^0C]')
xlabel('Date')

yyaxis right;
plot(time2, data2,'-o','LineWidth',2);
ytickformat('%.2f')
ylabel('Humidity [%]')
legend({'Temperature','Humidity'},'Location', 'northwest')
grid on
MATLAB Code Explanation
In the MATLAB code to visualize our sensor data, the first thing we need is to read the data from our channel. So for that, we would need to pass the channel ID to our program readChannelID = 1109284.
Then we pass the read API key to our program readAPIKey = 'BYW217LCLBT8UCSA'. This API key enables our program to read the temperature data from our channel.
Next, we write a function that retrieves the data from our channel and saves that information into two variables: temperature variable (data1) and date variable (time1). This function is called thingSpeakRead() function, and it accepts four parameters— the channel ID, field ID, number of points, and the read API key. [data1, time1] = thingSpeakRead(readChannelID, 'Field', fieldID1, 'NumPoints', 30, 'ReadKey', readAPIKey).
Lastly, we plot the temperature against the date on a 2D plot using the MATLAB functionplot(time1, data1,'-*','LineWidth',2). The rest of the code is just mere cosmetics which we use to make our plots look nicer.
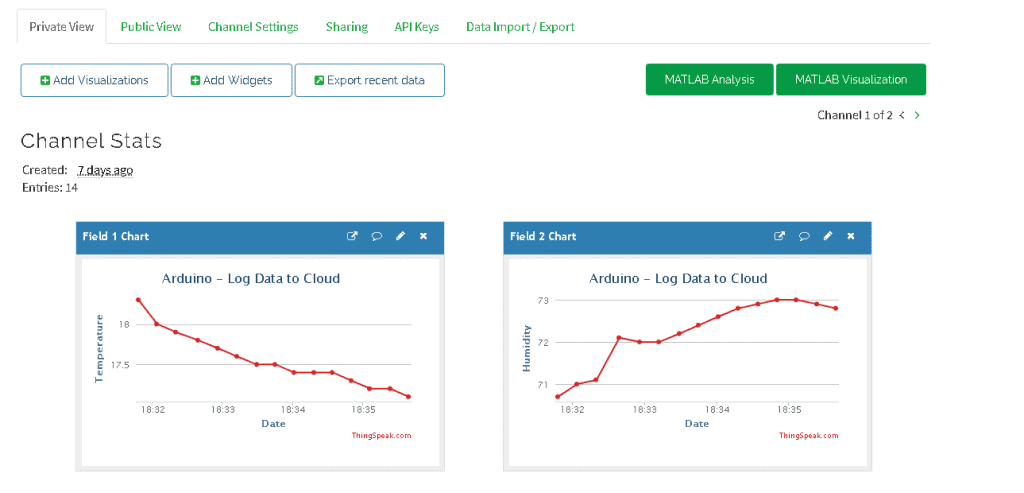
The result is shown on a 2D plot in the diagram below.
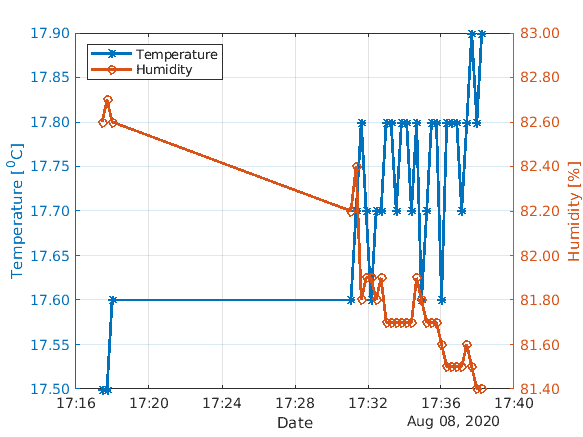
Our options are not just limited to creating 2D plots. There are so many ways we can use to graph the sensor data. For reference, you can use the method we have shown above to build your own custom plots.
How to Set Threshold Limits and Trigger an Email
We can also set conditions to trigger reactions when set thresholds have been exceeded. One is to trigger an email when our sensor data goes beyond a certain level. Here, we will attempt to send an email when the temperature exceeds 30 degrees Celsius. To enable email alerts on our channel, we do the following:
- Obtain the ThingSpeak Alerts API key by clicking the account tab, then clicking on ‘My Profile.’
- Create a new analysis by clicking on MATLAB analysis, and then create a new analysis.
- Choose a blank template and then paste the following code. Take note to replace the Alert API Key with your channel’s.
alert_body = 'Room temperature too high, consider reducing it...';alert_subject = 'Room temperature';alert_api_key = 'TAK5NZV7NM4NUW27B1XG';alert_url= "https://api.thingspeak.com/alerts/send";jsonmessage = sprintf(['{"subject": "%s", "body": "%s"}'], alert_subject,alert_body);options = weboptions("HeaderFields", {'Thingspeak-Alerts-API-Key', alert_api_key; 'Content-Type','application/json'});result = webwrite(alert_url, jsonmessage, options);Next, we create a React that will be connected to the Analysis that we have created above. Below is the form we use to create new React.
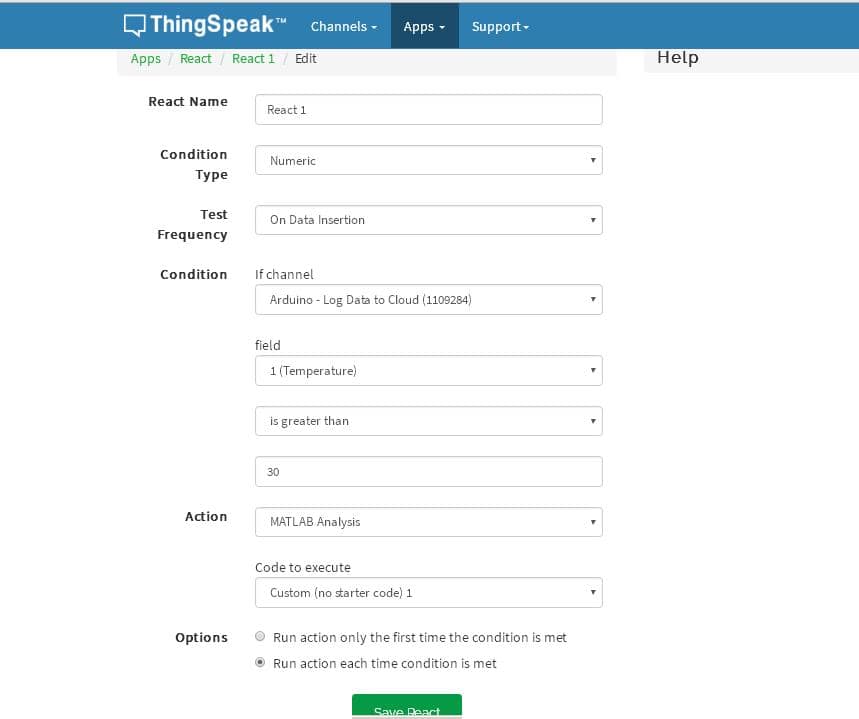
When everything has been set up correctly, we should receive an email alert when the temperature goes beyond a certain level.
Example Project
Now, let’s combine what we have done so far to create a project that logs sensor data to the cloud using Arduino Nano, DHT22 and ESP8266 WiFi module.
These are the parts you will need:
- Arduino Nano
- ESP8266 WiFi module
- DHT22 humidity and temperature sensor
- ESP8266 breadboard adapter
- Jumper wires
- Breadboard power supply
- 9V battery
- 100 Ohm resistor
- 250 Ohm resistor
- 10K Ohm resistor
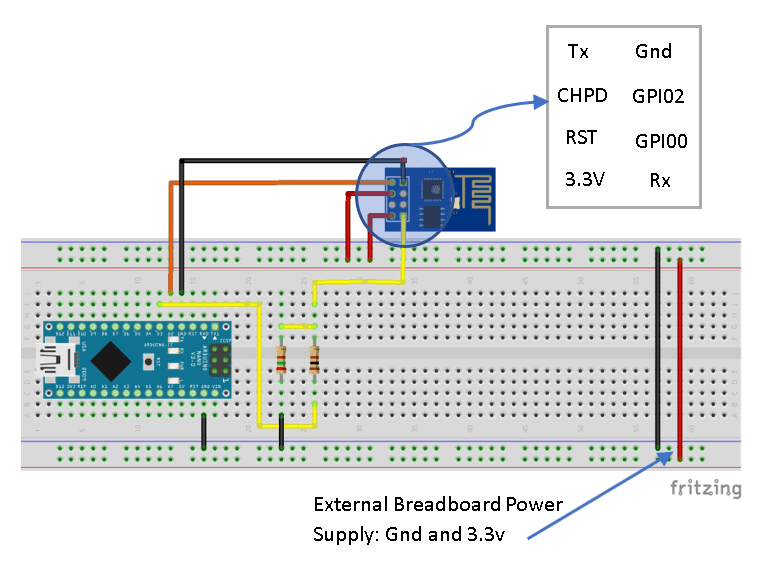
And here is how we are going to connect the components:
Next, we use the following code for the Arduino to send sensor data to the cloud by using the ESP8266 WiFi module.
#include <SoftwareSerial.h>
#define RX 2
#define TX 3
#include "DHT.h"
#define DHTPIN 6
#define DHTTYPE DHT22

DHT dht(DHTPIN, DHTTYPE);

String AP = "AndroidAP_7822";
String PASS = "485088c2825f";
String API = "DRMINLS2DN88G1EZ";
String HOST = "api.thingspeak.com";
String PORT = "80";
String field1 = "field1";
String field2 = "field2";
int countTrueCommand;
int countTimeCommand;
boolean found = false;
float TempSensor = 1;
float HumidSensor = 1;
SoftwareSerial esp8266(RX,TX);


void setup() {
  Serial.begin(9600);
  esp8266.begin(9600);
  dht.begin();
  delay(1000);
  sendCommand("AT",5,"OK");
  sendCommand("AT+CWMODE=1",5,"OK");
  sendCommand("AT+CWJAP=\""+ AP +"\",\""+ PASS +"\"",20,"OK");
}

void loop() {
 TempSensor = getTempData();
 HumidSensor = getHumidData();
 String getData = "GET /update?api_key="+ API +"&"+ field1 +"="+String(TempSensor)+"&"+ field2 +"="+String(HumidSensor);
sendCommand("AT+CIPMUX=1",5,"OK");
 sendCommand("AT+CIPSTART=0,\"TCP\",\""+ HOST +"\","+ PORT,15,"OK");
 sendCommand("AT+CIPSEND=0," +String(getData.length()+4),4,">");
 esp8266.println(getData);delay(1500);countTrueCommand++;
 sendCommand("AT+CIPCLOSE=0",5,"OK");
}

float getTempData(){
    delay(2000);
    float t = dht.readTemperature();
    if (isnan(t)) {
      Serial.println("Failed to read from DHT sensor!");
      return 0;
    }
    return t;
}
float getHumidData(){
    delay(2000);
    float h = dht.readHumidity();
    if (isnan(h)) {
        Serial.println("Failed to read from DHT sensor!");
        return 0;
    }
    return h;
}

void sendCommand(String command, int maxTime, char readReplay[]) {
  Serial.print(countTrueCommand);
  Serial.print(". at command => ");
  Serial.print(command);
  Serial.print(" ");
  while(countTimeCommand < (maxTime*1))
  {
    esp8266.println(command);//at+cipsend
    if(esp8266.find(readReplay))//ok
    {
      found = true;
      break;
    }

    countTimeCommand++;
  }

  if(found == true)
  {
    Serial.println("OK");
    countTrueCommand++;
    countTimeCommand = 0;
  }

  if(found == false)
  {
    Serial.println("Fail");
    countTrueCommand = 0;
    countTimeCommand = 0;
  }

  found = false;
 }
Explanation of the Code
sendCommand("AT",5,"OK"); sendCommand("AT+CWMODE=1",5,"OK"); sendCommand("AT+CWJAP=\""+ AP +"\",\""+ PASS +"\"",20,"OK"); are initiated by the Arduino to command the ESP8266 to enter station mode (AT+CWMODE=1), and connect to the access point and password.
TempSensor = getTempData(); HumidSensor = getHumidData(); are functions to query the DHT22 for temperature and humidity information.
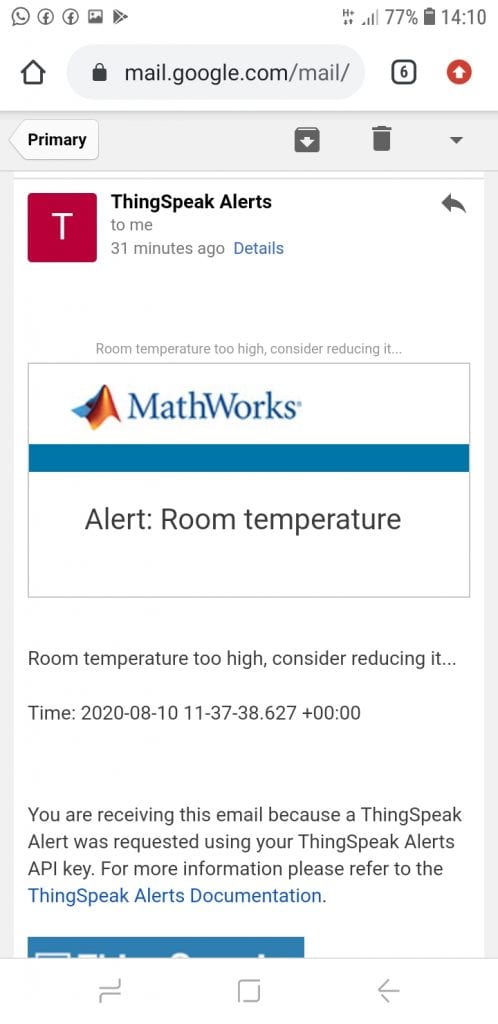
String getData = "GET /update?api_key="+ API +"&"+ field1 +"="+String(TempSensor)+"&"+ field2+"="+String(HumidSensor); is how the Arduino commands the ESP module to send this URL https://api.thingspeak.com/update?api_key=drminls2dn88g1ez&field1=4&field2=4.
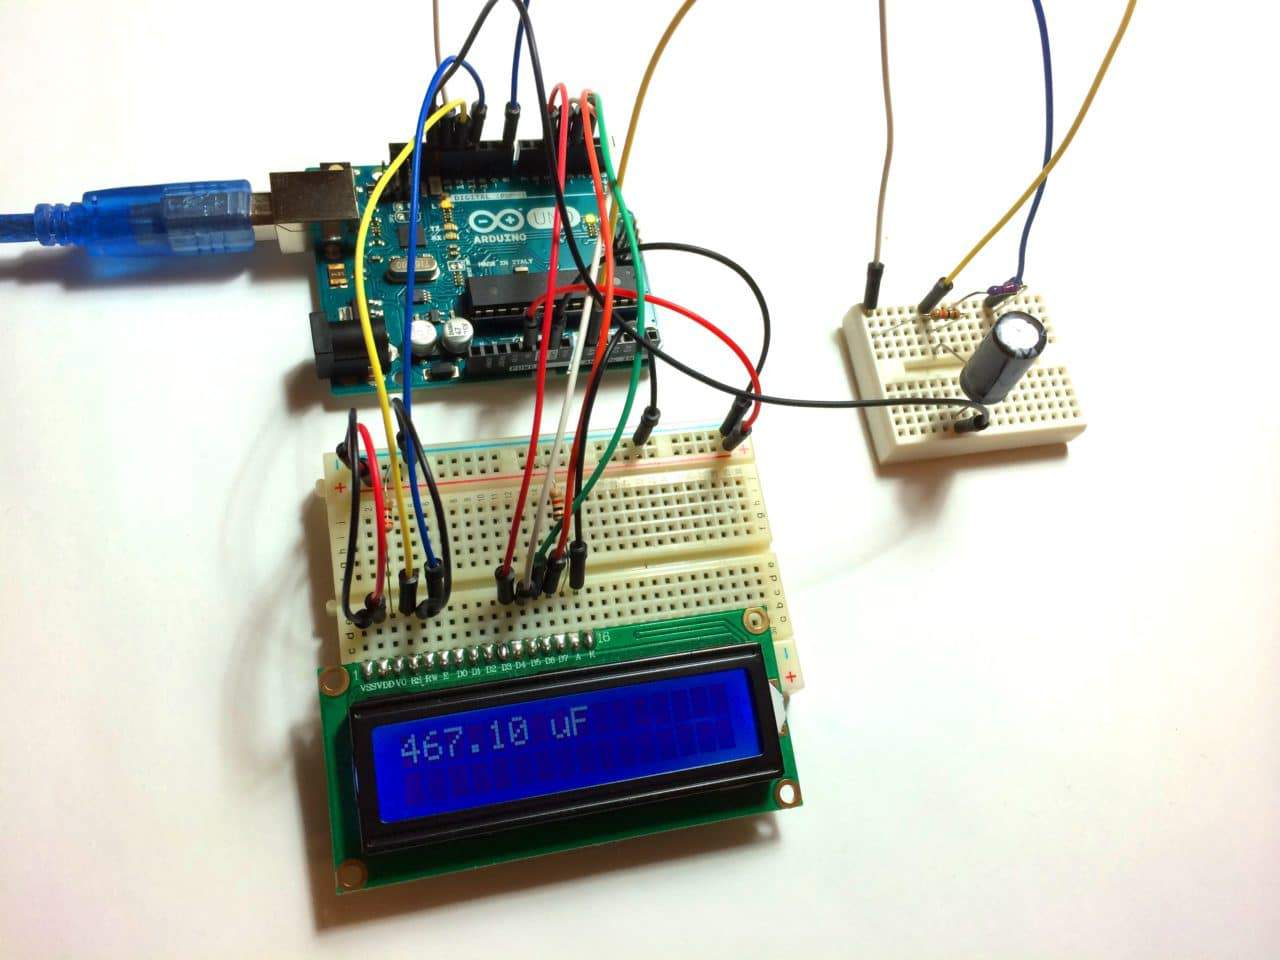
The result is shown in the image below:
In the future, we hope to develop a long-term battery powered project to investigate Arduino’s power saving modes. Feel free to leave a comment below if you have questions about anything!


First of all thanks for this amazing article
second I want to know what will be changed if I want to read not write
of course the read API but what else
thanks in advanced
Thank you Mustafa. You can read data from your ThingSpeak channel and display the data on your LCD or serial monitor. Do let me know if this is something that you would like to look at :-)
first of all, thank you for your reply
second, yes I want to read field from thing speak but not show in the display I will use the read value to control motor
can you post your mail to be able from sending some data for you
thanks in advance
Im having problems with programming my esp8266. I checked from device manager that my arduino nano is connected to COM3. In ESP8266 flash downloader I changed the port to COM3, selected the correct bin file, but it did not work. It created a log file that reads: “ValueError: Cannot configure port, some setting was wrong.” Do I need to change something in text field that says 0x00000 by default?