Note: This tutorial is for the Raspberry Pi 2 and earlier versions that need a USB WiFi adapter. To set up WiFi on the Raspberry Pi 3, please see this tutorial.

In a previous tutorial, I explained how to establish an SSH connection to your Raspberry Pi over ethernet without using an external keyboard or monitor. Connecting with an ethernet cable, is great if you want to leave it connected to your router with a physical cable. But I prefer to use WiFi, which gives me a lot more flexibility with where I can keep my Pi while it’s running.
Be careful when choosing a WiFi adapter for the Raspberry Pi though, because not all of them will work out of the box. I found that this one on Amazon works great without any driver installations needed.
Still, there are a couple things that need to be set up for any WiFi adapter to work properly with your Raspberry Pi. I’ll go through them step by step in this article. You should already have set up the SSH connection over ethernet, as described in this post.
This video will walk you through the steps, but see below for more details:
Edit the Network Interfaces File
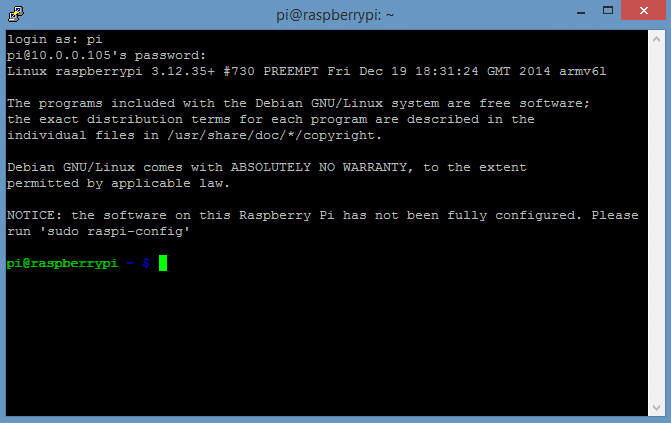
With your USB WiFi adapter plugged into the Pi, power up the Pi and connect it to your internet router with an ethernet cable just like we did in the last tutorial. Now SSH into your Pi with PuTTY, and get to the command prompt:
We’ll need to change a few things in the /etc/network/interfaces file.
To edit this file, we’ll use the Raspbian text editor Nano. Enter this at the command prompt to edit the file:
sudo nano /etc/network/interfaces
Pro Tip: If you ever want to copy something from your laptop/desktop and paste it into PuTTY, just copy it, then right click with your mouse where you want to paste it into PuTTY.
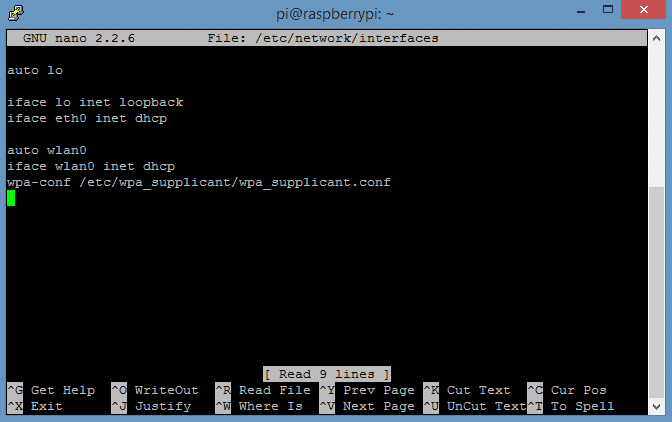
Replace the code in the file with this code:
auto lo

iface lo inet loopback
iface eth0 inet dhcp

auto wlan0
iface wlan0 inet dhcp
wpa-conf /etc/wpa_supplicant/wpa_supplicant.conf
Afterwards, the file should look like this:
Then type Ctrl-X to exit, and Y to save the changes.
Edit the wpa_supplicant.conf File
Now we need to make some changes to the /etc/wpa_supplicant/wpa_supplicant.conf file. Open the file in Nano by entering this at the command prompt:
sudo nano /etc/wpa_supplicant/wpa_supplicant.conf
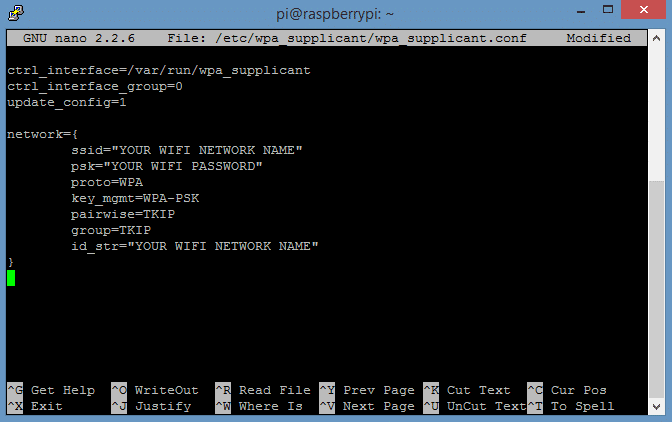
Replace the code in the file with this code:
ctrl_interface=/var/run/wpa_supplicant
ctrl_interface_group=0
update_config=1

network={
        ssid="YOUR WIFI NETWORK NAME"
        psk="YOUR WIFI PASSWORD"
        proto=WPA
        key_mgmt=WPA-PSK
        pairwise=TKIP
        group=TKIP
        id_str="YOUR WIFI NETWORK NAME"
}
The file should look like this:
The entry for ssid="YOUR WIFI NETWORK NAME" is the name of your wireless network, typed exactly as it appears when you connect to your WiFi from another computer. The letters are case sensitive, and the ” ” marks should be left in.
The entry for psk="YOUR WIFI PASSWORD" is the password you normally use to login to the network.
Re-enter your network name in the id_str="YOUR WIFI NETWORK NAME" line.
Now press Ctrl-X and Y to exit and save changes to the file.
Now shutdown the Pi by entering sudo poweroff at the command prompt. Unplug the Pi from power, and disconnect the ethernet cable from your internet router. Now restart the Pi.
Find the New Local IP Address
Up to this point we were SSHing to the Pi with the local IP address on the ethernet port. The IP will be different on WiFi, so you’ll need to use Advanced IP Scanner to find the new one. Once you get that, SSH with PuTTY using the IP address for the WiFi port.
Test the WiFi Connection
After you log back into the Pi, check the status of your WiFi connection by typing iwconfig at the command prompt. Your WiFi network name should appear under ESSID: "YOUR WIFI NETWORK NAME", in my case it’s "Siamese". If your WiFi connection is successful, you’ll see a message like this:
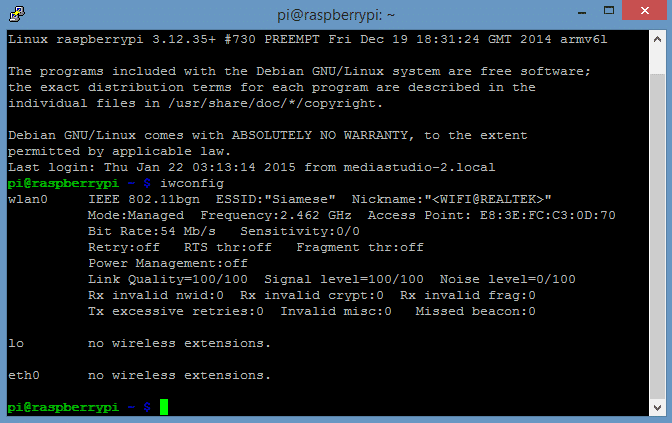
If you see something like Link Quality=0/100 or Signal Level=0/100 in the wlan0 section, it means the Pi isn’t connected to WiFi. Go back and make sure that you have entered everything exactly as it’s shown in the images.
Another way to test your Pi’s WiFi connection to the internet is by pinging Google. Do this by entering sudo ping www.google.com:

PuTTY is great if all you need to do is access your Raspberry Pi from the command line. However, many features are only available through the Raspbian desktop. In order to access the desktop remotely, we need to install and configure a Remote Desktop Connection. Read How to Access the Raspberry Pi Desktop With a Remote Desktop Connection for a tutorial on how to do that.
Thanks for reading! Feel free to leave a comment if you’re having trouble setting this up and I’ll do my best to help you out. And be sure to subscribe to get an email when we publish new tutorials!


Wonderful articles! I am waiting for the courier of my new Raspberry Pi 2. And…I have ordered a new dongle called as EDUP EP-N8553. I know that time will answer that..but do you think it will work with the above method?
I am a Doctor and excited to tinker and create some wifi medical gadgets with my Pi.
Thanks in advance!
Great! Hard to say if it will work or not, but I imagine it will. Have fun with your new Pi!
Thank you for the tutorials. You are awesome
it doesnt show wlan0 on iwconfig and if i type sudo iwlist etc…… it says :”Interface doesnt support scanning”
The same thing happened with me
pi@raspberrypi:~ $ sudo iwlist wlan0 scan | grep ESSID
pi@raspberrypi:~ $ sudo iwlist wlan0 scan
wlan0 No scan results
pi@raspberrypi:~ $ iwconfig
wlan0 unassociated Nickname:””
Mode:Managed Frequency=2.412 GHz Access Point: Not-Associated
Sensitivity:0/0
Retry:off RTS thr:off Fragment thr:off
Power Management:off
Link Quality:0 Signal level:0 Noise level:0
Rx invalid nwid:0 Rx invalid crypt:0 Rx invalid frag:0
Tx excessive retries:0 Invalid misc:0 Missed beacon:0
lo no wireless extensions.
eth0 no wireless extensions.
This is awesome, simple and clear, good job!
Why this page goes down it was a great help,
It happen 1 hour after I put this link in this forum
These tutorials are the best.
Thanks
Where is the problem that someone placing links here? your page raspberry-pi-basics-setup-without-monitor-keyboard-headless-mode have disappeared. put it working again for more peopple see your great tutorials
I’m not sure, it may have been an issue with my server. But by all means feel free to share any of our tutorials! Thanks!
Wireless networks don’t always show up as wlan[x]. Sometimes they show up as eth[x]. A dongle should never shift from one to the other, but if yours appears to be unrecognized, see if it’s eth[x] instead. If that happened, set up your configuration using eth2 (or whatever) instead of wlan0.
If you don’t plan on taking your Pi on the road, give it a static IP address. No more having to discover its IP every time it powers up or reboots. You can always do this in the Pi’s network configuration, but you might be able to have the router reserve an IP for a given MAC. If you do the former, it would be a good idea to set the router’s DHCP configuration to not assign some IPs so they can be used for static IP devices.
Very grateful for this article. However I ran into a problem with the scan command (got the message that the device could not be scanned) and eventually followed some advice just to make a couple of lines change to the wpa_supplicant.conf file (adding the network name and password to the end of that file and leaving the other file alone). This worked immediately with my Raspberry Pi wifi dongle. I am using the latest version of Raspian. Maybe the OS has been updated since your article, so I am just writing this here in case it’s useful to others.
Your articles here and subsequently are extremely useful – thank you.
I trust that I leave the quote marks on the “ssid” and “password”?
Mine shows Interface Doesn’t Support Scanning (RPi B Model) with
a StarTech USB2.0 to IEEE 802.11N adapter (150WN1X1)
After IWCONFIG, it says No Wireless Extensions…?
Kindly elaborate how to “cut & paste” from your article into the Raspbian text editor, Nano please
You LITERALLY highlight the code you want and COPY it (ie hit Control-C). You then place the mouse into the PUTTY window and right-click. Presto
You can copy anything from your desktop by using the usual Ctrl-C or right click and “copy”. Then to paste it into nano, all you need to do is right click your mouse and the text will be pasted in.
Thank you for the very detailed tutorial(s) I just started w/the Raspberry Pi 3 – and am wondering if the configuring the WIFI of this unit would be different – as it has an internal dongle – which I assume is active all the time…
I followed yr instructions and even though I have a NIC connection, after rebooting – no WIFI is found.
When I type iwconfig, this is what I get:
wlan0 IEEE 802.11bgn ESSID:off/any
Mode:Managed Access Point: Not Associated Tx-Power=1496 dBM
Retry short limit:7 RTS thr:off Fragment thr:off
Power Management:on
lo no wireless extensions.
eth0 no wireless extensions.
Yep, the set up for the RPi 3 is different, and a bit easier too. I’ve just posted a new tutorial on how to set up WiFi on the Pi 3: https://www.circuitbasics.com/how-to-set-up-wifi-on-the-raspberry-pi-3/
Trying to hook up wireless to pi2. Have copied and pasted your instructions to my terminal. When I remove the eth cable and try to use wireless, this is what I get. The $ iwconfig was completed with the eth cable hooked up. Then powered off, removed power cord and eth cable, inserted wifi dongle (Edimax) and tried to ssh back into pi with no luck. Any suggestions? Tried to scan ip and could not locate. Used the ip and worked with the eth cable attached. Thank you for your help and tutorials. Don
st login: Fri Apr 1 14:55:59 2016
pi@raspberrypi:~ $ iwconfig
wlan0 unassociated Nickname:””
Mode:Auto Frequency=2.412 GHz Access Point: Not-Associated
Sensitivity:0/0
Retry:off RTS thr:off Fragment thr:off
Power Management:off
Link Quality:0 Signal level:0 Noise level:0
Rx invalid nwid:0 Rx invalid crypt:0 Rx invalid frag:0
Tx excessive retries:0 Invalid misc:0 Missed beacon:0
lo no wireless extensions.
eth0 no wireless extensions.
pi@raspberrypi:~ $ sudo poweroff
Connection to 207.88.171.245 closed by remote host.
Connection to 207.88.171.245 closed.
207:~ donrowen$ ssh pi@207.88.171.245
ssh: connect to host 207.88.171.245 port 22: Operation timed out
207:~ donrowen$
What if our wifi network doesn’t need a password?
Excellent article . Just as the first article on headless installation of raspbian OS . This one too rocks.!!
thk u for this fantastic video
I wanted to send image from IPad3 or iPad pro using HDMI OPTION VIA WIRELESS TO MANY LCD MONTORS
CAN THE Pi2 support?
pls advice
thks & regards
Steven
I can FIND all my networks, but I consistently get a “wlan0 not associated” – I wonder if my router is not handing out credentials? Could that have to do with my WiFi location? (it persistently wants to be in the UK, not the US). I have this problem for the Pi1, Pi2 and Pi3 with two different dongles. Note that nothing else has ever had problems connecting to my network…
Any ideas?
your networks are WEP or WPA-PSK? I think that if you have a modem with WEP security, you going to have problems with the WIFI, I have a modem with WEP and i cant connect even if I change the configuration to WPA-PSK, I have the theory that the raspberry cant recognize that the password is other, becasuse it works with the default password even you change the configuration to WPA-PSK, tryed with a modem that the default configuration be WPA-PSK
Check out this blog, the author got his WiFi working with WEP encryption: https://jeffskinnerbox.wordpress.com/2012/11/05/wifi-support-on-raspberry-pi/comment-page-1/#comment-1959
They also offer some other ideas in this thread on the RPi Forums: https://www.raspberrypi.org/forums/viewtopic.php?f=91&t=9612
Thanks for the tutorial. It definitely helps. Can you please tell if this wifi dongle can be set in monitor mode to sniff all the packets? The broadcom wifi chip on Pi3 doesn’t allow to be set in monitor mode. I am looking for an economical alternative.
how to connect wifi on raspberry pi 3 model B?
give me procedure in detail
Another easy to follow tutorial, many thanks ( again) :-)
I can’t get mine to work, I’ve tried about 10 different tutorials…I can see the wifi ESSID that I need, I tried this back and forth and I can’t figure it out.
I am having the same issue; i.e. I can see our network but never get a connection with the latest version of Debian –> Jennie. I did try the older version (Wheezy) and that worked right out of the gate. My conclusion: there are changes to the way it all works that the majority of tutorials do not address as they were written for the older versions of Debian. I’ve read and tried many of them. I’m going to put my notes here as this forum/thread shows more recent activity and isn’t hard to post in.
Mike
The steps above do still work for Raspbian Jessie released 3-2-17. I just set it up on my Pi 2 to check. Were you able to find a solution to your connection problem?
First attempt: follow advise above and change the security on our wireless router
And what happend if the internet is a WEP instead a WPA-PSK, in WEP doesnt have TKIP,, Well i tryed to change the configuration from WEP to WPA-PSK and i do all the process in the tutorial, could you help me please
Try going through the steps in this tutorial: https://jeffskinnerbox.wordpress.com/2012/11/05/wifi-support-on-raspberry-pi/comment-page-1/#comment-1959
He seems to have gotten WiFi set up with WEP encryption. There’s also this thread from the Raspberry Pi Forums:
https://www.raspberrypi.org/forums/viewtopic.php?f=91&t=9612
how to connect raspberry pi to android mobile hotspot
tks a lot great help
This is NOT appropriate for RP 3 which has the built in WiFi. With the RP3, you need to use the desk top to set up the network (rop, right hand corner for WiFi icon).
The set up is different for the RPi 3, so I’ve just written a new guide on how to set it up. You can set it up with the desktop, but if you’re Pi is headless you can also use the command line: https://www.circuitbasics.com/how-to-set-up-wifi-on-the-raspberry-pi-3/
I wanted to setup WiFi on my pi and followed ur steps.Now it is not working with the dongle after changing those files . Plz tell what to do asap I worrying that how it will be corrected.
if i set my pi to my house wifi can it access other wifi also (provided i set it to access it in the same way) or once it is set will it wirelessly access only one wifi?
After doing this process my putty not accepting any address for wlan0 or wifi id’s
And also not login my wifi id’s. why??
USB WiFi adapter into one of the free USB ports on the Raspberry Pi. Power up the Raspberry Pi – remember at this point the WiFi adapter does not work yet. You are still going to need some other means of being able to control the Raspberry Pi either via a keyboard or remotely using a wired network connection.
I would suggest that you include a publish DATE on your articles. It is now April 23, 2021 and everything in this article seems to be very out of date.
Even better would be to update this article with all of the most recent data available and with a publish date.
Thanks.