Loops are used to control the flow of a program. In a loop, a block of code is executed over and over again. Each cycle of the loop is called an iteration of the loop. Depending on certain conditions that you can define in the code, you can control whether the program enters the loop or not.

Every Arduino sketch has at least one loop – the main loop or void loop() section. But it can be very useful to have other loops operating inside of the main loop.
In this article, we will discuss while loops, do while loops, for loops. We will see how to use these loops in an Arduino program with an example project that blinks an LED only when a button is pressed. We will also see how to perform operations like setting the pin modes of multiple pins at the same time with a for loop.
Watch the video for this tutorial here:
While Loops
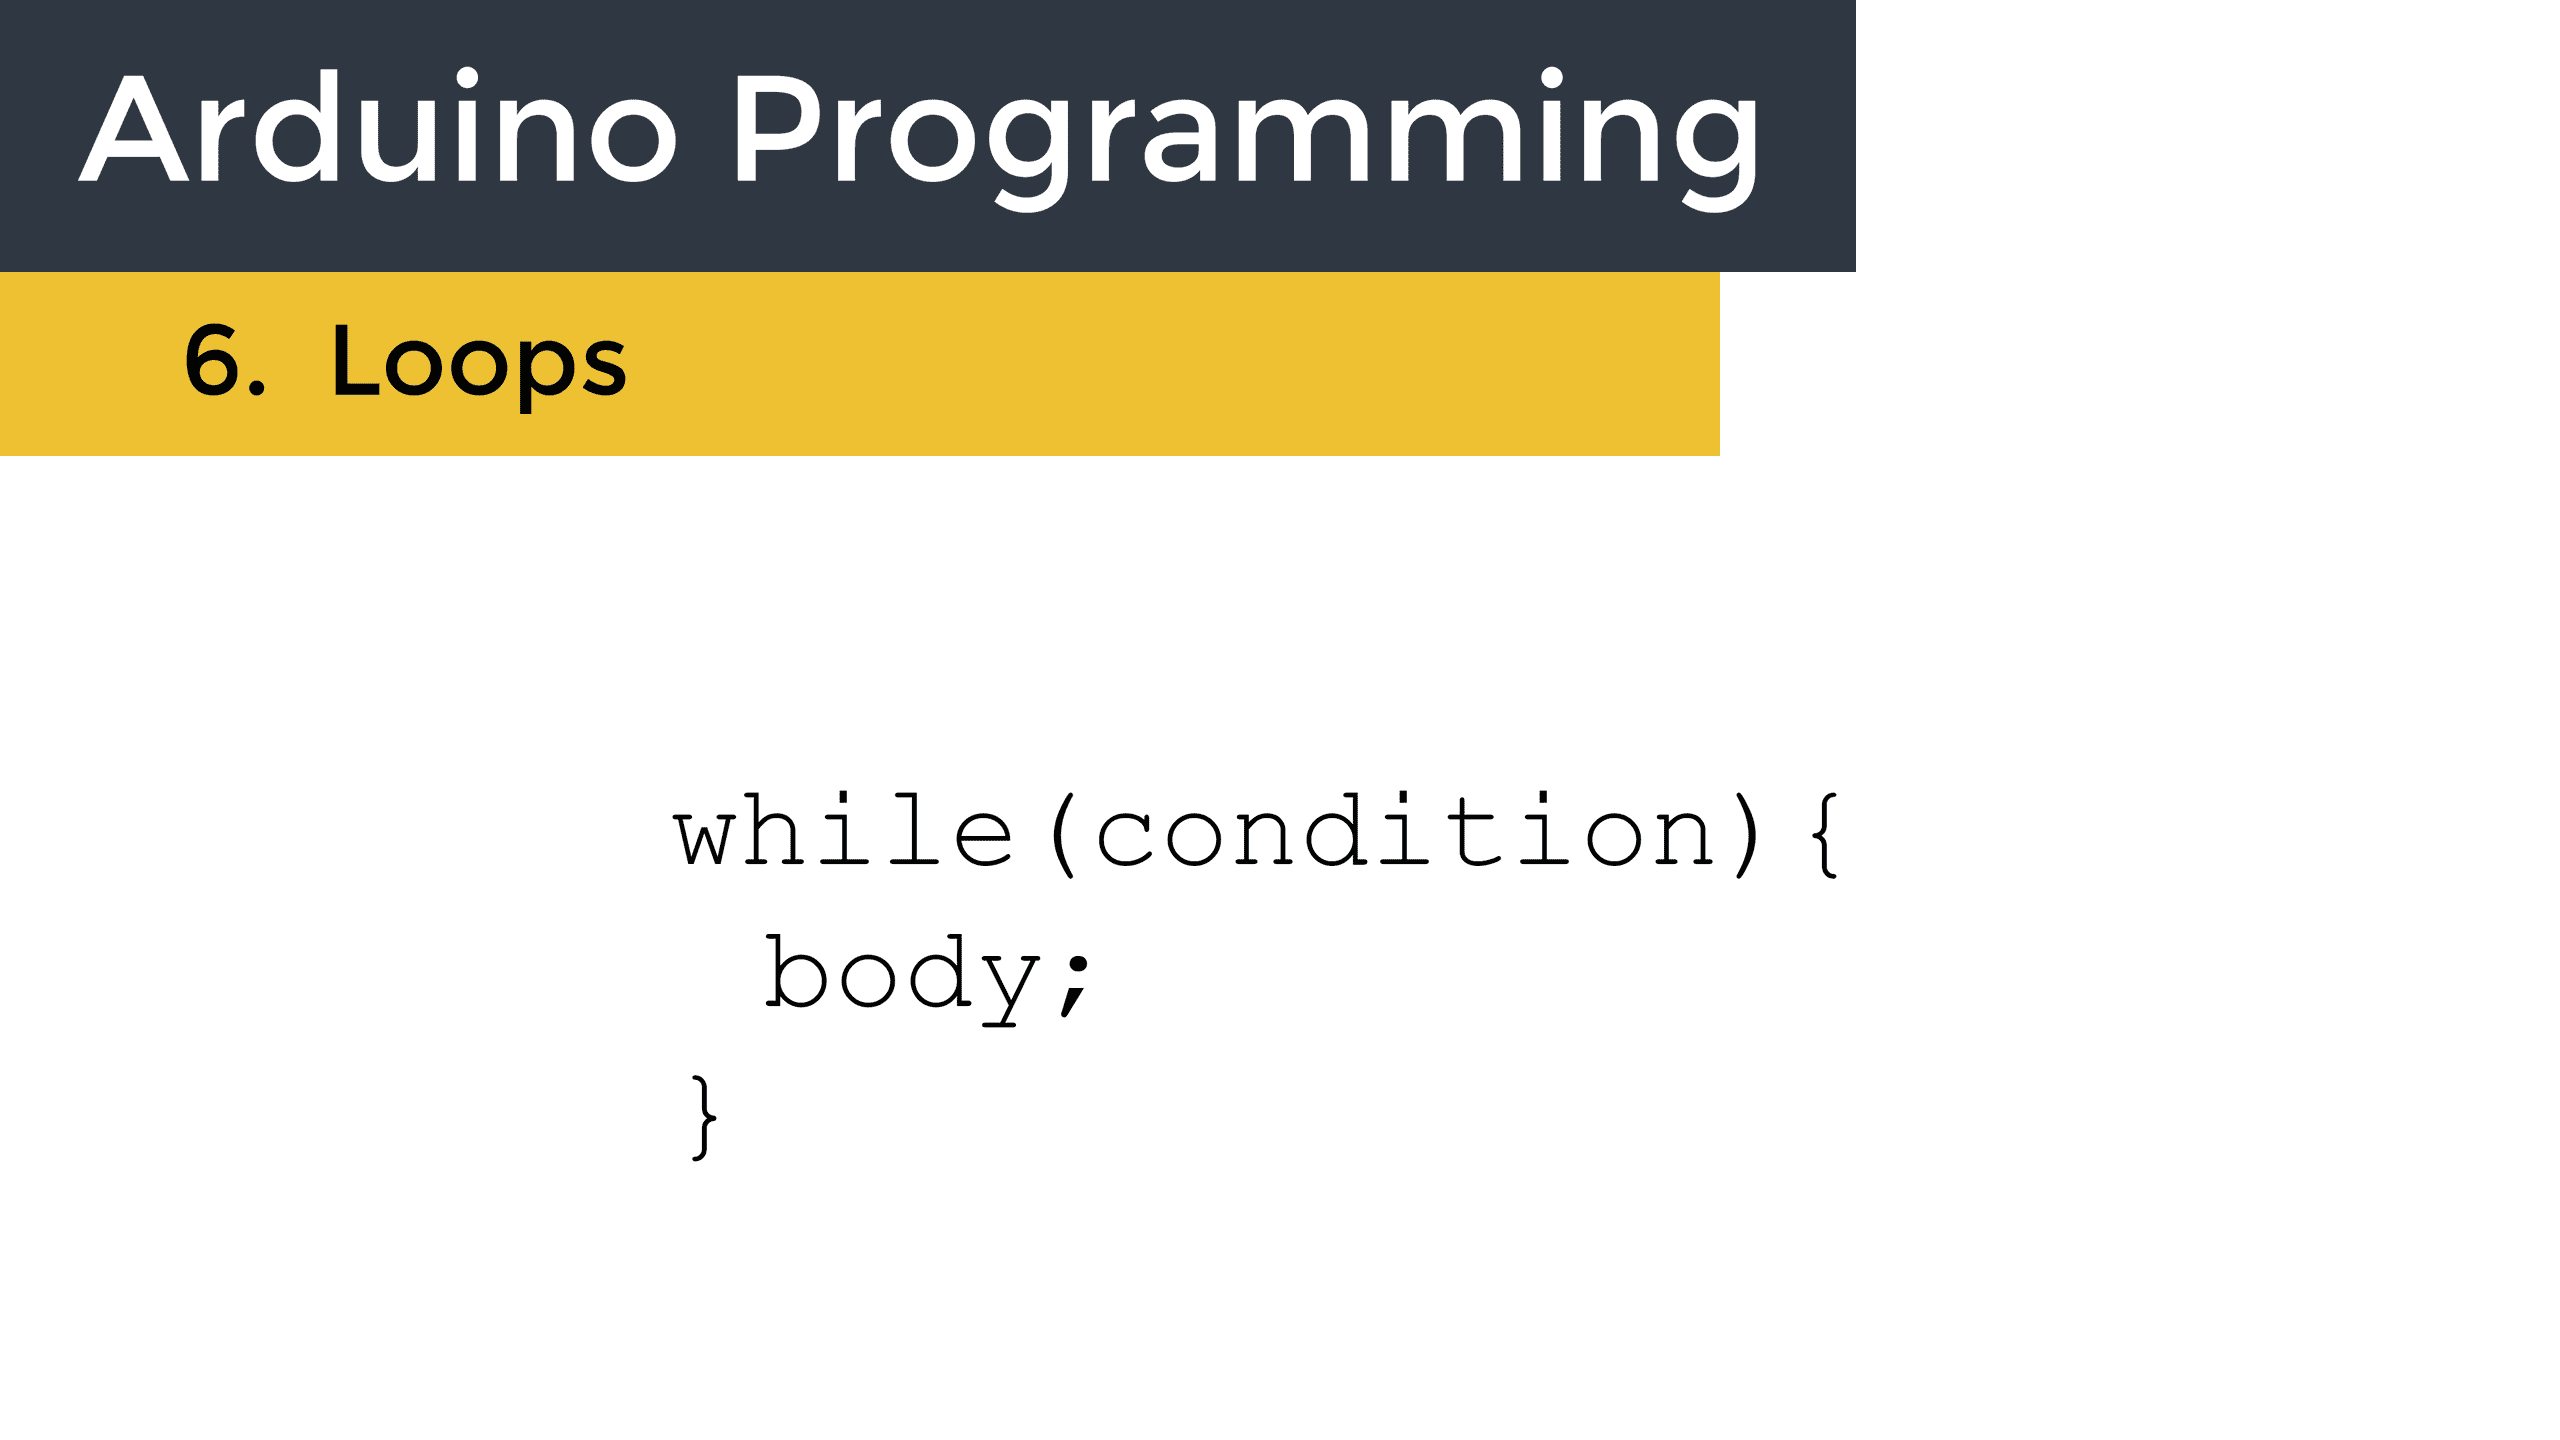
The code for a while loop looks like this:
while(condition){
	body;
}
If the condition is true, the program will enter the body of the while loop and execute the body code in a loop for as long as the condition remains true. If the condition is false, the program will skip the while loop and continue to the next line of code.
As an example of how to use a while loop, let’s build a circuit that will blink an LED as long as a push-button is pressed.
These are the parts you will need to build this project:
Follow this wiring diagram to connect the circuit:
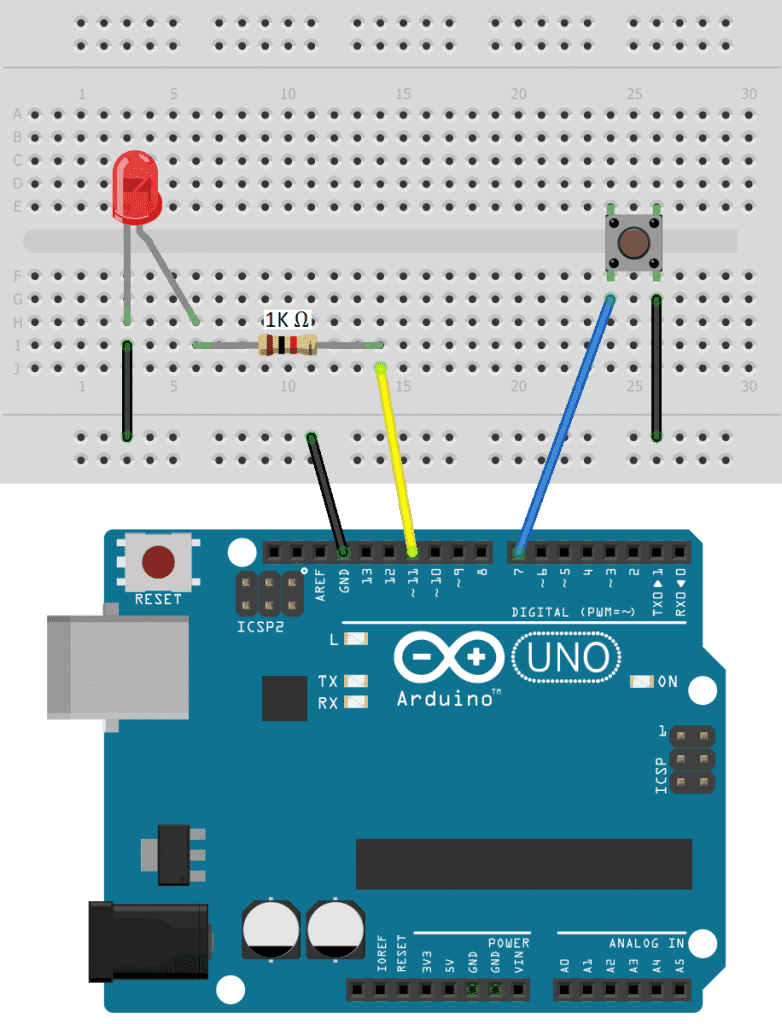
Once the circuit is connected, upload this code to the Arduino:
int buttonPin = 7;
int ledPin = 11;

void setup() {
  pinMode(buttonPin, INPUT_PULLUP);
  pinMode(ledPin, OUTPUT);
}

void loop() {
  int buttonState = digitalRead(buttonPin);

  while (buttonState == LOW) {
    digitalWrite(ledPin, HIGH);
    delay(200);
    digitalWrite(ledPin, LOW);
    delay(200);
  }
}
At the top of the sketch, we declare a pin variable for the pin connected to the push button called buttonPin, and a pin variable for the pin connected to the LED called ledPin.
In the setup() section, we set the buttonPin as an input with the internal pull-up resistor. Then we set the ledPin as an output.
In the loop() section, we declare a variable called buttonState, and set it equal to digitalRead(buttonPin). This will read the voltage state detected at the buttonPin (pin 7) and store the result in the buttonState variable.
We want the program to enter the while loop when the button is pressed. Pressing the button causes pin 7 to be pulled low. So the condition is buttonState == LOW. When the button is pressed, buttonState will equal low, making the condition true. So the Arduino will enter the while loop and execute the body code until the condition becomes false. The condition will only be false when buttonState is high, so as long as the button is pressed the LED will keep blinking on and off.
Do While Loops
Do while loops work the same way as regular while loops, except that the body code is executed before the test for the condition occurs. So even if the condition is false, the code in the body will be run at least once. The code for a do while loop looks like this:
do {
    body;
} while(condition);
First the Arduino enters the do block and executes the body code. Then it moves on to the while statement and evaluates the condition. If the condition is false, the Arduino will continue on to the rest of the sketch. But if the condition is true, the code in the body will be executed over and over until the condition becomes false.
For Loops
For loops are frequently used to increment and decrement counters, or to initialize large numbers of pins at the same time. For loops evaluate a set of three parameters – the initialization value, the condition, and the iteration:
for(initialization; condition; iteration) {
    body;
}
The initialization value sets a loop control variable, usually called i or j. The condition determines when the sketch will exit the for loop. The iteration value defines how the loop control variable changes with each iteration of the loop.
One useful application of for loops is to initialize multiple pins at the same time. For example, take a look at this code that could be used to set Arduino pins 0-9 as outputs:
void setup() {
    pinMode(0, OUTPUT);
    pinMode(1, OUTPUT);
    pinMode(2, OUTPUT);
    pinMode(3, OUTPUT);
    pinMode(4, OUTPUT);
    pinMode(5, OUTPUT);
    pinMode(6, OUTPUT);
    pinMode(7, OUTPUT);
    pinMode(8, OUTPUT);
    pinMode(9, OUTPUT);
}
Using a for loop, you can do the same thing with only three lines of code:
void setup(){
    for(i=0; i<10; i++) {
    pinMode(i, OUTPUT);
    }
}
Here, we declare a loop control variable called i and set it equal to zero. The loop control variable holds the loop count, which will increase by one each iteration through the loop.
Then we set the condition. The for loop will continue looping as long as the condition is true. In this case the condition is the number of pins we want to initialize. Every pin from zero to nine will be set as an output (10 pins), so the condition is i < 10.
We want the loop control variable i to increase by one every time through the loop, so we use i++ for the iteration value.
In the first iteration of the loop, i will be set to zero. Zero is less than ten, so the condition is true, and the code in the body will be executed. In the pinMode() function, the first parameter would usually be the pin number we want to initialize. But we can use the loop control variable i instead, so digital pin zero will be set as an output.
The next time through the loop, the iteration value i++ will make the loop control variable increase by one. So i will now equal one. One is still less than ten, so the Arduino enters the body of the for loop. Since i equals one now, pin one will be set as an output.
The for loop will continue iterating, increasing i by one each time until i is no longer less than ten. When i equals ten, the condition becomes false and the Arduino exits the for loop to continue on with the rest of the sketch.
The Break Command
You can make the program exit a loop even while the condition is true with the break keyword. The break keyword causes the program to exit the loop immediately. It works with while loops, do-while loops, and for loops. It’s just another way to control the behavior of a loop.
For example, you can use break to exit the loop when a specific event occurs:
for(i=0; i<10; i++) {
    if(x == 3){
    break;
    }
    Serial.print("Hello");
}
Serial.print("Goodbye");
In this example, break; is placed inside of an if statement. If x equals three, the Arduino will enter the body of the if statement and execute the break command. That will cause the sketch to exit the for loop, so “Hello” will not be printed to the serial monitor. But since Serial.print("Goodbye"); is outside of the for loop, “Goodbye” will be printed to the serial monitor.
The Continue Command
The continue keyword allows even more control over the action of loops. Continue causes the sketch to stop the current iteration of the loop, and start with a new cycle.
for(i=0; i<10; i++) {
    if(x == 3){
    continue;
    }
Serial.print("Hello");
}
As long as x does not equal three, “Hello” will be printed once for each iteration of the for loop. But when x does equal three, the Arduino will enter the body of the if statement and the continue keyword will be executed. This will make the Arduino stop the current iteration of the for loop and start a new cycle.
With the continue command, the sketch doesn’t exit the for loop, it just jumps to the start of the next iteration. The loop control variable keeps its value, so the count is not lost. The continue keyword is a way to cut short an iteration of a loop when a certain event occurs.
Understanding how the different types of loops work are important if you want full control over how your sketch operates. They’re not an easy topic to master, but with a bit of practice and some experimentation, you’ll be able to use them to get full control over the flow of your sketches. Feel free to leave a comment below if you have any questions!

For the first example I believe you also need to read the buttonPin inside of the while statement or else the LED will keep blinking when you release the button
That’s right… The example code here is not complete, it has been simplified to show the general concepts of programming loops.
Thank you for publishing these examples.
Oh yes; to prevent getting stuck inside the while loop, you’d need to add the following line at the end of it, so as to continuously poll the button switch:
buttonState = digitalRead(buttonPin);
Thanks, very helpfull :¬)