In this tutorial, we are going to connect a BMP280 barometric pressure sensor to an Arduino and write the results to a computer using a terminal emulator called PuTTY. The BMP280 will be connected using I2C. We will collect data and write to file a make-shift timestamp by reading the elapsed time since the Arduino started. The file will be written in CSV (comma separated values) format often used when data with similar structures are saved to file or transmitted over a link. It is Excel compatible and can just be opened with it to put the values into columns and rows.

Using PuTTY, we will create a data logger for a BMP280 connected to an Arduino. Generally, a data logger is an electronic device used to record data from sensors over time and stores it for further use or analysis.
How to Download, Install, and Set Up PuTTY
The PuTTY can be downloaded from here. Once you have it, just run the installer and choose where you want it installed.
PuTTY is a terminal emulator. Back in the day, programmers entered and read information out of mainframe computers with terminals. And some of these were even mechanical and were called teletypes, as in ‘telegraph typewriter’. PuTTY has many available connection types and data transfer protocols, but we are going to use the simple RS232 as serial. Terminal emulators were widely used to connect to other distant computers before the Internet.

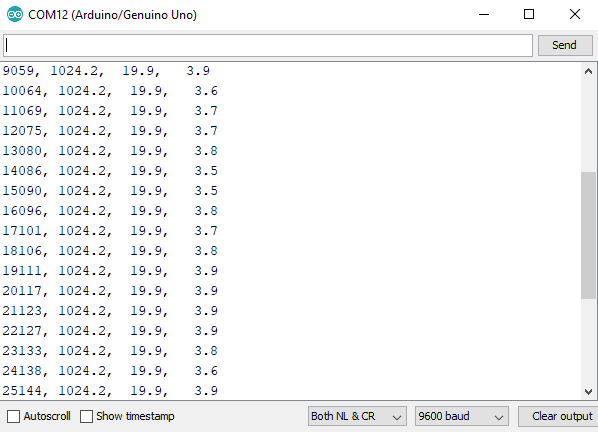
This time, concentrate first on getting the Arduino program before running and finding the data being written into your serial monitor window. Make a note of the port being used from the very top of the window (e.g. COM12).
Close the Serial window as we want to open this same port in PuTTY. No need to worry because the Arduino will continue to send data to the port. Now, open PuTTY and click on ‘Session’ at the left-hand side of the window. Enter the COM port (e.g. COM12) in the “Serial line” field, then click the “Serial” button.
On the left-hand side, select ‘Logging’, then select ‘Printable output’, and maybe select ‘Always’. Overwrite it if that is what you want. Click ‘Browse’ and look for a place and file name where you can save the file you logged. It’s a good idea to put the file name extension .csv (such as ‘logging.csv’) so that Excel can immediately recognize it. Go back to the Session window and in ‘Saved Sessions’, enter your name or initials then click ‘Save’. By doing this, every time you open PuTTY, just select your Saved session and click ‘Load’ and you won’t have to jump through all those hoops again. To start logging, just click on ‘Open’.
How to Connect the BMP280 to the Arduino
For more information on how the BMP280 works with Arduino, check out our tutorial on Wireless Communication Between Two Arduinos.
Here are the parts you will need to connect this:
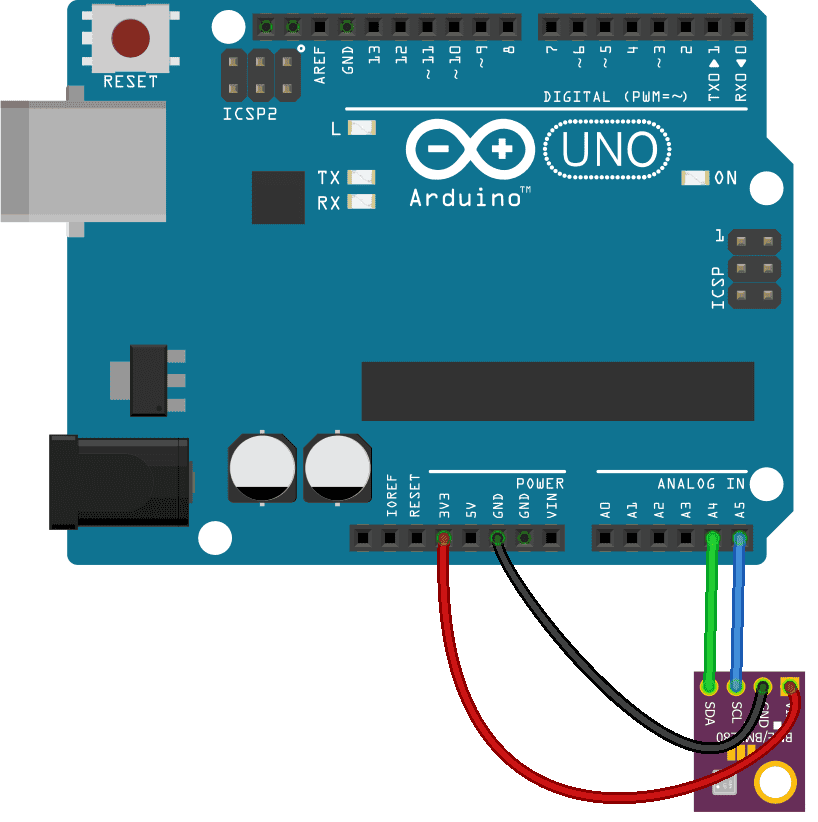
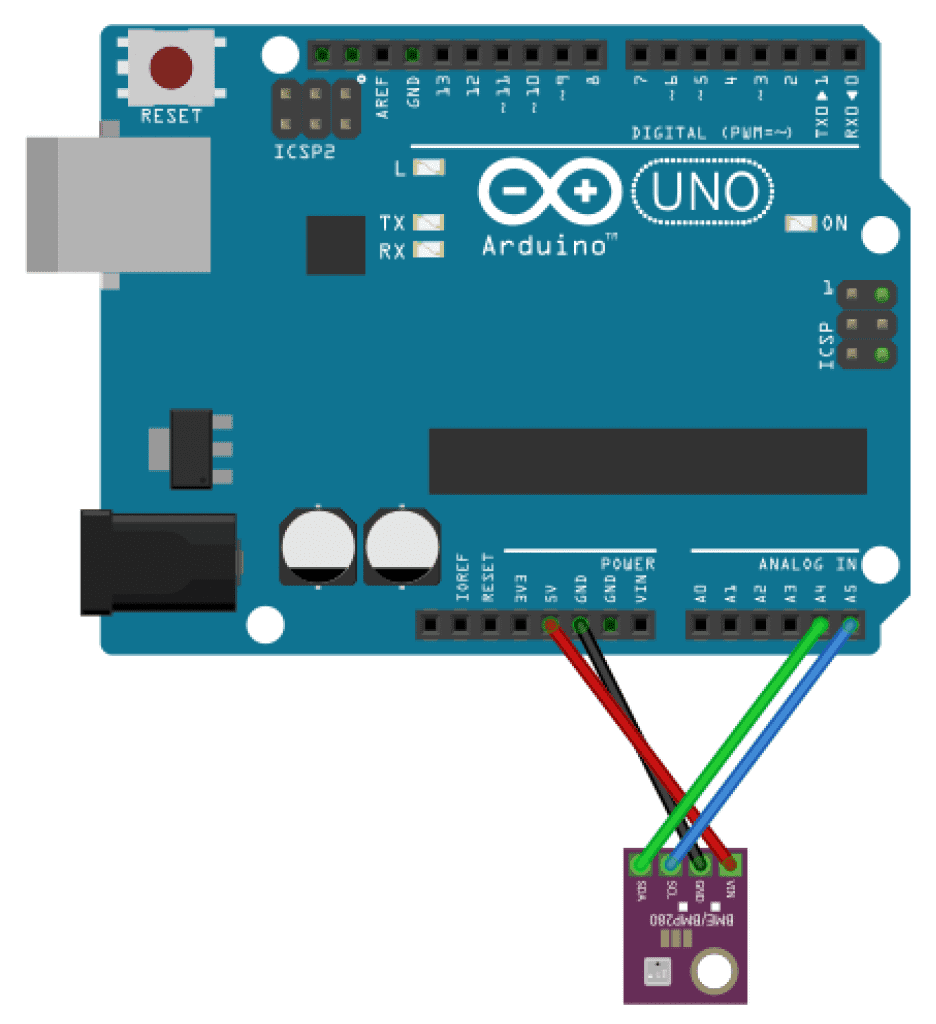
Now, connect the BMP280 to the Arduino using the wiring diagram below:
If you want to learn more about the Arduino, check out our Ultimate Guide to the Arduino video course. You’ll learn basic to advanced Arduino programming and circuit building techniques that will prepare you to build any project.
Installing the Libraries
To program the BMP280, we will use the Adafruit BMP280 library. The library can be downloaded from here.
Notes on the Sketch
For these sketches, I did not use the Arduino String object. Serious programmers avoid this actually and would rather use C-type character strings. To learn more about why you should avoid the string object, read here.
The loop() function kicks off with resetting the dataStr to 0 to refresh it, then gets a sort of timestamp with the millis() function (the number of milliseconds elapsed since we started). Now, it needs to be added onto the end of the dataStr (appended) and followed by the comma-separated variable.
strcat() is a bit confusing because it will yield something like this: buffer = strcat(dataStr, temperature). But the buffer is actually a temporary storage to hold the result.
Arduino Sketch
#include <Adafruit_BMP280.h>

Adafruit_BMP280 bmp;
float QNH = 1024.67; //Change the "1022.67" to your current sea level barometric pressure (https://www.wunderground.com)
const int BMP_address = 0x76;
float pressure;
float temperature;
float altimeter;
//char charRead;
char dataStr[100] = "";
char buffer[7];

void setup(){
  Serial.begin(9600);
  bmp.begin(BMP_address);
}

void loop(void){
 dataStr[0] = 0; //clean out string
 pressure = bmp.readPressure()/100;  //and convert Pa to hPa
 temperature = bmp.readTemperature();
 altimeter = bmp.readAltitude (QNH); //QNH is local sea level pressure
 //----------------------- using c-type ---------------------------
 //convert floats to string and assemble c-type char string for writing:
 ltoa( millis(),buffer,10); //convert long to charStr
 strcat(dataStr, buffer); //add it to the end
 strcat( dataStr, ", "); //append the delimiter

 //dtostrf(floatVal, minimum width, precision, character array);
 dtostrf(pressure, 5, 1, buffer);  //5 is minimum width, 1 is precision; float value is copied onto buff
 strcat( dataStr, buffer); //append the converted float
 strcat( dataStr, ", "); //append the delimiter

 dtostrf(temperature, 5, 1, buffer);  //5 is minimum width, 1 is precision; float value is copied onto buff
 strcat( dataStr, buffer); //append the converted float
 strcat( dataStr, ", "); //append the delimiter

 dtostrf(altimeter, 5, 1, buffer);  //5 is minimum width, 1 is precision; float value is copied onto buff
 strcat( dataStr, buffer); //append the converted float
 strcat( dataStr, 0); //terminate correctly
 Serial.println(dataStr);
 delay(1000);
}
Using the Project
If the wiring is correct, the serial window on the Arduino should show the following:
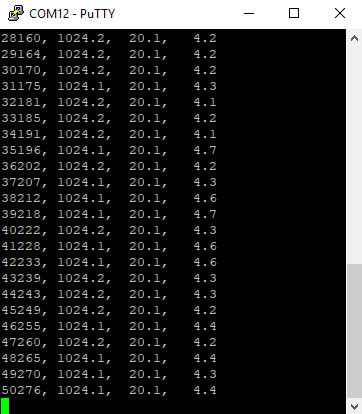
This time, close the Arduino serial window (PuTTY will not open the port if Arduino is holding it open). Open PuTTY and click “Open”. Afterward, the Arduino will stream out of the serial port so you should see something like this:
PuTTY gives you the option to append or overwrite your file. Once saved, you can open the CSV file in Excel. Leave a comment below if you have questions about anything!


Learned a lot on this project. Worked almost immediately. Would like more comments but they were right on as written. I learned a lot about terminal emulation for the Uno.