
The Raspberry Pi is perfect for data logging. It allows you to connect a sensor, record the data, and store the data for later analysis.

In this tutorial, we will see how to save sensor readings to a file on an external storage device using a Raspberry Pi. Using the DHT22 humidity and temperature sensor, we will build an example project that writes the temperature and humidity values to text files and CSV files.
How to Make a New File
There are two ways of creating and working with files on the Raspberry Pi. The first method uses the Raspberry Pi terminal to open a command-line text editor (CLI). The common CLI text editors that can be accessed through this method are GNU nano, Vim, vi, and EMACS.
The second method uses graphical user interface (GUI) text editors. Examples of GUI text editors are Geany, Leafpad, Bluej, Adafruit, WebIDE, and Code::Blocks IDE. If you have a monitor connected to your Raspberry Pi, you can create and edit files using GUI-based text editors. Alternatively, we can use CLI based text editors if we are accessing the Raspberry Pi remotely. To create a new file using the Raspberry Pi terminal, we do the following:
- Open the terminal.
- Navigate to the directory where you want to store the file
cd /directory. - If you are using GNU Nano text editor, use the command
sudo nano my_file.txt. - Here, we are creating a new text file called
"my_file"and has a (.txt) extension. If we want a Python extension, we simply usesudo nano my_file.py. We can create files with different extensions this way.
On the other hand, using GUI-based text editors is pretty straightforward. To create a new file, double click on the Leafpad icon to launch the program. Click on “save as” and enter the file name and extension you want. Click “OK” when complete.
How to Write to a File Using Python
In certain circumstances, we may need to create and write to files using a high-level programming language. We can use other languages such as C/C++, JAVA, or C#, but in this tutorial, we will use Python to create a text file and write to it. To open a file in Python, we need to use the "open" function: file_Object = open("file_Name","mode")
To write data to files, we declare the variable file_Object to open a file with the name "file_Name". We use the built-in open function, and then Python opens the file with the permissions specified by the "mode" parameter. Different modes exist for the open function, and these are:
- ‘r’ for reading files.
- ‘w’ if we want to open the file for writing. If the specified
file_Nameis not available, Python creates a new file with the same name. However, if the file is available in that directory, Python opens it for writing. - ‘a’ for appending data to files.
- ‘w+’ for reading and writing data to a file
The full implementation in this context will be f = open("myFile.txt","w+"). We will open a text file called myFile. If it is not available in that directory, we will create it. The file will have both read and write permissions, as defined by "w+".
How to Write to Text Files
In this first example project, we will write the humidity and temperature values from a DHT22 sensor to a text file. We will use the Raspberry Pi’s system time to add a date and time stamp for each sensor read.
Components
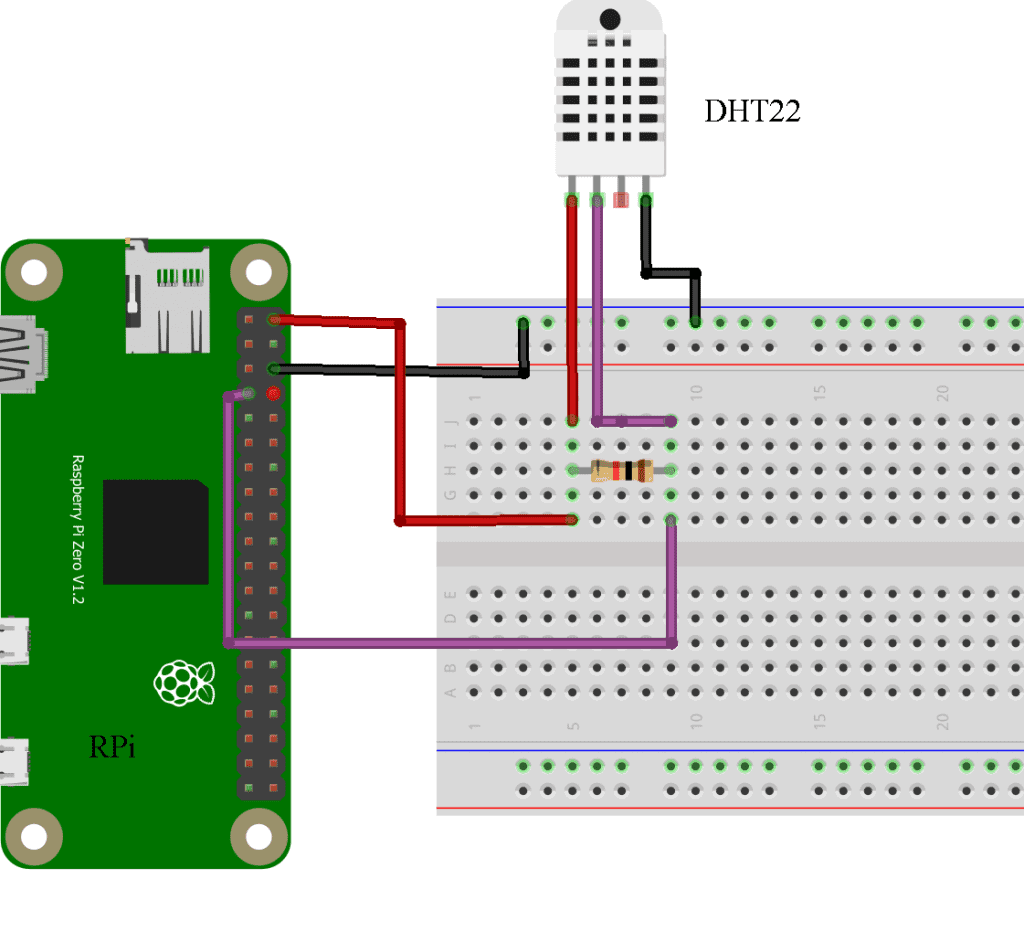
Code
import Adafruit_DHT
from datetime import datetime
DHT_SENSOR = Adafruit_DHT.DHT22
DHT_PIN = 4

humidity, temperature = Adafruit_DHT.read_retry(DHT_SENSOR, DHT_PIN)

if humidity is not None and temperature is not None:
	file = open("log.txt","a")
	file.write("Temp={0:0.1f}*C Humidity={1:0.1f}%".format(temperature, humidity))
else:
	file = open("log.txt","a")
	file.write("NAN  ")

file.write(datetime.today().strftime('%Y-%m-%d %H:%M:%S')+"\n")
file.close()
Code Description
The code in the section above reads the temperature and humidity values from a DHT22 sensor. The code is configured to use the Adafruit DHT22 sensor library, naming pin 4 as the input pin for reading the values. We import the datetime module because this will enable us to extract the date and time parameters from the data logging system.
Next, we use the If-else loop to check if we have a signal from the sensor. If we cannot connect to the sensor (for various reasons), we write the value "NAN" and the corresponding date and time stamp. This means that we failed to record the sensor readings at that time, which can be used to record sensor downtime.
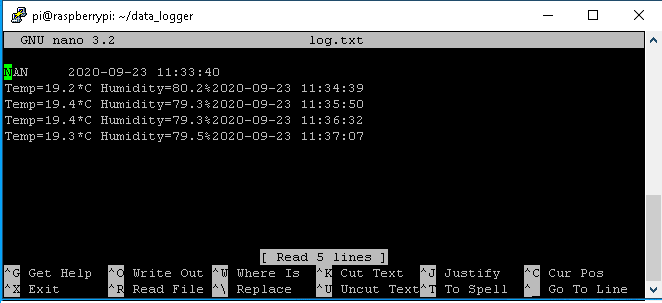
Once the sensor is connected, we use the attribute "a" to append the sensor readings to a new line of a text file called "log.txt". The line file.write(datetime.today().strftime('%Y-%m-%d %H:%M:%S')+"\n") is used for extracting the date and time values. Lastly, we close the file with file.close(). The result is shown below.
How to Format the Data in the Text File
Plain text is one of the most efficient ways to store text. In most circumstances, we may need to enhance the visual appearance of our text. Additional characters such as headers, alignment, or indentation are often added to our original text for formatting the data. To do that, we use escape sequences in our code. These are characters that do not represent themselves when used inside string literals in our Python code. Here is a list of the most common escape characters:
"\t"horizontal tab"\b"backspace"\n"new line"\r"carriage return"\\"backslash character
We can also use conversion specifiers to format the data in our text files.
"%d"prints an integer as a signed decimal number"%u"unsigned integer"%e"lower case floating-point number"%E"upper case floating-point number"%f"prints number as a floating-point
In our code for writing temperature and humidity values to a text file, we used "Temp={0:0.1f}*C Humidity={1:0.1f}%".format(temperature, humidity). This formats the temperature and humidity values to floating-point numbers with one decimal place. You can also replace “f” with “e” to change the output of the values or add additional decimal places as you please.
How to Write to CSV Files
For our second project, we are going to write the temperature and humidity values from the DHT22 humidity and temperature sensor to a CSV file. We are also going to add a date and time stamp for each sensor read.
Here is the code for creating and writing sensor readings to a standard CSV file:
import Adafruit_DHT
from datetime import datetime
DHT_SENSOR = Adafruit_DHT.DHT22
DHT_PIN = 4
humidity, temperature = Adafruit_DHT.read_retry(DHT_SENSOR, DHT_PIN)
if humidity is not None and temperature is not None:
file = open("log.csv","a")
file.write("{0:0.2f}".format(temperature)+","+"{0:0.2f}".format(humidity)+",")
else:
file = open("log.csv","a")
file.write("NAN "+",")
file.write(datetime.today().strftime('%Y-%m-%d'+"," '%H:%M:%S')+"\n")
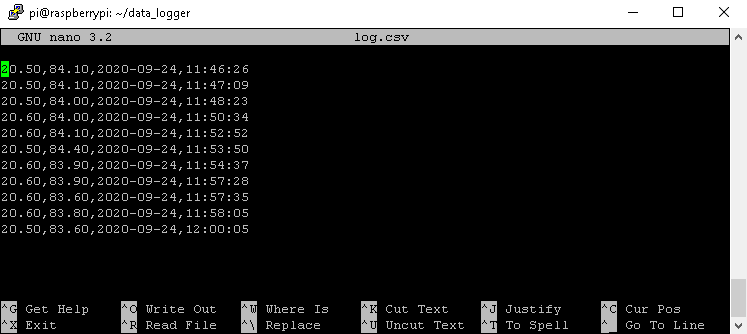
file.close()The functionality of this code has not changed. However, this time, we separated the temperature and humidity readings with a comma. We also removed the "Temp" and "Humidity" headings from the output string. Finally, our sensor readings now have two decimal places. Running the code above will produce the output below.
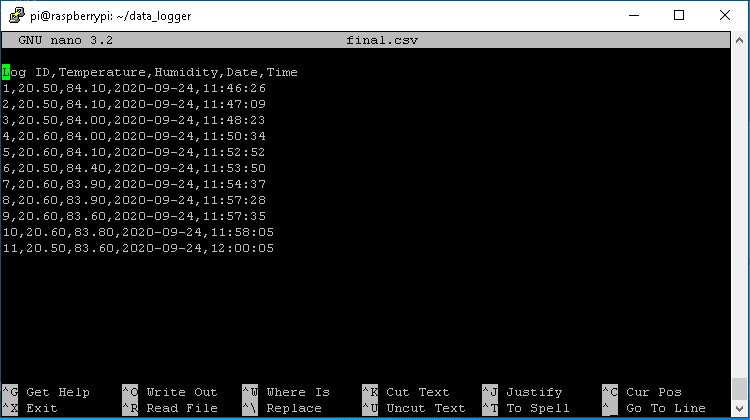
How to Label the Columns
To make a new column and label it, we are going to open our CSV file and add a new column to the left. This will be the first column of the output CSV file and it will record the log index (LOG ID) of each sensor reading. Here is the code:
import csv
num = 1

with open('log.csv','r') as file:
  with open('final.csv','w') as output:
    reader = csv.reader(file)
    output.write("Log ID"+","+"Temperature"+","+"Humidity"+","+"Date"+","+"Time"+"\n")
    writer = csv.writer(output, lineterminator='\n')

    for row in reader:
      writer.writerow([num]+row)
      num = num+1
Code Description
with open('log.csv','r') as file:We create a new Python file with the namereadData.py. In this file, we write code to open our CSV file'log.csv', which contains the temperature and humidity readings. We use theopenfunction and pass thefilenameand the read attribute'r'as parameters to this function.- Also, we create a new CSV file to store the results of our operation. As we have discussed before, we need to add a new column to an existing CSV file and label it. To do that, we create a new CSV file with the name
'final.csv', and we use the'w'attribute to write to our new file. Here is the code:with open('final.csv','w') as output: output.write("Log ID"+","+"Temperature"+","+"Humidity"+","+"Date"+","+"Time"+"\n")We use this code to create the first row, which contains the column labels.num = 1,writer.writerow([num]+row),num=num+1We create a variable with the name num. This variable will keep track of the number of rows in the CSV file, assigning each row a number that can be used to refer to the log index of the timestamped sensor readings.
How to Save the Text and CSV files
The data logging exercise’s final task is to store the values in a file for further processing. We may need to store the file either to a local drive or to an external storage device. If you are using the Raspbian desktop, simply plug in a USB stick and save the document as you would on your desktop computer or any computing platform.
To save the file to the USB drive from the command line, follow these steps:
- Plugin the USB stick to the Raspberry Pi.
- Use this command
ls -l /dev/disk/by-uuidto check the ID which has been assigned to your USB stick. In my situation, I have been assigned AAD6-2A81. It is always next to../../sda1, so you cannot miss it.

3. To create a mount point, we create a new directory by using the following command: sudo mkdir /media/usb. You can use any name to identify your new directory.
4. Next, we are going to give Pi the right to own this directory with this command: sudo chown -R pi:pi /media/usb.
5. Finally, we are going to use sudo mount /dev/sda1 /media/usb -o uid=pi,gid=pi to manually mount the drive.
6. After successfully mounting the drive, we can use the following command to check if our device is ready to use. We use the df -h command. Basically, this command displays the available space of file systems and we get the following:

We are now ready to copy or move files from our drive to the Raspberry Pi or vice versa. To copy the log.csv file from the Raspberry Pi to the USB stick, we can navigate to the directory of the file and use the following command: cp log.csv /media/usb.
Thanks for reading! Leave a comment below if you have questions about anything.


Wow, that all really made sense to me. THANK YOU
There are two things I would like to do and learn about your program:
1 – I would like to have an external input for controlling the sample rate. example – 5 minutes, 10 minutes and 15 Minutes. I think I can do that with an INPUT statement and a loop.
2 – I would like to run TWO (2) DHT-22’s. One for INDOOR T&H and one for OUTDOOR T&H.
I have not found and code for running two units. Can it be done?
Thank you,
Barry
Thank you Barry, I think that can be done, try this…
import Adafruit_DHT
from datetime import datetime
DHT_SENSOR = Adafruit_DHT.DHT22
DHT_PIN1 = 4
DHT_PIN2 = 6
humidity_outdoor, temperature_outdoor = Adafruit_DHT.read_retry(DHT_SENSOR, DHT_PIN1)
humidity_indoor, temperature_indoor = Adafruit_DHT.read_retry(DHT_SENSOR, DHT_PIN2)
That Simple??? Wow again… Harry, thank you for the supper quick response. As you probably surmised I am a novice at this. Got into it because I don’t want to be the old man on the bench. I’m trying to teach myself Python. <– Is that good enough or should I go over to LINX?
HAVE a Very Merry Christmas – Happy Holidays
Barry
This is a great article! Can I request another post on how to send these TXT and CSV file to a remote database as a record in a table using WiFI and BLE connections from the RPi?
Thank you!
BJ
Sure, there is one similar article that I am working on, keep checking this space :-)
Harry, Great Article!
So nice to see someone take the time to walk through the code for us newbies to further grasp the methodology.
I too am very interested in an article by you in response to BJ Raval’s post.