In this tutorial, I’ll walk you step by step through the process of installing an LCD touchscreen on the Raspberry Pi. Most LCD touchscreens for the Raspberry Pi ship with an OS image file that you can write to your SD card and get up and running pretty quickly. But what if you want to run a clean, updated version of Raspbian, without any bloatware included with the manufacturer’s image? Also, you might want to install a different OS such as Rasbmc or XBMC. In these cases, you should configure the touchscreen from scratch, as I’ll show you how to do in this tutorial. This process has been tested and works on the Raspberry Pi 2 Model B as well as older versions of the Raspberry Pi. Don’t worry, it’s not that hard!

Note: Be sure to make a backup of any important data on your SD card before starting this!
I’m using the Waveshare 3.2″ TFT LCD touchscreen with fresh install of Raspbian Jessie Full. Raspbian Jessie Lite won’t work with the touchscreen because it doesn’t have X-Server and the fbturbo video driver installed. A lot of LCD touchscreens can be set up by this process, but check here to see if your LCD is supported by the FBTFT driver to make sure. Scroll down the file and look for an abbreviated name of the screen you are using:
What we need to do to get the LCD working is install and configure the FBTFT drivers created by notro. There are two types of drivers we need to be concerned with here. One set of drivers is for the actual LCD display screen, and the other set of drivers is for the touchscreen sensors. Here is a good article explaining Linux kernel modules, devices, and drivers, which you may want to read for some background information. The standard version of Raspbian does not include the drivers for LCD touchscreens, so we will need to install and configure them manually. So just follow the steps below to get your LCD touchscreen working on the Raspberry Pi.
Watch the video tutorial for a quick overview of the steps:
Enable SPI
The Pi communicates with the touchscreen through SPI (serial peripheral interface). By default, SPI communication is disabled, so you need to enable it. If you’re using a version of Raspbian released after 1-31-2015, this can be done in the raspi-config menu.
If you’re using a version of Raspbian that was released before 1-31-2015, you’ll need to enable SPI by removing the entry from the blacklist file. Enter this at the command prompt to edit the file:
sudo nano /etc/modprobe.d/raspi-blacklist.conf
Remove the spi-bcm2708 driver from the blacklist by commenting out the line that says blacklist spi-bcm2708. Placing a “#” in front of the line tells the computer to ignore it:
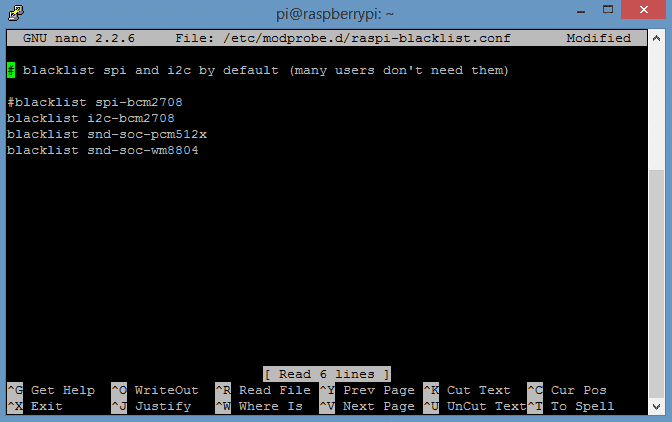
Press Ctrl-X then Y to exit Nano and save the changes.
Configure the fbturbo Driver
Now you need to configure the fbturbo video driver to output the Raspberry Pi’s display to the SPI bus instead of the HDMI bus. Enter this at the command prompt:
sudo nano /usr/share/X11/xorg.conf.d/99-fbturbo.conf
Find the line that says Option "fbdev" "/dev/fb0" and change the fb0 to fb1:
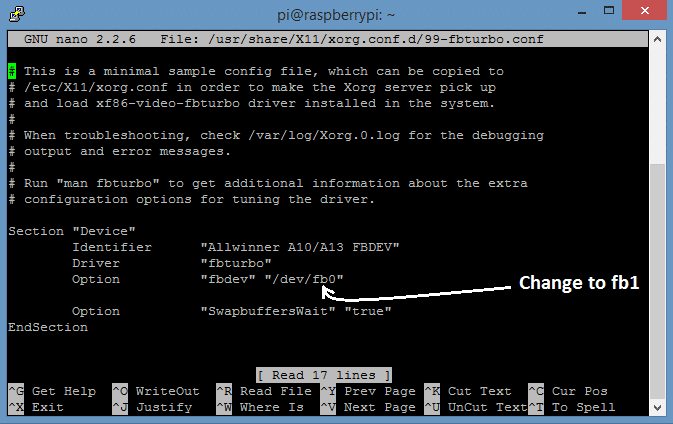
The fb0 option tells the video driver to output the display to HDMI, and the fb1 option tells it to output to the LCD screen. The file should now look like this:
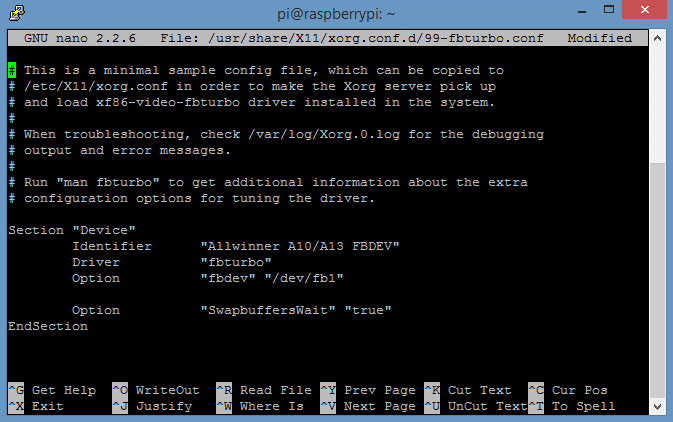
Press Ctrl-X then Y to exit Nano and save the changes.
Install the fbtft Drivers
Note: As of the 1-31-15 release of Raspbian, the fbturbo drivers are now included and enabled by default. So skip this step if your Raspbian OS was released 1-31-15 or later.
Now you need to download and install the drivers and kernel modules that are needed to run the LCD touchscreen. Enter this at the command prompt:
sudo REPO_URI=https://github.com/notro/rpi-firmware rpi-update
The download is about 47.2 MB:
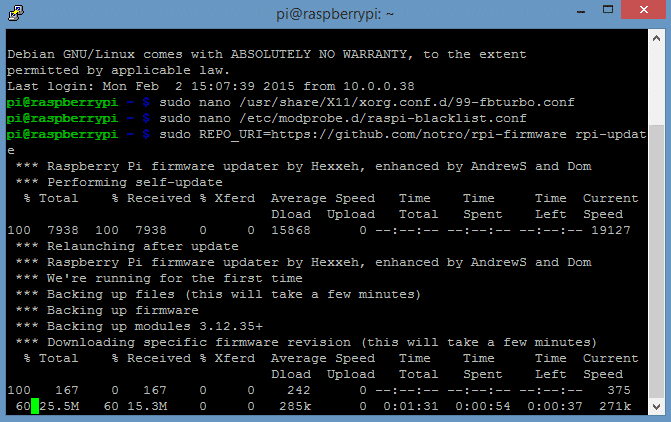
After the drivers have downloaded and installed, reboot the Pi by entering sudo reboot.
Configure the Kernel Modules
After the Pi is booted up and you’ve logging back in, the next step is to configure the kernel modules for the LCD display and touchscreen sensors. To do that we need to edit the /etc/modules file. So enter this at the command prompt:
sudo nano /etc/modules
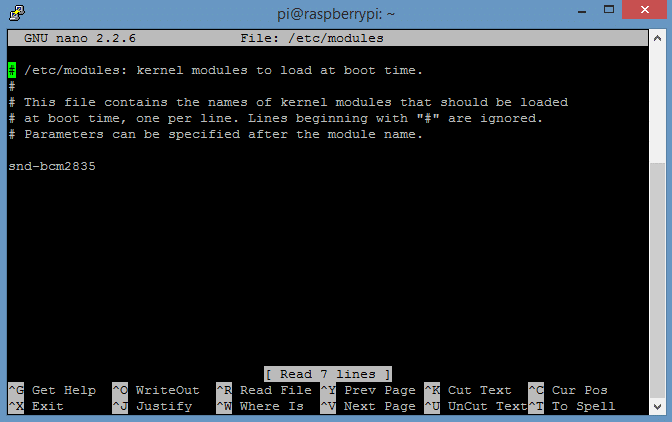
The first term of each line in this file is the name of a kernel module that will be loaded automatically at boot time. The terms after the name of the kernel module on each line are called parameters, and parameters can be changed to adjust the properties of each kernel module.
Currently, the only module that is set to load automatically is snd-bcm2835, which is the module for the Raspberry Pi’s Broadcom processor.
Add this code below the snd-bcm2835 line to support the fbtft_device and ads7846_device modules:
spi-bcm2708
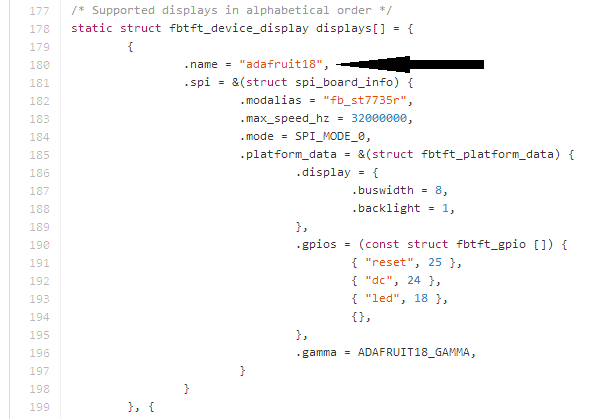
fbtft_device name=waveshare32b gpios=dc:22,reset:27 speed=48000000
waveshare32b width=320 height=240 buswidth=8 init=-1,0xCB,0x39,0x2C,0x00,0x34,0x02,-1,0xCF,0x00,0XC1,0X30,-1,0xE8,0x85,0x00,0x78,-1,0xEA,0x00,0x00,-1,0xED,0x64,0x03,0X12,0X81,-1,0xF7,0x20,-1,0xC0,0x23,-1,0xC1,0x10,-1,0xC5,0x3e,0x28,-1,0xC7,0x86,-1,0x36,0x28,-1,0x3A,0x55,-1,0xB1,0x00,0x18,-1,0xB6,0x08,0x82,0x27,-1,0xF2,0x00,-1,0x26,0x01,-1,0xE0,0x0F,0x31,0x2B,0x0C,0x0E,0x08,0x4E,0xF1,0x37,0x07,0x10,0x03,0x0E,0x09,0x00,-1,0XE1,0x00,0x0E,0x14,0x03,0x11,0x07,0x31,0xC1,0x48,0x08,0x0F,0x0C,0x31,0x36,0x0F,-1,0x11,-2,120,-1,0x29,-1,0x2c,-3
ads7846_device model=7846 cs=1 gpio_pendown=17 speed=1000000 keep_vref_on=1 swap_xy=0 pressure_max=255 x_plate_ohms=60 x_min=200 x_max=3900 y_min=200 y_max=3900Note: Line 5 is long so make sure you get everything, and use cut/paste to avoid typos. The file should look something like this now:
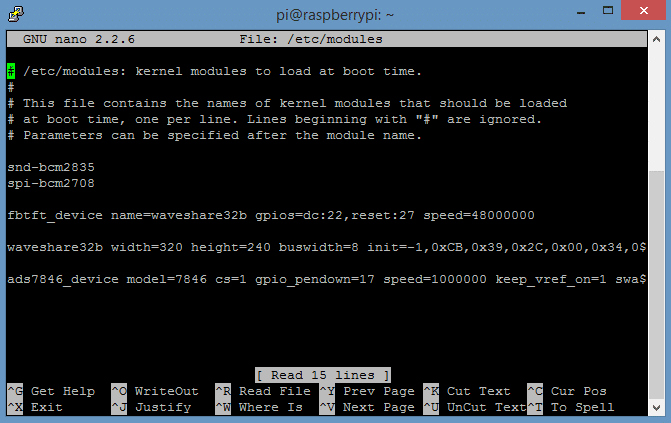
The kernel module for the LCD screen is called fbtft_device and the kernel module for the touchscreen is called ads7846_device. ads7846 is the name of the touchscreen controller chip used in the Waveshare 3.2″ LCD and many other touchscreen displays.
If you are not using the Waveshare 3.2″ Touchscreen LCD, first find the fbtft_device name of your device by checking here. Next, on the line that begins with fbtft_device, change the term name=waveshare32b to name=YOUR DEVICE NAME. Now, on the next line that begins with waveshare32b, change the waveshare32b term to your own device name, for example adafruit28, or sainsmart32_spi.
Press Ctrl-X then Y to exit Nano and save the changes.
Edit the /boot/cmdline.txt File
Now we need to edit the /boot/cmdline.txt file which contains all of the settings used to configure the system when it boots up. This file is read by the GPU (graphics processing unit), before it is read by the CPU (central processing unit) and the Linux OS. It is equivalent to BIOS in other systems, and contains lots of useful options for configuring your system at boot time. To edit this file, enter sudo nano /boot/cmdline.txt at the command prompt.
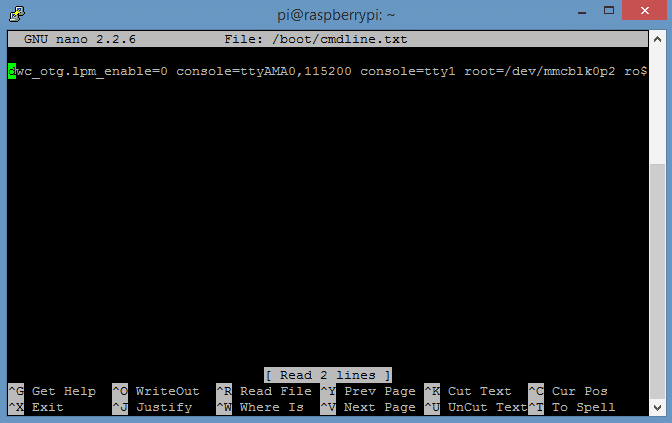
Replace the code in this file with this code, entered in one single line:
dwc_otg.lpm_enable=0 console=ttyAMA0,115200 console=tty1 root=/dev/mmcblk0p2 rootfstype=ext4 elevator=deadline rootwait fbtft_device.custom fbtft_device.name=waveshare32b fbtft_device.gpios=dc:22,reset:27 fbtft_device.bgr=1 fbtft_device.speed=48000000 fbcon=map:10 fbcon=font:ProFont6x11 logo.nologo dma.dmachans=0x7f35 console=tty1 consoleblank=0 fbtft_device.fps=50 fbtft_device.rotate=0Note: This line is really long, so make sure you get everything, and copy/paste to avoid typos.
Similarly to what was done in step 4 above, if you are not using the Waveshare 3.2″ Touchscreen LCD, first find the fbtft_device name of your device by checking here. Then replace fbtft_device.name=waveshare32b in the code above with fbtft_device.name=YOUR DEVICE NAME.
Press Ctrl-X then Y to exit Nano and save the changes.
Configure startx to Load Automatically
The final step is to setup the Pi to load startx automatically and boot to the GUI. If you would rather boot to the command prompt, just skip this step. Enter sudo nano /etc/rc.local at the command prompt:
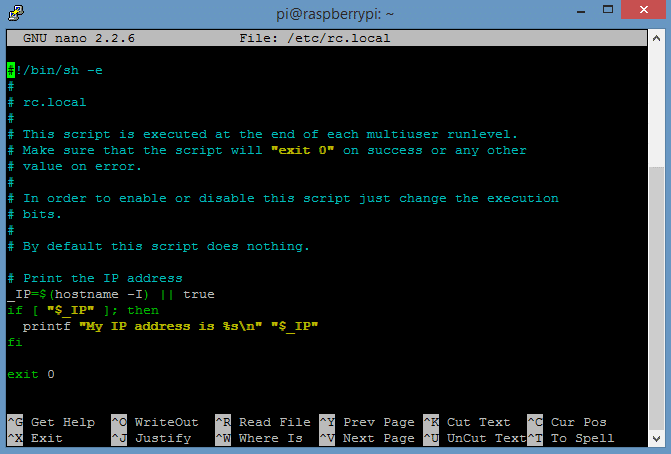
Now add su -l pi -c startx above the line that says exit 0:
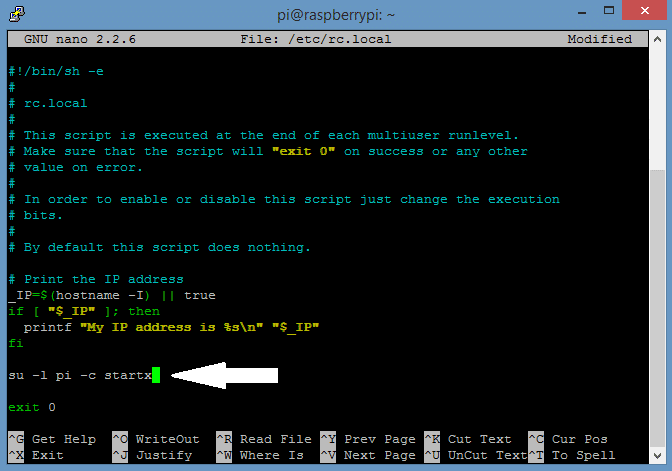
Press Ctrl-X then Y to exit nano and save the changes.
If you are using the Raspberry Pi 2 Model B, the next step is to set the system to boot to the desktop GUI in the raspi-config menu. If you are using versions of Raspbian earlier than 1-31-15 on the Model B+, you can skip this part.
At the command prompt, enter sudo raspi-config.
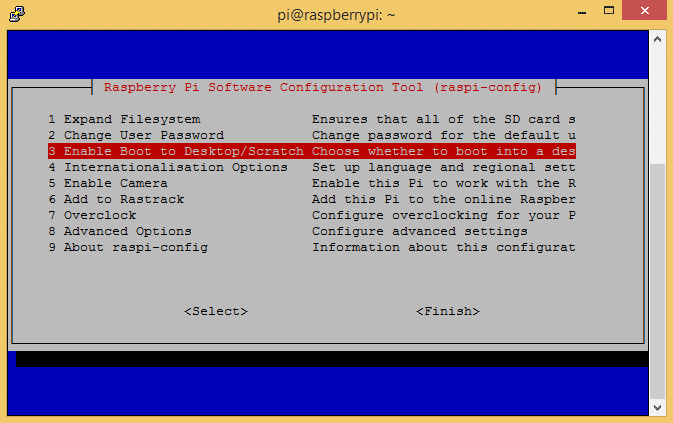
Select the line that says “Enable Boot to Desktop/Scratch”, and press enter.
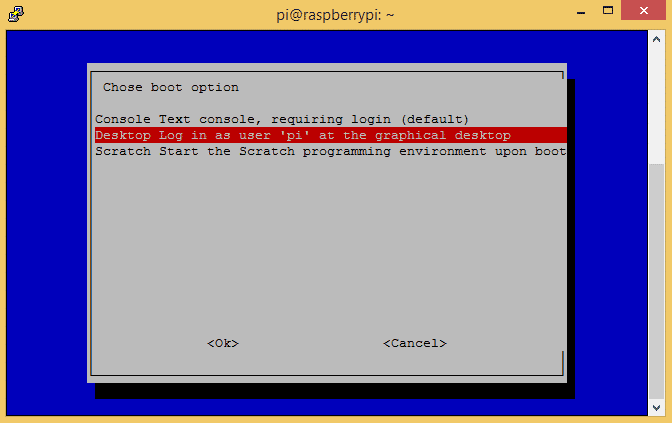
Select the line that says “Desktop Log in as user ‘pi’ at the graphical desktop”, and press enter. Now exit the raspi-config menu.
At the command prompt, enter sudo reboot, and after the Pi boots up the GUI should appear on the LCD screen:

If your screen looks like this:

It is probably due to your Pi being overclocked at turbo speed or Pi 2 speed. Try the high setting or lower to fix this.
There have been some issues with the FBTFT drivers when using sudo update and sudo upgrade. Some people have reported that after updating and upgrading, the LCD touchscreen stops working. This seems to be caused by the Raspberry Pi bootloader package overwriting the FBTFT kernel and modules during the update/upgrade install. To prevent this from happening, update and upgrade by:
1. Updating all packages except for the Raspberry Pi bootloader by entering this at the command prompt:
sudo apt-mark hold raspberrypi-bootloader
sudo apt-get update
sudo apt-get upgrade
2. Then, updating the Raspberry Pi bootloader independently by entering this at the command prompt:
sudo apt-get install rpi-update
sudo SKIP_KERNEL=1 rpi-update
If your drivers have been accidentally overwritten, they can be restored without having to go through the entire installation process again. Just enter this at the command prompt:
sudo REPO_URI=https://github.com/notro/rpi-firmware BRANCH=builtin rpi-update
sudo reboot
More information about this issue can be found here.
Continue on to the next article Raspberry Pi Touchscreen Calibration and Screen Rotation to find out how to change the screen orientation of your Raspberry Pi and calibrate the touchscreen for the best accuracy.
If you have any problems setting up your Raspberry Pi LCD touchscreen, please leave a comment below and I will try to help you solve it…
Please share this if you found it useful, and subsribe to get more tutorial like this in your inbox!


Thank u for this post………
sorry guys but i can’t download the lcd’s driver because i have a problem with the link s certificate
If you have an error message on licenses , this may be due to:
At a date / time to shift your Raspberry Pi => solve it using NTP to put your Raspberry Pi on time.
sudo apt-get install ntpdate
sudo ntpdate -u pool.ntp.org
Hey, is there any way to control the backlight on the waveshare LCD?
After “update/upgrade” Display is just white again.
Thanks for bringing this to my attention. It appears that the upgrade package overwrites the FBTFT drivers, in particular, the Raspberry Pi bootloader. This seems to solve the problem:
To update all packages except the bootloader, enter this at the command prompt:
sudo apt-mark hold raspberrypi-bootloader
sudo apt-get update
sudo apt-get upgrade
To update the bootloader:
sudo apt-get install rpi-update
sudo SKIP_KERNEL=1 rpi-update
See here for more information: https://github.com/notrofbtft/issues/10
Once overwritten, how can i get the old back?
I found a way to fix it without installing all new. :D
sudo REPO_URI=https://github.com/notro/rpi-firmware BRANCH=builtin rpi-update
sudo reboot
ALLES WIEDER GUT :D
Great, that’s easy! Thanks for the update :)
sorry guys but i can’t download the lcd’s driver because i have a problem with the link s certificate
Any idea why using BRANCH=builtin cause Pi2 to stuck at initial Rainbow screen?
Hi – any thoughts on possible changes required to set up on the new raspberry pi 2?
My RPi 2 should be arriving this Monday so I’ll try it out and let you know!
Ive tried it on the new RPi 2 today but had no joy. What type of the LCD you have. My is waveshare spotpear 3.2 V3.
I just tested this, and it looks like the difference is how SPI is enabled. In the RPi 2 it’s enabled in raspi-config, not commented out in the blacklist file. I just updated the post so it should work now!
Looks like the only difference is in how SPI is enabled. In the new release of Raspbian, SPI is enabled in the raspi-config menu under advanced settings. In older versions of Raspbian, it is enabled by commenting out the line in the blacklist file
This is just great, best thing since hot water, thanks a bunch!!!
This is great, only issue is that something in step 5 is crashing the device, and every time I have to reinstall the OS and start fresh.
Oh that’s no good… What OS are you using, and what screen do you have?
3.2″ exact same model and brand as you, using the NOOBs method of installing raspbian (or however it it spelled)
Have you tested to make sure the screen is working by using the image provided by the manufacturer?
The screen works, if I ignore step 5 and do a reboot after step 4 and then do “startx”, it comes up on the screen perfectly
Solved it: for raspberry pi 2:
dwc_otg.lpm_enable=0 console=ttyAMA0,115200 console=tty1 root=/dev/mmcblk0p6 rootfstype=ext4 elevator=deadline rootwait fbtft_device.custom fbtft_device.name=waveshare32b fbtft_device.gpios=dc:22,reset:27 fbtft_device.bgr=1 fbtft_device.speed=48000000 fbcon=map:10 fbcon=font:ProFont6x11 logo.nologo dma.dmachans=0x7f35 console=tty1 consoleblank=0 fbtft_device.fps=50 fbtft_device.rotate=0
Oh great, glad to hear you got it working!
Hi Dabomber60,
below you’re showing the same command line as it’s inside the tutorial, and you called it: “Solved it: for raspberry pi 2″…
As I can’t see any difference (to the original one) I may ask you, what the solution has been for you, please.
Frank
root=/dev/mmcblk0p6
vs.
root=/dev/mmcblk0p2
I have the waveshare spotpear 3.5″ :http://www.amazon.fr/gp/product/B00SKOPWC4?psc=1&redirect=true&ref_=oh_aui_detailpage_o03_s00
Can’t get it working, screen is always white
EDIT: After completed all steps, reboot my Pi2 but nothing on HDMI and nothing on the waveshare screen… (screen is white)
This link helped me in simple 4 steps, with out having to edit any system file. This applies to Osoyoo 3.5 LCD touch screen.
http://osoyoo.com/wp-content/ uploads/samplecode/rasp_lcd.pdf.
KvRajan
Unfortunately, their “driver” is an SD card image containing a complete installation of Raspbian which has been preconfigured to use their display. Which is fine if you’re setting up a brand new system that doesn’t need to be a specific distro, but if you’re trying to add the display to an existing Raspberry Pi, already configured the way you want it, with software installed and data present, or if you want to use a specific distro such as Octopi, then it’s not terribly helpful.
Hello..I tired to interface this lcd “https://www.crazypi.com/raspberry-pi-products/Raspberry-Pi-Accessories/32-TOUCH-DISPLAY-RASPBERRY-PI” to my Raspberry pi model B+.I got a DVD containing image for LCD in the package.I burned it to the SD card and plugged in the display.But my lcd is completly blank.But green inidcation led (ACT LED) in board is blinking.Why my LCD is Blank ?
If you have tried using the manufacturers image and the screen doesn’t work, it could be that the screen has a hardware malfunction. If the process above doesn’t work either, I would contact the manufacturer
Is your RED (POWER) LED on? I had the same problem. Green Led was blinking and screen was white. Then I noticed RED Led is off, indicating there’s something wrong with the power. I plugged into different port and it started
I have the exact same problem so I guess we are 2 screens with hardware malfunction…
EDIT: Maybe my screen isn’t supported…
https://github.com/notro/fbtft/blob/master/fbtft_device.c
Can’t see any “waveshare35” in the list
Yes, it may be that the screen isn’t supported. Newer screens might not have drivers yet. I do know it is possible to make your own driver but that’s above my level of knowledge :)
Really useful How To thanks very much, and thanks to Dabomber60 as his updated cmdline.txt entry fixed things for my RPi2.
While the screen does work I noticed that during boot on the HDMI it says that it can’t load/find the waveshare32b module.
I’m using an RPi2 with a v4 WaveShare SpotPear 3.2″.
Any chance of the image? Trying to get this combo working as well…
Will this method work for my LCD?Link is shown above.
Need support for this screen:
http://www.wvshare.com/product/3.5inch-RPi-LCD-A.htm
My Touchscreen is now working fine.The problem was for the ribbon cable on the back side of LCD.It was not connected properly.I just tighted the cable and it worked fine.Hope it will be useful tip.
Now the problem is i can’t shutdown my pi correctly.It restarts after i execute sudo shutdown -h -P now command.What is the reason ?
hello, all worked fine BUT only KODI don’t start on LCD, it is ever send to HDMI. :-(
Can anyone help me, please.
Hello!
Excuse me i Have the same problem as you.
Kodi doens’t show in LCD Screen, always in HDMI Screen.
Do you have any Solution?
Best Regards
Hi, any luck projecting koi on the LCD?i am struggling too
::::FYI::::
Buttons can be accessed directly via GPIO. On my WaveShare SpotPear 3.2″ v4 these are pins 12,16 and 18.
import RPi.GPIO as GPIO
GPIO.setmode(GPIO.BOARD)
GPIO.setup(12, GPIO.IN, pull_up_down = GPIO.PUD_UP)
GPIO.setup(16, GPIO.IN, pull_up_down = GPIO.PUD_UP)
GPIO.setup(18, GPIO.IN, pull_up_down = GPIO.PUD_UP)
while True:
if(GPIO.input(12) == 0):
print(“Button 1 pressed”)
if(GPIO.input(16) == 0):
print(“Button 2 pressed”)
if(GPIO.input(18) == 0):
print(“Button 3 pressed”)
GPIO.cleanup()
Can u make the buttons reset or power down the pi?
Thank’s Jeff, this has solved quite some grief I had with accessing the keys.
As most of the time the was a problem between the chair & the keyboard.
Lesson learned: It helps to use the interface (BOARD va. BCM) and pin addressing consistently. :-)
Thank you for this great tutorial. I looked everywhere for this information. I have an eleduino 3.5 version A. I was able to get it working on my Pi 2 by following your tutorial and using flexfb as the screen type. I got the other settings from the image that came with the product. I did find that the ts_calibrate didn’t recognize the screen so I installed xinput-calibrator and it worked fine.
What other settings are you speaking of? Where are they on the image? I’m also using the Eleduino 3.5, but I’m not sure which letter version it is. It says version 141226 on the back, and it’s a black PCB.
Hey Guys,
Just got my Pi2 running Wheezy, working with the Eleduino 3.5 LCD without running the OEMs image… kinda. I didn’t want to rebuild the application environment again, so was avoiding flashing the SD.
This is the screen I have:
http://www.amazon.com/gp/product/B00R1M40F6?psc=1&redirect=true&ref_=oh_aui_detailpage_o02_s00
This is the Pi I have:
http://www.amazon.com/gp/product/B00T2U7R7I?psc=1&redirect=true&ref_=oh_aui_detailpage_o03_s01
I tried the steps in this tutorial. It’s very clear and easy to follow, thank you. But it didn’t work for me, I tried setting my device to flexfb. Only got white screen.
So I started to experiment.
I downloaded this:
https://copy.com/CuiAGFtJSeie9rWF
..linked from the OEMs product site ( http://www.eleduino.com/Raspberry-Pi-2-model-B-B-3-5-Inch-320×480-Pixel-Resistive-IPS-TouchScreen-p10439.html).
It seems to be an archive of the RASPIAN binaries (I’m not an expert)
Unzipped it and looked around. From a shell script inside i kinda figured out what it was doing. I didn’t like what I saw, so I manually made changes omitting the parts I didn’t like (it rm -r my /lib/modules directory… omitted that part) and copied 2 files and 1 directory from the OEMs archive to the file system of my Pi2.
The archive unpacks to a directory called RPI2B_B_B+_TOUCH_SPI_3.5_RASPBIAN
The shell script I was looking at is called SPI_3.5_RASPBIAN
This was my process:
1: Power down my Pi2
2: Removed the SD card
3: Mounted the Pi2’s SD on laptop where I had unpacked the OEMs archive.
Lets say I mounted the SDs filesystem at /media
4: Backed up SD files:
mv /media/boot/kernel.img /media/boot/kernel.backup
mv /media/boot/kernel7.img /media/boot/kernel7.backup
5: Copied the 2 matching kernel files from the OEMs Archive in the the SDs files system
cd RPI2B_B_B+_TOUCH_SPI_3.5_RASPBIAN
cp kernel.img /media/boot/.
cp kernel7.img /media/boot/.
6: Copied prebuilt kernel modules from the OEMs archive to the SD filesystem
# Still in OEM archive directory
cp -R ./modules/3.18.6-v7+ /media/[long-generated-image-id]/lib/modules/.
7: Unmounted the Pi2 SD.
8: Reinserted to Pi2 and rebooted. Screen started working!! I honestly don’t know why this worked. Maybe someone can help answer it.
## Some outputs:
pi@p2pool001 ~ $ lsmod
Module Size Used by
snd_bcm2835 18850 0
snd_soc_wm8804 7354 0
regmap_spi 1793 1 snd_soc_wm8804
snd_soc_pcm512x_i2c 1689 0
snd_soc_tas5713 5006 0
snd_soc_pcm512x 6340 1 snd_soc_pcm512x_i2c
regmap_i2c 2354 3 snd_soc_wm8804,snd_soc_pcm512x_i2c,snd_soc_tas5713
snd_soc_bcm2708_i2s 6613 0
regmap_mmio 2961 1 snd_soc_bcm2708_i2s
snd_soc_core 140272 4 snd_soc_pcm512x,snd_soc_wm8804,snd_soc_tas5713,snd_soc_bcm2708_i2s
snd_pcm_dmaengine 3359 1 snd_soc_core
snd_pcm 75404 4 snd_bcm2835,snd_soc_wm8804,snd_soc_core,snd_pcm_dmaengine
snd_compress 7618 1 snd_soc_core
snd_seq 53074 0
snd_timer 17780 2 snd_pcm,snd_seq
snd_seq_device 5632 1 snd_seq
snd 51667 7 snd_bcm2835,snd_soc_core,snd_timer,snd_pcm,snd_seq,snd_seq_device,snd_compress
i2c_bcm2708 4990 0
pi@p2pool001 ~ $ dmesg | grep spi
[ 1.732072] bcm2708_spi bcm2708_spi.0: master is unqueued, this is deprecated
[ 2.338259] bcm2708_spi bcm2708_spi.0: chipselect 0 already in use
[ 2.344635] bcm2708_spi bcm2708_spi.0: can’t create new device for flexfb
[ 2.351591] bcm2708_spi bcm2708_spi.0: SPI Controller at 0x3f204000 (irq 80)
[ 3.337084] ads7846 spi0.1: touchscreen, irq 273
[ 3.347035] input: ADS7843 Touchscreen as /devices/platform/bcm2708_spi.0/spi_master/spi0/spi0.1/input/input0
pi@p2pool001 ~ $ dmesg | grep fbtft
[ 0.000000] Kernel command line: dma.dmachans=0x7f35 bcm2708_fb.fbwidth=656 bcm2708_fb.fbheight=416 bcm2709.boardrev=0xa21041 bcm2709.serial=0x631a4eae smsc95xx.macaddr=B8:27:EB:1A:4E:AE bcm2708_fb.fbswap=1 bcm2709.disk_led_gpio=47 bcm2709.disk_led_active_low=0 sdhci-bcm2708.emmc_clock_freq=250000000 vc_mem.mem_base=0x3dc00000 vc_mem.mem_size=0x3f000000 dwc_otg.lpm_enable=0 console=ttyAMA0,115200 console=tty1 root=/dev/mmcblk0p2 rootfstype=ext4 elevator=deadline rootwait fbtft_device.custom fbtft_device.name=flexfb fbtft_device.gpios=dc:22,reset:27 fbtft_device.bgr=1 fbtft_device.speed=48000000 fbcon=map:10 fbcon=font:ProFont6x11 logo.nologo dma.dmachans=0x7f35 console=tty1 consoleblank=0 fbtft_device.fps=50 fbtft_device.rotate=0
[ 0.749082] fbtft_device: SPI devices registered:
[ 0.749113] fbtft_device: ‘fb’ Platform devices registered:
[ 0.749154] fbtft_device: bcm2708_fb id=-1 pdata? no
[ 0.749217] fbtft_device: GPIOS used by ‘flexfb’:
[ 0.749249] fbtft_device: ‘dc’ = GPIO22
[ 0.749277] fbtft_device: ‘reset’ = GPIO27
hello.
thank you for your great tutorial, it got me on the right way. unfortunataly i only see some boot messages on the lcd and then it turns black. maybe you could give me a hint on how to get it working entirely.
i have a watterott display (https://github.com/watterott/RPi-Display) and changed the device-name to “rpi-display”. i use a rsapberrypi 2 and hae the latest raspian image installed.
perhaps it is also helpfull if you knew that i have almost no experience with linux.
Very fine tutorial for the specific TFT…
… but the hints for connecting other ones don’t meet the requirements, sorry…
… instead of only exchanging the name of the display, it’s very important to adapt the “right” pin out of the TFT correctly.
But nevertheless, a very fine starting point for connecting / integrating touch screens into a standard image files. Thank very much!!!
Did you check to see if your device is supported yet? The device name should be specific for your screen, as listed in the fbtft file linked to in the beginning of the post
I too have a raspberry pi 2, and a waveshare spotpear 3.2 RPi lcd (v3) and I just can’t get it to work! I suspect I have a faulty LCD, but thought I’ll try this forum for help before I sent it back.
Soon as the pi is powered, the LCD lights up all white, with a few vertical pixels coloured at one of the edges, and nothing else. I don’t think that should happen – not at least before the BOIS has started up.
Anyway, point 1, says to change to dev/fb1 – I don’t have fb1. Only fb0 appears to be there. is that a clue what could be wrong? I have enabled SPI (is there a command to tell if its enabled?) I have also ran spidev to troubleshot (though I haven’t a clue what I means)
./spidev_test -D /dev/spidev0.0
gives me…
pi@raspberrypi ~ $ ls /dev/fb*
/dev/fb0
pi@raspberrypi ~ $ ./spidev_test -D /dev/spidev0.1
spi mode: 0
bits per word: 8
max speed: 500000 Hz (500 KHz)
00 98 98 98 98 98
1C 3F FC 00 00 00
F8 98 98 98 98 98
98 98 98 98 98 98
98 98 98 98 98 98
98 88 88 80 F8 80
88 7F
Any ideas what going wrong? I am using the latest “2015-02-16-raspbian-wheezy_zip”. Enabled SPI. done all the steps. Even changed mmcblk0p2 to mmcblk0p6 as suggested by Dabomber60 (but that freezes for me)
edit: managed to get this fb1 to appear. not quiet sure how! But still doesn’t work
pi@raspberrypi /var/log $ gpio readall
+—–+—–+———+——+—+—Pi 2—+—+——+———+—–+—–+
| BCM | wPi | Name | Mode | V | Physical | V | Mode | Name | wPi | BCM |
+—–+—–+———+——+—+—-++—-+—+——+———+—–+—–+
| | | 3.3v | | | 1 || 2 | | | 5v | | |
| 2 | 8 | SDA.1 | IN | 1 | 3 || 4 | | | 5V | | |
| 3 | 9 | SCL.1 | IN | 1 | 5 || 6 | | | 0v | | |
| 4 | 7 | GPIO. 7 | IN | 1 | 7 || 8 | 1 | ALT0 | TxD | 15 | 14 |
| | | 0v | | | 9 || 10 | 1 | ALT0 | RxD | 16 | 15 |
| 17 | 0 | GPIO. 0 | IN | 1 | 11 || 12 | 0 | IN | GPIO. 1 | 1 | 18 |
| 27 | 2 | GPIO. 2 | OUT | 1 | 13 || 14 | | | 0v | | |
| 22 | 3 | GPIO. 3 | OUT | 1 | 15 || 16 | 0 | IN | GPIO. 4 | 4 | 23 |
| | | 3.3v | | | 17 || 18 | 0 | IN | GPIO. 5 | 5 | 24 |
| 10 | 12 | MOSI | ALT0 | 0 | 19 || 20 | | | 0v | | |
| 9 | 13 | MISO | ALT0 | 0 | 21 || 22 | 0 | IN | GPIO. 6 | 6 | 25 |
| 11 | 14 | SCLK | ALT0 | 0 | 23 || 24 | 1 | ALT0 | CE0 | 10 | 8 |
| | | 0v | | | 25 || 26 | 1 | ALT0 | CE1 | 11 | 7 |
| 0 | 30 | SDA.0 | IN | 1 | 27 || 28 | 1 | IN | SCL.0 | 31 | 1 |
| 5 | 21 | GPIO.21 | IN | 1 | 29 || 30 | | | 0v | | |
| 6 | 22 | GPIO.22 | IN | 1 | 31 || 32 | 0 | IN | GPIO.26 | 26 | 12 |
| 13 | 23 | GPIO.23 | IN | 0 | 33 || 34 | | | 0v | | |
| 19 | 24 | GPIO.24 | IN | 0 | 35 || 36 | 0 | IN | GPIO.27 | 27 | 16 |
| 26 | 25 | GPIO.25 | IN | 0 | 37 || 38 | 0 | IN | GPIO.28 | 28 | 20 |
| | | 0v | | | 39 || 40 | 0 | IN | GPIO.29 | 29 | 21 |
+—–+—–+———+——+—+—-++—-+—+——+———+—–+—–+
| BCM | wPi | Name | Mode | V | Physical | V | Mode | Name | wPi | BCM |
+—–+—–+———+——+—+—Pi 2—+—+——+———+—–+—–+
pi@raspberrypi /var/log $ dmesg | grep spi
[ 0.000000] Linux version 3.18.5-v7+ (pi@raspi2) (gcc version 4.8.3 20140106 (prerelease) (crosstool-NG linaro-1.13.1-4.8-2014.01 – Linaro GCC 2013.11) ) #1 SMP PREEMPT Fri Feb 6 23:06:57 CET 2015
[ 4.589677] bcm2708_spi 3f204000.spi: DMA channel 2 at address 0xf3007200 with irq 77
[ 4.603982] bcm2708_spi 3f204000.spi: DMA channel 4 at address 0xf3007400 with irq 20
[ 4.638597] bcm2708_spi 3f204000.spi: SPI Controller at 0x3f204000 (irq 80)
[ 4.650717] bcm2708_spi 3f204000.spi: SPI Controller running in dma mode
[ 8.173545] fbtft_device: spidev spi0.0 500kHz 8 bits mode=0x00
[ 8.182743] fbtft_device: spidev spi0.1 500kHz 8 bits mode=0x00
[ 8.209345] fbtft_device: Deleting spi0.0
[ 8.246057] fbtft_device: spidev spi0.1 500kHz 8 bits mode=0x00
[ 8.254959] fbtft_device: fb_ili9340 spi0.0 48000kHz 8 bits mode=0x00
[ 8.355289] ads7846_device: Deleting spi0.1
[ 8.583982] graphics fb1: fb_ili9340 frame buffer, 240×320, 150 KiB video memory, 4 KiB DMA buffer memory, fps=50, spi0.0 at 48 MHz
[ 8.602286] ads7846 spi0.1: touchscreen, irq 465
[ 8.612807] input: ADS7846 Touchscreen as /devices/soc/3f204000.spi/spi_master/spi0/spi0.1/input/input0
pi@raspberrypi /var/log $
Jeff G button script seems to work as well (when button is pressed, I get alerts)
It seems all appears to be working – just the LCD is still all white with a single line of coloured pixels on edge) and nothing else. Is there a way to output, like jeff G script, of touch points?
I had the same one, I finally found a driver for it here: http://www.waveshare.net/wiki/3.2inch_RPi_LCD_(B) you will need to translate the page, but unpack the driver then run sudo ./LCD-show/LCD32-show. It should reboot and all will be good with the screen :)
Really trying hard to get my v4 WaveShare SpotPear 3.2″ to work with my pi2.
Can anyone let me know if the default OS image sent with the screen works with pi2 or just Pi B/B+ as i think my screen maybe broken but can’t confirm it yet as i have not had it working at all
I don’t have v4 (have v3), but since p2 I suspect it newer then v4, I would think that the default image is designed for b/b+. My default image (for v3) is “DVK512-LCD32(V3)-140817.img” and doesn’t appear to work on my p2 (and neither to my p1b as it should be designed for). My LCD appears to be just all white except on edge appears to be different coloured pixels.
Please make sure you enable SPI and I2C. Then reboot.
For me the image on the mini cd came with LCD does not worked for RPI2. Get fresh image and follow steps in this tutorial, which should work.
I got one working on my Pi2
Hi, thanks for the great tutorial. However, I still have a little problem with my LCD display.
My system: Raspberry Pi 2 Model B with Raspian Wheezy from Febuary 2015. LCD display of Sainsmart 3.2 http://www.conrad.de/ce/de/product/1283498/Raspberry-Pi-Display-Modul-Touch-Display-81-cm-32/?ref=home&rt=home&rb=1
cmdline.txt:
dwc_otg.lpm_enable=0 console=ttyAMA0,115200 console=tty1 root=/dev/mmcblk0p2 rootfstype=ext4 cgroup_enable=memory elevator=deadline rootwait fbtft_device.custom fbtft_device.name=sainsmart32_spi fbtft_device.gpios=dc:24,reset:25 fbtft_device.bgr=1 fbtft_device.speed=48000000 fbcon=map:10 fbcon=font:ProFont6x11 logo.nologo dma.dmachans=0x7f35 console=tty1 consoleblank=0 fbtft_device.fps=50 fbtft_device.rotate=90
etc/modules:
spi-bcm2708
fbtft_device name=sainsmart32_spi gpios=dc:24,reset:25 speed=16000000
sainsmart32_spi width=320 height=240 buswidth=8 init=-1,0xCB,0x39,0x2C,0x00,0x34,0x02,-1,0xCF,0x00,0XC1,0X30,-1,0xE8,0x85,0x00,0x78,-1,0xEA,0x00,0x00,-1,0xED,0x64,0x03,0X12,0X81,-1,0xF7,0x20,-1,0xC0,0x23,-1,0xC1,0x10,-1,0xC5,0x3e,0x28,-1,0xC7,0x86,-1,0×36,0x28,-1,0x3A,0x55,-1,0xB1,0x00,0x18,-1,0xB6,0x08,0x82,0x27,-1,0xF2,0x00,-1,0×26,0x01,-1,0xE0,0x0F,0x31,0x2B,0x0C,0x0E,0x08,0x4E,0xF1,0x37,0x07,0x10,0x03,0x0E,0x09,0x00,-1,0XE1,0x00,0x0E,0x14,0x03,0x11,0x07,0x31,0xC1,0x48,0x08,0x0F,0x0C,0x31,0x36,0x0F,-1,0×11,-2,120,-1,0×29,-1,0x2c,-3
ads7846_device model=7846 cs=1 gpio_pendown=23 speed=2000000 keep_vref_on=1 swap_xy=1 pressure_max=255 x_plate_ohms=60 x_min=300 x_max=3800 y_min=700 y_max=3400
The LCD display shows the raspberry correctly. However, the touch screen input does not work. The mouse pointer can I move correctly with your finger, but I can not select things (function of the left mouse button).
Furthermore, I get an error on boot: [info] Loading kernel module sainsmart32_spi.
FATAL: Module sainsmart32_spi not found.
Can someone give me a hint.
Thank You.
I have exactly the same problem. Did you fix it up ?? Any help will be highly appreciated.
Thank you so much for this great tutorial. I have my WaveShare SpotPear 3.2″ V4 working fine on my Raspberry Pi 2. If you are having problems with this specific hardware, skip step 5.
Many thanks for your response. But leave out of step 5, does not change the function. The problem still exists .
Many thanks for your response. But leave out of step 5, does not change the function. The problem still exists .
leaving out step 5 works… i’ve got it working,with a few bugs.
Thank you very much for this article – saved me lots of hassle!
so i have the exact thing as you exept i use a pi 2. the resolution works but the windows dont fit… does that make sence to you? if so please help
Can someone upload SD card image that works with RBP2 ? My idea is to use Eleduino TFT as additional screen and play movies via HDMI.. is it possible?
Do not follow this article when you don’t know what kind of LCD module. In my case, I follow all of this and my raspberry pi cannot boot anymore. I will try to recover, but I think I should format my SD card and reinstall OS.
congrats.
really helpful
console works fine on lcd until i type startx then it switches back to the HDMI
Following tutorial able to get it working on RPi 2 and waveshare v4 3.2.
But when tried
sudo REPO_URI=https://github.com/notro/rpi-firmware BRANCH=builtin rpi-update
Expecting this would builtin driver module within kernel and help with avoiding mistakenly overwriting anything. But with this is cause LCD screen to go blank white and no boot activity. Also noticed on HDMI it get stuck on Initial rainbow screen and stuck on that.
Any Idea what happening with that?
Also can you someone explain what exactly happen when do rpi-update? Want to understand what this step actualy doing and help me to debug any such situation and able to help others.
Thanks
Does anyone tried splash boot screen with waveshare v4 LCD and Rpi2? I tried to follow some example from https://github.com/notro/fbtft/wiki/Bootsplash but no success.
Anyone with success please share experience and steps for same.
Thanks
Great tutorial thanks; got an X session working great 1st time. Has anybody managed to get Kodi/XMBC working on the LCD either Kodi standalone, Raspbmc or Xbian?
in this part of step 4:
“Currently, the only module that is set to load automatically is snd-bcm2835, which is the module for the Raspberry Pi’s Broadcom processor.
Add this code below the snd-bcm2835 line to support the fbtft_device and ads7846_device modules:”
in the video you say to change the existing line to “snd-bcm2836” for the rasppi2 which isn’t listed in the written part of the instructions (part 4).. this should be added (I believe it caused me to have to re-image the OS again, the Pi wouldn’t boot to anything just using the written steps)
but other than that, got this working on my Pi2 after watching the video :D thanks for the fantastic writeup!
Got it to work to 99% with Pi 2 and waveshare 32b-touch screen. However left-right is swapped… Don´t know exactly what to do here…
Please could you backup and upload your SD card image? I cant make mine work using this tutorial and it would help me a lot.
Did you ever manage to get an image for this? I would also find it very useful…
I think there need correction in step 4, as it should have
spi-bcm2708
fbtft_device name=waveshare32b gpios=dc:22,reset:27 speed=48000000 width=320 height=240 buswidth=8 init=-1,0xCB,0x39,0x2C,0x00,0x34,0x02,-1,0xCF,0x00,0XC1,0X30,-1,0xE8,0x85,0x00,0x78,-1,0xEA,0x00,0x00,-1,0xED,0x64,0x03,0X12,0X81,-1,0xF7,0x20,-1,0xC0,0x23,-1,0xC1,0x10,-1,0xC5,0x3e,0x28,-1,0xC7,0x86,-1,0×36,0x28,-1,0x3A,0x55,-1,0xB1,0x00,0x18,-1,0xB6,0x08,0x82,0x27,-1,0xF2,0x00,-1,0×26,0x01,-1,0xE0,0x0F,0x31,0x2B,0x0C,0x0E,0x08,0x4E,0xF1,0x37,0x07,0x10,0x03,0x0E,0x09,0x00,-1,0XE1,0x00,0x0E,0x14,0x03,0x11,0x07,0x31,0xC1,0x48,0x08,0x0F,0x0C,0x31,0x36,0x0F,-1,0×11,-2,120,-1,0×29,-1,0x2c,-3
ads7846_device model=7846 cs=1 gpio_pendown=17 speed=1000000 keep_vref_on=1 swap_xy=0 pressure_max=255 x_plate_ohms=60 x_min=200 x_max=3900 y_min=200 y_max=3900
As otherwise I see FATAL error in boot.log as it fail to load module waveshare32b not found.
anyone got the waveshare 3.2 touchscreen working on pi 2? I always end up on kernel panic. Could anyone post a working image please?
my touchscreen won’t work, keep getting this error. ERROR: could not insert ‘spi_bcm2708’: No such device.
anyone got this to work with waveshare spotpare 3.5″ iv tryed 5 times with no luck
I made all, and image appear but not works tactile part
After following this tut to the letter on a brand new image of Raspian, I find that the touch driver does not function. Anyone experience the same? Basically all I did was image a current copy of rasping, did a apt-get upgrade, and then did this tutorial. Then the touch driver does not work, meaning the pointer does not respond.
The reason I did this was because on a production version of my system I added the 3.2 screen and it worked great except for the x-axis. So I wanted to see if there was something in my system that was interfering or if this is another error. Now with a raw rasping the driver does not work at all. I wonder if the touch pin has changed since the kernel is using BCM pins instead of GPIO pin numbers?
I have exactly the same problem. I also installed a new version of Raspbian, and the LCD part works fine (except all the windows are way too large), but the touch part doesn’t work at all… I’m using Waveshare Spotpear 3.2″ V4.
I remember that I plugged in the screen wrongly one time, before configuring any of the GPIO pins. Can this have damaged the screen? Still it’s weird that the display part works well and the touch part not at all.
I do not think that has anything to do with it. Other than power pins, the rest are communication. If it still works then you are good. No, there is something else. I do suspect it us related to the BCM pin numbering. The real question is… Why isnt the eeveloper responding? I have since abandoned this TFT because of his lack of response.
Touch actually goes through one of the SPI pins I think. Either the driver is toast with the required kernel update or the driver is using the wrong pin. It is very likely the this works well with previous raspian versions, but not with the new B+ and with the new kernel.
I am trying to use the sainsmart 2.8″ lcd sold through microcenter, using the sainsmart32_spi … seems to have the same pinouts, should I be able to get this to work? I am stuck at the white out screen on the lcd, doesn’t seem to recognize the module either.
The SainSmart 3.2 sold by MicroCenter (20-111-971) is actually the exact same WaveShare SpotPear v3 documented here. So maybe your 2.8 would work if you tried a WaveShare driver?
Thanks for the post but….
I fall at the first hurdle I am afraid.
The file that you suggest should be edited (99-fbturbo.conf) doesn’t appear in my xorg.conf.d folder. What have I missed.
I find apt-get updating everything and rebooting before starting on this made it appear for me.
Thanks for the ultra fast response.
Unfortunately I’ve tried that ( a few times actually) but the file still doesn’t exist. Thanks very much for the assistance anyway. I must be doing something wrong. My Raspian came from a Noobs installation, I’m wondering if I should try installing the OS from somewhere else. My LCD screen didn’t come with a CD or any docs so I’m completely in the dark here.
I have just found a way to get this file on my system! Apparently its part of the fbturbo installation. I found it here http://www.raspberrypi.org/forums/viewtopic.php?f=63&t=45746&start=75 (under experimental enhanced x driver (rpifb).. Sorry if this is obvious to everyone but I am SUCH a noob at this!!
I have the waveshare 3.5 and what to use it only as a secondary screen by putting measurement data with a c program on the screen. Is there any solution?
Ok, what am I doing wrong. I am using a fresh install of the newest raspbian, on a Pi 2. After doing the first two steps and rebooting I get the rainbow screen, then the boot up process, and then my screen just goes black with a flashing cursor in the top left. I am not able to enter any commands or anything…like the pi is halting just after boot up. Any thoughts/suggestions would be greatly appreciated. Thanks.
Well figured out that step 1 was causing my problems. I’m guessing it is shutting off my hdmi feed and trying to switch it over to the SPI, am I guessing right? If so, not sure how I’m suppose to complete the rest of the steps if my hdmi output gets turned off before the LCD is actually set up to work…that sounds kind of smartass-like, which is not my intention, just looking for some clarification on what is going on in that first step as I am fairly new to this stuff. Thanks.
Anyway, I was able to do the rest of the steps with no problem. LCD didn’t work, but I am using a Waveshare 3.5, which doesn’t look to be supported yet. Mostly I am trying to play around and see if I can get it working somehow. Anyone found a way to do this yet?
Got the display working, now have to work on the touch part
How did you
Hey dude, how did you fix it? Seriously, I need help.
Hey dude, how did you get it to work? Seriously, I need help.
Doesn’t work. Crashes on reboot after last part. Will install image that came with Waveshare
I use waveshare 3.5 A , not work.*sigh*
Here is a link to an updated image from waveshare. Upon install it got the display up and running, but I still do not have touch functionality. I’ve been playing around with it, but it has been to no avail…hopefully someone better at this stuff from me can get the touch working.
https://drive.google.com/file/d/0BwEi-HnH9J8oZUJlRE9YbWQwN1E/view?usp=sharing
Oh yeah, this is the waveshare 3.5(A) and I’m running it on the PI2
I am having an issue with getting the GUI back. Every time I use startx my pi just sits there for about two minutes saying “No protocol specified”, and then it just gives up. I went through this tutorial about four times now and am not certain why it is doing this. I have the exact same LCD as is in the tutotial (WaveShare 3.2b). any help would be great.
Hey, is there any way to control the backlight on the LCD?
There is likely an attribute that you can add that controls it, or you would add a variable resistor to the display power.
The file to add the attribute would most likely be “/etc/modules”.
Hi, i have a 3.2 LCD tontec screen, I need help. The name does not appear on the list.
Thank you.
Hi I am making a project for school,using the raspberry pi b+ and waveshare spotpare 3.2b. Everything works except the touch input doesn’t work. Any help would be appreciated very much.
https://www.circuitbasics.com/raspberry-pi-touchscreen-calibration-screen-rotation/
May this help you mate.
I keep getting errors when posting – testing
I keep getting a white screen on my LCD. I can tell it’s connected properly though because when I move my mouse, the screen flashes.
/usr/share/X11/xorg.conf.d/99-fbturbo.conf
File not found,
I have tried apt-get and all the solutions in the comments.
how ever I have skiped the first step (switching FB1 to FB0)
the LCD work on but when I command “Startx” the LCD goes black and that is all.
any help please?
sudo apt-get install xserver-xorg-video-fbturbo
hope this helps
hi tryingto follow guide but after I do the update on reboot I get a black screen on main screen with a flashing dash in top left corner
Hello mate
the problem seems to be that you have fail to fullfil the first step: switch FB0 to FB1.
try to do so and tell me what comes up.
just tried it leaveing the 1st stestep till last but get on boot screen
end kernel panic – not syncing: vfs: uunable to mount root fs on unknown-block(179.2)
ramom: momblocking pool is initialized
followed yourguide but used info from txtfiles from the given image with screen 4inch spotpear waveshare
I have found that my problem was that I made a typing Error writing: sudo nano /usr/share/X11/xorg.conf.d/99-fbturbo.conf
selly me :D
I also followed these instructions and at the last reboot ended up with the exact same kernel panic. Raspberry Pi 2 and a Waveshare 3.2 screen.
very frustrating… I spent a whole day try it, and now, Iget the same white screen and I have lost everything. Not recommanded !
So complicated (and especially the line with myriad of hexadecimal values) that if you succed you’re a very Lucky person. Don’t do that except if you have time to kill.
Great write up – worked first time for me. The only difference is by modules blacklist file was empty so there was no change needed there. Maybe to do with me being on a newer rasbian?
same problem here, exactly the same, any solutions?
i ment, this exact problem:
the raspberry pi b+ and waveshare spotpare 3.2b. Everything works except the touch input doesn’t work
Hi, I am using a Raspberry Pi 2 and a WaveShare SpotPear 3.5inch Touch LCD. It is possible to fix it with a FBTFT driver? Thank you!
Thanks for the tutorial. It works, but I get the boot/command line stuff on the HDMI monitor and the LCD only comes on when I do startx. Is there a way to get everything to appear on the LCD screen?
amigos con esta imagen funciono mi LCD 3.2” V4 en mi raspberry PI2
https://yadi.sk/d/MqEusRptgZYsC
Hi, Thanks for this useful post. Can u help me will this screen device name I purchased off ebay. I’ve no idea what device name it has.
Here’s the link:
http://www.ebay.com/itm/3-5-Raspberry-Pi-B-B-PI2-Touch-Screen-Monitor-480×320-LCD-Case-Heatsink-/171576408857?pt=LH_DefaultDomain_0&hash=item27f2c03b19
Thank you.
I am trying to get this same screen to work with the image of RetroPie 2.6 and it won’t work. I have followed all the steps and nothing, please help I an kinda a noob.
I too am trying to get this to work with RetroPie with just a white screen when all the steps are completed
I have a Tontec 7 inch touchscreen with a Raspberry Pi 2 B. After following the instructions the touch screen is functioning but not properly… The only are that works is the upper left (and only a small area of that). I tried changing the width and height in the modules but it didnt change anything. Also the xy seems to be reversed, I changed the swap_xy to 1 but again no change on the screen.
What am I doing wrong?
Hello, I have the same touchscreen. Can you please say to me how you put the fbtft_device name.
Thank you so much.It works :)
Hey,
I am having some issues,
I am trying to make my 3.2 inch waveshare work with Retropie emulation station OS
Since its based on Raspbian I thought it would work but I was wrong,
Now the OS freezes at the emulation station loading screen, and if I connect my lcd it gives me a lot of error messages which I can only see on the 3.2 inch screen.
I can type but command wont work.
Any ideas?
hi im using this screen
http://www.amazon.com/gp/product/B00PRIXAWU?psc=1&redirect=true&ref_=oh_aui_detailpage_o00_s00
i did all the steps everything works .however , retro pi wont show the UI juts the commands help please!!!!
hi i have the same screen with a raspberry pi 2 im trying to run retro pie but it wont show ..however it shows all the commands …but i cant get it to show the gui …if u guys can make an image or something please i have been in this pain for two weeks already thank you
my screen is named 3.5 inch RPi LCD V3.0
before the setup my screen was blanked
now the pi does not boot
the screen remains dark
what can i do ?
hi
excuse me
my screen remains blanked, (not dark)
i have choosed the name “rpi-display” in the list
well ,,i follow all instructions and still kernel panic ,,,,may i request from mr. Circuitbasics@Gmail.Com that have a contact with manufacture and just ask for 2-3 links for image files for different versions of pi till all this f discussions are finished,,i cant understand 10 guys said we run it and 40 guys said kernel panic ,,as an expert i did 50 times imaging and follow all changes fro this forum and other forums and still cant run it ,,,so sth is wrong …..just asking the manufacture for simple f image ,,that`s it ,,,,simpleeeeeeeeeeeeeeeee
well i did it at last on pi 2,,after reading 100 pages and reimaging 50 times ,,i finally find the solution ,,,,there is a simple line forgotten to be attached in setup instruction,,,well i give u clue for prodigies ,,there is a step left between step 3 and 4,,,,and a simple change in step 5 according to your pi version ,,,that`s it ,,nothing else,,,,
dude help out …. i am facing the same problem… some help plz..
Please check out https://github.com/swkim01/waveshare-dtoverlays
Hi,
I got it show the booting screen but when it goes to the xdesktop it’s just a blinking cursor. Good document. Got further than sainsmart’s site did.
Damn.. I thought I was kickin ass haha. I am using the SainSmart 3.2″.. the backlight is lit up and the pi was booting and everything just fine but on the final reboot it gets hung and says “nonblocking pool is initialized” ?? No idea what that means. But it’s def just frozen at this point.. on my main screen, and just the backlight is on the SainSmart.
Hi , I have on the screen flashes the top menu . Accurate appears and disappears a white stripe instead of the menu
This was an excellent tutorial. I have gotten an output to the screen, but no touchscreen usage . I have the Waveshare SpotPear 3.2 Inch LCD V4 screen, but using Raspberry PI 2 with wheezy. Any ideas?
thanks again for all the help
is there an Support for an adafruit waveshare 4″
poopooplater
Dear Sir
Thanks a lot for this article. Very clear and easy . I am new in pi’s world and my 3.2″ screen is working fine. I rotate 90 º and works. I can use mouse and so on.Not problems.
Like other members , I have problems with touch screen.
I have a pi B+ , and 3.2″ touch screen Waveshare SpotPear V4. The manufacturer image did not work.
Whe I start the system, in the external monitor begin to show “load” text like allways until it finish with these messages:
Loading kernel module waveshare32b
FATAL Module waveshare not found
Loading kernel module ads7816_device
FATAL module ads7816_device not found
But the screen start to work here and works well.
I filed the steps to calibrate the screen but it did not work.I think because it did not find the TFT pin, because I think the touch problem is the assigned pin to control it changed.
On the other hand I did not chage parameters about I2C interface .
Please , have anybody fix the touchscreen issue?
Thanks in advance for your help and time.
Sincerely from Canary Islands,
Santiago
Hi Santiago!. I have the same problem . I have problems with touch screen.
you’ve found the solution?.
Thanks in advance for your help and time.
Sincerely from Zaragoza,
Santiago
Will this work on other boards like the odroid x2 ?
For anyone else who ends up with a kernel panic after following these instructions:
Boot your Pi into recovery mode by holding down shift when starting
Edit config
In cmdline.txt change mmcblk0p2 to mmcblk0p6
Save and reboot.
Guy, you are a life saver, doing this worked.
Hopefully Google will pick this up, I had error end kernel panic – not syncing: vfs: unable to mount root fs on unknown-block(179,2)
Had this over and over regardless of Pi model (defo works on a B+ now).
Getting it to work:
I actually used the driver from here http://www.waveshare.com/wiki/3.2inch_RPi_LCD_(B) , from a new wheezy build, did nothing except enable SPI in config, install driver, and change mmcblk0p2 to mmcblk0p6 in cmdline.txt and it all worked, no drama.
Hi I managed to set up my touch screen ok but I now have the issue that everything desktop fits fine but the windows I open are all huge and I can’t remember how to change the size and cannot see the option in desktop preferences any idea what I have to do and is it at all possible to install kodi to run through the raspbian is as this would be a lot my useful than having to keep swapping os on every boot up many thanks in advanced hope you can help me
The touch module in no longer included in the newest kernel. You have to set it up as an overlay.
Hi, sorry I’m a REAL noob… I can’t manage changing 99-fbturbo.conf at the first step (fb0 to fb1), because the file is in read only mode (Raspbian july 2015). I can’t manage getting rights to change… Any idea? Thanks.
Type Sudo in front of the command
Advice to all who have the drivers from the (touch)screen manufacturer and cannot obtain those otherwise: you can skip everything and go to the update steps skipping the kernel and kernel modules update (as mentioned by the author) so that you don’t override the preinstalled drivers. I have a Waveshare 3.5″ RPi v3 (not the 3.2″ supported by notro’s drivers) and actually managed without any problems to get notro’s drivers make it work. However I am still reading about the xinput and xinput-calibrator to figure out how to include it as a kernel module so that I can compile my own kernel and add it there.
Hi, does this method also work for Waveshare 5″ touchscreen, it also work using the GPIO.
Hope you could point me in the right direction. Thanks.
i have raspberry pi 2 with 3.2 inch rpi lcd v4 waveshare spotpear.i have done as per your instructions.the display is working but touch screen not working.error shows waveshare32b module not found as well as touch screen module not found messages.
Hey! i did this and rotated it… It loads console perfectly, but when it goes into startx, i get a black background with only the wastebin/trashcan… how do i get the taskbar(or whatever that bar is called)? and the raspberry background?
Activating the touchscreen:
sudo nano /boot/config.txt
after the last entry:
dtoverlay=ads7846,speed=500000,penirq=17,swapxy=1
hi guys i have a raspberry pi 2 model B 1gb and have installed raspbian on it NOOBS_v1_4_1, i am using waveshare 3.2 4v lcd screen.
I followed the whole process to the dot but i am still getting a white screen.
can anyone help me plzzzz!!
i am on a deadline u see.
can you use it with emulationstation (retropie project)
I use this for my 3.5 inch touch screen, and it works
http://www.waveshare.com/wiki/3.5inch_RPi_LCD_(A)#Programming_the_image_file
under FAQ it tells you
How to apply the RPi LCD in a custom Raspbian system mirror image
Great information well described!
Now my question—
How can I set up my raspberry pi2 so that I can either use the 7″ LCd monitor and touchscreen or another monitor?
It looks as though the set up you describe makes a permanent change to spi rather than enabling the system to use whichever screen is connected.
Thanks
Very nice article it is very usefull!
I have this problem though:
I have followed all of your steps, but when I have rebooted nothing happens on my spi OLED screen, only on my HDMI screen it says:
FATAL: module pioled not found.
Do you know why it does that?
Any help will be greatly appericiated!
Rasmus
Hi, great article.
Unfortunately I have lost the Touch facility on my Waveshare 3.5″ LCD Touchscreen? Can you offer any reasons as to why? I copied the Raspbian image to my Raspberry Pi from the Waveshare website first of all. The Touchscreen displays but is not reactive with any touch
I have purchased a raspberry pi B+ total kit and waveshare 3.2 TFT display online. In the package i have been given a pre-loaded NOOBS installed SD card. I did not even start anything yet. What should i do what r the things needed and how to connect the display i really want to know. I need help as i don’t know anything. Does the above solution help or will u suggest something………………..
Hi, I have a Sainsmart 3.5″ TFT LCD and a RPi2. Is there any preset I can use or do I have to create a new one?
Hi great article thanks. I am trying to get a waveshare 7 inch LCD with capacitive touch running it works with the suppled image but if you upgrade it breaks the capacitive touch. I have a sense-hat and GPS which require the latest kernel and RASPIAN image and the install program for the screen replaces the /lib/modules directory and the kernel with older ones. I need to be able to install the touch drivers into a new clean OS can anyone give me some pointers? Thanks
I should add that the screen is plugged into the HDMI port and always works. The capacitive touch is driven from the USB port which also supplies power.
what about retropie it has nothing in the file from step one. so what do I do?
For anyone who have those unbranded cheap TFT touch modules and cannot get it to work with this guide, I had success on my 3.5″ with the following steps: http://pastebin.com/89qmFbPB
(Don’t forget to run ‘sudo raspi-config’ and “Expand Filesystem” if you cannot get into desktop)
I have the WaveShare 3.5 (A) and cannot get it to work with the Kali Linux with TFT for Raspberry Pi. Have anybody gotten the A to work? (Not the B, theres instructions for the B already and dont work with A)
So I have the original image that came with my screen and it works fine with the LCD but my problem is that I want to use my LCD screen with other distros (at this time I am trying to use it with Kali Linux with TFT support by default https://www.offensive-security.com/kali-linux-vmware-arm-image-download/) What do I have to do to transfer the needed files from the original image that WORKS with the screen and use them with another image?
Do you find a soluton for Kali?
I originally bought this bundle http://www.amazon.com/gp/product/B013E0IJUK?psc=1&redirect=true&ref_=oh_aui_detailpage_o02_s00 with an RPi LCD V3 and no extra documentation on the specifics on the chipset. I tried with the bftft drivers but since I have no idea what to call this screen I just suppose it isn’t supported.
After 4 lost days I just decided to get another screen, a Waveshare 3.2 (just like the one on this tutorial), I’ll follow these steps and see if it work for me.
Thanks for the post!
help when i try to boot my raspberry pi after doing all this it says Unable to mount root fs on unknown-block(0.0)
nevermind i retryed it only thing is that the tuchscreen is only a screen
I’ve followed your instructions and am only getting a white screen stil. I am using the Osoyoo 3.5 inch touchscreen from Amazon. http://www.amazon.com/gp/product/B013E0IJVE?psc=1&redirect=true&ref_=oh_aui_detailpage_o01_s00
I am running a Raspberry Pi 2, running Raspbian Jessie. Any suggestions?
I’m not sure if the Jessie kernel is compatible – can anyone please confirm or not ?? Adafruit states that their setup for TFT screens are Wheezy only ; is this a different setup ??
Ooops – updates from adafruit as we speak here ; https://learn.adafruit.com/adafruit-pitft-28-inch-resistive-touchscreen-display-raspberry-pi/easy-install
Hello! I have a problem with my raspberry pi 2. After loading I see a black screen with words. What I’ve doing wrong?
Hi,
I am using the same LCD and followed your tutorial. Have your tested the guide lately? Are you certain that it works? I see the boot messages on console but I get white screen as GUI starts.
Below is the /var/log/messages after reboot. Could you please help?
Oct 16 17:38:48 spare kernel: [ 11.653936] fbtft: module is from the staging directory, the quality is unknown, you have been warned.
Oct 16 17:38:48 spare kernel: [ 11.691425] fbtft_device: module is from the staging directory, the quality is unknown, you have been warned.
Oct 16 17:38:48 spare kernel: [ 11.722872] fbtft_device: SPI devices registered:
Oct 16 17:38:48 spare kernel: [ 11.732559] fbtft_device: spidev spi0.0 500kHz 8 bits mode=0x00
Oct 16 17:38:48 spare kernel: [ 11.741603] fbtft_device: spidev spi0.1 500kHz 8 bits mode=0x00
Oct 16 17:38:48 spare kernel: [ 11.750250] fbtft_device: ‘fb’ Platform devices registered:
Oct 16 17:38:48 spare kernel: [ 11.758218] fbtft_device: soc:fb id=-1 pdata? no
Oct 16 17:38:48 spare kernel: [ 11.765443] fbtft_device: Deleting spi0.0
Oct 16 17:38:48 spare kernel: [ 11.774787] fbtft_device: GPIOS used by ‘waveshare32b’:
Oct 16 17:38:48 spare kernel: [ 11.797819] fbtft_device: ‘dc’ = GPIO22
Oct 16 17:38:48 spare kernel: [ 11.804016] fbtft_device: ‘reset’ = GPIO27
Oct 16 17:38:48 spare kernel: [ 11.817202] fbtft_device: SPI devices registered:
Oct 16 17:38:48 spare kernel: [ 11.824518] fb_ili9340: module is from the staging directory, the quality is unknown, you have been warned.
Oct 16 17:38:48 spare kernel: [ 11.838570] fbtft_device: spidev spi0.1 500kHz 8 bits mode=0x00
Oct 16 17:38:48 spare kernel: [ 11.847045] fbtft_device: fb_ili9340 spi0.0 48000kHz 8 bits mode=0x00
Oct 16 17:38:48 spare kernel: [ 12.544859] graphics fb1: fb_ili9340 frame buffer, 320×240, 150 KiB video memory, 4 KiB DMA buffer memory, fps=50, spi0.0 at 48 MHz
Oct 16 17:38:48 spare kernel: [ 15.047752] random: nonblocking pool is initialized
Oct 16 17:38:48 spare kernel: [ 21.773644] smsc95xx 1-1.1:1.0 eth0: hardware isn’t capable of remote wakeup
Oct 16 17:38:48 spare kernel: [ 23.233722] smsc95xx 1-1.1:1.0 eth0: link up, 100Mbps, full-duplex, lpa 0x4DE1
Oct 16 17:38:48 spare kernel: [ 26.731487] cfg80211: Calling CRDA to update world regulatory domain
Oct 16 17:38:51 spare kernel: [ 31.201111] Adding 102396k swap on /var/swap. Priority:-1 extents:2 across:2134012k SSFS
Sorry, that was my mistake, a type while setting output to SPI. Now it displays the desktop, I see it for a few seconds and white screen again :(
Below is the /var/log/Xorg.0.log file. FBTURBO(0): FBIOBLANK: Invalid argument line could be the key.
[ 30.619]
X.Org X Server 1.12.4
Release Date: 2012-08-27
[ 30.620] X Protocol Version 11, Revision 0
[ 30.620] Build Operating System: Linux 3.2.0-2-mx5 armv7l Debian
[ 30.620] Current Operating System: Linux spare 4.0.7+ #1 PREEMPT Sat Jul 11 20:08:42 CEST 2015 armv6l
[ 30.621] Kernel command line: dma.dmachans=0x7f35 bcm2708_fb.fbwidth=656 bcm2708_fb.fbheight=416 bcm2708.boardrev=0x10 bcm2708.seri
al=0xffb17f8 smsc95xx.macaddr=B8:27:EB:FB:17:F8 bcm2708_fb.fbswap=1 bcm2708.disk_led_gpio=47 bcm2708.disk_led_active_low=0 sdhci-bcm270
8.emmc_clock_freq=250000000 vc_mem.mem_base=0x1ec00000 vc_mem.mem_size=0x20000000 dwc_otg.lpm_enable=0 console=ttyAMA0,115200 console=
tty1 root=/dev/mmcblk0p2 rootfstype=ext4 elevator=deadline rootwait fbtft_device.custom fbtft_device.name=waveshare32b fbtft_device.gpi
os=dc:22,reset:27 fbtft_device.bgr=1 fbtft_device.speed=48000000 fbcon=map:10 fbcon=font:ProFont6x11 logo.nologo dma.dmachans=0x7f35 co
nsole=tty1 consoleblank=0 fbtft_device.fps=50 fbtft_device.rotate=90
[ 30.622] Build Date: 11 February 2015 09:31:17PM
[ 30.622] xorg-server 2:1.12.4-6+deb7u6 (Julien Cristau )
[ 30.623] Current version of pixman: 0.33.1
[ 30.623] Before reporting problems, check http://wiki.x.org
to make sure that you have the latest version.
[ 30.623] Markers: (–) probed, (**) from config file, (==) default setting,
(++) from command line, (!!) notice, (II) informational,
(WW) warning, (EE) error, (NI) not implemented, (??) unknown.
[ 30.625] (==) Log file: “/var/log/Xorg.0.log”, Time: Fri Oct 16 18:15:23 2015
[ 30.636] (==) Using system config directory “/usr/share/X11/xorg.conf.d”
[ 30.641] (==) No Layout section. Using the first Screen section.
[ 30.641] (==) No screen section available. Using defaults.
[ 30.641] (**) |–>Screen “Default Screen Section” (0)
[ 30.641] (**) | |–>Monitor “”
[ 30.649] (==) No device specified for screen “Default Screen Section”.
Using the first device section listed.
[ 30.649] (**) | |–>Device “Allwinner A10/A13 FBDEV”
[ 30.649] (==) No monitor specified for screen “Default Screen Section”.
Using a default monitor configuration.
[ 30.650] (==) Automatically adding devices
[ 30.650] (==) Automatically enabling devices
[ 30.671] (WW) The directory “/usr/share/fonts/X11/misc” does not exist.
[ 30.671] Entry deleted from font path.
[ 30.671] (WW) The directory “/usr/share/fonts/X11/cyrillic” does not exist.
[ 30.671] Entry deleted from font path.
[ 30.672] (WW) The directory “/usr/share/fonts/X11/100dpi/” does not exist.
[ 30.672] Entry deleted from font path.
[ 30.672] (WW) The directory “/usr/share/fonts/X11/75dpi/” does not exist.
[ 30.672] Entry deleted from font path.
[ 30.678] (WW) The directory “/usr/share/fonts/X11/100dpi” does not exist.
[ 30.678] Entry deleted from font path.
[ 30.678] (WW) The directory “/usr/share/fonts/X11/75dpi” does not exist.
[ 30.678] Entry deleted from font path.
[ 30.679] (WW) The directory “/var/lib/defoma/x-ttcidfont-conf.d/dirs/TrueType” does not exist.
[ 30.679] Entry deleted from font path.
[ 30.679] (==) FontPath set to:
/usr/share/fonts/X11/Type1,
built-ins
[ 30.679] (==) ModulePath set to “/usr/lib/xorg/modules”
[ 30.679] (II) The server relies on udev to provide the list of input devices.
If no devices become available, reconfigure udev or disable AutoAddDevices.
[ 30.679] (II) Loader magic: 0xb6fe5cf0
[ 30.680] (II) Module ABI versions:
[ 30.680] X.Org ANSI C Emulation: 0.4
[ 30.680] X.Org Video Driver: 12.1
[ 30.681] X.Org XInput driver : 16.0
[ 30.681] X.Org Server Extension : 6.0
[ 30.681] (II) LoadModule: “extmod”
[ 30.707] (II) Loading /usr/lib/xorg/modules/extensions/libextmod.so
[ 30.721] (II) Module extmod: vendor=”X.Org Foundation”
[ 30.721] compiled for 1.12.4, module version = 1.0.0
[ 30.722] Module class: X.Org Server Extension
[ 30.722] ABI class: X.Org Server Extension, version 6.0
[ 30.722] (II) Loading extension SELinux
[ 30.722] (II) Loading extension MIT-SCREEN-SAVER
[ 30.722] (II) Loading extension XFree86-VidModeExtension
[ 30.723] (II) Loading extension XFree86-DGA
[ 30.723] (II) Loading extension DPMS
[ 30.723] (II) Loading extension XVideo
[ 30.723] (II) Loading extension XVideo-MotionCompensation
[ 30.723] (II) Loading extension X-Resource
[ 30.723] (II) LoadModule: “dbe”
[ 30.725] (II) Loading /usr/lib/xorg/modules/extensions/libdbe.so
[ 30.729] (II) Module dbe: vendor=”X.Org Foundation”
[ 30.729] compiled for 1.12.4, module version = 1.0.0
[ 30.729] Module class: X.Org Server Extension
[ 30.729] ABI class: X.Org Server Extension, version 6.0
[ 30.729] (II) Loading extension DOUBLE-BUFFER
[ 30.730] (II) LoadModule: “glx”
[ 30.732] (II) Loading /usr/lib/xorg/modules/extensions/libglx.so
[ 30.755] (II) Module glx: vendor=”X.Org Foundation”
[ 30.755] compiled for 1.12.4, module version = 1.0.0
[ 30.755] ABI class: X.Org Server Extension, version 6.0
[ 30.755] (==) AIGLX enabled
[ 30.756] (II) Loading extension GLX
[ 30.756] (II) LoadModule: “record”
[ 30.758] (II) Loading /usr/lib/xorg/modules/extensions/librecord.so
[ 30.763] (II) Module record: vendor=”X.Org Foundation”
[ 30.763] compiled for 1.12.4, module version = 1.13.0
[ 30.763] Module class: X.Org Server Extension
[ 30.763] ABI class: X.Org Server Extension, version 6.0
[ 30.763] (II) Loading extension RECORD
[ 30.764] (II) LoadModule: “dri”
[ 30.765] (II) Loading /usr/lib/xorg/modules/extensions/libdri.so
[ 30.776] (II) Module dri: vendor=”X.Org Foundation”
[ 30.777] compiled for 1.12.4, module version = 1.0.0
[ 30.777] ABI class: X.Org Server Extension, version 6.0
[ 30.777] (II) Loading extension XFree86-DRI
[ 30.777] (II) LoadModule: “dri2″
[ 30.779] (II) Loading /usr/lib/xorg/modules/extensions/libdri2.so
[ 30.783] (II) Module dri2: vendor=”X.Org Foundation”
[ 30.784] compiled for 1.12.4, module version = 1.2.0
[ 30.784] ABI class: X.Org Server Extension, version 6.0
[ 30.784] (II) Loading extension DRI2
[ 30.784] (II) LoadModule: “fbturbo”
[ 30.786] (II) Loading /usr/lib/xorg/modules/drivers/fbturbo_drv.so
[ 30.791] (II) Module fbturbo: vendor=”X.Org Foundation”
[ 30.791] compiled for 1.12.4, module version = 0.3.1
[ 30.791] Module class: X.Org Video Driver
[ 30.792] ABI class: X.Org Video Driver, version 12.1
[ 30.792] (II) FBTURBO: driver for framebuffer: fbturbo
[ 30.792] (++) using VT number 7
[ 30.793] (WW) Falling back to old probe method for fbturbo
[ 30.793] (II) Loading sub module “fbdevhw”
[ 30.793] (II) LoadModule: “fbdevhw”
[ 30.794] (II) Loading /usr/lib/xorg/modules/libfbdevhw.so
[ 30.798] (II) Module fbdevhw: vendor=”X.Org Foundation”
[ 30.798] compiled for 1.12.4, module version = 0.0.2
[ 30.798] ABI class: X.Org Video Driver, version 12.1
[ 30.799] (II) FBTURBO(0): using /dev/fb1
[ 30.799] (WW) VGA arbiter: cannot open kernel arbiter, no multi-card support
[ 30.800] (II) FBTURBO(0): Creating default Display subsection in Screen section
“Default Screen Section” for depth/fbbpp 16/16
[ 30.800] (==) FBTURBO(0): Depth 16, (==) framebuffer bpp 16
[ 30.800] (==) FBTURBO(0): RGB weight 565
[ 30.800] (==) FBTURBO(0): Default visual is TrueColor
[ 30.801] (==) FBTURBO(0): Using gamma correction (1.0, 1.0, 1.0)
[ 30.801] (II) FBTURBO(0): hardware: fb_ili9340 (video memory: 150kB)
[ 30.801] (**) FBTURBO(0): Option “fbdev” “/dev/fb1”
[ 30.802] (**) FBTURBO(0): Option “SwapbuffersWait” “true”
[ 30.803] (II) FBTURBO(0): processor: ARM1176
[ 30.803] (II) FBTURBO(0): checking modes against framebuffer device…
[ 30.803] (II) FBTURBO(0): checking modes against monitor…
[ 30.805] (–) FBTURBO(0): Virtual size is 320×240 (pitch 320)
[ 30.805] (**) FBTURBO(0): Built-in mode “current”
[ 30.805] (==) FBTURBO(0): DPI set to (96, 96)
[ 30.806] (II) Loading sub module “fb”
[ 30.806] (II) LoadModule: “fb”
[ 30.807] (II) Loading /usr/lib/xorg/modules/libfb.so
[ 30.817] (II) Module fb: vendor=”X.Org Foundation”
[ 30.818] compiled for 1.12.4, module version = 1.0.0
[ 30.818] ABI class: X.Org ANSI C Emulation, version 0.4
[ 30.819] (EE) FBTURBO(0): FBIOBLANK: Invalid argument
[ 30.840] (II) FBTURBO(0): using backing store heuristics
[ 30.861] (II) FBTURBO(0): can’t load ‘g2d_23’ kernel module
[ 30.861] (II) FBTURBO(0): failed to enable the use of sunxi display controller
[ 30.862] (II) FBTURBO(0): No sunxi-g2d hardware detected (check /dev/disp and /dev/g2d)
[ 30.862] (II) FBTURBO(0): G2D hardware acceleration can’t be enabled
[ 30.862] (II) FBTURBO(0): enabled VFP/NEON optimizations
[ 30.862] (==) FBTURBO(0): Backing store disabled
[ 30.864] (==) FBTURBO(0): DPMS enabled
[ 30.864] (II) FBTURBO(0): failed to enable hardware cursor
[ 30.864] (II) FBTURBO(0): no 3D acceleration because the driver has been compiled without libUMP
[ 30.864] (II) FBTURBO(0): if this is wrong and needs to be fixed, please check ./configure log
[ 30.864] (==) RandR enabled
[ 30.865] (II) Initializing built-in extension Generic Event Extension
[ 30.865] (II) Initializing built-in extension SHAPE
[ 30.865] (II) Initializing built-in extension MIT-SHM
[ 30.865] (II) Initializing built-in extension XInputExtension
[ 30.865] (II) Initializing built-in extension XTEST
[ 30.865] (II) Initializing built-in extension BIG-REQUESTS
[ 30.865] (II) Initializing built-in extension SYNC
[ 30.866] (II) Initializing built-in extension XKEYBOARD
[ 30.866] (II) Initializing built-in extension XC-MISC
[ 30.866] (II) Initializing built-in extension SECURITY
[ 30.866] (II) Initializing built-in extension XINERAMA
[ 30.866] (II) Initializing built-in extension XFIXES
[ 30.866] (II) Initializing built-in extension RENDER
[ 30.867] (II) Initializing built-in extension RANDR
[ 30.867] (II) Initializing built-in extension COMPOSITE
[ 30.867] (II) Initializing built-in extension DAMAGE
[ 30.867] (II) SELinux: Disabled on system
[ 30.983] (II) AIGLX: Screen 0 is not DRI2 capable
[ 30.983] (II) AIGLX: Screen 0 is not DRI capable
[ 31.132] (II) AIGLX: Loaded and initialized swrast
[ 31.133] (II) GLX: Initialized DRISWRAST GL provider for screen 0
[ 31.708] (EE) FBTURBO(0): FBIOBLANK: Invalid argument
Perl script for accessing the buttons on the Tontec 3.2″ LCD display board. Will probably work for similar boards.
Requires Perl module Device::BCM2835:
http://search.cpan.org/~mikem/Device-BCM2835-1.0/lib/Device/BCM2835.pm
#!/usr/bin/perluse Device::BCM2835;
use strict;
Device::BCM2835::init() || die "Could not init library";
# Display physical pin number for reference but check GPIO (BCM) for key press
my %pin = (12 => 18, 16 => 23, 18 => 24);
print 'Content-Type: text/html' . "\r\n\r\n";
while (1) {
foreach (%pin) {
Device::BCM2835::gpio_set_pud($pin{$_}, &Device::BCM2835::BCM2835_GPIO_PUD_UP);
if (Device::BCM2835::gpio_lev($pin{$_}) == 0) {
print 'Key press detected on PIN ' . $_ . ' (GPIO ' . $pin{$_} . ')!' . "\n";
Device::BCM2835::delay(1000);
}
}
}
Any chance you can provide a image of the sd
After I rebooted in step 3, my raspberry pi won’t boot up again. It goes thru the process of booting and the text scrolls down and every thing says “ok”. Then instead of going to GUI it just guys to a black screen on my monitor with a blinking underscore in the top left corner. Anyway to get around this? or should I start over with a fresh disk image??
That is what happens to mine also.. So long story short —> THIS SITE NEEDS TO BE UPDATED OR SHUT DOWN <— There are a hundred people on here that have all lost everything on the pi drive, and spent all day (or more) working thru this tutorial 4 or 5 (dozen) times and nothing. Just have to reinstall the os over again and again.
What a let down.
Please check out my answer, it may help you if it works. I’m not in that case but I’m assuming that the desktop environment simply doesn’t automatically start running anymore… This can be changed in the raspi-setup
Try typing ‘startx’ if you problem isn’t solved (assuming you’re using Raspbian and LXDE), it should start the desktop environment you’re used to see. What you’re seeing is the Command Line Input interface (CLI), the most basic way to interact with a computer. Hope I helped you a little
I am unable to type anything
I have tried to set up waveshare 32b on my Pi B using the latest Raspian download. I learned a lot in the process using Windows Putty, Nano etc. I have repeated the setup process several times from scratch and included the corrections for possible overwriting. My Waveshare SpotPear 3.2 inch RPi LCD V4 just shows a white screen. Any suggestions?
I’d suggest that you use the included installation disk to make a clean install on another SD card to see if the screen itself works fine or not, then try to repeat the process of installation after upgrading
There was no disk included. I asked for drivers and was given a download link to the image file. After down loading this I tried it and still got just a white screen. The HDMI monitor locks partway though the boot. I can still log in to pi using putty from my PC.
sudo nano /usr/share/X11/xorg.conf.d/99-fbturbo.conf.
i dont have a #99-fbturbo.conf.# file . PLease help
or should i look for the config file specific
Still, dont know how to get 99-fbturbo.conf, or any of the drivers for that matter
figured it out!
sudo apt-get install xserver-xorg-video-fbturbo
LCD 3.2 inch B , still white screen
The moment i enable “SPI” , and reboot my HDMI disconnects as it supposed to . But its not opening on to the LCD. iTS STILL A WHITE SCREEN .
i AM USING Rpi B only. Please help. Is thee any other way to test if its issue with LCD or the way am installing.
The putty becomes inactive once i reboot after SPI is enabled. Please help
for those who have the osoyoo lcd. found their tutorial.
http://osoyoo.com/wp-content/uploads/samplecode/rasp_lcd.pdf
This process worked for me except for two things. The screen only shows 25* of any page so the most important buttons are inaccessible, and now the Wifi does not work and cannot be activated where it worked fine before the reboot. Any suggestions?
Hey did you get Wifi and LCD working together? Any techniques for this?
Hi, I am using raspberry pi 2 with raspbian jessie installed. I the waveshare spotpear 3.2 v4. The above instructions are not working. and after completing the steps there was no display from hdmi or lcd. One things to notify is.: the etc/modules files only had i2c-dev and not snd-bcm2835.
I am trying to get this to work with Retro Pie 3.3.1 and the Waveshare3.2″ v4 but I only get the terminal on the lcd and emulation station starts on hdmi. to get it working with retro pie i just replaced startx with emulationstation. how do i get this to work?
Sir, Your post has very useful to me. i am using Tinylcd. but i cant get display. i am performing all the steps in your post. i cant get touch controller information from the product website and also i am using RASPberryPi B+ model. could u please give me best solution to my work. Than you.
Hi, what if you dont know the make of your screen, i purchased via Ebay, and it is unbranded, the contact speaks barely any English and keeps linking me to a custom kernal download.
Did the ebay listing mention anything about a brand name? Post a link to the kernel, there might be something in there that has some info about it
Looks like a lot of this is out of date. See: https://github.com/notro/fbtft/wiki
hey im using PI2 and sudo nano /usr/share/X11/xorg.conf.d/99-fbturbo.conf. code doesnt show the file only has two lines. please help ?
what if OS is not Raspbian, any other distro like Yocto project, etc.? Could you please specify process without “rpi-update” that makes driver installation process more generic, not dedicated to Raspbian.
I completed all steps except for the last one (I want it to boot to console). However, when I reboot, it never completes the boot process. I start in recovery mode and check the cmdline.txt file and it is exactly how it appears on this page. I copied the kernel info as well, but I am not sure if it correct as I cannot get to it to check. Any suggestions? I might just reinstall the OS and start over…
i installed android OS in raspberry pi 2. can i use same LCD touch screen set up for android installed raspberry pi 2 which you are used for raspbian.
Is it normal the white back light during the whole process of initializing (I suspect that during the transportation trere is a deffect)? The problem is that I missed the step #1 and I performed it at the end. Unfortunately I don’t have any monitor available right now – neither “normal”, neither LCD :))))). Is it possible turning back the system or the only option is reinstallation of the Raspbian?
Hi everyone,
I have KeDei 3.5 inch TFT version 4.0 by Osoyoo. (released after January 1 2016) how do i get it working with vanilla Raspbian Jessie (do not want to install the image sent by the seller)
I do not find the osoyoo in the .name section in the github repo also.
#osoyoo #kedei
If you’re trying to use an overclocked pi just try playing around with the speed for fbtft_device
I’m trying to use an original Raspberry Pi model B with a cheap 3.5 inch 320×480 LCD which allegedly was manufactured to work with the Pi and has the correct fittings to fit over the GPIO pins. The operating system is the latest, downloaded yesterday and installed with NOOBS. I can’t get past step 2 of this guidance. When I reboot after using raspi-config I can see text generated as the Pi boots, then the HDMI fed screen goes blank apart from a flashing cursor in the top left hand corner. The LCD just remains white with nothing else on it. I have missed out step 1 and rebooted after step 2 and the screen functions as I would expect. Does anyone have any ideas please?
Unfortunately following this instruction on this page made my kernel panic
I’m with pi2 model b, and waveshare 3.5 lcd
Trying to follow waveshare wiki way. see how that happens
That’s it
I’m tossing this piece of garbage to the bin !
tried tutorial on this page and got kernel panic, fortunately doing the trick switching mmcblk0p2 to mmcblk0p6 saved the day
now when it seem WaveShare release their own custom image or sources, same thing happens kernel panic. unfortunately this time around doing the same trick doesn’t save the day !
Is there any chance of getting and update on this tutorial?
I have a waveshare 3.2′ screen that I cannot get working with with raspberry pi 2
Thanks for the great tutorial. I do have a question. Once you install the drivers for the lcd are you effectively disabiling the hdmi port or is it still available to use and will the pi function with both displays. I have a pi 3
once you install the drivers it replaces the kernel by disabling hdmi output and enables it for LCD. i don’t think we have a solution to get em both working at the same time. ( you are encouraged to search for it )
what is the display module you have ?
I have the wave share 3.5 ver a
PI2 + Jessie: tried almost everything in this post, my screen is white (red and green leds on)!
I’ll try (I wouldn’t because I already worked on my Jessie image) with manufacturer’s image.
Afterthat I’ll give up.
Hey guys,
I followed your tutorial to the tee. I have a raspberry pi 2 Model B 1GB and a LCD screen from: http://www.microcenter.com/product/442465/32_TFT_LCD_Module_320x240_Touch_Screen_Display_for_Raspberry_Pi
After using the fb name sainsmart32 and sainsmart32_spi I get a white screen.
please let me know any info you need to see
thanks
Oscar
Same here… I have a RPI3. I configured up to the reboot part. I get rainbow screen and White LCD.
I had command line enabled (not desktop). The Ethernet and WiFi does not enable.
Thanks for the guide, have been doing this with my son but once we leave raspi config and reboot all we get is a black screen with a flashing white horizontal line (dash). Can you help? I have looked in the comments at the end of the article but no one else appears to have this issue.
Gratefully
Bryan and Alex
Everything works but i tap and the pointer does not work or if i drag it still doesn’t work i use the same except v3
I have a raspberry pi 2 with waveshare screenn 3.5 inches. Isn’t it the same instructions. But it isnt working, all i get is a white screen, and the red led on the pi is on. The green LED isnot working.
How do I revert the instructions up to the reboot??? I mounted the sd card and can modify it…
i am sorry, but i am a naive , and i have this question, can we upload any file into it for the display? like have a software in which if i tap it gives back a feedback to the code?
please reply!
My Rpi3 gets “ERROR: could not insert ‘spi_bcm2708’: No such device” after I enable SPI in the raspi-config.My Rpi3 is freezing on the rainbow screen after I reboot at the end of step 3. I’ve tried adding boot_delay=1 to config.txt.
If the fbturbo file seems to be blank try this:
sudo apt-get update && sudo apt-get install xserver-xorg-video-fbturbo
This will install that package if you don’t have it installed already.
I am using Raspberry pi 3. after the reboot in step 3,ethernet goes off :( there is no light blinking so I can not use putty.Please help me out
if any interested, now i have a raspian image working on raspberry 3 with Waveshare 3.5, also with sdr support for dongles and FreqShow working perfectly on touch
@Danilo would love to know how you got this to work
dear, was really a nightmare, the image on Waveshare site is unuseful.
let me get back my mind:
– download the latest Raspbian ( do not use NOOB)
– first expand the filesystem via raspi-config
– reboot
– in /dev as you can see fb1 do not exist
– get LCD-show.tar (64MB) (i’m loading to dropbox for you if you need.)
– copy to / the .gz and use sudo to deploy (no to /home/pi
– reboot
– you will see now /dev/fb1
up to now be sure to do this to refresh:
sudo apt-mark hold raspberrypi-bootloader
sudo apt-get update
sudo apt-get upgrade
up to now you can switch to LCD35 or HDMI via the ./ command LCD-hdmi or LCD35-show (auto reboot)
just added matchbox-keyboard to be used with LCD
if not ok i can load the image to dropbox, take me time is bigger
just notice me
beer !
I would like to get a copy of this image. Can you put up a download link?
image ye, bigger, try first the above procedure winstalling this
https://www.dropbox.com/s/5g6qhvxf32t82z5/LCD-show.tar.gz?dl=0
tell me !
Ugh, Well I had to try this out on RPI3 and crashed the system!
On boot up the red led is on the green flashes, the rainbow appears on the screen followed by the raspbain recovery screen
after about 1 second the screen flashes white for about 1 second then goes black forever.
During this boot my hard drive spins up and abruptly stops when the screen goes black.
The red led is on and so is the green but nothing else appears to be working KB, Mouse etc.
I have made a ton of configurations over the last few weeks and would hate to loose them.
Is there any way to recover the boot?
Thank you: Dennis
Hello! I’m having a little bit of trouble getting my screen to work. At the moment the screen is completely white. I’m using a Raspberry pi 2 B
I have a:
http://www.amazon.com/INSMA-Display-Module-Screen-Raspberry/dp/B01C8O9O8Y?ie=UTF8&psc=1&redirect=true&ref_=oh_aui_detailpage_o02_s00e
I been using “sainsmart32”. My screen probably doesn’t support these drivers..
I have done everything on the guide and still nothing. Thanks for any help!
Hello Rodrigo Seminario
I’m not sure this will work for you but it’s worth a try.
I had problems with a 7″ SainSmart display until I applied the following.
If this doesn’t work simply comment out the items you added to config.txt and reboot.
The following information was gathered from:
https://www.raspberrypi.org/forums/viewtopic.php?f=29&t=24679
Open config.txt from the terminal:
sudo nano /boot/config.txt
#once you have copied the following hit ctl+o followed by enter after the save hit ctl+x to exit.
#suno reboot
#Add the following or un-comment the line if it already exists.
#remove black borders
disable_overscan=1
#increase HDMI signal strength (just a black screen if not set!)
config_hdmi_boost=4
#set CVT as default
hdmi_group=2
hdmi_mode=87
#set specific CVT mode
hdmi_cvt 800 480 60 6 0 0 0
#=========================================================================================
# specific CVT mode format: do not add this info to the config.txt file.
#
# hdmi_cvt=
# width width in pixels of your display
# height height in pixels of your display
# framerate framerate in Hz
# aspect aspect ratio 1=4:3, 2=14:9, 3=16:9, 4=5:4, 5=16:10, 6=15:9
# margins 0=margins disabled, 1=margins enabled
# interlace 0=progressive, 1=interlaced
# rb 0=normal, 1=reduced blanking
#=========================================================================================
Dennis Mclean
Does this work with the raspberry pi zero? i have one and i want to check before i get the display.
Hi, I’m late to the Pi Party I’m just starting out with my first Pi (the pi zero) so I’m trying to learn quickly.
I have a waveshare 3.5 v3
With it being the bigger screen, will is still work? And will it work on the Zero.
I’m essentially trying to make a handheld Retropie console for my son. (And me, let’s face it)
Will I need to go out and purchase a smaller screen?
I’m a proper novice, have no coding experience. A these tutorials and walk throughs are invaluable. So thank you in advance for all the help and support.
I cant get step 3 to work for me, the download doesn’t initialise.
Also I anticipate an issue when naming the decice since it’s not the waveshare32
Will I still use that and hope it works the same?
Any help is appreciated.
Thanks again
Raspberry Pi 3 KeDei 3.5″ TFT LCD Version 6.0
How can setup this ? Help me pls! :/
I tried following your tutorial but I got stuck right at the first step… I enter sudo nano /usr/share/X11/xorg.conf.d/99-fbturbo.conf the whole screen is blank except for the command list at the bottom…
spi-bcm2708
fbtft_device name=waveshare32b gpios=dc:22,reset:27 speed=48000000
waveshare32b width=320 height=240 buswidth=8 init=-1,0xCB,0x39,0x2C,0x00,0x34,0x02,-1,0xCF,0x00,0XC1,0X30,-1,0xE8,0x85,0x00,0x78,-1,0xEA,0x00,0x00,-1,0xED,0x64,0x03,0X12,0X81,-1,0xF7,0x20,-1,0xC0,0x23,-1,0xC1,0x10,-1,0xC5,0x3e,0x28,-1,0xC7,0x86,-1,0×36,0x28,-1,0x3A,0x55,-1,0xB1,0x00,0x18,-1,0xB6,0x08,0x82,0x27,-1,0xF2,0x00,-1,0×26,0x01,-1,0xE0,0x0F,0x31,0x2B,0x0C,0x0E,0x08,0x4E,0xF1,0x37,0x07,0x10,0x03,0x0E,0x09,0x00,-1,0XE1,0x00,0x0E,0x14,0x03,0x11,0x07,0x31,0xC1,0x48,0x08,0x0F,0x0C,0x31,0x36,0x0F,-1,0×11,-2,120,-1,0×29,-1,0x2c,-3
ads7846_device model=7846 cs=1 gpio_pendown=17 speed=1000000 keep_vref_on=1 swap_xy=0 pressure_max=255 x_plate_ohms=60 x_min=200 x_max=3900 y_min=200 y_max=3900
I have this screen, but I have no idea what model it is…
http://www.sainsmart.com/sainsmart-9-inch-tft-lcd-800-480-touch-screen-display-for-raspberry-pi-2-b-b.html
The display is connected with hdmi so i have the image working, but i can’t get the touch screen to work.
thanks for article
I think I have a visit from the devil on my Pi Zero.
No matter what I do, I can’t get this to work. It works perfectly fine on my Pi2, but when I follow and use the guide on my Zero, I always end up with the activity LED blinking 8 times (corrupt SD/filesystem error).
The Zero works fine, I can read from it and write to it, but only as long as it’s hooked via HDMI.
Do you know any tricks to make it work with the Pi Zero?
Have you found a solution to this? Cannot make it work on the Zero.
I’d like to find the driver software for my 7″ LCD with touch (official Pi unit) so that I can use it in buildroot. I wanted to make sure this kernel is the one before I started digging further.
I tried following your tutorial but nothing is working….
I am using “2014-09-09-wheezy-raspbian” image on Pi model A (256MB RAM) with waveshare 3.2 lcd spotvear.
I have all the things mentioned in your tutorial But nothing is running on LCD. Only white backlit is glowing.
I am sending commands to Pi board via Putty from Windows 10.
Every time I reboot after step 3 I get the rainbow screen of death (lost the kernel) and have to reimage my card and start over. Anybody had this happen and have a solution?
I started through your tutorial and completed step 3 and rebooted. After the Raspberry screen and some of the boot text on my HDMI monitor, I now have a black HDMI monitor and a white screen on my LCD. Does this mean that the bootloader was overwritten or something else is wrong? How am I supposed to enter in the proposed fixes to the bootloader, when I can’t get the RPi to boot? Do I have to interrupt the boot process at some point to reinstall the bootloader or what?
Same thing happened to me @Bhiker. I don’t think this guide works anymore. I can’t ssh into it anymore.
i have a 3.2 inch LCD module and i need to interface it with Raspberry Pi 3. please provide me with proper guide lines.
I tried these over an SSH terminal and got it working straight away (after rebooting)
wget http://www.waveshare.net/w/upload/7/73/LCD-show.tar.gz
tar xvf LCD-show.tar.gz
cd LCD-show
sudo ./LCD4-show
The first wget took me very long even though it is a really small file. Loaded or limited server I guess…
Bob,
I am curious. What does LCD4-show do?
Chris.
Its a script. Download and instead of running sudo ./LCD4-show run cat ./LCD4-show to simply display what it does without actually running it. The commands are fairly simple modifying a few files. I actually saved the LCD-show.tar.gz on my own server for faster future download but also for backup as it saved me tons of hours (if that’s a measuring unit for time :) )
Thank you.
That simple thing did everything for my Pi Zero with a 3.2″ display.
I used this link though (smaller file ~ 50 KB, fast download) http://www.waveshare.com/w/upload/4/4b/LCD-show-161112.tar.gz and replaced LCD4-show with LCD32-show in the last line.
Now it all works :)
hello Bob
Which Raspberry Pi are you using?
I am using the RPi3 and 3.2 inch waveshare LCD module in which no display comes on the screen.
Please help me to make this working…
I’m using RasPi Zero with latest (as of last week) Jessie Raspbian. Did you run the script? If it didn’t work and you have modified other files in the process of making it work, I would recommend installing a fresh installed image on a new card and running the script. Can you suspect the screen being faulty or got “burned” in the process?
Does this works with latest Noobs???
Hmmm… Sorry I don’t use noobs. I don’t know.
if leave device idle for more than 8 hours my USB port is disabled and I need to connect manually again to get communication again
please help!…
i bought a 3.5 inch tft lcd screen from banggood. and i have installed raspian jessie, the latest version, in my sd card. but when i power on my Pi, only a white backlit screen comes. there are no images or graphics whatsoever.
Of course. Raspbian Jessie does not come with the drivers needed to talk to the screen. See my previous comment (September 22, 2016 at 11:54 am) and follow it.
The continued presence of this article on the internet and the author’s unresponsiveness to latest comments is unnerving. This is a menacing trap!
The owner of this article should including a WARNING in the header that if someone follows the steps, they will install a deprecated driver (which is only visible as tiny text on its gethub page here https://github.com/notro/rpi-firmware). This driver after install will break Raspberry Pi and the SD card will need to be reimaged, for some less experienced users, this could also mean lost work if they failed to backup their code or resources. On windows, it requires installing Linux reader software and it takes a long time to fix this f**kup which could easily have been avoided if the author had and sense of responsibility.
I am shocked to read the latest comments and see so many people fall for it, me included, and nothing is being done. I’ve list 3 days back tracking to where i suddenly lost everything…
PLEASE DELETE this article. You have great power with this article showing up for so many people in their search results, and you display ZERO responsibility. This is terrible!
I have done every thing right but the only major problem is that the screen is still white and my raspberrypi freezes after a line of code when booting up and I cant get in with SSH
I just managed to make it run…. it’s so simple I had to put it in here since it’s one of the main search results.
I’m running it on a 3.5″ from ebay.
Check this video: https://www.youtube.com/watch?v=pAS5lkdDNMo
Also this is the actual site if you’re having a hard time getting it from the video.
http://www.waveshare.com/wiki/3.5inch_RPi_LCD_(A)#Method_1._Driver_installation
Just like that.
Will your system work with my SainSmart 2.8″ 2.8 inch TFT LCD 240×320 Arduino DUE MEGA2560 R3 Raspberry Pi ? I would like to know before not be able to back out. Thanks, Lee
I know I will end up regretting this, but how do I change fb0 to fb1? I’m on the screen that has all the info, but no way to change it. Am I looking for a file? I have had my screen for MONTHS and I can’t do anything with my pi or the screen. I am >< close to smashing both. COMPLETE WASTE OF MONEY so far!!
so you have to use your computer’s arrow keys. then you overwrite the 0 with a 1 then you have to move your arrow so it’s on top of the ” and then delete the 0 that was there.
hello. I really appreciate your blog post. I have a raspberry pi 3 B. I have been unable to get my waveshare 3.2 screen to work.I am at a complete loss for what to do. I do step 2 I change fb0 to fb1 and then follow your directions I don’t get the prompt to reboot; however, I do it manually with sudo reboot. that works fine then I complete step three and that works just fine; however once I reboot from getting those drivers and when I attempt to reboot it is unsuccessful and then my whole raspberry pi will not restart. then when I power it back on it will just shut back off. I then have to redo noobs onto a new SD card I would GREATLY appreciate anyones help
I am getting the same error
I’ve got the same error…How can i make it work?
I just brought it and connected it, it worked fine
Nice tutorial, but after doing Step 3 REPO_URI=https://github.com/notro/rpi-firmware rpi-update. my Raspi 3 is dead. It does not start any more.
Bad thing, can I do anything to bring it to live again. I that step is as problematic, you should print a warning
Thanks for any help
The same happened to me =/
the same happened to me on raspberry pi zero
Hi dAVE, could you fix it?
Thank you for your article ,
I ‘m actually using a LCD Waveshare3.2” , I followed your steps to setup the lcd touchscreen for my rpi and it work but I have a problem with the resolution because if I open a repertory I do not see the whole contents on the screen .
Thanks for any help
My 3.5″ waveshare display is not working with Raspberry Pi 2 with NOOBS installed. Could you help me to fix it?
hi! thank you for this post…. I was wondering if all the raspberry pi’s gpio are being held by this screen or do we have any of those availables for use??
Thanks agains! :)
it worked. but the resolution is for bigger screens. i got the menubar small, but the rest appears too big , and out of screen. the wastebasket icon is 1/6 of my 3.2″ screen. wich HAS the resolution capability too display the whole desktop. But i’m a PI newby and dunno how to adjust the screen resolution on this display. anybody?
I have this screen here:
https://www.amazon.com/SainSmart-3-2-Inch-SSD1289-Arduino-Raspberry/dp/B008FWSG3S/ref=sr_1_1?s=electronics&ie=UTF8&qid=1496091030&sr=1-1&keywords=sainsmart+3.2%22+tft+touch+lcd+arduino+raspberry
It comes with a bunch of header pins. How do I connect them directly to the GPIO pins of the rpi?
hey! thank you for this post, i just want to know if it works for raspberry pi 3 model B ??
Hey! I have a generic 3.5 inch tft LCD touch screen brought from aliexpress, it doesn’t come with a driver, can you advise how to get it to work?.
Thanks in advance.
hey Thanks for this good post …I have capacitive touchscreen which i brought from the link below..can you guide how i can configure the kernel modules…It will be very helpful for me…Thanks
hey Thanks for this good post …I have capacitive touchscreen which i brought from the link below..can you guide how i can configure the kernel modules…It will be very helpful for me…Thanks
http://www.buydisplay.com/default/4-3-tft-lcd-display-module-controller-board-serial-spi-i2c-mcu
I did a 5inch LCD for my raspberry pi. I dont use the touchscreen so i didnt have to install any drivers. It works out of the box but doesnt cover the whole screen unless you open the terminal and do:
sudo nano /boot/config.txt
And enter in the hdmi_group=2
And enter in the appropriate dimensions.
It makes for having a great laptop for less than $100
I have noticed you don’t monetize your page, don’t waste your traffic,
you can earn additional bucks every month because you’ve got hi quality
content. If you want to know how to make extra money,
search for: Boorfe’s tips best adsense alternative
anyone solved the issue?
http://techrapidly.com/
HI I have my RPI running Pi Presents on a view sonic TD2230 Touchscreen. It all works fine, touching the click areas can navigate you thru my presentation, The problem arises when you use multitouch gestures like you would on a iPhone. Pinch or expand etc… and then all touch ability goes away. I can still control the presentation via a mouse, but I don’t get touch control back until I either relaunch Pi Presents, or if I unplug and plug the usb cable going to the touchscreen.
Any thoughts or Ideas would be greatly appreciated.
Thanks
Barry
I have a 10.1 from https://www.chalk-elec.com/?page_id=1280#!/10-universal-LCD-with-HDMI-interface-and-capacitive-multi-touch/p/42545413/category=3094861
I am NOT that savvy to be messing with this. –
https://www.chalk-elec.com/?p=2028
I installed Kivy and it was successful – yet I can’t get anything to work touch wise.
I have a RPI3 using the RPI Lite install. from the NOOBS website.
I also modified – append /boot/config.txt file with text:
max_usb_current_=1
hdmi_group=2
hdmi_mode=1
hdmi_mode=87
hdmi_cvt 1280 800 60 6 0 0 0
Now i have a little black boarder but no more Lines
Screen works fine in (display wise in windows) I haven’t tried it for touch in windows or OS X.
looking for insight or drivers etc. for how to get it working.
when i install the FBTFT drivers my pi do not reboot anymore. i had to load a new image :_(
Здравствуйте! Or you can just check out the connections for the pins of the Raspberry Pi touchscreen LCD display module as shown below.
Could you provide me with a os image of open elec that you already built for the waveshare spotpear v4 3.2 inch touchscreen,because I cannot make sense of your website’s instructions?
The most easy way to install a 3.5 inch LCD to the raspberry pi is this: https://youtu.be/Fj3wq98pd20
Much of this is outdated on Raspbian Stretch where device tree overlays (see https://www.raspberrypi.org/documentation/configuration/device-tree.md) provide for most of the configuration automatically.
In the case of the WaveShare driver, their setup script from their “LCD_show” repository will copy a device-tree overlay to /boot/overlays/ that provides most of the module config etc via boot-time device-tree patch.
You still have to add a “dtoverlay” directive in config.txt to enable it, copy it in place, and make some cmdline changes, then configure X. so it’s not trivial. But it doesn’t need to be this in depth either.
After I did the step that “INSTALL THE FBTFT DRIVERS” and then reboot, my raspberry pi couldn’t boot successfully and the green light is always on, could you help me solve this problem? Thank you.
I have a display the bought from
https://www.stoneitech.com/product/by-application/civil-type/stvc043wt-01.html.
I Want to know how to link with raspberry pie.
Use your own OS (Raspbian) and install the drivers
https://dewwool.com/types-of-battery/
hello brother
I have a Raspberry 4 and a 3.5 inch SPI touchscreen (upports up to 125MHz SPI input)
I did all the steps and the screen didn’t work. It freezes on white. Please reply