The Raspberry Pi OS, like any other operating system, is always doing some form of reading and write executions even when it is running idle. If suddenly the power to the Raspberry Pi board is interrupted, there is a great chance that the OS file system gets corrupted. This is the reason why the Raspberry Pi OS needs to be shut down properly.

To learn more about the Raspberry Pi, read an introductory article here.
Raspberry Pi OS Startup and Shutdown
There are several ways to shutdown the Raspberry Pi OS:
- Using the Desktop Graphical User Interface (GUI)
- Via the Terminal
- By configuring a pair of GPIO pins to initiate a shutdown script.
For the startup, if you use the first two options, you need to remove the power supply from the wall socket or from the USB-C port and reconnect again.
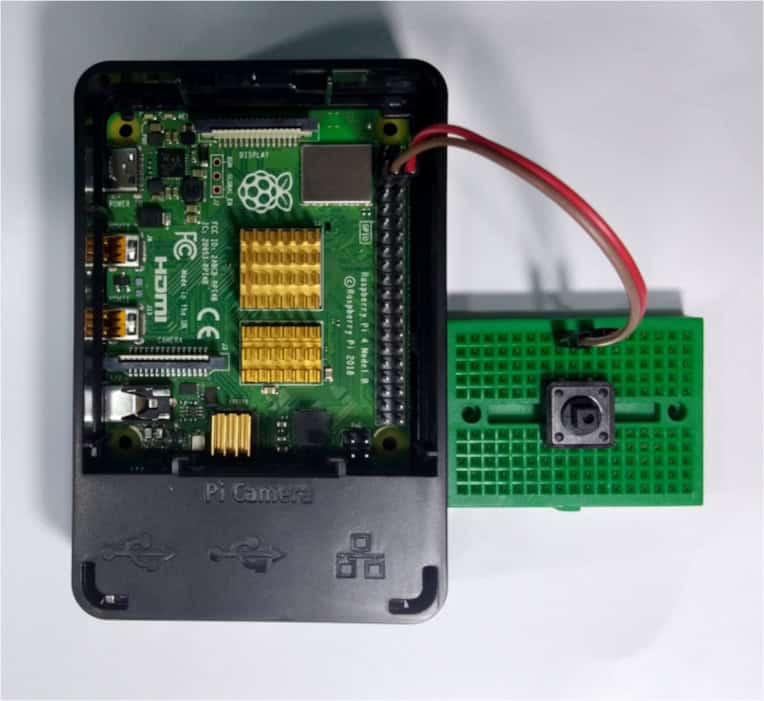
This tutorial will focus on the last option. We will connect a push button to two pins on the GPIO to shutdown and startup the Raspberry Pi.
Author Note:
This tutorial does not actually power-down the Raspberry Pi board. It only puts the system to standby mode and consumes minimal power. To actually power-down the board, you need to initiate shutdown via the Desktop GUI or execute the shutdown command on the Terminal.
Hardware Requirements
For this tutorial, we will use the following components:
- Raspberry Pi with Raspberry Pi OS installed
- Tactile push button
- Jumper wires
- Breadboard
Connection Diagram
Once you have all of the components, wire up everything following this wiring diagram:
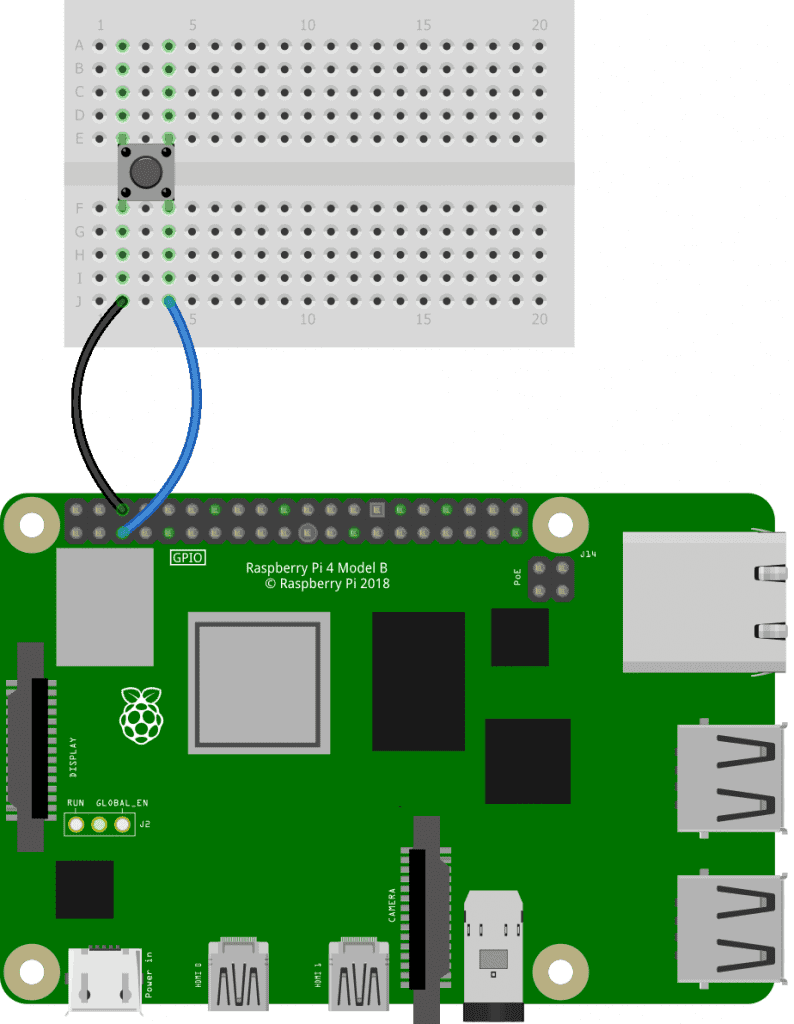
We will use GPIO3 (pin 5) and GND to connect the push button. You can use any Ground pin available on the Raspberry Pi GPIO header.
One terminal of the push button must connect to GND, and the other terminal to GPIO3. It doesn’t matter which terminal of the push button you will connect to GND and GPIO3 as long as they make contact when the button is pressed.
Configuring the Raspberry Pi OS
To make the push button work as intended, we need to modify the Raspberry Pi OS’s config. txt file. We can do this by opening a terminal and entering the following command.
sudo nano /boot/config.txtThe above command will open config.txt file using the Nano text editor. Scroll down at the end of the file and add the following in a new line.
dtoverlay=gpio-shutdownAfter adding the line, save it by pressing CTRL+O, press ENTER to overwrite existing file, and press CTRL+X to exit editor.
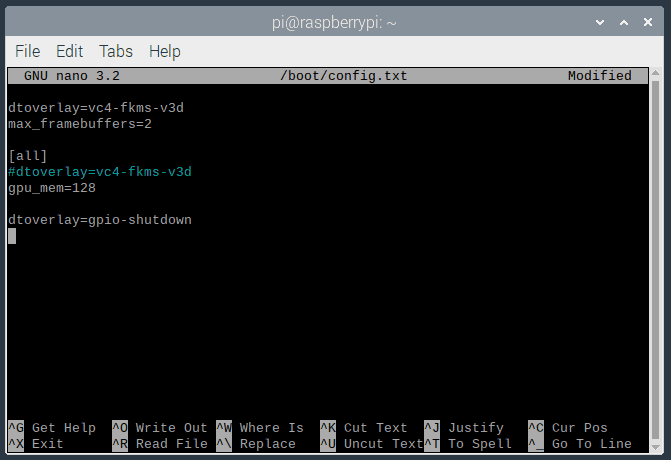
By adding dtoverlay=gpio-shutdown in config.txt, we are configuring the Raspberry Pi to use GPIO3 as a startup and shutdown signal.
By pressing the button, we are connecting to the Ground. This action pulls the GPIO3 to LOW and causes the Raspberry Pi OS to shutdown or startup depending on its current state.
Project Test
Apply power to the Raspberry Pi 4B and wait for it to finish its booting sequence. Press the button to shutdown the Raspberry Pi board. To startup, press the button again.
Congratulations! You now have a physical button to startup and shutdown your Raspberry Pi! Leave a comment below if you have any questions.


Would it not be a good idea to debounce the switch??
I also think that a UPS like PiJuice should be used, which will not only take care of the on/off but also performs an automatic shutdown when the power is off.
Well this doesn’t work on Raspberry pi 3. Must be more that needs to be done before it will work.
Thanks! Everything works on my Raspberry Pi 3B+
I amusing a rasp. pi 4 model B but it doesn’t work. My rasp. pi has an external power supply which as a push button ON/OFF. Is it the reason why or not
Never shut your Rpi down without performing a “shutdown” command. Just switching off the power will very probably destroy your SSD/SD. If you want a battery backup – recommended – then use something like PiJuice which can send a signal to the RPI via the GPIO to tell the RPi that the battery is low ( or no mains) and then select in the installation programme what you want the RPi to do when such a signal is received.
By the way, if using a pushbutton on a GPIO port, please make sure it is denounced – otherwise, it could cause problems.
The GPIOZERO is a good library that has software debouncing. Personally, I prefer Hardware debouncing.
Hope this helps…all the best with experimenting with the RPi!
This is brilliant! It works like a charm on a Pi4 running HAMCLOCK. Thanks for the post.
Will it work on a PiZeroW?
Best regards
Dan D’Eon AG7GM