If you use your Raspberry Pi as a gaming console, media server, or stand-alone computer, WiFi is a great way to get internet access. But if you connect to your Pi with SSH or a remote desktop application a lot, WiFi is actually one of the slowest and least reliable ways to do it. A direct ethernet connection is much faster and a lot more stable. By connecting to your Pi directly from your laptop or desktop with an ethernet cable you are bypassing your local network, and you aren’t sharing bandwidth with other computers on your network. It also allows you to connect to your Pi when you’re outside of your home network. If you are experiencing slow connectivity and network time outs with your current set up, you need to try this! All you need to set it up is an ethernet cable and a way to access the Rapberry Pi command prompt.

What we’re going to do is assign a static IP address to the ethernet port of the Pi. This address will depend on the IP address of the ethernet adapter on the computer you will be connecting to the Pi from.
I will be using a clean installation of Raspbian Jessie Lite to demonstrate this, but the process also works for the full version of Raspbian Jessie. The set up for a static IP is a little different for older versions of Raspbian Wheezy, but once you know how to create the static IP address, it should be easy on any OS.
Find your Ethernet Adapter’s IP Address
First, we need to find out the IP address of the ethernet adapter on the computer you will be accessing the Pi from.
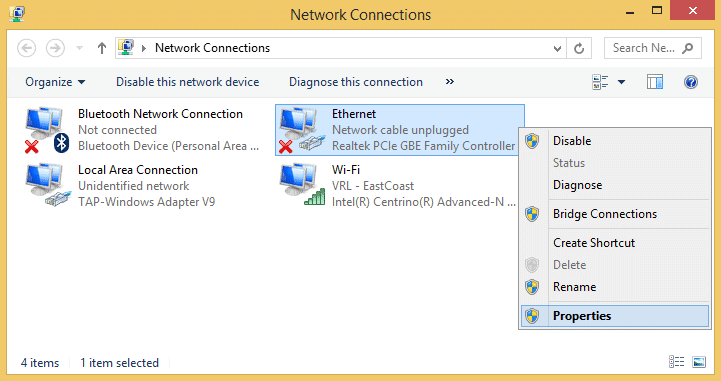
Access the “Network Connections” window by right clicking on the Windows icon in the task bar, or through the Control Panel. Then right click on the Ethernet connection and select “Properties”:
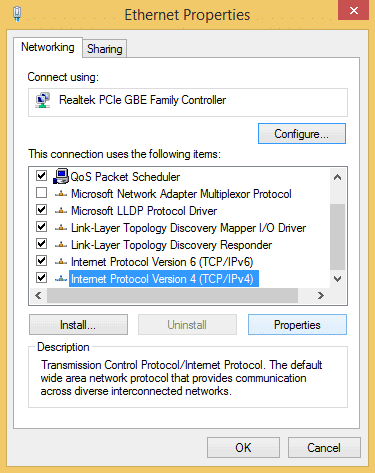
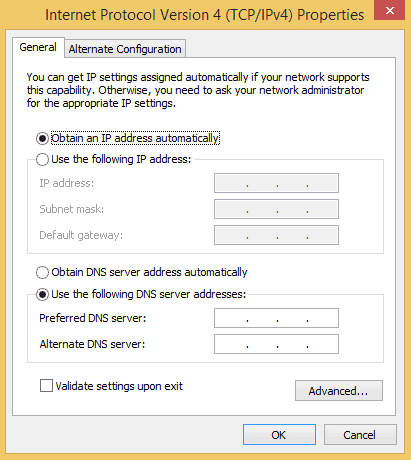
Scroll down the list and select “Internet Protocol Version 4 (TCP/IPv4)”, then click the “Properties” button:
If “Use the following IP address” is selected, take note of the IP address. In this case it’s 10.0.0.6, but your’s will probably be different:
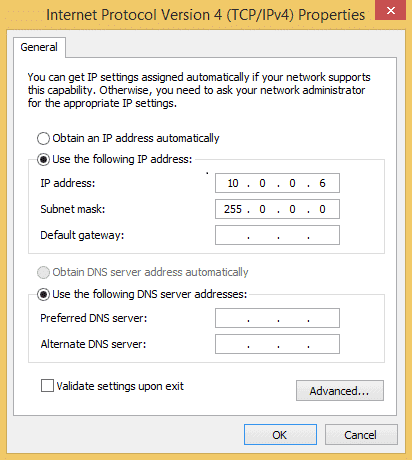
If “Obtain an IP address automatically” is selected, we will need to find your autoconfiguration IPv4 address using ipconfig in the Windows Command Prompt:
Find your Autoconfiguration IPv4 Address
Skip this step if you found the IP address of your ethernet adapter in the step above.
The autoconfiguration IPv4 address won’t be displayed unless something is connected to the ethernet adapter of your laptop/desktop computer, so plug your Pi into your computer with an ethernet cable, and power it up.
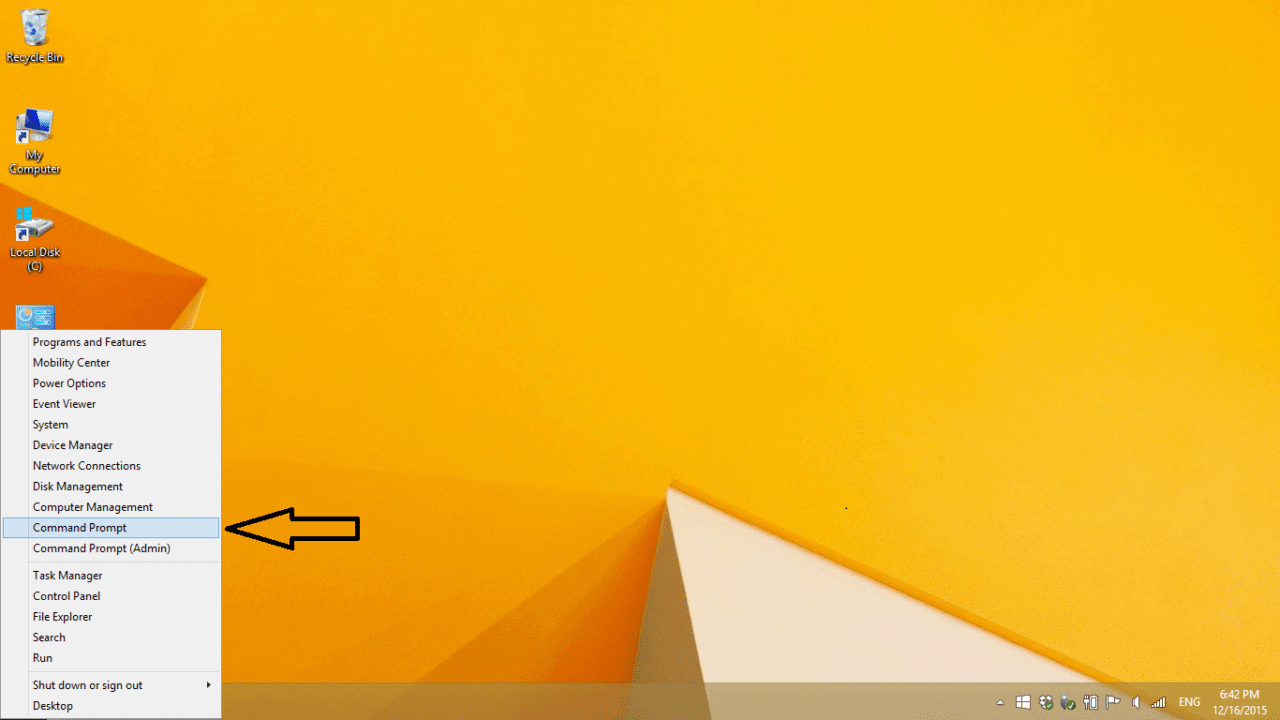
Now we will need to access the Windows command prompt. Either search for it in the Start menu, find it in the Control Panel, or right click on the Windows icon in the task bar:
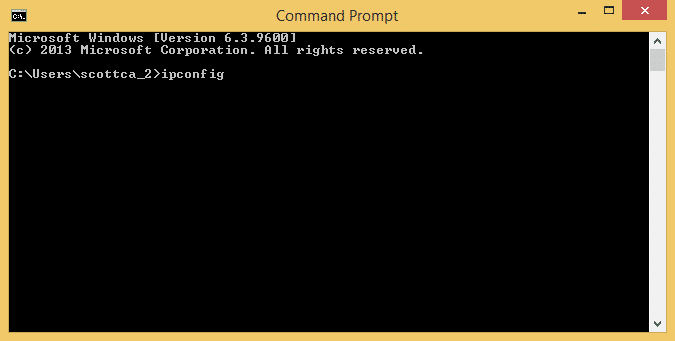
Once you get to the command prompt, enter ipconfig:
Scroll down to see the configuration settings of your Ethernet adapter, which should say something like “Ethernet adapter Ethernet”:
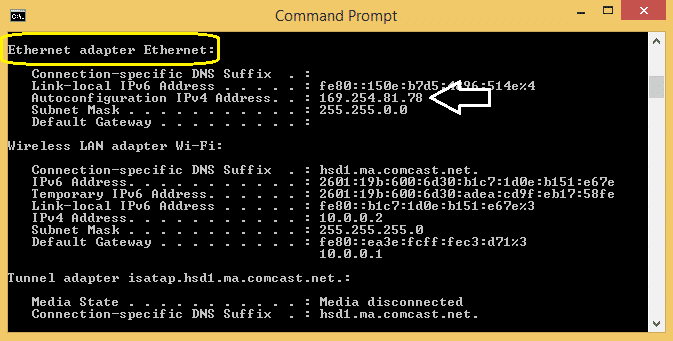
Take note of the Autoconfiguration IPv4 Address, in my case it’s 169.254.81.78. This is the IP address of the ethernet adapter on my laptop.
Find your Default Gateway IP
The next step is to find out your default gateway IP. This is the local IP address of your network router. Computers on your network use it to communicate with the router and access the internet. If you already know what it is, just skip this step.
Power up and log into your Raspberry Pi via WiFi or ethernet, then enter route -ne at the command prompt to see your network routing information:
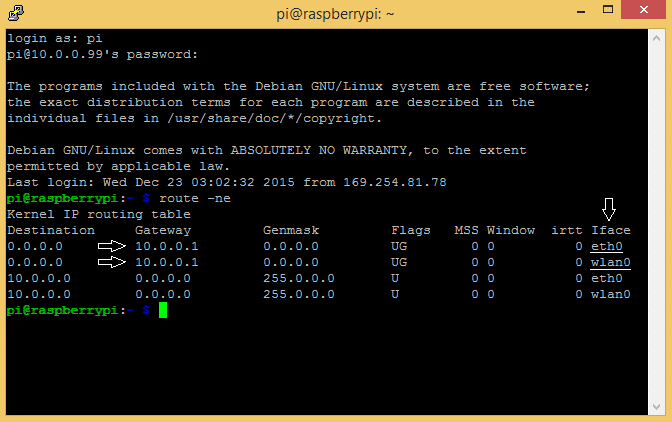
Under the “Gateway” column, you can see your Default Gateway IP (10.0.0.1 in my case) for each interface (Iface) – ethernet (eth0) and WiFi (wlan0). Write down your default gateway IP, we will need it later.
Find Your Static Domain Name Servers
Now we need to find out the IP addresses of the domain name servers your Pi uses to find websites on the internet. Power up your Pi and log in to the command prompt, then enter cat /etc/resolv.conf:
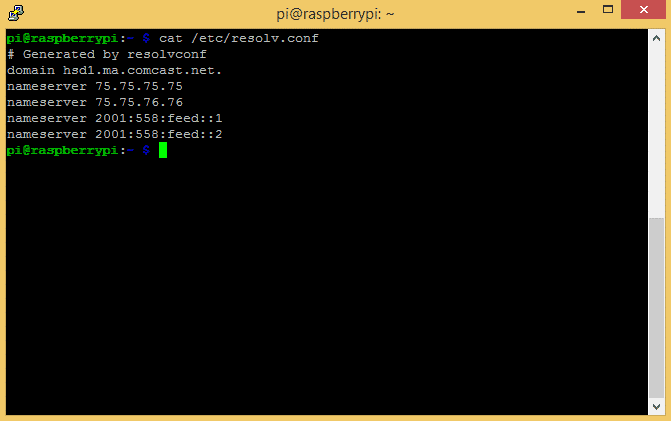
Copy these IP addresses to a text editor on your PC or write them down for later.
Configuring the Static IP
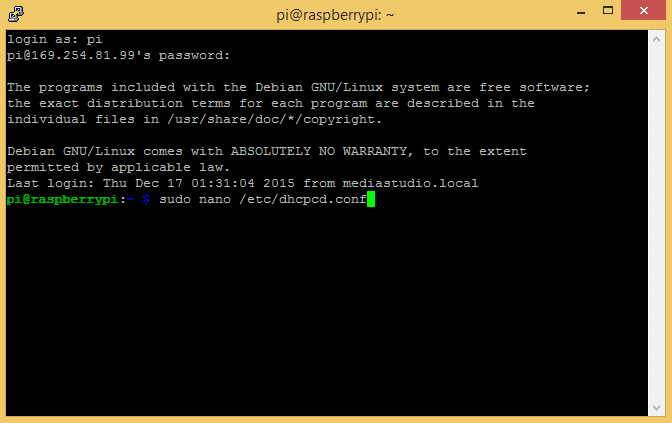
Now we’re ready to configure the network settings on the Pi and set up our static IP address. Enter sudo nano /etc/dhcpcd.conf to edit the dhcpcd.conf file:
Now, add this code to the end of the dhcpcd.conf file, and change the IP addresses with your own:
interface eth0
static ip_address=169.254.81.99

static routers=10.0.0.1
static domain_name_servers=75.75.75.75 75.75.76.76 2001:558:feed::1 2001:558:feed::2
The three IP address are created as follows:
static ip_address– This will be the static IP address you use to SSH or remotely connect to your Pi. Take the IP address of your computer’s ethernet adapter (found in the steps above), and change the last number to any other number between 0 and 255.static routers– This is the default gateway IP we found above.static domain_name_servers– These are the IP’s we found in the resolv.conf file above. Separate each IP with a single space.
For example, I found out that the IP address of the ethernet adapter on my laptop is 169.254.81.78. To create the static IP address for my Pi, I replaced the 78 with 99 to get 169.254.81.99. This is the new static IP address I will use to log in to my Pi via SSH and remote desktop connection.
The dhcpcd.conf file should look like this after you have put in your own IP addresses:
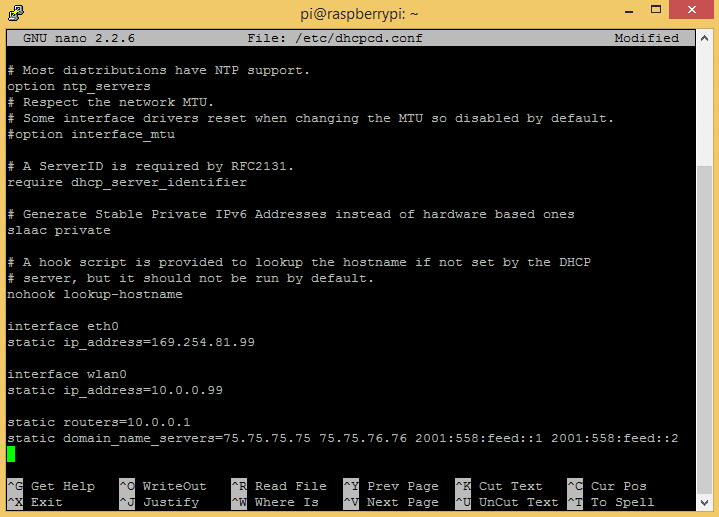
Note: I have also configured a static IP for my WiFi (wlan0) connection in the image above. If you haven’t already done the same, just ignore those lines.
After you have added the code and replaced the IP addresses, press Ctrl-X and Y to exit and save the dhcpcd.conf file.
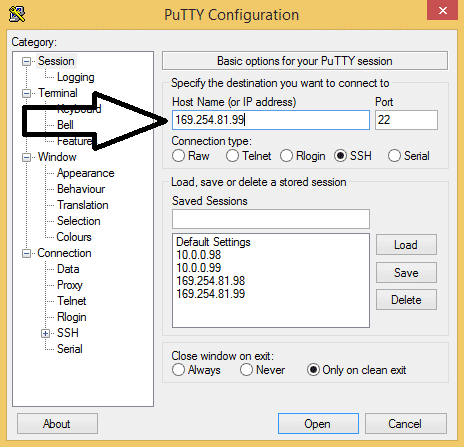
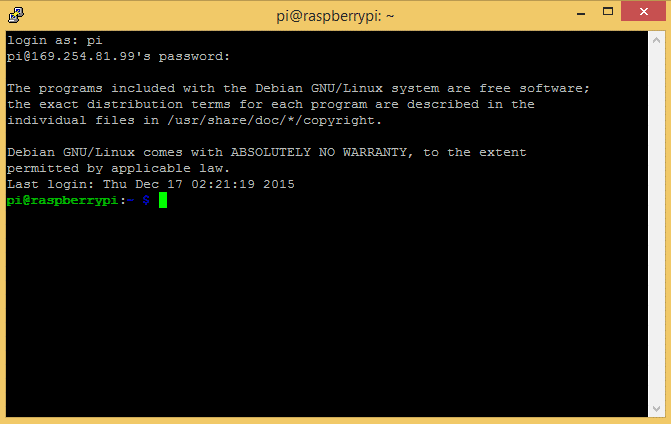
Now reboot the Pi, and plug an ethernet cable from the Pi directly to your laptop or desktop. Open PuTTY (or another SSH client) and log in with the static IP address you created above:
Now test to make sure that your Pi is able to access the internet by pinging Google. Enter sudo ping www.google.com at the command prompt:
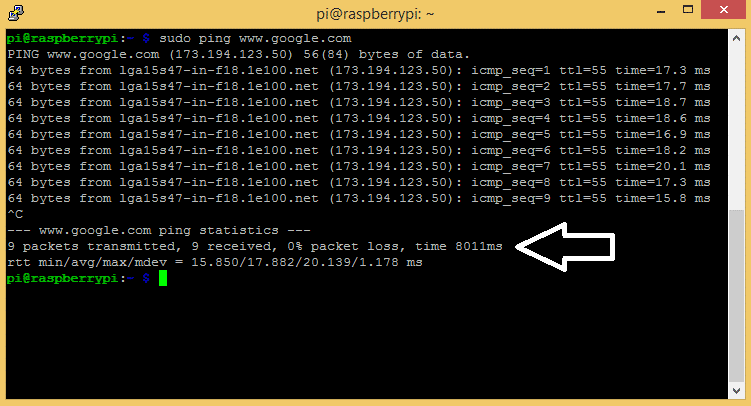
If the connection is successful, you’ll see that packets have been sent and received. If the connection is unsuccessful, you will get a “Network is unreachable” error:

Watch a video of the steps above here:
We’ve created a static IP address that you can use to connect your Raspberry Pi directly with your laptop or desktop computer. You will notice a big improvement in speed and stability compared to connecting with WiFi. You can leave your Pi connected as long as you want without getting disconnected or getting network time outs. Hope this helps! Feel free to leave a comment if you have any questions, and be sure to subscribe via email to get notified when we post new articles!


Very Precise and informative….thank you :)
I followed all of of the steps. Every was fine until at the very end when logging back into the Pi. I am asked for a password. I used my regular and received “access denied”. On the Pi, I changed the password, rebooted, and still received “access denied”. What’s happening?
Try: pi
Passw: raspberry
That’s strange, your password shouldn’t have changed… Does it say access denied when you connect to the Pi as you normally do?
Hello. Thank for responding. I found a workaround. I switched my OS from Raspbian to Ubuntu Mate which I am more familiar with these days. Your other videos on remote desktop and headless setups were extremely helpful in the initial setup of my RPi. I tried several other YouTube videos and website tutorials, but only yours worked. I was very surprised that I had a problem with this one. Thank you very much!
Great! Glad you got it to work…
Hi CB,
Nice job on all of your forums and videos. I connected a ethernet cable from my laptop which is running windows directly to the Pi. I changed the laptop to a an arbitrary static IP address 192.168.1.5 and the subnet mask to 255.255.255.0. I did not update anything else. I updated the cmdline.txt file in the /boot directory apeending this address “ip=192.168.1.10” to the end. After rebooting both I had no problem connecting to the Pi. Just thought I’d let you know. Thanks
Can you explain a bit more.? I have a new Raspberry Pi 3 Model 3 which has an on board Wireless LAN.It has already connected to my Home WiFi router and I can see it works properly on my TV.I want to connect my Pi to my Laptop through Ethernet cable.Which Ethernet cable should I use..? Normal or Crossover ?.I connected a Normal cable but I find the Ethernet adapter address blank on my Laptop even after powering up Pi . Also I want to disable the onboard Wireless LAN on the Pi and use the shared internet connection from my Laptop.Can you please explain me how to do it.?
I am able to connect to the Pi using ethernet cable to my Laptop using the steps in this tutorial.I used a normal ethernet cable.Thank you.But when I ping http://www.google.com nothing happens and the command prompt returns after some time.Is it necessary to share the internet connection of the Laptop so that this works..?
hi i follow your instruction step by step, but at last putty show me a fatal error”network error: connection refused”
i dont know why this error occur? do you give some recommendation to resolve this problem?
Ah, I am in the same boat! I have a raspberry pi2 without wifi so I’m trying this tutorial. All is going well except when I click open, I get the same warning “network error: connection refused”. Is there something else I need to do on the raspberry pi’s end to allow this?
I figured it out. I just had to enable SSH in Raspberry Pi Software Configuration tool (raspi-config). Thanks for the great tutorial!
while communicating my raspberry pi 2 i am getting putty fatal error: network error connection refused.
Hi, after a few failed attempts i finally make it, thanks! but when i try to connect wireless (the raspberry connected to the router) like i did it before i can not enter, do i have to erase the code that i wrote in the file dhcpcd.conf to make it wireless again?
Do i have to put the IP’s laptop, IP’s raspeberry in the same net with the router?
For example:
Router: 192.168.10.1
Laptop 192.168.10.2
Raspberry: 192.168.10.3
I want to connect the remote desktop wireless and with ethernet without do this modifications everytime, is it possible?
Sorry for bad english and again thanks the connection p2p with an ethernet cable works wonderful.
Perfect. Thank you very much.
I successfully reconfigured the etc/dhcpcd/file ( I think) and connected by Ethernet cable using putty to SSH, but now I’ve lost my connection to VNC, why does the same IP address I set up not let me connect with a VNC client?
Also, using the route -ne command tells me that my name servers are just my router IP. Could I use the same Name servers listed?
Thanks for the Tutorial.
Ummm, I am confused. You are talking about static ip address within dhcp setting…
Just having problems connecting to the internet now once Pi is connected by LAN.
In theory can I use any name-server IP settings i.e. Google 8.8.8.8 or the ones listed in the tutorial?
Thanks, sorry if I can not explain what I wish to achieve.
how login in rasberrypi trough putty but give timeout message fatal error
Every things work well for me. I made static IP address for Ethernet.
But I don’t have internet on my Raspberrypi :-( even if wifi of Raspberrypi is connected
I don’t know what is the problem
When I look at the Gateway information by typing “route -ne” in PuTTY, I get only 10.0.0.1 for wlan0 and only 0.0.0.0 for eth0. Should I use 0.0.0.0 when I change the final file on the RPi? Will this be a problem?
I can ssh and remote desktop in using VNC with the static IP address I have now, but cannot access the internet. Even when I have a wifi connection.
I removed the ethernet cable and used a monitor on the Pi and can connect to the internet via wifi.
I’m guessing due to the fact we’ve forced a static IP address, which is now outside of the usual address my wifi router operates in? A solution to this added onto to this great walkthrough would be grand. Im going to look for a solution. If I find one, ill reply back.
I have followed the steps .After logging in using static ip ,reply of ping is
pi@raspberrypi:~ $ ping http://www.google.com
ping: unknown host http://www.google.com
Please advise
Hey!
I am facing the same problem. Do you have a solution yet?
Hi!
I followed all your steps and I am able to login to my Pi. However, I get an error message of ” unknown host http://www.google.com“. Also, right after I sign in, instead of getting the message of last login from 10.0.0.110 (ipv4 of host) I am getting just the login date and time and no ipv4.
Please advise
Hey all,
For anyone wanting to get their RasberryPi project online, check out –
The PiAnywhere 4G & LTE Hat for the Raspberry Pi Beta provides 4G mobile data for the Raspberry Pi mini computer. Our intelligent HAT module provides your Raspberry Pi with mobile data, GPS positioning information and battery support. This is the perfect module for hackers, scientists, and creators as it gives your Pi powerful connectivity wherever you are. Simple plug out module into your Raspberry Pi and start playing. Find out more at http://www.pianywhere.com
The easier way, is to install dhcp server on your laptop. http://www.dhcpserver.de/
No configuring needed on the pi.
Do you also know how to do this on a mac?
On the second part you say ‘Power up and log into your Raspberry Pi via WiFi or ethernet in’, via some terminal…
How does this work? Aren’t we trying to setup a network connection in the first place?? Could someone clarify that? I’m still kind of new to Linux/pi
Which ethernet cable can give high speed with raspberry PI. I am using raspberry pi in my final year project. Please reply as soon as possible.
Sir,I am using raspberry pi zero I followed your instructions but my gatway is coming as 0.0.0.0 and only one name server 192.168.137.1 which is also it’s preferred ip address.
I am having error: temporary failure in name resolution while running code ping http://www.google.com
This tutorial worked great for me except this instruction:
static ip_address= This will be the static IP address you use to SSH or remotely connect to your Pi. Take the IP address of your computer’s ethernet adapter (found in the steps above), and change the last number to any other number between 0 and 255.
I tried changing the last number to 0 and it did not work. In the video you say to change it to any number between 1 and 255. When I changed it to 99 it worked. That’s the only problem I had. Thanks for writing this up for us!
ping 127.0.0.1
Hi
After completing this
If I unplug my pi
Will I have to go through the process again in order to establish the connection again
And will it affect My laptop in any way
Hey in your case you got the default gateway as 10.0.0.1 as eth0 but when I am doing the same thing it shows me nothing related to eth0
Please help me
Hi. Really good tutorial. But I have a problem: when I look at the Gateway information by typing “route -ne” in PuTTY, I get only 192.168.1.254 for wlan0 and only 0.0.0.0 for eth0. I used 192.168.1.254 as “static routers” in dhcpcd.conf file. After rebooting and plugging the Ethernet Cable I’m not able to connect to my RPi from my Windows laptop.
Should I use 0.0.0.0 as “static routers”? Will this be a problem?
In addition: after rebooting, if I type “route -ne” again I can’t see eth0 in the list. Somebody may help me?
Thank you
Hi
first of all thanks for so descriptive tutorial i am unable to get internet on my raspberry pi while connected to ethernet can you help?
To be able to communicate between two directly connected units you only need to set static IP-addresses on both that belongs to the same sub-net.
Example:
PC IP-adress: 192.168.77.1
RPi IP address: 192.168.77.2
The rest can be identical:
Mask: 255.255.255.0
GateWay: 192.168.77.1
DNS: 192.168.77.1
can this be done on a Chromebook ?
will this work with buster or kali ?
Hello
I am trying to connect but after I reboot the pi and everything I tried to ping google but, it says ping: unknown host http://www.google.com. Then shortly after it says it disconnected.
If you get “network error: connection refused” when attempting to ssh into the pi, it could be because of an ip address conflict.
If you set your rpi ip address to 192.168.1.3 (for example), there may already be a device with that ip address on your network which will lead to a conflict. Try using a higher number like 192.168.1.99 and reboot the rpi after you make the change.
(There are also ways to find out what ip addresses are in use on your network so check that if you’re stuck)
I’m looking for info. on Raspberry PI connecting via Ethernet ONLY in and out. I want to filter using PI hole via ethernet only. I can’t seem to find this information. I appreciate your help. Thanks.
How connect Raspberry Pi directly with an Ethernet cable and PC with Linux OS (Ubuntu, Debian)?