Using the Raspberry Pi to control an LED might seem like a basic or boring task. However, the same hardware and programming concepts used to control an LED can be used to control a wide variety of sensors and modules. Learning how to control an LED with the Raspberry Pi’s GPIO pins will open up a whole new variety of devices you can use with the Raspberry Pi.

Connect the LED to the Raspberry Pi
Let’s jump right in by connecting the LED to the Raspberry Pi.
For this project we will need the following:
Connect the components as shown in the wiring diagram below.
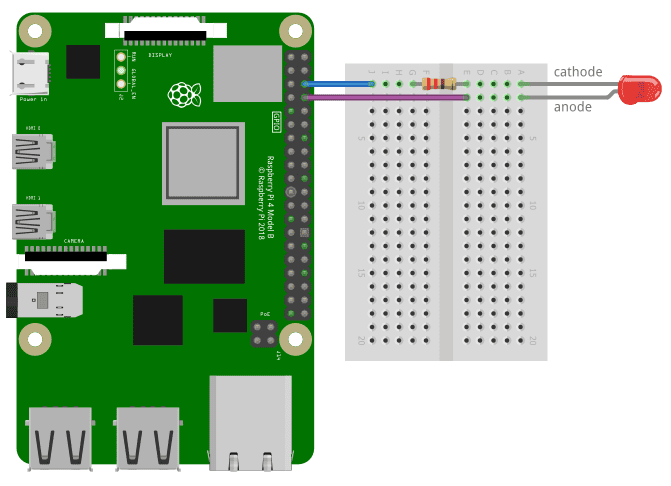
The 330 Ohm resistor is a current limiting resistor. Current limiting resistors should always be used when connecting LEDs to the GPIO pins. If an LED is connected to a GPIO pin without a resistor, the LED will draw too much current, which can damage the Raspberry Pi or burn out the LED. Here is a nice calculator that will give you the value of a current limiting resistor to use for different LEDs.
Python Code
After connecting the hardware components, the next step is to create a Python program to switch on and off the LED. This program will make the LED turn on and off once every second and output the status of the LED to the terminal.
The first step is to create a Python file. To do this, open the Raspberry Pi terminal and type nano LED.py. Then press Enter.
This will create a file named LED.py and open it in the Nano text editor. Copy and paste the Python code below into Nano and save and close the file.
import RPi.GPIO as GPIO
import time

GPIO.setmode(GPIO.BCM)
GPIO.setwarnings(False)
GPIO.setup(14,GPIO.OUT)

# While loop
while True:
        # set GPIO14 pin to HIGH
        GPIO.output(14,GPIO.HIGH)
        # show message to Terminal
        print "LED is ON"
        # pause for one second
        time.sleep(1)


        # set GPIO14 pin to HIGH
        GPIO.output(14,GPIO.LOW)
        # show message to Terminal
        print "LED is OFF"
        # pause for one second
        time.sleep(1)
Explanation of the Code
At the top of the program we import the RPi.GPIO and time libraries. The RPi.GPIO library will allow us to control the GPIO pins. The time library contains the sleep() function that we will use to make the LED pause for one second.
Next we initialize the GPIO object with GPIO.setmode(GPIO.BCM). We are using the BCM pin numbering system in this program.
We use .GPIO.setwarnings(False) to disable the warnings and GPIO.setup(14,GPIO.OUT) is used to set GPIO14 as an output.
Now we need to change the on/off state of GPIO14 once every second. We do this with the GPIO.output() function. The first parameter of this function is the GPIO pin that will be switched high or low. We have the LED connected to GPIO14 in this circuit, so the first argument is 14.
The second parameter of the GPIO.output() function is the voltage state of the GPIO pin. We can use either GPIO.HIGH or GPIO.LOW as an argument to turn the pin on or off.
Each GPIO.output() function in the code above is followed by a sleep() function that causes the pin to hold its voltage state for the time (in seconds) defined in the parameter of the function. In this program we are switching the LED on and off once every second so the argument is 1. You can change this value to make the LED blink on and off faster or slower.
Run the Program
Run the Python program above by entering the following into the Raspberry Pi’s terminal:
sudo python LED.pyYou should see the LED blinking on and off once every second.
You should also see a message in the terminal with “LED is ON“ when the LED is turned on, and “LED is OFF” when the LED is turned off.
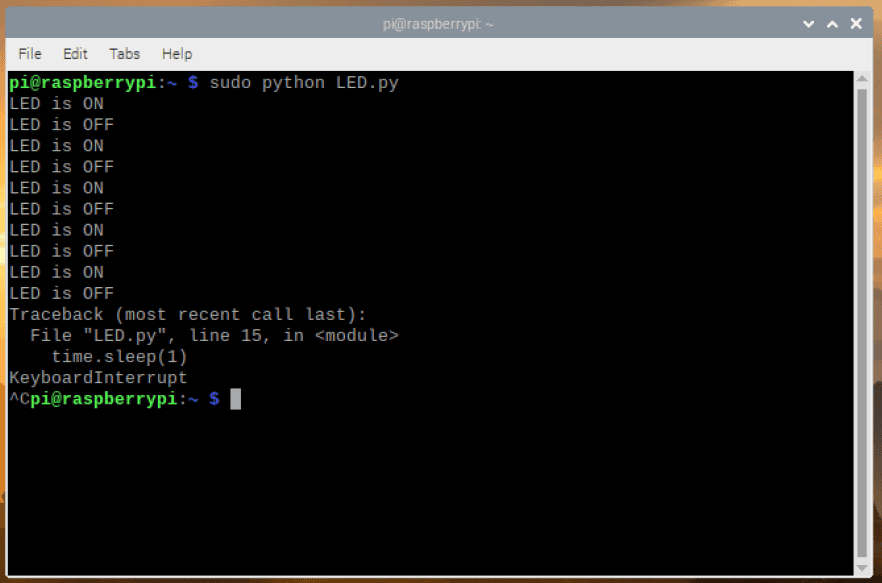
To stop the program, press Ctrl + C on your keyboard.
Congratulations! We have successfully used the Raspberry Pi’s GPIO pins to control an LED using Python. Try it for yourself and leave a comment below if you have any questions.


Hi,
Copy and paste causes problems sometimes:
# set GPIO14 pin to HIGH
GPIO.output(14,GPIO.LOW)
# show message to Terminal
print “LED is OFF”
# pause for one second
time.sleep(1)
Great tutorial well documented I always thought the resistor was to protect the LED which it might do on a straight circuit but it make sense with the GPIO.
I know the set warnings is a problem and I use the try loop and keyboard exceptions and the cleanup to release the pin . I wonder is this the same with GPIO.BOARD and the GPIO zero setup are the channels to the pins always left on?
Hello,
I’m your worst nightmare. I’m a newbie. I am using THONNE PYTHON IDE to edit and test the program. When I to RUN the program I received an error message: MODUAL NOT FOUND ERROR: NO MODULE BAMED ‘RPi’.
Question: Does THONNY import RPi.GPIO?
Question: Can RPi.GPIO run on THONNY?
Should I assume the ‘import’ will only work on the RPi?
Thank you All,
Barry
What a pain in the posterior Capcha is!! My sevcond attempt to post a reply – this time I’ll copy it in case the post fails!!!
I’ve used Thonny for quite a whil. Great for editing and running Python, and I rarefly get problems. I’m sure it does not run the program itself, but just calls python to do so. Python 2 is a bit different from 3, so tghis can casue issues (eg pint “hello” in 2, but print(“hello”) in 3! I tried cutting and pasting the code from the article into Thonny, and it ran without problems. Please be aware that Python is case dependent (upper and lower case characters are treated as being different). also the text font used on web pages (not just here) can make it difficult to distinguish between some characters (eg: i, l, I, 1). Try cutting and pasting from the article if you re-typed it yourself in Thonny. Hope this helps, please contact me if you want. Mike
PS: Thonny and the Pi or Pi Zero seem the same, but ther eare definitely some annoyinbg major differences between the modules/libraries for these versions of the Pi and the Pico!!! Thonny works fine with the Pico too, but needs to be configured for it, and the libraries and functions seem completely different. Mike
This article should be updated to have the Python code reflect Python 3, not Python 2, i.e. having the ‘print’ command include the parentheses.