
The Raspberry Pi is perfect for DIY audio projects like media players, sonars, and digital musical instruments. You can even add a sensor so that it plays a sound when a door is opened.

In this tutorial, we will learn how to connect wired and Bluetooth speakers to the Raspberry Pi. Then we will learn how to play audio files from the Raspberry Pi OS’s command line interface and desktop interface. Finally we will see how to setup RuneAudio to turn the Raspberry Pi into a Hi-Fi media player.
Connecting Wired Speakers
The simplest way to play audio on the Raspberry Pi is with wired speakers or headphones. These can be connected to the Raspberry Pi with the onboard headphone jack.
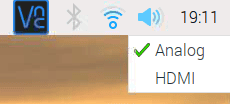
From the desktop, make sure to set the Audio output to Analog by right-clicking the sound icon on the menu bar’s top right portion.
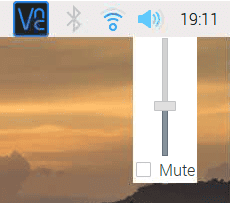
You can adjust the volume by pressing with the left mouse button.
Connecting Bluetooth Speakers
Alternatively, you can use Bluetooth speakers. Bluetooth chipsets have been present in the Raspberry Pi since the release of Raspberry Pi 3. So if you bought your Pi after February 2016, chances are you can connect via Bluetooth.
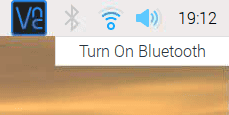
To enable Bluetooth, left click the Bluetooth icon and turn it on.
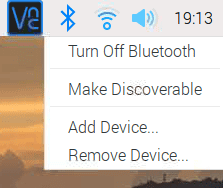
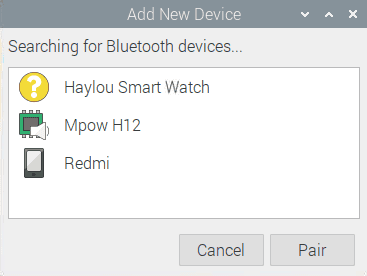
Next, make sure your Bluetooth speaker or headphones is in pair mode. Then, click the icon again and select add device.
I turned on multiple Bluetooth devices aside from the headphones to illustrate how each device looks. The Raspberry Pi doesn’t support smartwatches yet, so it just appears as a question mark. Phones appear with a black phone icon. Lastly, speakers and headphones appear with a green sound chip beside a speaker icon.
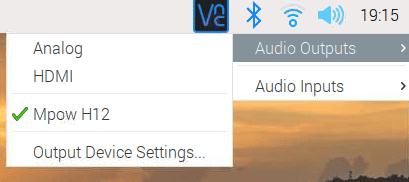
After pairing your sound device, you can already connect to it by left-clicking the sound icon just like traditional speakers.
How to Play Audio Files From the Raspberry Pi OS
There are various ways to play audio files with the Raspberry Pi. The most obvious method is by installing a desktop media player. Software like VLC, MPV, and Winamp are readily available to install using the terminal or the Preferences Menu. Aside from this method, you can also use a command-line native player or a dedicated Python library. These we will discuss in the next section.
Using the Command Line
Omxplayer is actually a command-line video player specifically made for the Raspberry Pi’s GPU. It uses OpenMAX hardware acceleration API, Broadcom’s VideoCore officially supported API for GPU video/audio processing. In short, it has full-access to Raspberry Pi’s GPU so it basically supports every audio and video codec in existence.
It works by sending the audio signal to the headphones jack by default. The command syntax is as simple as below:
omxplayer /path/to/audio/file.wavYou can read more about Omxplayer on its official GitHub page for advanced applications.
Using Python
For Python, you can use Pygame. Pygame is a widely popular python library for creating games. And the best thing about it is that it comes with the Raspberry Pi OS. You can use the mixer function to play audio in less than 10 lines of code.
import pygame
pygame.mixer.init()
pygame.mixer.music.load("myFile.wav")
pygame.mixer.music.play()
while pygame.mixer.music.get_busy() == True:
    continue
These methods are all very convenient, but the sound quality for most of them are decent at best, and you have to build their interfaces from scratch, which is troublesome, especially if you’re looking for a one-stop-shop. This is where Rune Audio comes in.
Hi-Fi Audio on the Raspberry Pi
RuneAudio is an open-source software that turns your Raspberry Pi into a Hi-Fi music player. It will make the Pi perform like a high-fidelity digital source. It is built around the idea of having high-quality music playback in single-board computers such as the Raspberry Pi. Furthermore, Rune Audio is a custom-built Linux distribution, which means it is a full-fledged operating system. It stripped away all the clutter from the standard OS to take full advantage of its target board hardware.
Acquiring RuneAudio
To get started with RuneAudio, download the image file for your target device (in our case, the Raspberry Pi). Check the download page here. Once the download is complete, extract the zip files to obtain the image file.
Next, prepare an SD card that will contain the operating system. Format it. Copy the extracted files to the SD card. Make sure it doesn’t have any other files inside.
Setting up the Raspberry Pi
- If you have a USB DAC, plug it into a USB port. Otherwise, just plug in the analog jack.
- Connect the ethernet cable.
- Turn on the Raspberry Pi.
On your first boot, RuneAudio will automatically acquire an IP address via ethernet and create its user interface.
Getting familiar with the interface
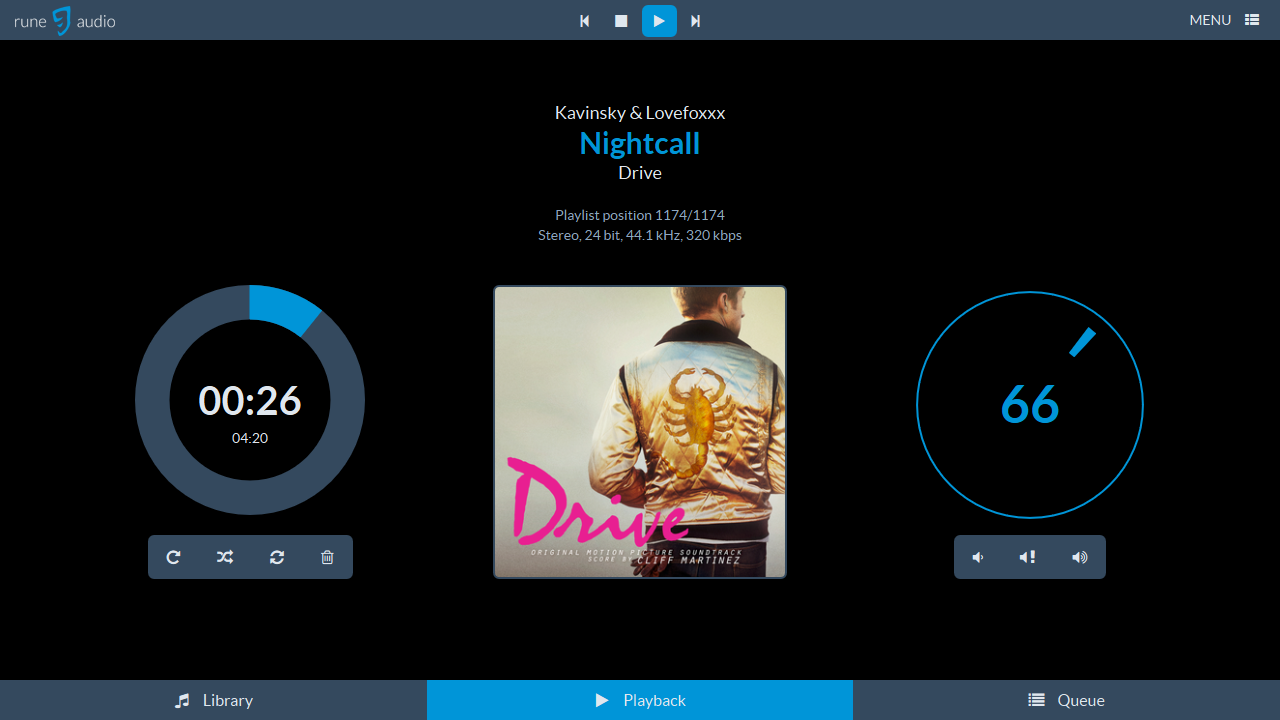
RuneAudio uses a web interface called RuneUI. It has everything a standard music player has but is very intuitive and easy to use, unlike most open-source software. You can easily browse your music library, control the playback and configure the player.
Accessing the RuneUI
Another amazing thing about RuneUI is that you can access the player outside the Raspberry Pi. There are several ways you can connect with it using different systems, here are some of the examples:
- Windows – http://runeaudio
- OS/Linux/Android – http://runeaudio.local
- Via Local IP Address – Using the Raspberry Pi’s IP address, you can connect to RuneUI from any device (e.g., http://192.168.1.xxx)
Thanks for reading! Hope this article has helped you get your Raspberry Pi setup to play audio files. Feel free to leave a comment below if you have any questions.


