
In this tutorial, we’re going to look at EEPROM memory on the Arduino. EEPROM memory is a type of external memory that the Arduino can write to. You can use it to store files and log sensor data. To demonstrate how to use EEPROM memory on the Arduino, we will build a project that reads the temperature from a thermistor, and writes the sensor data to an external EEPROM.

From ROM to EEPROM
ROM stands for Read-Only Memory and was used in early microcontrollers to typically store the computer’s operating system. In fact, what was used was PROM (Programmable Read-Only Memory) and is programmed or “burned” externally in a special programmer with high voltages. And once programmed, it becomes unchangeable and needs to go back from the start.
The EPROM (Erasable Programmable Read-Only Memory) came up next. It has a little glass window and can be erased under a strong UV light. It can then take it back to the programmer and do again the so-called “burn and crash”. Then came the EEPROM or the Electrically Erasable Programmable Read-only Memory. With this, you can retain the chips and go back to the UV eraser on site.
EEPROM Capacity
With the creation of EEPROM, the ROM is no longer a read-only device but rather something you can write back similar to the RAM (Random Access Memory). EEPROM is considerably slower than RAM and has a limitation as to the number of writes (typically 1 million). But this should not a problem because there are 2 versions of EEPROM. The first version is where you can write data in a byte-wide parallel manner and the other is the serial using I2C where you write in a serial manner. It has a limited guaranteed data retention life which is typically 10 years.
The flash memory came next and was able to store much more data in the same size. While EEPROM can be written byte by byte, flash memory writes in blocks or in big chunks, typically 512 bytes at a time. Take note that the number of times you can write is typically 100,000 so you have to manage that.
EEPROM memory size can be misleading as it is usually specified in bits and not in bytes. A 256K EEPROM can hold 256K bits of data or just 32K bytes, about 16 pages of plain text. Also, it works as a nonvolatile memory, which means it can retain its memory even after power is cycled back (as opposed to volatile memory which loses its contents after power is removed).
What’s Inside the Chip?
Typically, each memory bit is made up of two field-effect transistors or FETs. One of these is the memory FET which has a floating gate that can be charged or discharged. It can be set to 1 or 0. The second FET is the gate allowing the first to be written to or read from.
Why add an external EEPROM and not just use an SD card? The EEPROM is much faster to read from and write to than on an SD card. It has more space (32kB compared to 1kB on the UNO) and it is more steady than an SD card which could fall out of its holder due to vibrations.
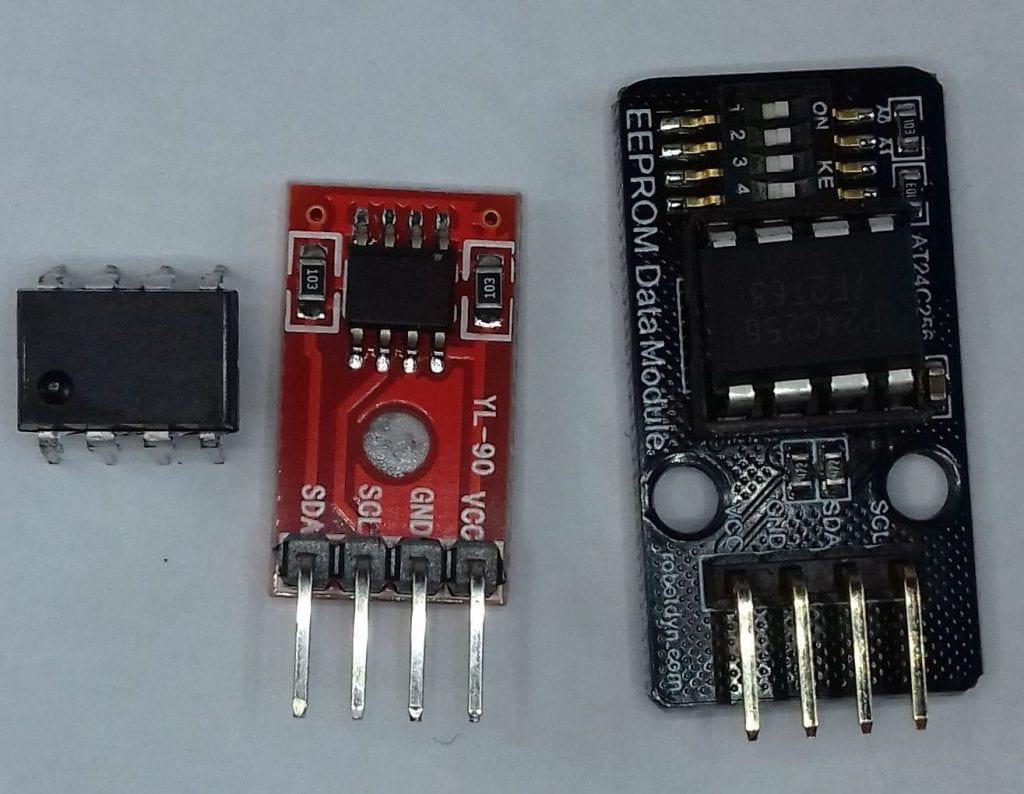
Furthermore, the I2C protocol makes it easier to use compared to SPI used on SD cards. The 24LC256 comes in different variations. Shown above is a DIP IC package, a breakout board which includes pull-up resistors, and a more fancy one with built-in address selectors.
Using EEPROM on the Arduino
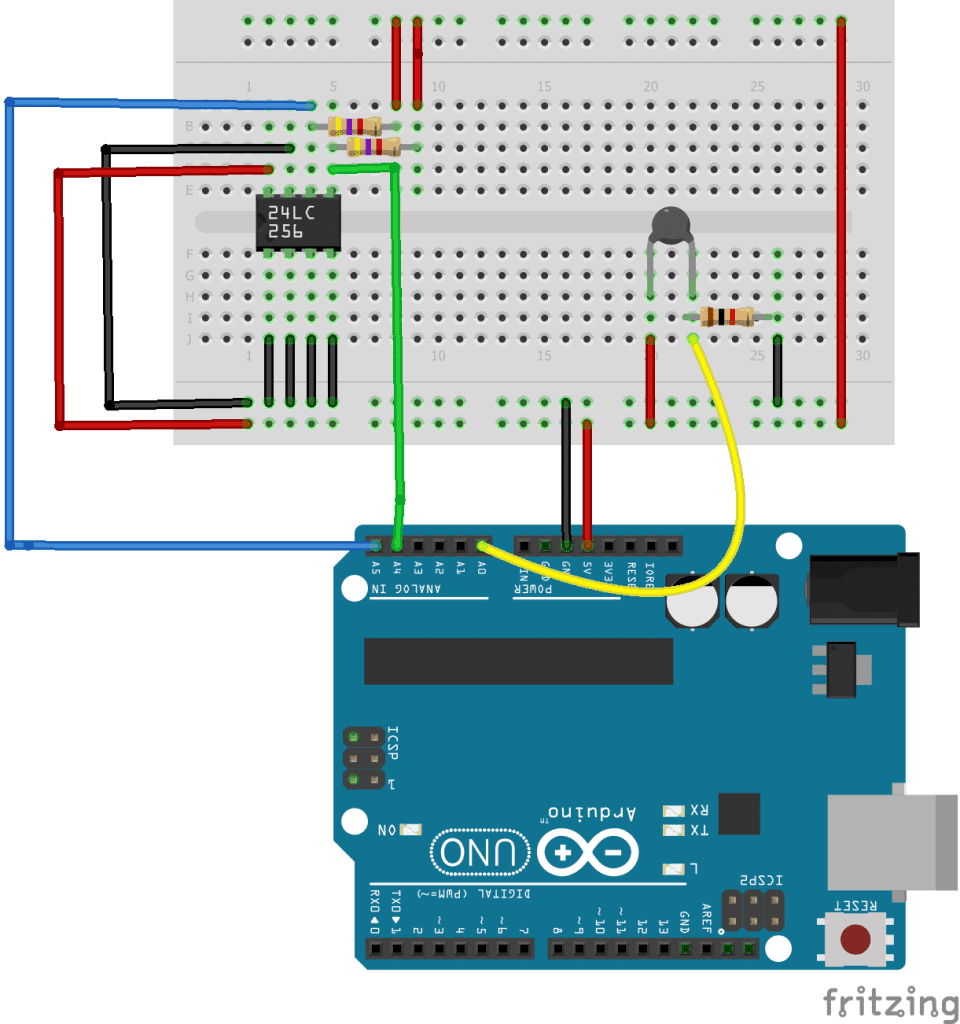
Now, let’s build a project that will write temperature data from a thermistor to the EEPROM. A thermistor is a resistor that changes resistance with temperature. For more information about thermistors, read here.
Parts Needed
If you want to learn more about the Arduino, check out our Ultimate Guide to the Arduino video course. You’ll learn basic to advanced Arduino programming and circuit building techniques that will prepare you to build any project.
Setting the Address
If you are going to connect more than one 24LC256 EEPROM to a microcontroller, you will need to vary the addresses of each one by taking pins 1 to 3 high or low. As there are three (3) address lines, there can be 8 EEPROM devices (23= 8). But each one must have a unique address. If you are only using one, ground all 3 pins and you will get an address of 0x50. The Write-Protect pin, pin 7, is usually taken high but leave it low.
Wire up the junction of the thermistor and the 10k resistor to A0. Note that the parameters for the Steinhart equation depend on the specific type of thermistor you’re using. If you have a different one, your results may vary but you can calculate the parameters here.
Code for the Project
#include <Wire.h>
#define xAddr 0x50 //defines the base address of the external EEPROM
byte hiByte;
byte loByte;
byte i;
char buffer[10];
char newStr[10];
unsigned int eepromAdd = 0;
int ThermistorPin = A0;
int Vo;
float R1 = 10000;
float logR2, R2, T;
float c1 = 1.009249522e-03, c2 = 2.378405444e-04, c3 = 2.019202697e-07;

void setup() {
  Serial.begin(9600);
  Wire.begin(); //creates a Wire object

  /*
  //write an integer
  int myInt = 5678;
  hiByte = highByte(myInt); //breaks up into into 2 bytes
  loByte = lowByte(myInt);
  writeEEPROM(xAddr, eepromAdd, hiByte); //write a byte
  writeEEPROM(xAddr, eepromAdd+1, loByte); //write a byte
  //now read it back
  hiByte = readEEPROM(xAddr, eepromAdd);
  loByte = readEEPROM(xAddr, eepromAdd + 1); //step 1
  int newInt = word(hiByte, loByte);
  Serial.println(newInt);
  */
}

void loop() {
  Vo = analogRead(ThermistorPin);
  R2 = R1 * (1023.0 / (float)Vo - 1.0);
  logR2 = log(R2);
  T = (1.0 / (c1 + c2*logR2 + c3*logR2*logR2*logR2));
  T = T - 273.15; //in centigrade
  //T = (T * 9.0)/ 5.0 + 32.0; // un-comment for Fahrenheit

  Serial.print("Temperature measured: ");
  Serial.print(T);
  Serial.println(" C");
  delay(500);

  //convert float to string and write it to the EEPROM
  char chrFloat[] = "";;
  char buffer[10];
  dtostrf(T, 6, 4, buffer);  //6 is minimum width, 4 is precision; float value is copied onto buff
  strcat( chrFloat, buffer); //append the converted (float now string)

  //write the string:
  for(byte i=0; i<=strlen(chrFloat);i++)
     writeEEPROM(xAddr, eepromAdd+i, chrFloat[i]); //write a byte

  //read it back:
  for(i=0; i<=strlen(chrFloat);i++)
      newStr[i] = readEEPROM(xAddr, eepromAdd + i); //read a byte
  newStr[i] = 0;

  Serial.print("Temperature from EEPROM ");
  Serial.println(atof(newStr),2); //convert ASCII to float with 2 decimals
}

//write a byte or single char - less than 256
void writeEEPROM(int devAddr, unsigned int eeAddr, byte data ) {
  Wire.beginTransmission(devAddr);
  Wire.write((byte)eeAddr >> 8);      //writes the most significant byte, move LSB off to right to get rid of it
  Wire.write((byte)eeAddr & 0xFF);    //writes the least significant byte, mask off LSB with bitwise AND 0
  Wire.write(data);
  Wire.endTransmission();
  delay(5);  //need this for sure
  }

//read a byte or single char - less than 256
byte readEEPROM(int devAddr, unsigned int eeAddr ) {
  byte readByte = 0;
  Wire.beginTransmission(devAddr);
  Wire.write((byte)eeAddr >> 8);      //writes the most significant byte
  Wire.write((byte)eeAddr & 0xFF);    //writes the least significant byte
  Wire.endTransmission();
  Wire.requestFrom(devAddr,1);
  if (Wire.available())
    readByte = Wire.read();
  return readByte;
  }
After the temperature, T, is read, we save it to the EEPROM and then read it back. Looking at about line 50, we convert the float value T to a c-type char string dtostr() and add it to our string chrFloat. Then, we write and read it back from the EEPROM. This is done by the ‘engine’ of the program writeEEPROM() and readEEPROM() where the string is written and read byte by byte. So you can use the functions to read/write single bytes or characters or via a loop or a long string.
Note that you should not use strings longer than 32 bytes. For your use, I have also included (commented out) how to read/write an integer at the end of setup. An integer takes up 2 bytes so you have to split it into 2 bytes to save and then on reading, put it together again with word().
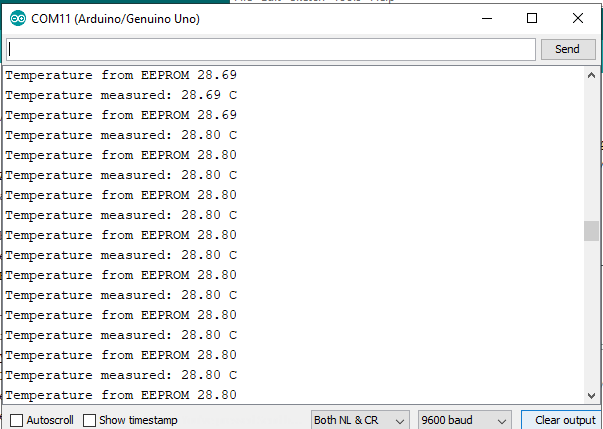
Output in the Serial Window
The serial window should look like this:
Hope this helps you to use EEPROM memory in your own Arduino projects. If you have any questions, feel free to leave a comment below.

I want to understand in detail: Is the “FET memory”.
I consider the FET a type of transistor.
I assume that a 256K FET memory that can store 256 bits (1 / 0 ) is made with 256 FET Flip-Flop
Is this correct ?