In this article, we’re going to learn about switch debouncing and how to use it in your Arduino projects. Switch bounce is a problem with almost all mechanical switches. When a switch bounces, the Arduino gets confused about whether the switch is open or closed. A bouncing switch can make the Arduino think that a switch was pressed multiple times when it was only pressed once.

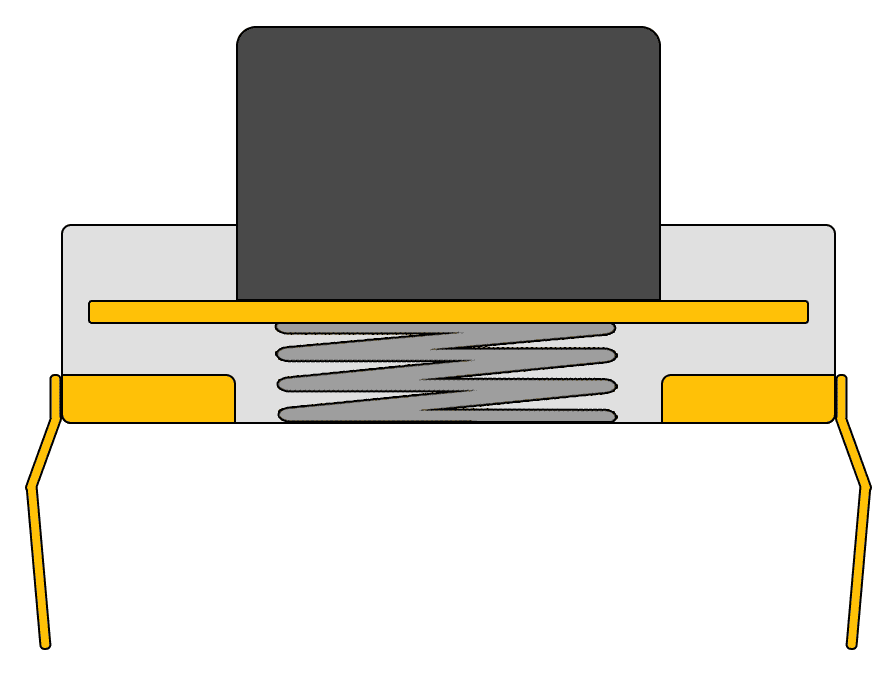
On the Arduino, switch debouncing can be done with hardware or with code in the sketch. We will see how to use both methods. We will use a tactical push button to demonstrate how to debounce switches in this article, but the same techniques can be applied to any switch.
Watch the video for this tutorial here:
What is a Bouncing Switch?
In order for a microcontroller to detect when a switch is open or closed, it has to constantly listen to or poll the switch to detect when the signal changes. But when the button is pressed, the metal contacts inside the button don’t make an instant electrical connection.
The button might hit one side of the contacts first, then the other side several times before making a reliable connection. Bumps or dirt on the metal contacts can also prevent a good contact right away. This causes the button signal to bounce up and down before settling on a resting state. The bounces usually only last for a few milliseconds, but the Arduino runs so fast that each bounce can be counted as a button press.
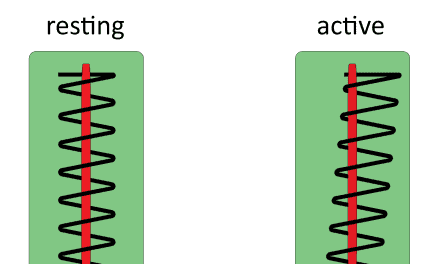
If we connected the push button’s output to an oscilloscope, this is what a clean non-bouncing signal would look like:
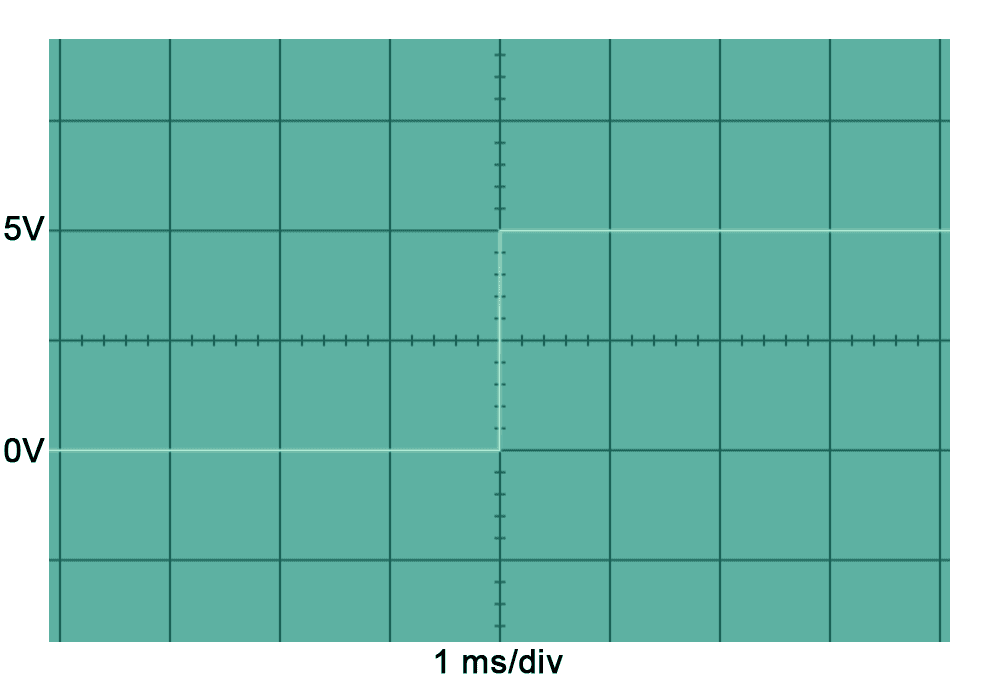
The signal starts low at 0 volts then goes high to 5 volts and stays there.
This is what a bouncing signal would look like:
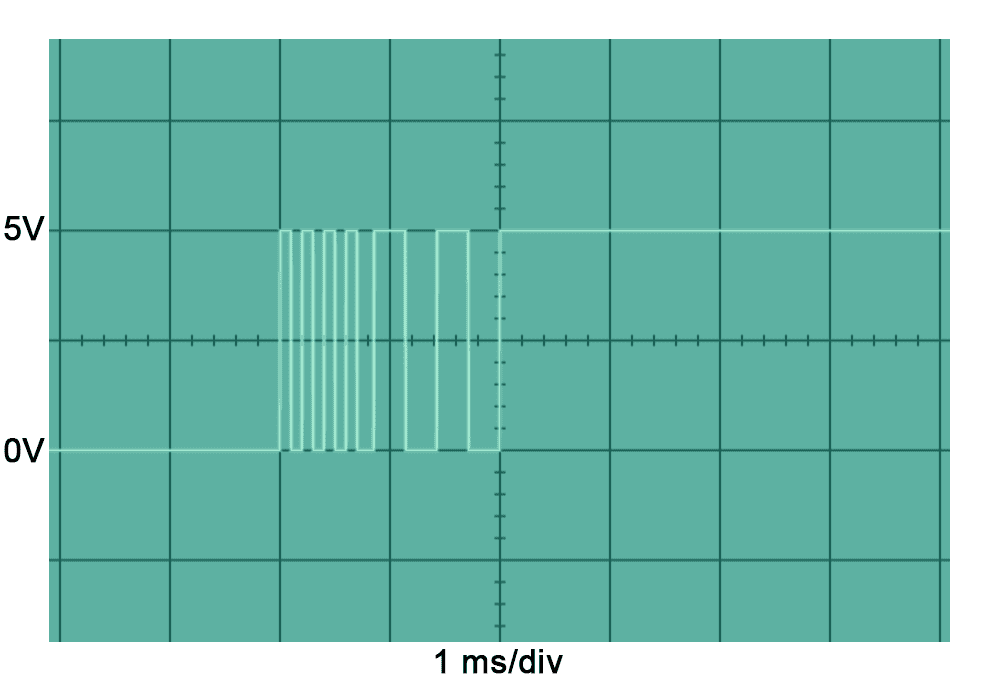
The signal starts low but bounces up and down between 0 and 5 volts before settling on 5 volts. The time scale is one millisecond per division, so this is happening very fast. Even though the bouncing only lasts for two milliseconds, each bounce could be interpreted by the Arduino as a button press.
How to Debounce Switches With Hardware
The easiest hardware solution for debouncing switches is to use a Schmitt trigger. Schmitt triggers are usually used to convert analog signals into digital signals, but they can also be used to debounce switches. A Schmitt trigger takes an analog input signal and outputs a digital signal:
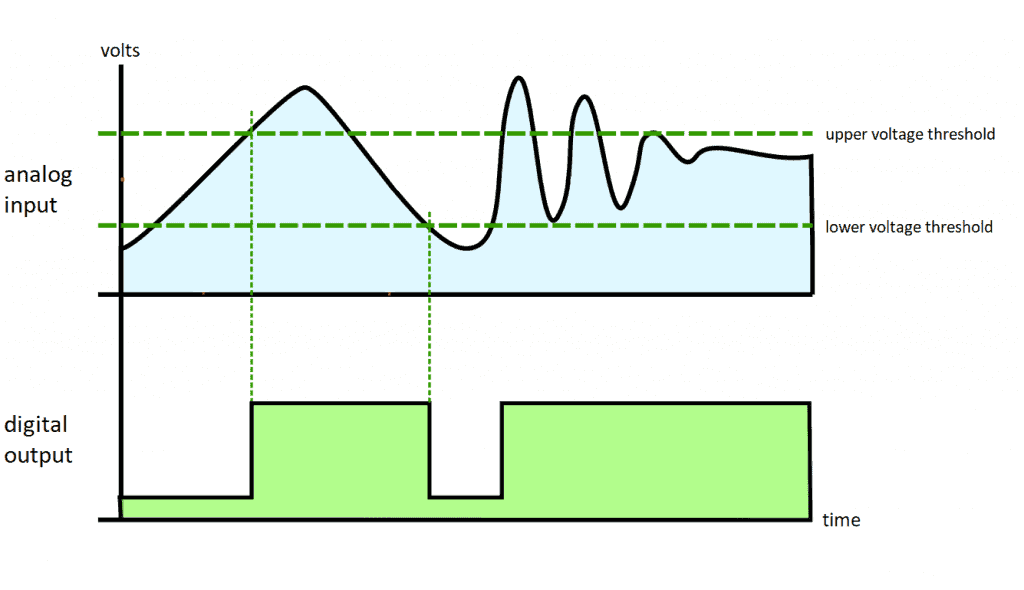
When the input to the Schmitt trigger exceeds the upper voltage threshold, the digital output switches to high. The output switches low when the input signal falls below the lower voltage threshold.
The Schmitt trigger we will use is the SN74HC14N from Texas Instruments:
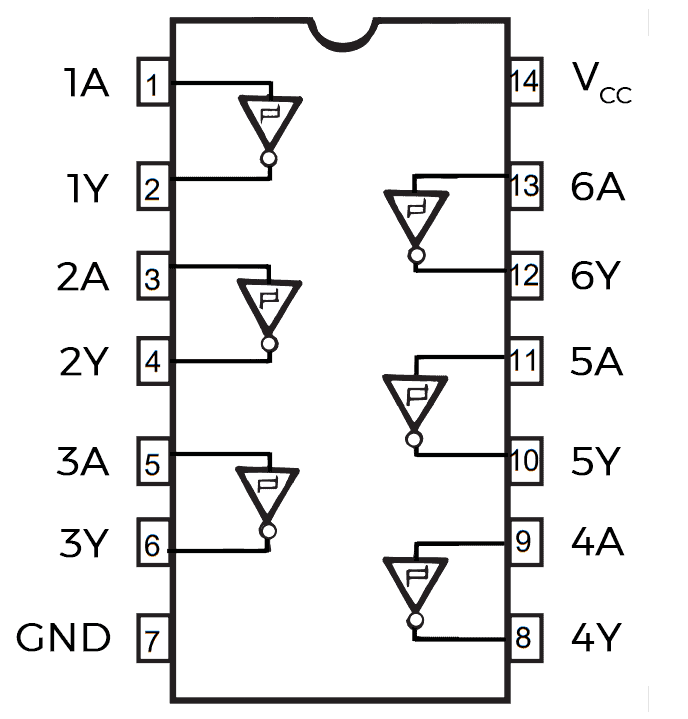
The SN74HC14N actually has six separate Schmitt triggers. The Schmitt trigger inputs are pins 1A, 2A, 3A, 4A, 5A, and 6A. The Schmitt trigger outputs are pins 1Y, 2Y, 3Y, 4Y, 5Y, and 6Y. Power is connected to the Vcc pin, and ground connects to the GND pin.
How to Connect a Schmitt Trigger to the Arduino
Let’s see how to use a Schmitt trigger to debounce switches with an example project that increases the count of a counter each time a button is pressed.
These are the parts you will need to build this project:
- Arduino Uno
- Jumper wires
- Breadboard
- SN74HC14N Schmitt trigger
- Tactile push button
- 10K Ohm resistor
- 1 uF capacitor
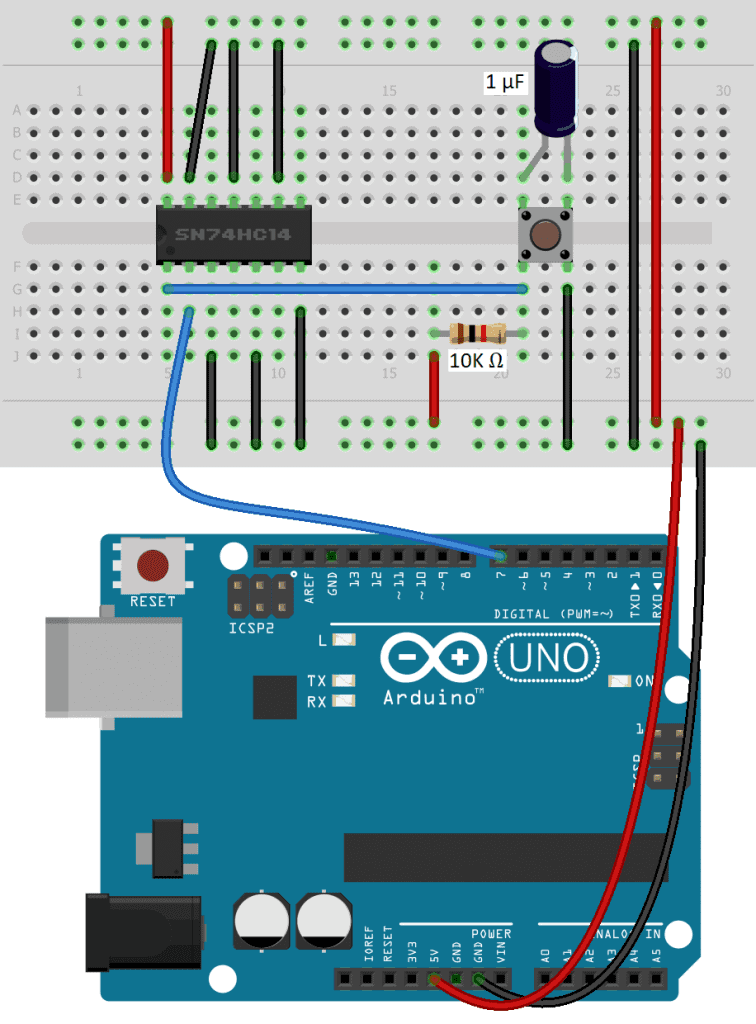
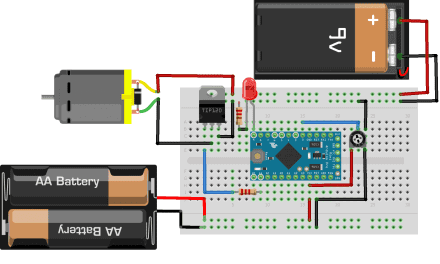
To build the button counter project, connect an SN74HC14N Schmitt trigger and a push button to the Arduino like this:
How to Program a Schmitt Trigger on the Arduino
The sketch below reads the signal from the Schmitt trigger and increases a counter by one digit with every press of the button. The count is printed to the serial monitor.
Once the Schmitt trigger is connected, upload this code to the Arduino:
int inputPin = 7;
int counter = 0;
int buttonState = 0;
int lastButtonState = 0;

void setup() {
  pinMode(inputPin, INPUT);
  Serial.begin(9600);
}

void loop() {
  buttonState = digitalRead(inputPin);

  if (buttonState != lastButtonState) {
    if (buttonState == LOW) {
      counter++;
      Serial.println(counter);
    }
  }
  lastButtonState = buttonState;
}
Once the code is uploaded, open the serial monitor and you should see the numbers count up one at a time with each press of the button.
To see how switch bouncing affects the counter, bypass the Schmitt trigger by connecting the output of the push button directly to Arduino pin 7. You’ll see that pressing the button once increases the count by multiple digits at a time.
How to Debounce Switches With Code
Using a Schmitt trigger is the most reliable way to debounce a switch, but debouncing with code has the advantage that no extra components are needed.
To add switch debouncing to a sketch, we need to start a timer when the first button signal change occurs. If the signal bounces within a certain amount of time, the signal will be ignored. If the button signal change lasts longer than a set amount of time, it will be counted as a button press. For example, if the button signal goes high three times within 50 milliseconds, the sketch will ignore it and only count the signal after 50 milliseconds.
Here’s the button counter sketch from above with the software debouncing code added:
int inputPin = 7;
int counter = 0;
int buttonState = 0;
int lastButtonState = 0;

int currentButtonState = 0;
unsigned long lastDebounceTime = 0;
unsigned long debounceDelay = 50;

void setup() {
  pinMode(inputPin, INPUT);
  Serial.begin(9600);
}

void loop() {
  currentButtonState = digitalRead(inputPin);

  if (currentButtonState != lastButtonState) {
    lastDebounceTime = millis();
  }

  if ((millis() - lastDebounceTime) > debounceDelay) {
    if (currentButtonState != buttonState) {
      buttonState = currentButtonState;
      if (buttonState == LOW) {
        counter++;
        Serial.println(counter);
      }
    }
  }
  lastButtonState = currentButtonState;
}
Explanation of the Code
At the top of the sketch, we have the same variables we declared in the previous sketch. We just need a few more variables for debouncing:
currentButtonState: Holds the reading from theinputPin.lastDebounceTime: Stores the time after the initial signal change is detected.debounceDelay: Sets the length of time in milliseconds that signal bounces should be ignored.
The setup() section is the same as the previous sketch.
In the loop() section, we take a digital read from the inputPin and store it in the currentButtonState variable. Then we get to an if statement that says “if the currentButtonState is not equal to the lastButtonState, enter the body of the if statement”. In other words, the if statement will be executed if the button signal has changed since the last time through the loop.
In the body of the if statement we have lastDebounceTime = millis(). The millis() function outputs the number of milliseconds that have passed since the Arduino was turned on. So this line will store the time of the first button signal change in the lastDebounceTime variable.
Then we have another if statement. The second if statement says “if the current time (millis()) minus the lastDebounceTime is greater than the debounceDelay, enter the if statement”. The time value output by the millis() function is constantly increasing. But the lastDebounceTime is the time when the first button signal change occurred. So millis() - lastDebounceTime is equal to the number of milliseconds from the first button signal change to the next one. If this time is greater than the debounceDelay defined at the top of the sketch, the code in the if statement (the code that increments the counter) will be executed. If the time is less than the debounceDelay, the if statement will not be executed and the counter will not be incremented.
For example, say we press and hold the push button, which creates a signal bounce that lasts for 5 milliseconds. The value stored in lastButtonState is high, and the value stored in currentButtonState is low. Since currentButtonState and lastButtonState are not equal, the program enters the body of the first if statement where the millis() value is stored in lastDebounceTime.
Say that 10,000 milliseconds has passed since the Arduino was turned on. The millis() function outputs a value of 10,000, which is stored in the lastDebounceTime variable. In the condition of the second if statement, millis() is 10,000 and lastDebounceTime is also 10,000, so millis() - lastDebounceTime equals zero. Zero is not greater than the debounceDelay, which was set to 50 at the top of the sketch. So the if statement is not executed and the counter is not incremented.
At the end of the loop() section, the lastButtonState variable is set equal to the currentButtonState. The button signal is still low since the Arduino runs much faster than the signal is bouncing. The loop() section cycles through multiple times in one millisecond.
Continuing the example back at the top of the loop() section, the inputPin is still low, so the currentButtonState is still low. The currentButtonState is equal to the lastButtonState, so the first if statement is skipped.
Now say that one millisecond has passed since the button was first pressed. In the second if statement, millis() - lastDebounceTime equals 10,001-10,000 = 1, which is not greater than 50 so the second if statement is skipped as well.
This continues looping over and over until the 5 millisecond signal bounce is over. The reading at the inputPin is now high again, so a high value is stored in currentButtonState. Therefore, currentButtonState does not equal lastButtonState, which is low, so the program enters the first if statement and the timer is reset with lastDebounceTime = millis().
It’s only until the inputPin stays low for greater than 50 milliseconds that the program will enter the body of the if statement that has the code to increment the counter. The code is a little hard to understand at first, but if you walk through the loop() section a few times it should become clear. Feel free to leave a comment below if you have questions about anything.


A Schmidt trigger won’t help much unless you put a small capacitor across the switch.
Here is my version of a software Schmidt trigger. Switch is connected to an Analog input. I seldom have bounce issues, but for best results the program should operate on switch release, not switch contact, so the capacitor can do it’s job.
/********************************************************
function to read analog pins as debounced digital inputs
works with 10k pull up and 0.01 or 0.1 ufd cap across switch
has 33 percent hysteresis.
Beware this will spin forever on an unterminated analog input
********************************************************/
boolean Button(int Bpin) {
// Force an initial analogRead
int level = 600; // middle of dead zone
while (level > 400 && level = 800) {
return HIGH; // in upper third
}
else {
return LOW; // in lower third
}
}
does user know if this code is reliable – there are so many “miracle code” solutions out there make hyper claims?
One could aslo use the MAX 6818 Debounce chip. It needs no further componentes.
https://www.maximintegrated.com/en/products/interface/signal-line-protection-ics/switch-debouncers-protectors/MAX6818.html
I agree!
“tactile” push button, not “tactical”…