
A Network-Attached Storage (NAS) is a centralized storage device for storing data in a network. With a NAS, you can share files with all of the devices connected to the network. For example, you could use a Raspberry Pi NAS to store music files and have a stereo in another room access and play the files. They are also great for backing up data and making documents available for use on multiple devices.

Why not just use a cloud service? Most importantly, the NAS is hosted on your own network so it is completely private. A NAS can also be cheaper than a cloud service, and it’s easy to add more storage as needed.
In this article, we will configure the Raspberry Pi and an external storage device to operate as a NAS on private network.
Building the Raspberry Pi NAS
The first thing you need when building a Raspberry Pi NAS from scratch is the storage device. The Raspberry Pi’s onboard microSD card just won’t cut it. I recommend using a USB flash drive or an external hard drive.
Setting up the Raspberry Pi
As always, first update your Raspberry Pi OS to the newest version:
sudo apt update
sudo apt upgrade
After the update is complete, create the public and private folders accessible with the NAS. Then change the public folder’s owner to root and the group to the current user. Finally, allow read, write, and execute permissions on the current user and group while read and execute only for others:
sudo mkdir /home/shares
sudo mkdir /home/shares/public
sudo chown -R root:users /home/shares/public
sudo chmod -R ug=rwx,o=rx /home/shares/public
Now that we’ve finished setting up the Raspberry Pi as a NAS server let’s work on installing the NAS software itself. In this tutorial, we will use Samba.
Install and Configure Samba
Samba is an open-source re-implementation of SMB (Server Message Block), a network protocol originally used between a Microsoft client and server. It was created to allow Windows clients access to a Linux host’s file and print services. With Samba, Windows computers can read, write, or execute files without knowing it is from a Linux host.
Moreover, the current version of Samba offers interoperability between Windows and Linux systems and any other popular operating system or computer connected to the network.
To install Samba on your Raspberry Pi, enter the command below:
sudo apt install samba samba-common-binThen, edit the configuration file using the nano text editor:
sudo nano /etc/samba/smb.confYou can limit the connections to your NAS by adding authentication. In the Samba configuration file, press CTRL + W and search for “Authentication”:
##### Authentication #####Now, add the line below:
security = userThen scroll down and find [homes]. It’s under the Share Definitions section. Change the read-only line to No. This will allow you to write files to your NAS so that you can send and save files to it:
read only = noFinally, add the public parameters below. Save the file and exit:
[public]
  comment = public storage
  path = /home/shares/public
  valid users = @users
  force group = users
  create mask = 0660
  directory mask = 0771
  read only = no
Restart the Samba service to enable the changes:
sudo /etc/init.d/smbd restartThere should be a GUI that pops up after restarting the Samba service. It will ask for your SMB password for client authentication. Otherwise, you can enter the line below to add user “pi” and assign a password manually:
sudo smbpasswd -a piMount the Storage Device
At this point, you can already access all of the Raspberry Pi’s memory with any connected device in your network.
Now we need to mount the USB flash drive or external storage drive on the Raspberry Pi. You can add multiple storage devices to a Raspberry Pi NAS, but it is best to configure things one by one to simplify the procedure.
First, connect your storage device to the Raspberry Pi. Then, identify the name of the storage device by entering the following command in the terminal:
dmesgIf you’re connecting the first storage device, the name should be sda1. You must format your device with a Linux file system, such as ext3 or ext4. If it isn’t, you can format it using the command below:
umount /dev/sda1
sudo mkfs.ext4 /dev/sda1
Next, create a directory, change the owner, and change the read, write, and execute permissions just how we did with the Raspberry Pi’s main microSD card:
sudo mkdir /home/shares/public/disk1
sudo chown -R root:users /home/shares/public/disk1
sudo chmod -R ug=rwx,o=rx /home/shares/public/disk1
Finally, mount the device on the folder:
sudo mount /dev/sda1 /home/shares/public/disk1Mount the Devices When Starting the Raspberry Pi
To make the storage device mount automatically during startup, we must edit the fstab file:
sudo nano /etc/fstabNow for each device you registered, add the following line to the bottom of the fstab file. It would be best to change the device name and the designated directory for every registered storage device to the Raspberry Pi NAS:
/dev/sda1 /home/shares/public/disk1 auto noatime,nofail 0 0Accessing the Raspberry Pi NAS
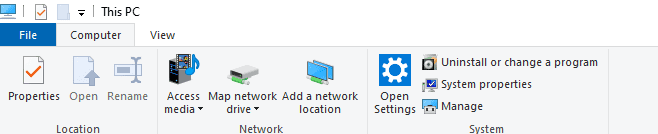
The Raspberry Pi NAS can be accessed by any device on the network. To access the Raspberry Pi NAS from a Windows PC, go to This PC, click the Computer tab, and then click Map network drive:
After that, a prompt will ask you for the network folder you’d like to map.
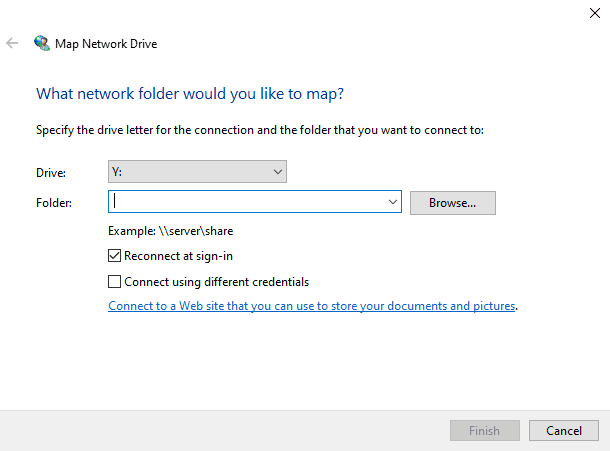
You can use any drive letter you want.
In the Folder field, enter \\raspberrypi\public to connect to the public directory. Enter \\raspberrypi\pi to connect to the private directory.
The Raspberry Pi should now appear in the list of storage devices:

To connect to the Raspberry Pi NAS with a smartphone, use an app like File Expert for Android or File Explorer on IOS.
There you have it! You now know how to make a Raspberry Pi NAS using only a Raspberry Pi and an external storage device. Feel free to leave a comment below if you have any questions.


great article, but how do you hook up rpi to a sata drive? Surely you aren’t saying a rpi will drive the sata drive, are you?