PuTTY is a software application that you can run from your desktop or laptop computer to access the Raspberry Pi command-line interface. It uses SSH (secure shell) to open a terminal window on your computer, which you can use to send commands to the Raspberry Pi and receive data from it. There are other programs that you can use to access the Raspberry Pi terminal, but PuTTY is by far the most popular.

PuTTY is open source and free to use. Visit the PuTTY website to download and install it.
Using PuTTY to Connect to the Raspberry Pi Serial Console Port
PuTTY is a terminal emulator that supports several network protocols, including SSH, SCP, Telnet, rlogin. We will use this application since it’s simple to download and setup.
You can connect PuTTY to your system either through your network, or using a USB to a serial converter cable. The first example outlines the procedure for connecting through a serial connector from your PC.
To connect to a Raspberry Pi from your PC, configure the interfaces as shown below in the Raspberry Pi Configuration menu.

Using an FT232RL FTDI (Adafruit FTDI Friend), connect to the serial converter set for 3.3 volts. The Raspberry Pi uses 3-volt signal levels, so make sure that you are using a 3-volt connection. Connect the ground lead from the FTDI connector to the ground on the Raspberry Pi on pin 6. Then connect the ReceiveA from the FTDI to the Raspberry Pi Transmit pin at pin 8 and the Transmit to the Receive pin at physical pin 10.

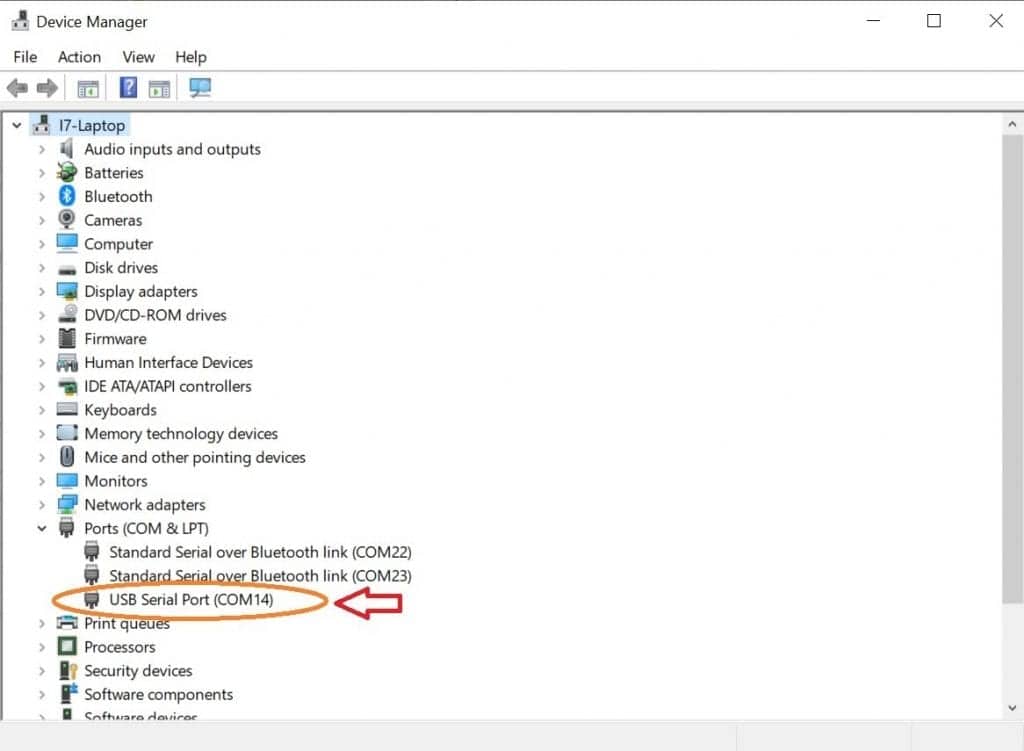
Attach the USB connector to your PC, and open the Device Manager in Windows to determine which serial port you will be using to connect.
Once you have determined the serial port, open PuTTY and edit the settings.

Configure PuTTY by entering the COM port you want to use in the “Serial line” box. Click “Open”, and hit enter until you establish a connection.

If this is your first time logging into the Raspberry Pi, the default username is pi, and the password is raspberry. If you have changed the username and password, use those credentials instead.
Note: You can also get to the command line prompt from your Raspberry desktop. Opening the Terminal prompt on your Desktop will also give you access to the command prompt.
Using PuTTY to Connect to the Raspberry Pi on Your Network
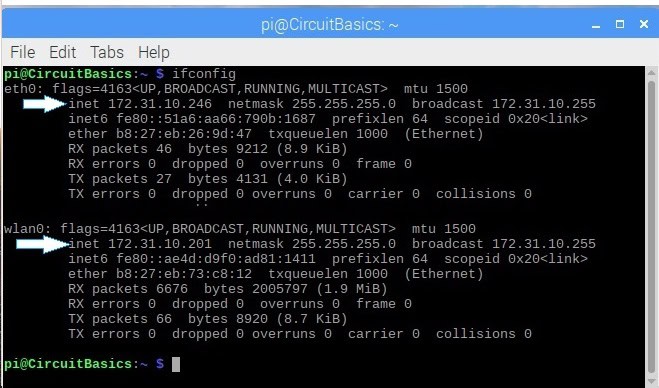
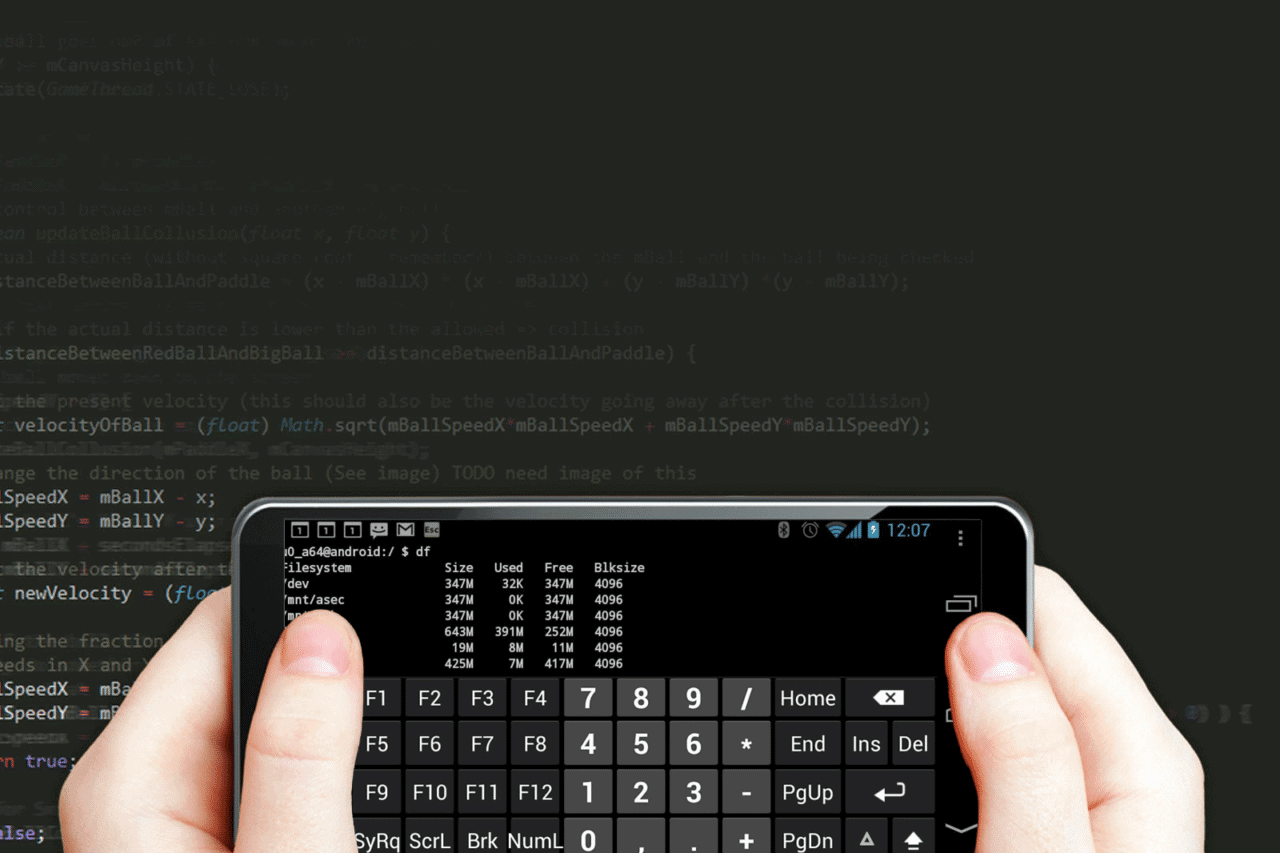
To connect using a network connection, open your Raspberry Pi to determine the IP address. The easiest way to do this is to open the Terminal prompt on the Desktop and enter ifconfig as shown below. If you have established a WiFi connection, look for wlan0, and note the inet entry. In this case, it’s 172.312.10.201.
If you’re using an ethernet connection, look for eth0, and note the inet entry (172.31.10.246 in this case). Depending on your setup, you may have two addresses bu,t you just need to select one. Make a note of the IP address because you will need it to connect to the Pi with PuTTY.
Next, open the Raspberry Pi Configuration Menu and turn on SSL, Serial Port, and Serial Console, as shown below. Then click “OK”. If you are using a wired Ethernet connection, connect it now.

This time, open up PuTTY, and enter your IP address where it says “Host Name (or IP address)”.
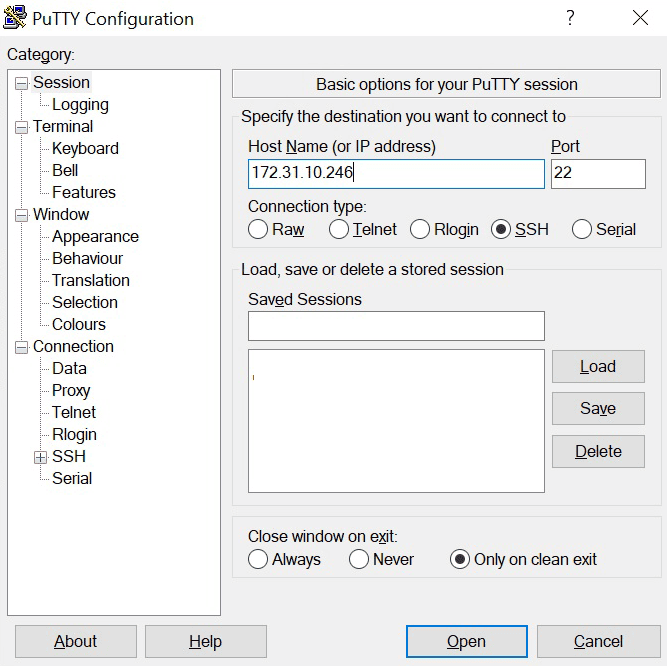
Then click “Open” to open up the terminal window:

If this is your first time logging into the Raspberry Pi, the default username is pi, and the password is raspberry. If you’ve changed the username and password, use those credentials instead.
Once you have established your connection, you can now easily navigate the Raspberry Pi Linux file system. Feel free to leave a comment below if you have questions about anything!

So whats the advantage of PuTTY over just doing ssh in a shell?
Hi :) Not sure if i got the point – what shell did You mean? On Windows Putty is quite simple and straightforward (unless You have Cygwin, MSYS or something like this); i bet that many of RPI users still have Windows on their PCs:)
Regards,
r.
That works well, but I tend now to use VMC so control my RPis and be able to observe the display.
I suppose one could also use VNC and putty to log in on a Win Laptop. I must find out if that would work…