Arrays are like variables – they can store sensor readings, text strings, and Boolean values like high and low. But a variable can only store one value at a time. Arrays can store multiple values at the same time. If you think of a variable as a storage container for data, arrays are like that container but with dividers that you can use to store multiple pieces of data.

Arrays are especially useful for controlling LED matrixes, matrix keypads, and LCD displays on the Arduino.
Watch the video for this tutorial here:
How to Use Arrays on the Arduino
The code for an array looks like this:
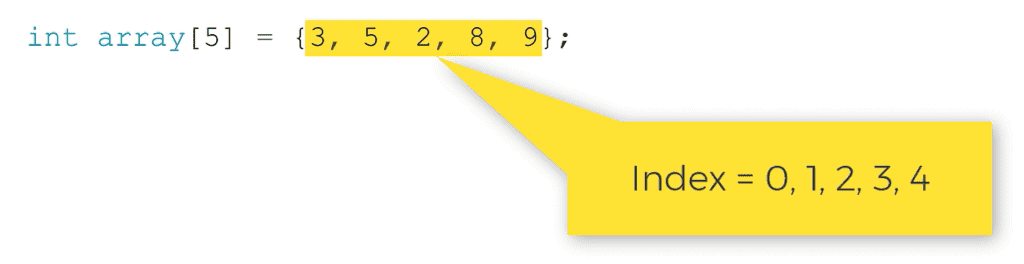
int array[5] = {3, 5, 2, 8, 9};Creating an array is called initializing an array. In this example, the data type of the array is an integer (int) and the name of the array is array[]. The number inside the square brackets is the array index. The array index defines the number of elements in the array.
Elements are the values you want to store in the array. In this array, there are five elements (3, 5, 2, 8, and 9), so the array index is 5. The elements of an array are written inside curly brackets and separated by commas. This is called an array initializer list.
Arrays are zero indexed, which means that the first element is given an index of zero, the second element is index one, the third element is index two, and so on:
To use the elements of an array in a sketch, write the name of the of the array and put the index of the element in square brackets.
For example, say you wanted to print the number eight from the array above to the serial monitor. The number eight element has an index of three, so the code would look like this:
Serial.print(array[3]);When an array is initialized like this:
int array[5] = {3, 5, 2, 8, 9};We are declaring the size of the array and initializing the elements in the array at the same time. But arrays can also be declared without initializing the elements. Elements can be added to the array later in the sketch.
To do this, declare the array at the top of the sketch by writing the name of the array and the array index in square brackets like this:
int array[5];Later in the sketch, you can store different values in the array by setting the array equal to the element you want stored in a particular index number. The index number goes inside the square brackets. For example, this assigns the number four to index two of the array[] array:
array[2] = 4;Arrays can also be initialized without setting the size of the array. Instead of putting the size of the array in square brackets as above, you can leave the brackets empty and the size of the array will be determined automatically:
int array[] = {3, 5, 2, 8, 9}; Array Data Types
Any data type can be used in an array. Float, string, byte, and char data types can all be used. But all of the elements in the array need to have the same data type.
When using char arrays, the array size needs to be one greater than the number of actual characters. The extra element stores the null character. For example, to use an array of chars to store the word “hello”, use this:
char array[6] = {"hello"};There are only five characters in “hello”, but the array index is six.
Example Project Using Arrays
Arrays are commonly used with for loops to automatically set pin numbers or to control the voltage state of multiple pins at the same time.
As an example of how to use arrays on the Arduino, let’s build a circuit that controls an array of LEDs. Each LED in the array will blink on and off one after the other.
This project uses the following parts:
- Arduino Uno
- Jumper wires
- Breadboard
- SN74HC14N Schmitt trigger
- Tactile push button
- 10K Ohm resistor
- 1 uF capacitor
Follow this wiring diagram to connect the circuit:
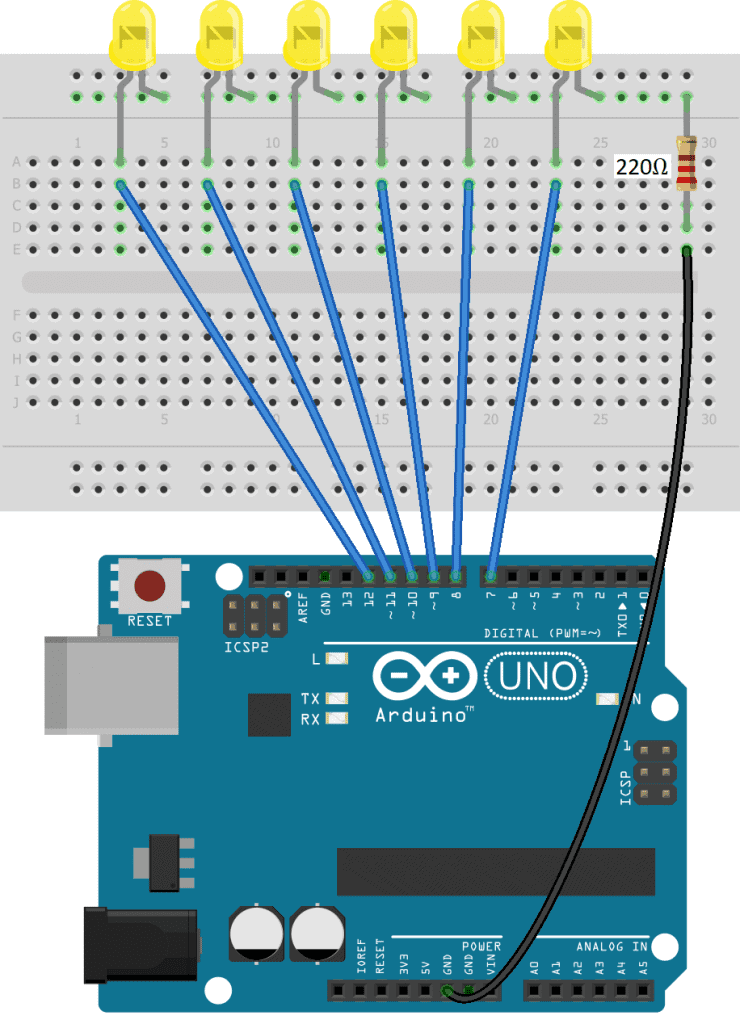
The cathode of each LED is connected to ground via a 220 Ohm current limiting resistor. Once the circuit is connected, upload this code to the Arduino:
int ledPins[6] = {12, 11, 10, 9, 8, 7};

void setup() {

  for (int i = 0; i < 6 ; i++) {
    pinMode(ledPins[i], OUTPUT);
  }
}

void loop() {

  for (int j = 0; j < 6; j++) {
    digitalWrite(ledPins[j], HIGH);
    delay(500);
    digitalWrite(ledPins[j], LOW);
    delay(500);
  }
}
Explanation of the Code
This project is perfect for arrays since there are lots of pins all doing pretty much the same thing – turning LEDs on and off. At the top of the sketch, we initialize an array called ledPins[] to store the six pin numbers that are connected to the LEDs (pins 7-12).
Normally we would set the pin modes for each pin in the setup() section with separate pinMode() functions. But now that the pins are stored in the ledPins[] array, we can use a for loop to set them with just two lines of code. In the condition of the for loop, we declare a count variable i, and set it equal to 0. Then we set the index of each element with i<6. Next, i++ increments the count variable i by one with each iteration of the for loop.
In the body of the for loop there is a pinMode() function. The first argument of the pinMode() function is normally the pin number that will be set as an input or output, but instead we can enter the ledPins[] array with the count variable i inside the square brackets. Each pin will be an output, so the second argument of pinMode() is OUTPUT. The for loop will loop six times, setting the pin mode to output for each element in the ledPins[] array.
In the loop() section we have another for loop that will make each LED blink on and off for 500 milliseconds, one after the other.
In the condition of the for loop, we declare a count variable j and set it equal to 0. We still want to loop through each element of the ledPins[] array so we set the condition to j<6. Then we have j++ to increment the count by one with each iteration of the for loop. The code in the body of the for loop will be executed once for each element of the ledPins[] array.
In the body of the for loop we digital write the elements of the ledPins[] array high and low to blink the LEDs on and off. But instead of using a pin number as the first argument of each digitalWrite() function, we can use the ledPins[] array with the count variable j inside the square brackets.
So the for loop will start at element zero of the ledPins[] array (pin 12), write it high, delay for 500 milliseconds, then write it low and delay for another 500 milliseconds. In the next cycle through the for loop, the count variable j will increment by one, so the code in the body of the for loop will be executed on element one (pin 11). So pin 11 will be written high and low for 500 milliseconds.
The for loop will continue cycling up to element five, at which point the Arduino exits the for loop and returns to the top of the loop() section. In the next cycle through the loop the Arduino enters the for loop again, blinking the six LEDs on and off in succession once more.
Two Dimensional Arrays
Up to this point we’ve been talking about one dimensional arrays but there are also two dimensional arrays. One dimensional arrays can only store a single list of values but two dimensional arrays can store two lists of values.
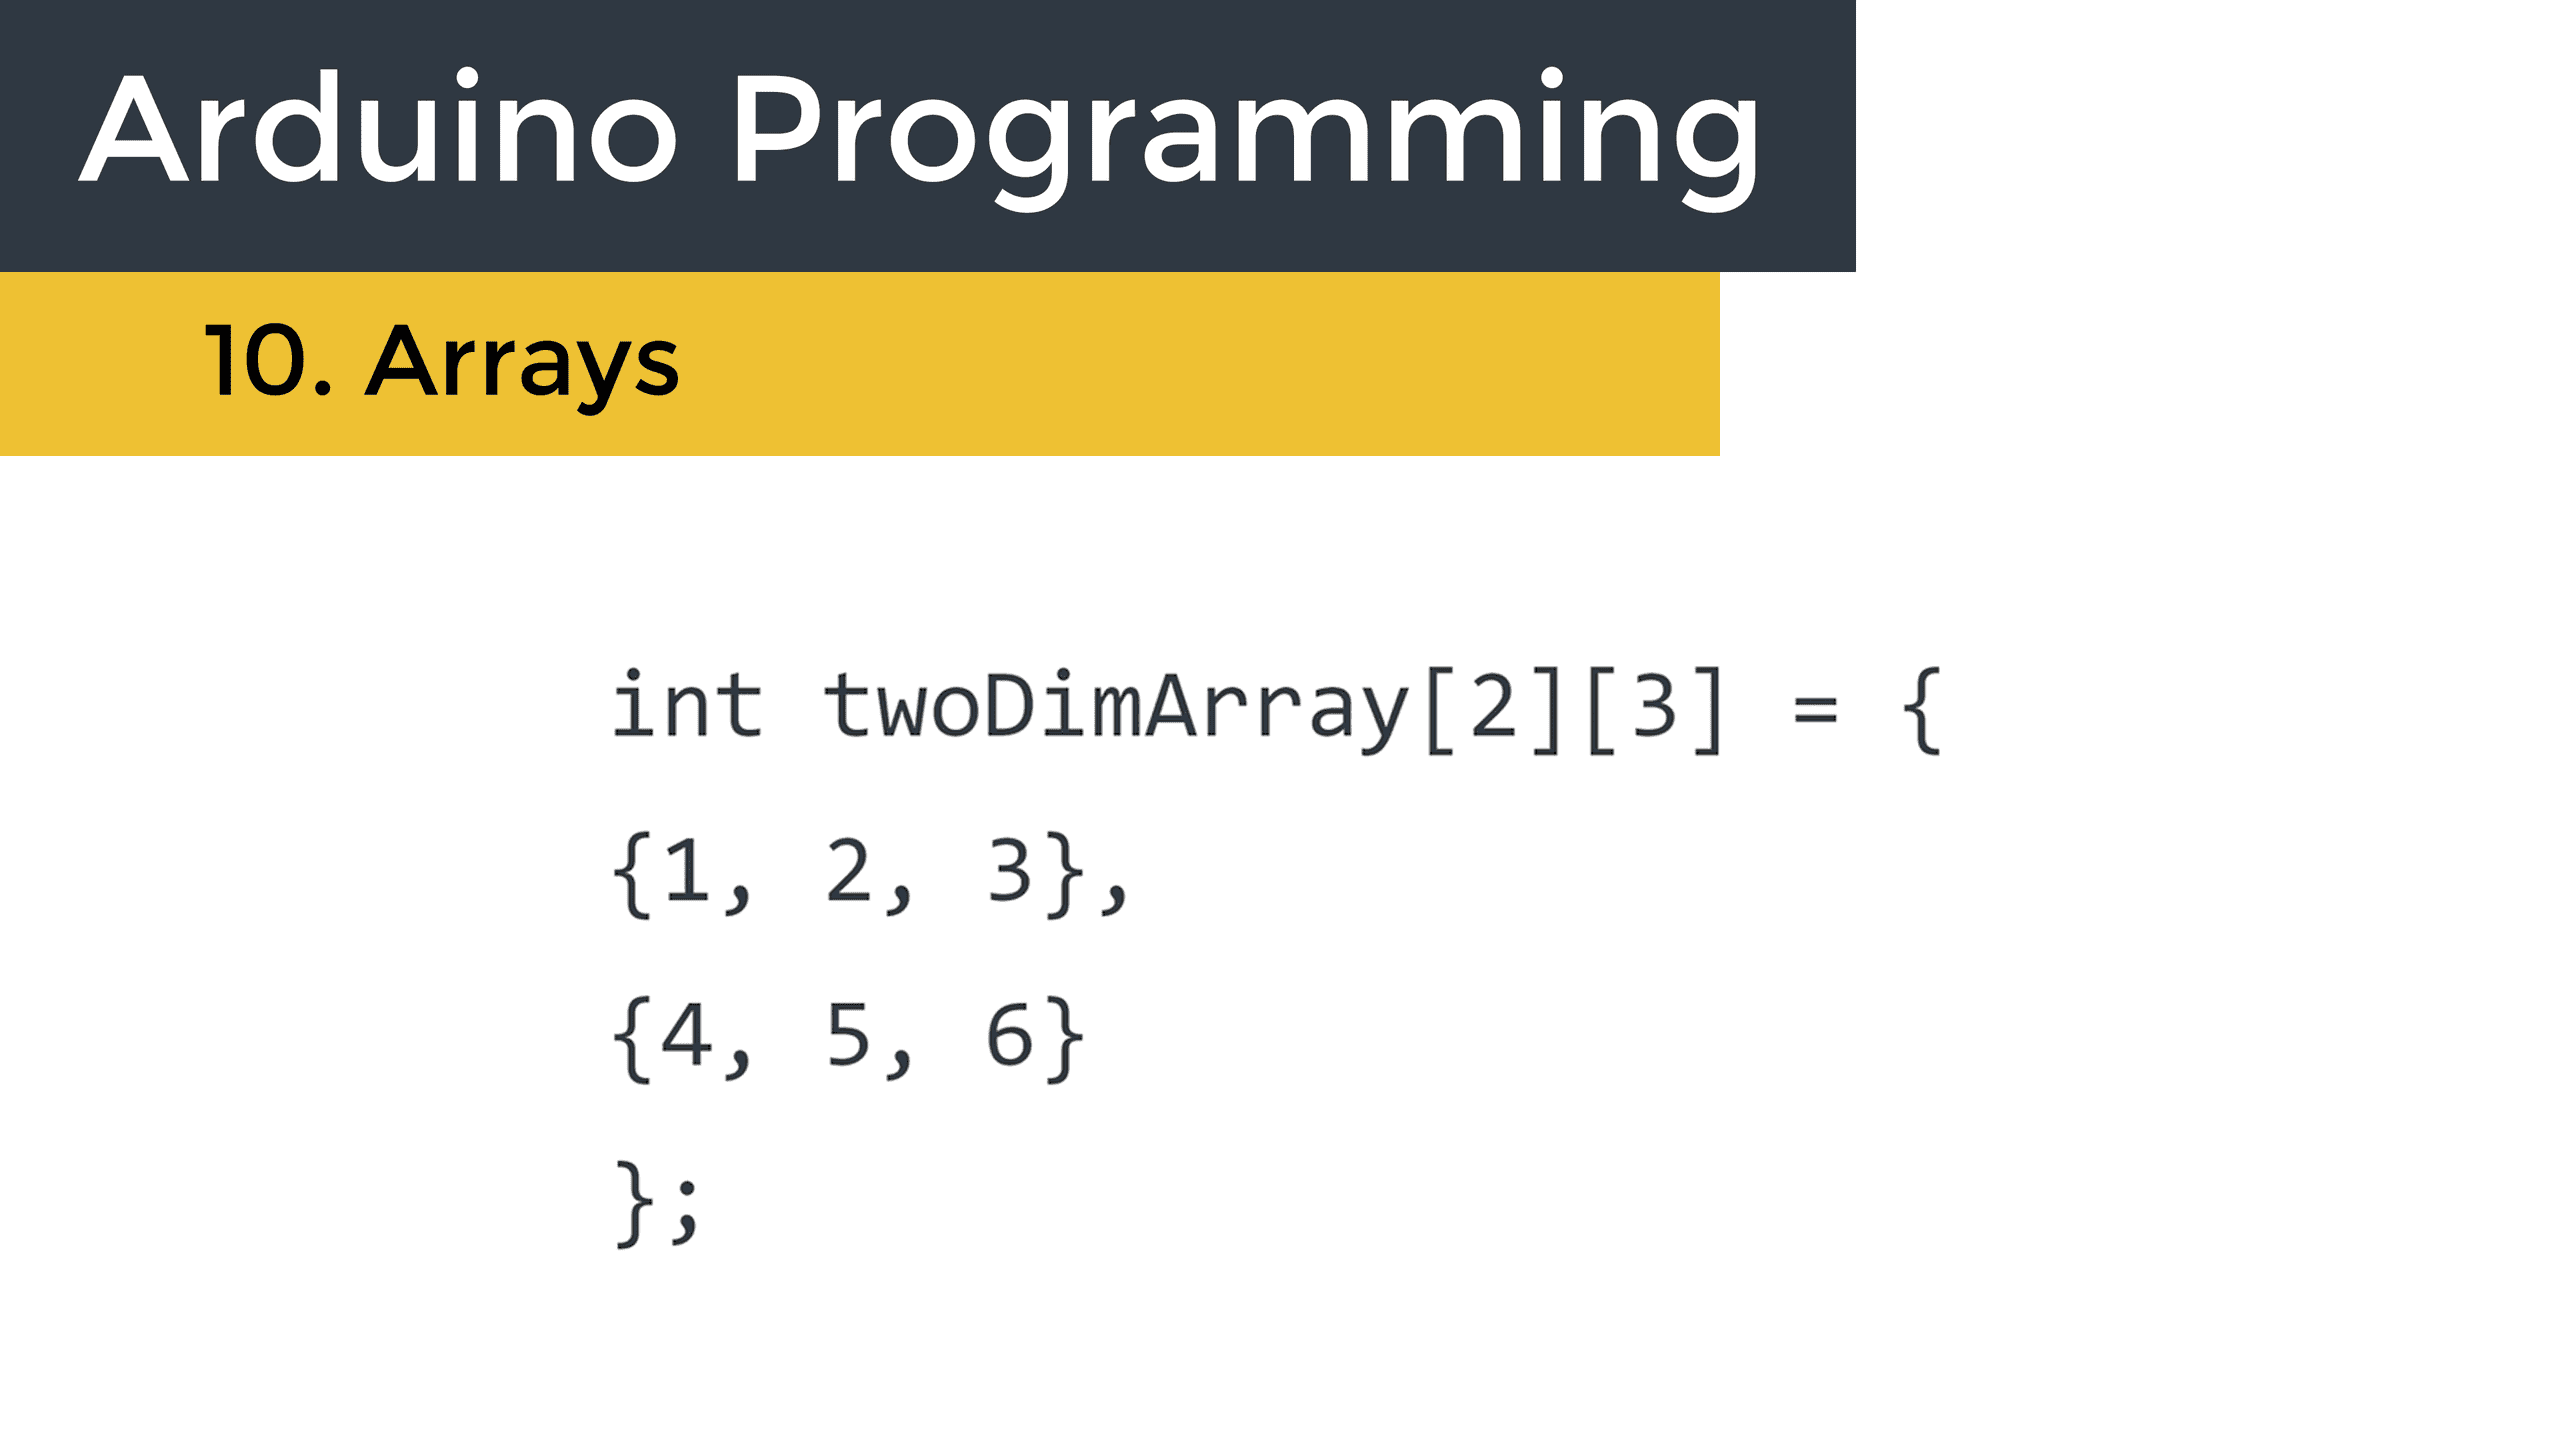
Two dimensional arrays are normally used to program LED matrixes, matrix keypads, and LCD displays. The code to make a two dimensional array is similar to making a one dimensional array. For example, this code will declare a two dimensional array with six elements:
int twoDimArray[2][3] = {
{1, 2, 3},
{4, 5, 6}
};
The number in the first set of square brackets [2] defines the number of rows in the array. The number in the second pair of brackets [3] sets the number of elements in each row. So twoDimArray[2][3] defines a two dimensional array with two rows and three columns.
The elements of a two dimensional array are initialized inside two sets of curly braces:
int twoDimArray[2][3] = {
{1, 2, 3},
{4, 5, 6}
};
Accessing the elements in a two dimensional array is similar to accessing elements in a one dimensional array. Like one dimensional arrays, two dimensional arrays are zero indexed. However, to access an element in a two dimensional array, the row and column of each element needs to be specified.
For example, to access the number one in the two dimensional array above, use this code:
twoDimArray[0][0];twoDimArray[][] can be used as the input to a Serial.print(), digitalWrite(), or any other function.
For example, to print the number six in the array above to the serial monitor we would use the following code:
Serial.print(twoDimArray[1][2]);Hope this article helps you to understand how to use arrays on the Arduino. Be sure to leave a comment below if you have questions about anything!

This is the first Video which i have watched and for the first time I now get ho arrays work and how they will help me with my project of building a sketch to creat an Emergency vehicle LED sequences for a Fire Appliance. I have literally watched hundreds of videos and this is by far teh most explanatary i have vieweed. Now going to view all your other videos and become more enlightened.