The “should I use a Raspberry Pi, or should I use an Arduino” question always comes up in the first stages of product development. Honestly, who wouldn’t be confused? Both boards are popular, but there are subtle differences in their optimal use cases.

The Raspberry Pi is a computer, so it uses an operating system. This creates multiple layers of abstraction that make real-time signal generation and detection unreliable. On the other hand, the Arduino can read and write electronic signals much faster and more reliably than the Raspberry Pi.
Luckily the Arduino and Raspberry Pi can be used together to take advantage of features from each board.
In this tutorial we will learn how to control the Arduino’s GPIO pins with a Python program run on the Raspberry Pi. The Arduino will be connected to the Raspberry Pi directly with a USB cable. To do this, we will use a protocol called Firmata.
Firmata
Firmata is a communication protocol that connects a microcontroller to software on a host computer. Think of Firmata as a language that the Raspberry Pi and the Arduino both understand.
Setting Up the Arduino
The easiest way to setup Firmata on the Arduino is by using the Raspberry Pi. First, we need to install the required software.
1. Connect the Raspberry Pi to the internet. Open command terminal and enter the following command:
sudo apt-get -y install arduino python-serial mercurial2. Now, connect the Arduino to the Raspberry Pi with an A to B USB cable.
3. Open the Arduino IDE, and select the correct port for the device.
4. Next, upload the PyFirmata firmware to the Arduino by opening the sketch from File > Examples > Firmata > Standard Firmata.
5. Finally, click the upload button.
Setting Up the Raspberry Pi
To prepare the Raspberry Pi:
1. First, install the pyFirmata files by entering this:
git clone https://github.com/tino/pyFirmata2. Then, run the following commands:
cd pyFirmata
sudo python setup.py install
Preparing the Hardware
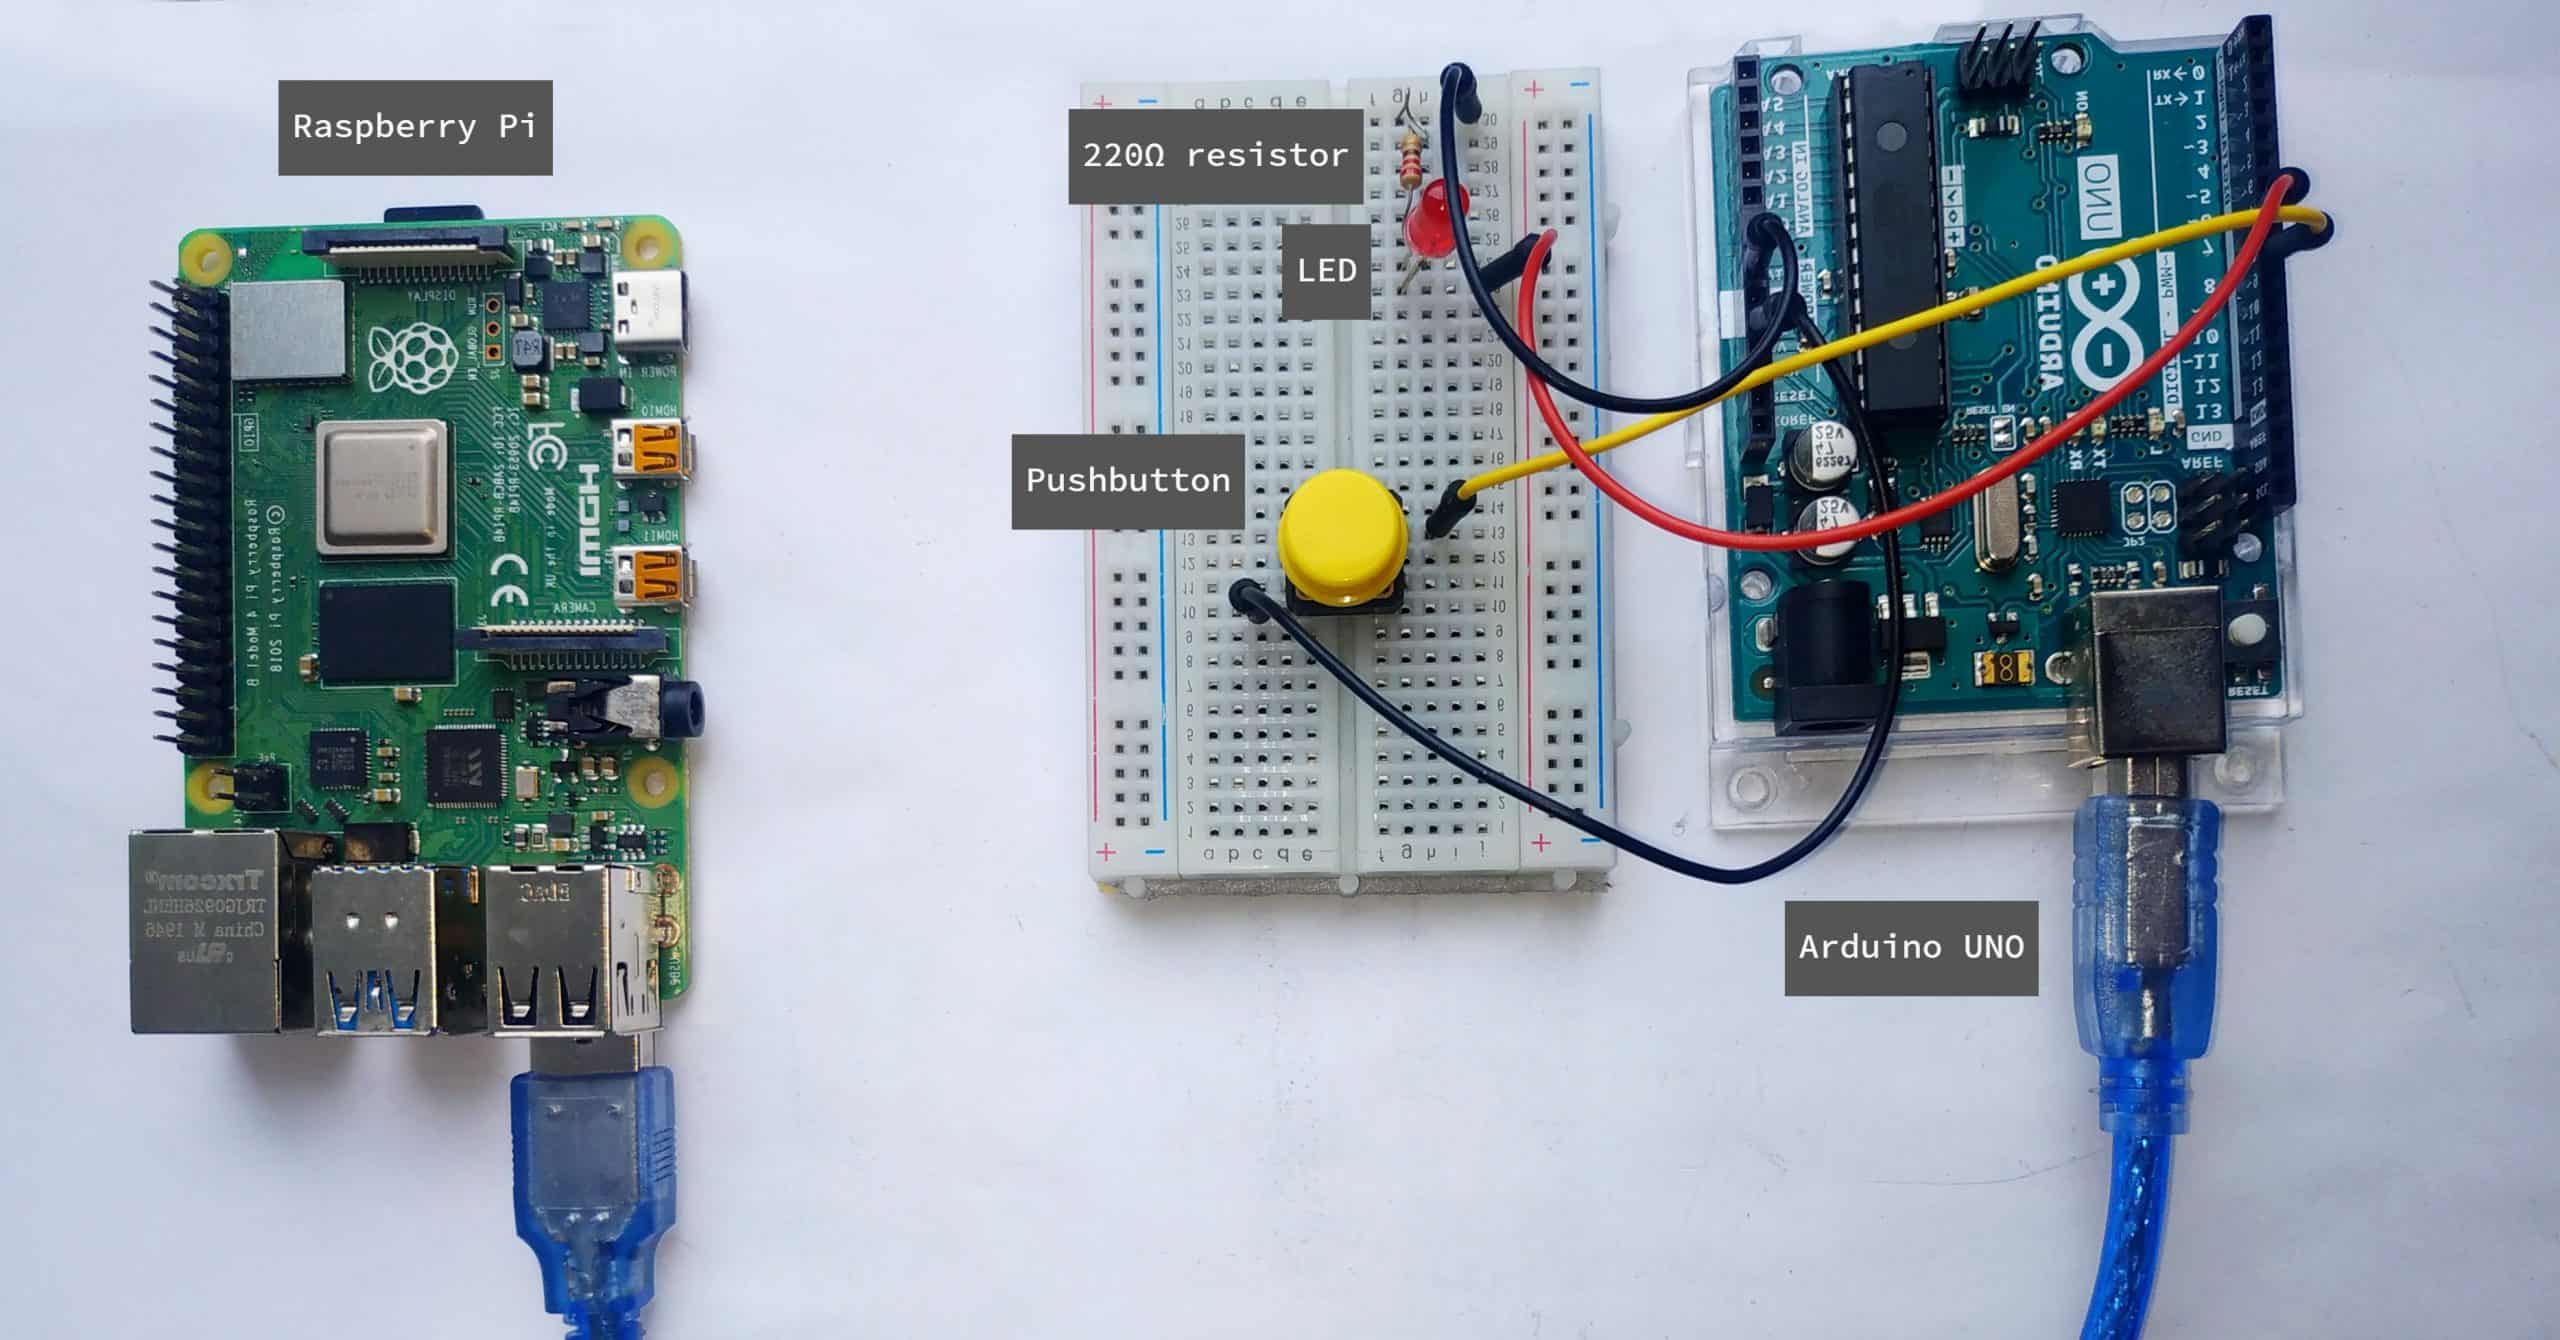
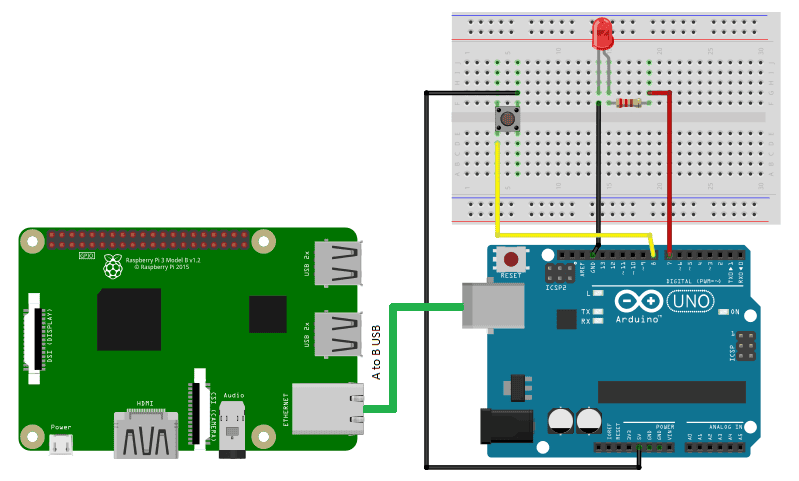
To demonstrate how Firmata works, we will build a project that uses a Python program on the Raspberry Pi to control the Arduino’s GPIO pins. We will connect a button and LED to the Arduino so that the LED lights up when the button is pressed.
To build this project, we need the following components:
- Raspberry Pi
- Arduino Uno
- Jumper wires
- Breadboard
- Tactile push button
- One LED
- One 220 Ohm resistor
- A to B USB cable
Follow this diagram to connect the LED and push button to the Arduino. The Arduino is connected to the Raspberry Pi with an A to B USB cable like this:
To learn more about the Arduino, check out our Ultimate Guide to the Arduino video course. We teach Arduino programming and circuit building techniques that will prepare you to build any project.
Python Code
Copy the code below to your Raspberry Pi and save it as a “.py” file. Run the program by typing python filename.py:
import pyfirmata

led_pin = 7
button_pin = 8

board = pyfirmata.Arduino("/dev/ttyACM0")

while True:
    if board.digital[button_pin].read(1):
        board.digital[led_pin].write(1)
    else:
        board.digital[led_pin].write(0)
Code Explanation
First, we import the pyfirmata library using import pyfirmata. Then we label the LED and button pins by storing them into variables: led_pin and button_pin. To make this program connect to the Arduino, we need to tell it the port where the Arduino is connected. Use pyfirmata.Arduino() and then create the instance by assigning the port in the board variable. In this case it’s /dev/ttyACM0.
The while loop basically acts like void setup(). We use an if statement to monitor the status of the button. If the button sends a HIGH signal, meaning it was pressed, the LED lights up. Both use the digital[].read and digital[].write methods to control the GPIO pins on the Arduino.
Now when you press the button the LED should light up. Press CTRL + C to stop the program.
Hope this tutorial has helped you to understand how to control the Arduino with a Raspberry Pi. Leave a comment below if you have any questions!

Thanks for the great article, very cool.
I used a similar approach myself but went with Javascript as the language of choice and used a Raspberry PI to host the database, web server, etc using NodeJS communicating with the Arduino using Firmata via Johnny Five API which worked out great, basically gives me a web front end to control all my sensors, pumps, etc. Demo of the UI is available at mintyhydro.netlify.app and the source code is in GitHub if anyone is interested.
Reason I found your article is that I am thinking about removing the Arduino requirement and considering using a Grove Shield on the PI then reading the sensors directly from the PI so just wondered what your thoughts on that would be?
Hi. I followed the instructions to the letter, but I keep getting an error when trying to run the code
Traceback (most recent call last):
File “/home/pi/Documents/pyFirmataProjects/FirmataFirstTest.py”, line 1, in
import pyfirmata
File “/usr/lib/python3/dist-packages/thonny/backend.py”, line 290, in _custom_import
module = self._original_import(*args, **kw)
ImportError: No module named ‘pyfirmata’
File “/usr/lib/python3/dist-packages/thonny/backend.py”, line 290, in
I am not certain, but I think the error is having one extra character right before the word packages
Can you help please? I’m getting an error message as follows when running the Python code:
Traceback (most recent call last):
File “/dev/pyFirmata/test_firmata.py”, line 9, in
if board.digital[button_pin].read(1):
^^^^^^^^^^^^^^^^^^^^^^^^^^^^^^^^^
TypeError: Pin.read() takes 1 positional argument but 2 were given
This is using Python.3.11.2 on a clean install of Debian GNU/Linux 12 (bookworm) running on a Raspberry Pi Model 4B connected by serial port to an Arduino Uno R3. Thank you in advance for any advice.
After some digging around in the library code and some experimentation I managed to find something that worked.
#!/usr/bin/env python3
import pyfirmata
led_pin = 7
button_pin = 8
board = pyfirmata.Arduino(“/dev/ttyACM0”)
board.digital[button_pin]._set_mode(0)
board.digital[button_pin].enable_reporting()
while True:
board.iterate()
if board.digital[button_pin].read():
board.digital[led_pin].write(1)
else:
board.digital[led_pin].write(0)
The python indentation for the while loop and he if-else conditions has been stripped out for some reason. Please just put it back in if you copy the code.
I forgot to mention that the error occurs without the button being pressed at all.
Fritzing circuit picture show a
+ + Arduino USB connected to
– – Raspberry Pi Ethernet