This is the second article in a series about how to build a webserver with the Raspberry Pi. Be sure to read the first article – How to Build a Raspberry Pi Web Server – Part 1 before performing the steps below. In these articles, we demonstrate how to create a web server on your Raspberry Pi and access it either from a local network or from the internet. We mainly use the Bottle framework because it is easy to learn, easy to use, and very lightweight (making it suitable for small web applications).

In the previous article, we installed Bottle.py and demonstrated how to display the temperature and humidity readings from a DHT22 humidity and temperature sensor on a web page.
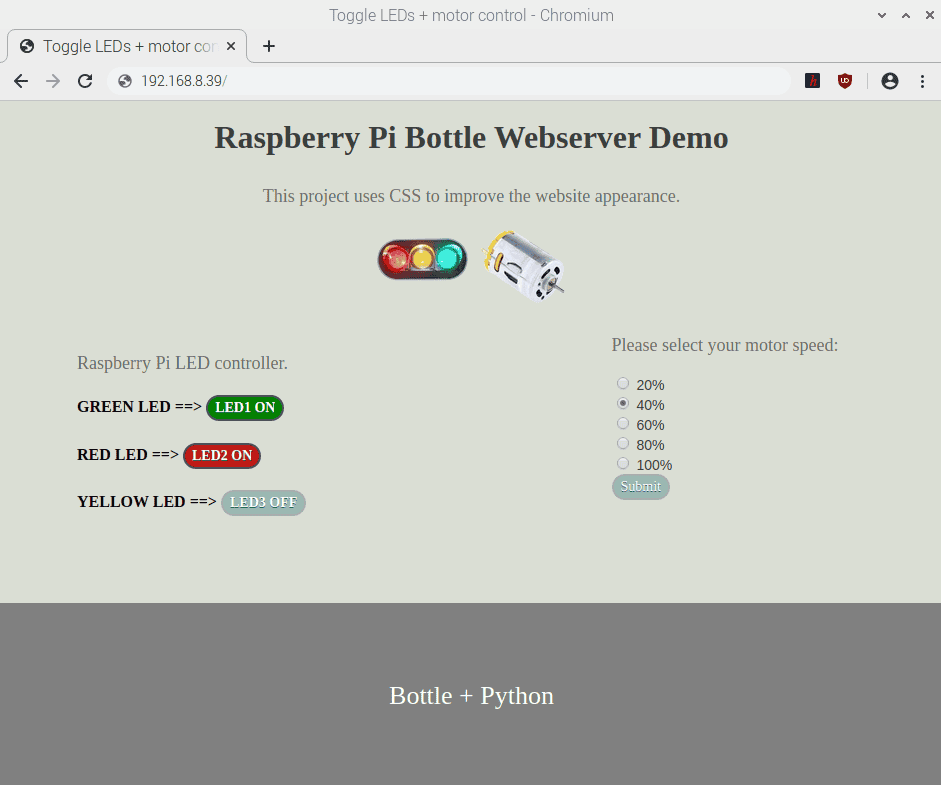
In this article, we are going to do something more interesting. We will learn how to control the Raspberry Pi’s GPIO pins from a web page. To demonstrate, we will toggle three LEDs and control the speed of a DC motor from the webpage. We will also look at how to style the webpage with CSS to make it look better.
We have two tasks for this project. The first task is to create a web page with three toggle buttons that turn ON/OFF three LEDs connected to the Raspberry Pi. For the second task, we will create a set of five radio buttons that correspond to five different PWM duty cycles (LOW to HIGH) output by the Raspberry Pi to control the speed of a DC motor.
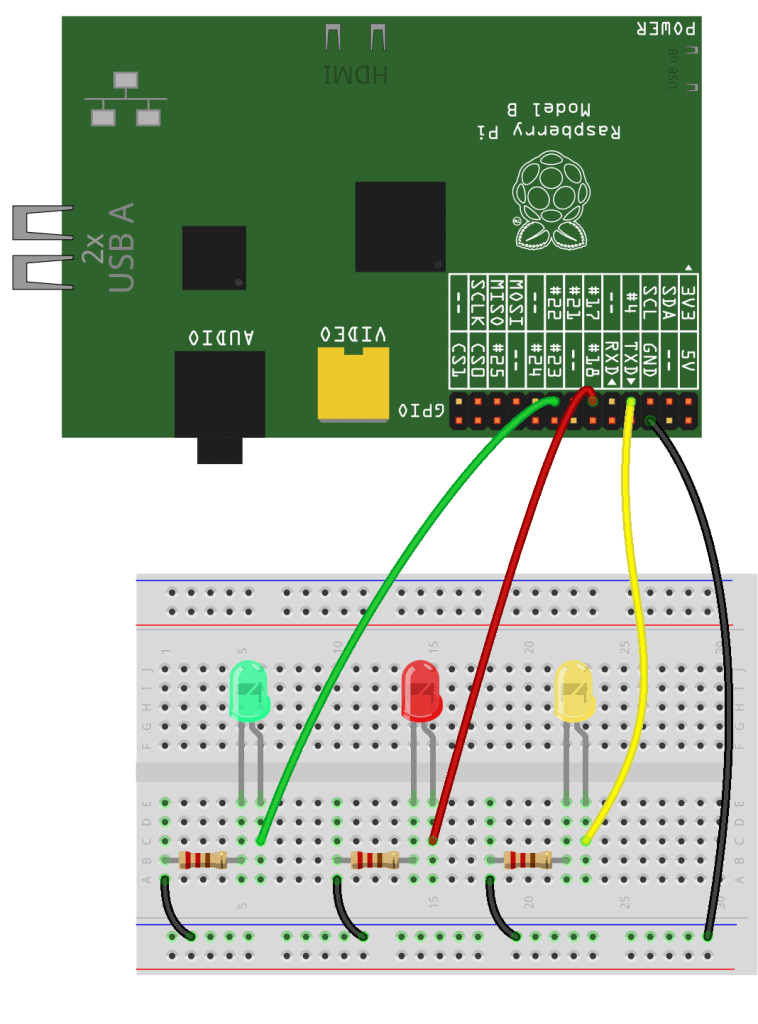
Connect the LEDs to the Raspberry Pi
For this project, we will need the following:
Connect the DC Motor to the Raspberry Pi
The Raspberry Pi’s GPIO pins can’t supply enough current to power the DC motor directly. Therefore we will use a an L293D H-bridge motor driver to power and control the motor.
These are the parts you will need:
Once you have all of the parts, connect everything as shown in the wiring diagram below:
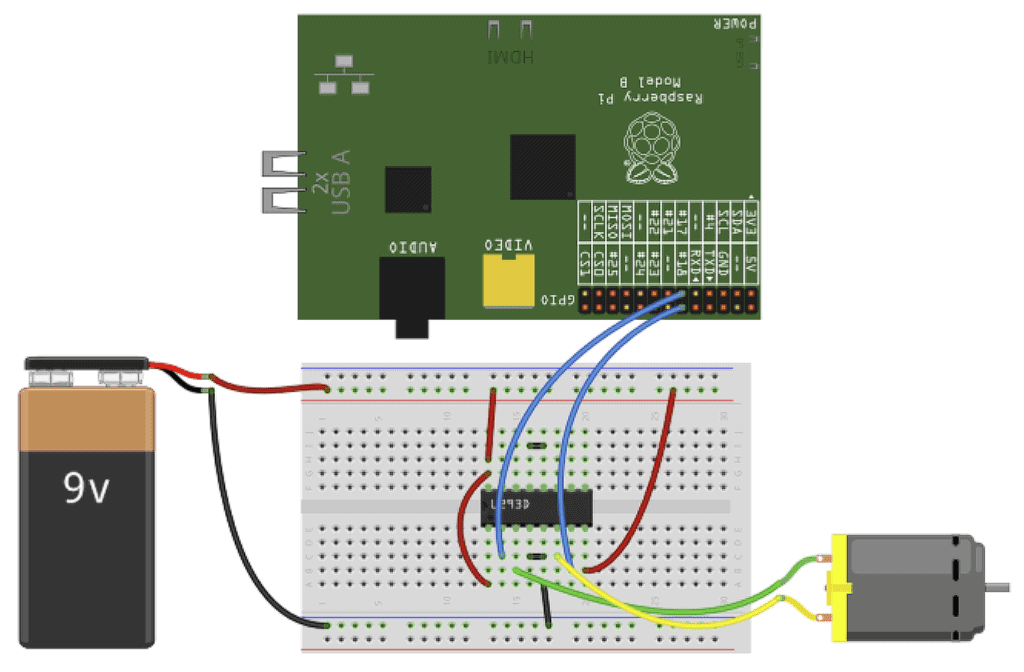
To learn more about using DC motors with the Raspberry Pi, check out our article on How to Use DC Motors on the Raspberry Pi.
Prepare the Raspberry Pi
webserver2/
       ├── main.py
       ├── main.tpl
       └── static/
           ├── images/
           │   └── led_motor.png
           └── styles/
               └── mystyle.css
Create three files using the commands below and save them as shown in the file tree above. Note that the image folder is optional.
sudo nano main.tpl: this is the template file that will contain our HTML code.sudo nano main.py: we will write the main Python code in this file.mystyle.css: finally, we will need the CSS file to improve the aesthetics of our website.
Lastly, copy the code below into the respective files and run the Python file using the command sudo python main.py.
The HTML Code
Name this program main.tpl:
<!DOCTYPE html>
<html lang="en">
<head>
    <title>Toggle LEDs + motor control</title>
    <link rel="stylesheet" type="text/css" href='/static/styles/mystyle.css'>
</head>
<body>
    <h1>Raspberry Pi Bottle Webserver Demo</h1>
    <p style="text-align:center;">This project uses CSS to improve the website appearance.</p>
    <p style="text-align:center;"><img src="static/images/led_motor.png"></p>

    <section class="container">
    <div class="one">
    <p>Raspberry Pi LED controller.</p>
    <h4>GREEN LED ==>
        % if greenLed:
            <a href="../greenLed/toggle" class="myButton1">LED1 ON</a>
        % else:
            <a href="../greenLed/toggle" class="myButton">LED1 OFF</a>
        % end
    </h4>
    <h4>RED LED ==>
        % if redLed:
            <a href="/redLed/toggle" class="myButton2">LED2 ON</a>
        % else:
            <a href="/redLed/toggle" class="myButton">LED2 OFF</a>
        % end
    </h4>
    <h4>YELLOW LED ==>
        % if yellowLed:
            <a href="/yellowLed/toggle" class="myButton3">LED3 ON</a>
        % else:
            <a href="/yellowLed/toggle" class="myButton">LED3 OFF</a>
        % end
    </h4>
    <br><br>
    </div>
    </section>
    <section class="container">
    <div class="two">
    <form action="/DC_motor", method='post'>
      <p>Please select your motor speed:</p>
      <input type="radio" id="male" name="motor" value="0.2">
      <label for="male">20%</label><br>
      <input type="radio" id="female" name="motor" value="0.4">
      <label for="female">40%</label><br>
      <input type="radio" id="other" name="motor" value="0.6">
      <label for="other">60%</label><br>
      <input type="radio" id="other" name="motor" value="0.8">
      <label for="other">80%</label><br>
      <input type="radio" id="other" name="motor" value="1.0">
      <label for="other">100%</label><br>
      <input type="submit" class="myButton" value="Submit"><br>
    </form>
    <br>
    </div>
    </section>

  <footer>Bottle + Python</footer>
</body>
</html>
HTML Code Description
In the .tpl file, we will write normal HTML code for our web page and we reference an external CSS stylesheet from an HTML <link> element. The important part of controlling LEDs is the section where we read the status of each individual LED, and then toggle the respective LED based on that condition.
We use the following if statement – if greenLed:. If this statement is TRUE, this means that the LED will be ON and then we display the following button <a href="/greenLed/toggle" class="myButton2">LED1 ON</a>. We also use CSS class myButton2 if the LED is ON.
Otherwise, if the statement is FALSE, it means that the LED is OFF, and we display the following button: <a href="/greenLed/toggle" class="myButton1">LED2 OFF</a>. The same applies to other LEDs. For the motor control, we are simply going to use a form with five radio buttons. :
The Python Code
Next, we are going to need the Python code for the server control. Here is the code for the main.py file.
from bottle import route, run, template, redirect, get, post, request, static_file
import time
from gpiozero import LED, Motor

led1 = LED(4)
led2 = LED(17)
led3 = LED(22)
motor = Motor(3,27)

HOST = '192.168.8.39'

#initialize GPIO status values
LedState1 = 0
LedState2 = 0
LedState3 = 0

#turn Leds off
led1.off()
led2.off()
led3.off()

@route('/static/<filepath:path>')
def serve_files(filepath):
    return static_file(filepath, root='/home/pi/webserver2/static')

@route('/')
def index():
    #Read sensor status
    LedState1 = led1.is_lit
    LedState2 = led2.is_lit
    LedState3 = led3.is_lit

    myData = {
        'greenLed' : LedState1,
        'redLed' : LedState2,
        'yellowLed' : LedState3
    }
    return template('main.tpl', **myData)

@route("/<deviceName>/<action>")
def action(deviceName, action):

    #Green LED
    if deviceName =='greenLed':
        actuator = led1
    if deviceName =='redLed':
        actuator = led2
    if deviceName =='yellowLed':
        actuator = led3

    if action == 'toggle':
        actuator.toggle()

    LedState1 = led1.is_lit
    LedState2 = led2.is_lit
    LedState3 = led3.is_lit
    myData = {
        'greenLed' : LedState1,
        'redLed' : LedState2,
        'yellowLed' : LedState3
    }
    redirect("/")
    return template('main.tpl', **myData)

@route('/DC_motor', method='POST')
def DC_motor():
    motor_val = request.forms.get('motor')
    motor.forward(float(motor_val))
    redirect("/")

run(host=HOST, port=80, debug=True, reloader=True)
Python Code Description
@route('/static/<filepath:path>'): This is the route for serving static files (images and CSS code). As you can see in the file tree above, I have created a static folder with two sub-folders. These are images and styles. When you run the code, take note of your directory for static files. Mine isroot='/home/pi/webserver2/static'.@route('/'): This is the route on the index that returns the index template, or in other words, the “Homepage.”@route("/<deviceName>/<action>").Here, we use thedeviceNameparameter to select a certain LED. There are three LEDs to choose from (green, red, and yellow). The action parameter is to toggle the LED state.@route('/DC_motor', method='POST'). Lastly, this route allows us to set the motor speed using the functionmotor.forward(float(motor_val)).
How to Make the Web Page User Interface Look Nicer
We will use CSS to improve the aesthetics of our website. CSS stands for Cascading Style Sheets, and it’s a styling language that describes how HTML elements are displayed on the website.
Here is the CSS code. Save it as a file named mystyle.css:
body {
	background-color: #DADED4;
}
h1 {
  color: #3C403D;
  font-family: Verdana;
  text-align: center;
  margin: 0 0 20px;
  padding: 10px;
}

p {
  color: #707070;
  font-size:18px;
}

.myButton {
	background-color:#9ab8b0;
	border-radius:23px;
	border:2px solid #a9b0ae;
	display:inline-block;
	cursor:pointer;
	color:#ffffff;
	font-family:Verdana;
	font-size:14px;
	padding:3px 7px;
	text-decoration:none;
	text-shadow:0px 1px 0px #2b665e;
}

.myButton:hover {
	background-color:#598f8f;
}
.myButton:active {
	position:relative;
	top:1px;
}

.myButton1 {
	background-color: green;
	border-radius:23px;
	border:2px solid #4d4f4f;
	display:inline-block;
	cursor:pointer;
	color:#ffffff;
	font-family:Verdana;
	font-size:14px;
	padding:3px 7px;
	text-decoration:none;
	text-shadow:0px 1px 0px #2b665e;
}
.myButton1:hover {
	background-color:#598f8f;
}
.myButton1:active {
	position:relative;
	top:1px;
}

.myButton2 {
	background-color: #bf1a11;
	border-radius:23px;
	border:2px solid #4d4f4f;
	display:inline-block;
	cursor:pointer;
	color:#ffffff;
	font-family:Verdana;
	font-size:14px;
	padding:3px 7px;
	text-decoration:none;
	text-shadow:0px 1px 0px #2b665e;
}
.myButton2:hover {
	background-color:#598f8f;
}
.myButton2:active {
	position:relative;
	top:1px;
}

.myButton3 {
	background-color: #cad417;
	border-radius:23px;
	border:2px solid #4d4f4f;
	display:inline-block;
	cursor:pointer;
	color:#ffffff;
	font-family:Verdana;
	font-size:14px;
	padding:3px 7px;
	text-decoration:none;
	text-shadow:0px 1px 0px #2b665e;
}
.myButton3:hover {
	background-color:#598f8f;
}
.myButton3:active {
	position:relative;
	top:1px;
}

input[type="radio"] + label {
    color: #3C403D;
    font-family: Arial, sans-serif;
    font-size: 14px;
}

.container {
  margin: auto;
}

.one {
  width: 50%;
  height: 200px;
  float: left;
  padding: 0 70px;
}

.two {
  margin-left: 60%;
  height: 200px;

}

footer {
  background-color: gray;
  padding: 3em 0;
  text-align: center;
  color: white;
  font-size: 26px;
  bottom: 0;
  position: fixed;
  left: 0;
  width: 100%;
}
How CSS Works
As you can see from the code above, a CSS stylesheet consists of a selector, properties, and values. Basically, we define the layout and styling of an HTML document by setting the CSS properties to specific values, as shown below.
Selector {
           Property1: value;
           Property2: value;
           Property3: value;
           Property4: value;
}- Selector: selects the element you want to target. Examples of selectors include tags, id’s and classes.
- Properties: attributes like color, font size, background, height.
- Value: values associated with these properties.
Using this definition, we can then define multiple properties for an object. Accessing these properties from our HTML is simple as we write: class="myButton1".
How to Access the Raspberry Pi Webserver From Anywhere
The last task for this project is interesting. We need to access the server not just on our local network but from anywhere in the world. To do this, we need to set up port forwarding on our router. Port forwarding allows computers on the internet to access the webserver running on our Raspberry Pi.
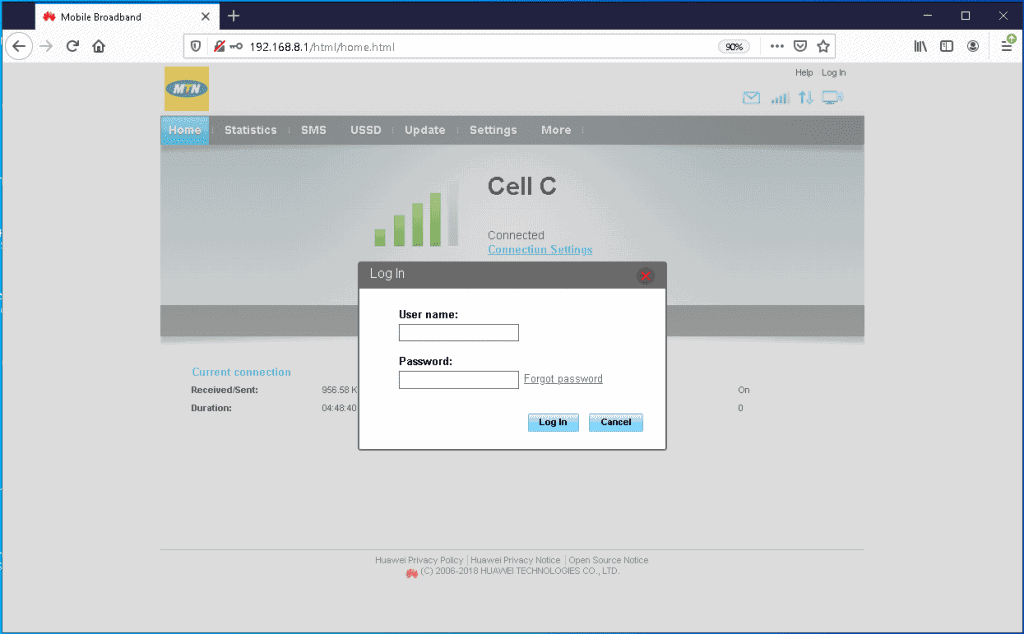
I am using the Huawei B315 router, so to access the settings page, type in the router’s internal IP address. This will take you the home page where you can log in as the administrator.
Click on “Settings” and this will take you to the following page.
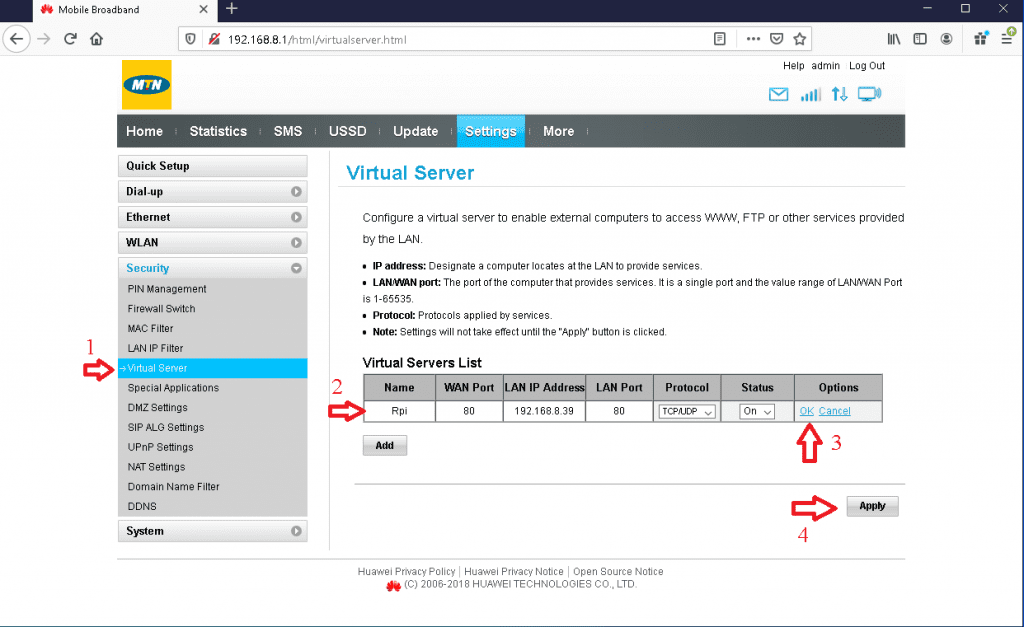
On the Settings page, click on “Virtual Server,” then click the “Add” button and fill in the numbered entry fields. Click OK and then “Apply.”
That’s it! We are now ready for internet requests. On your favorite browser, type in the external IP address of your router but make sure that the main.py is running on the Raspberry Pi first.
Hope this two part tutorial series has helped you set your Raspberry Pi up as webserver. Be sure to leave a comment below if you have any questions!

Great article!
Would this code work on Raspberry Pi Pico or Zero?
Thanks, it is great example for new learners. where do I down load image file led_motor.png ? Thanks