In the previous article Getting Started with the Raspberry Pi, we learned how to set up a Raspberry Pi 4 Model B and discussed GPIO pins. In this tutorial, we will continue by discussing how to install the Raspberry Pi Operating System needed to boot-up our Raspberry Pi and how to do the initial configuration. At the end of this tutorial, we will also tackle additional steps necessary for a headless setup of our Raspberry Pi 4 Model B.

Software Requirements
To make our Raspberry Pi work, we need to install an Operating System (OS) into a microSD card. The Raspberry Pi Foundation made this step very easy for beginners by providing a software called the Raspberry Pi Imager.
Raspberry Pi Imager
The Raspberry Pi Imager software can download an OS image, and it can also write an image into a microSD card. You can download it by following this link.
Raspberry Pi Operating System
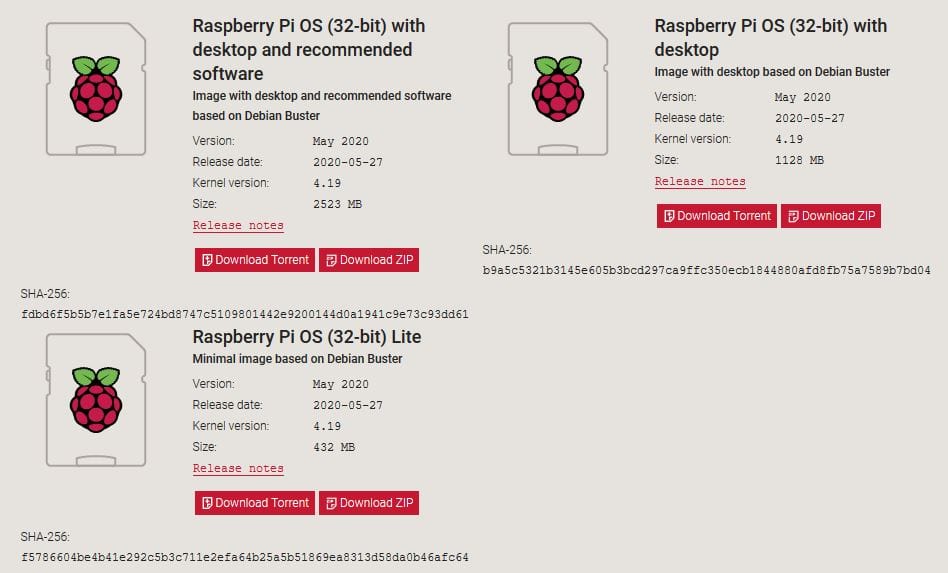
The official OS for the Raspberry Pi is called the Raspberry Pi OS (formerly known as Raspbian). You can download it separately from this link. If you are using the Raspberry Pi Imager software, it can download the OS for you.
The download page gives several versions of the Raspberry Pi OS (32-bit):
- With desktop and recommended software
- With desktop
- Lite
The first two download options are self-explanatory. The third version means it doesn’t include the desktop GUI.
Installing the Raspberry Pi Operating System
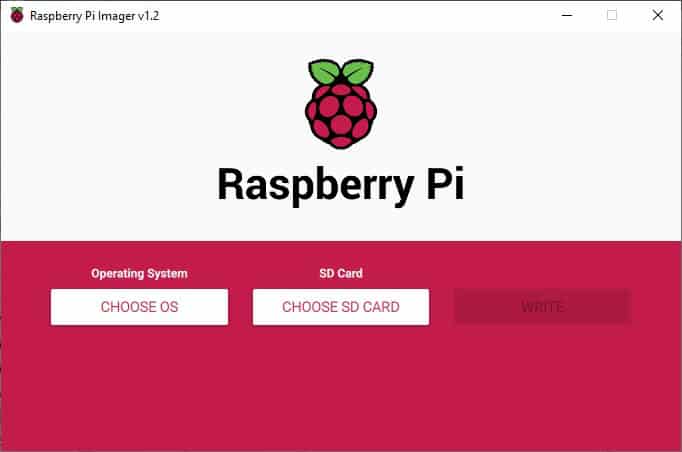
The OS needs to be installed into a microSD card using a computer, a microSD card reader, and the imager software. The first step is to install the Raspberry Pi Imager. Run the downloaded executable file and install the software.
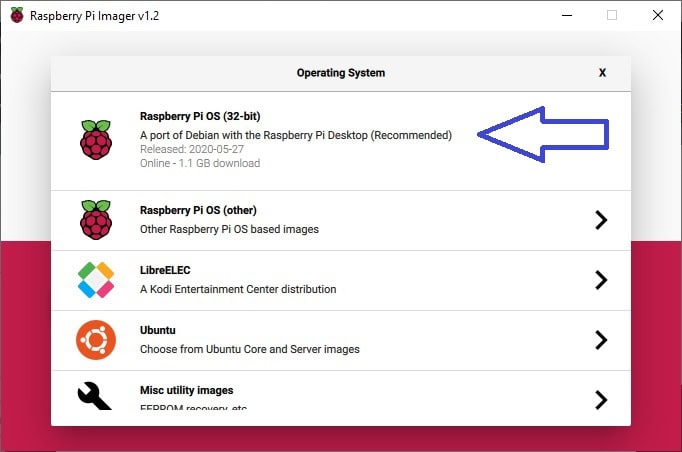
After installing the software, the next step is to insert the microSD card to a card reader connected to a computer. After doing this, run the Raspberry Pi Imager software, and a home screen will greet you with three buttons. Click the first button on the left labeled Choose OS. Here, you will have several choices for the OS available for the Raspberry Pi board. If you don’t have a local copy of a compatible OS image, click the first choice. This will download the recommended version of the Raspberry Pi OS.
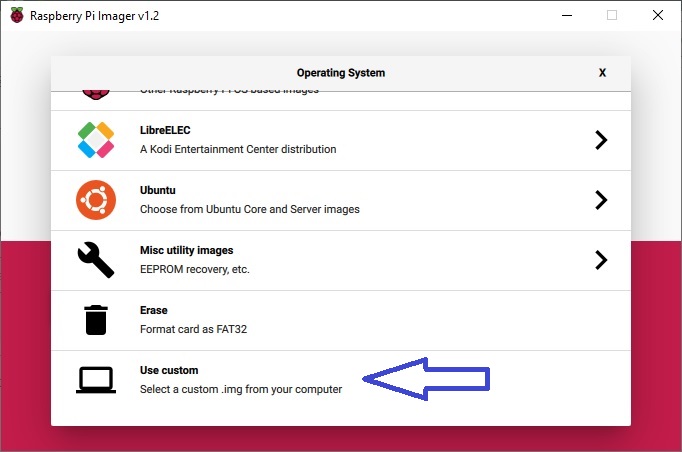
You can also choose the last option Use Custom if you already have a local image file of a compatible OS.
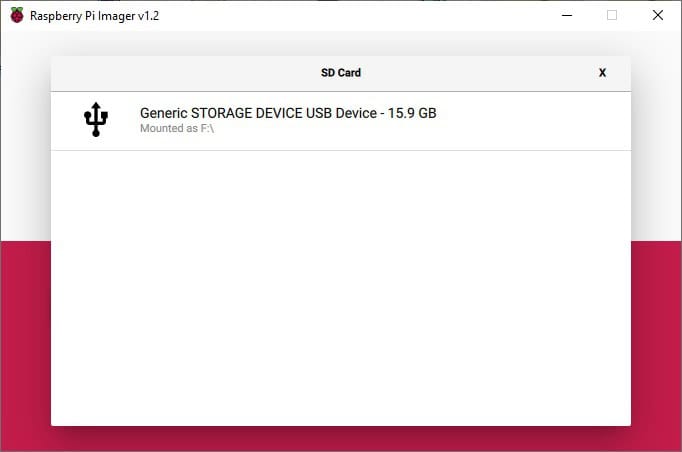
After choosing the OS image file, the next step is to select the middle button. This will give you the option to select which of the detected storage devices to use in writing the OS image. Take note that all data in the chosen device will be lost during the image writing process. Select the microSD card you will use.
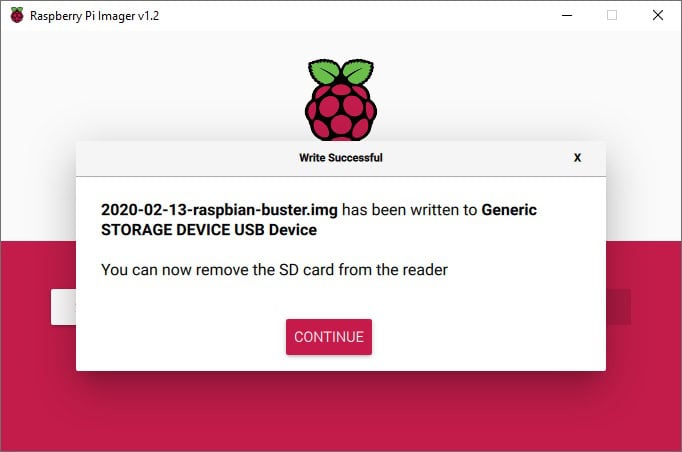
The last step in writing the image file to the microSD card is to select the third button Write. This will write the OS image file to the microSD card.
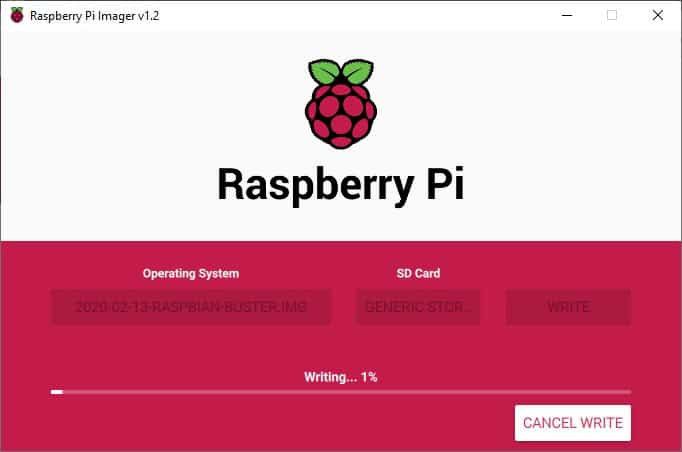
Wait for the writing and verification process to finish then click Continue.
First Boot
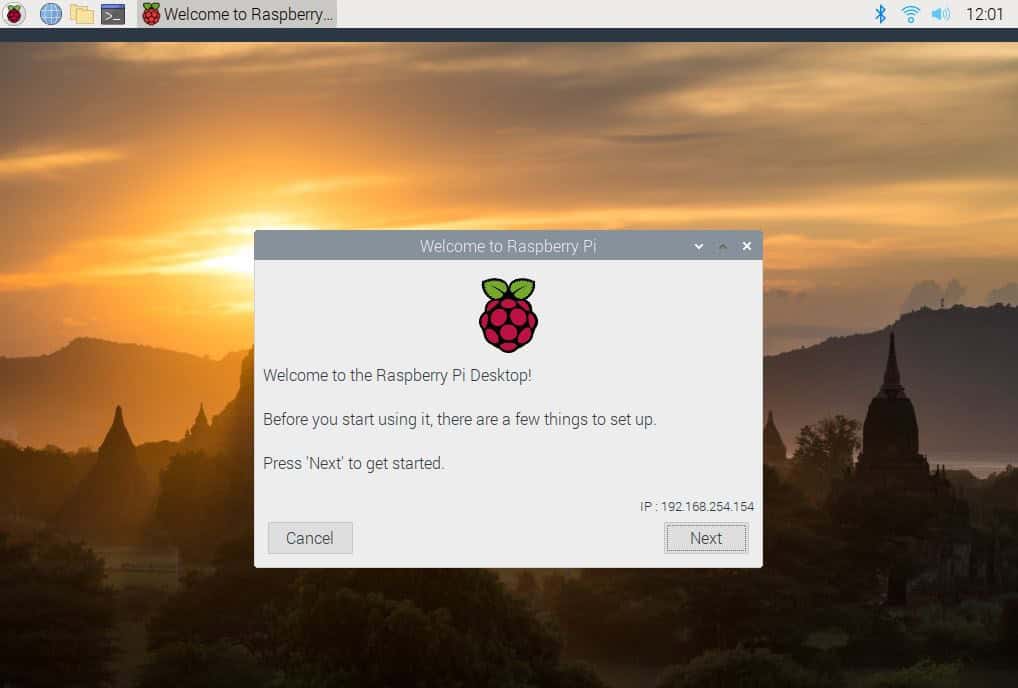
Insert the microSD card into the Raspberry Pi, connect an HDMI display, USB keyboard, and USB mouse. After the Raspberry Pi OS boots, you will be asked for your log-in credentials. The default username is pi and default password is raspberry. After logging in, you will be greeted by a desktop with a welcome window. Click Next and follow the on-screen messages to finish the setup.
Congratulations! You now have a working Raspberry Pi Linux Computer.
Command Line Interface
The Command Line Interface (CLI), a.k.a. Terminal is a powerful tool for modifying configurations and setting/viewing parameters on the Raspberry Pi OS. You can access the command line by clicking the icon on the taskbar.
Here are some useful Terminal commands.
Setting the Date and Time via Terminal
The Raspberry Pi 4 Model B does not have a built-in real time clock. So every time it is shutdown, the date and time are lost. To set the date and time manually, type the command below and press Enter.
sudo date "22 JUN 2020 23:59:59" Updating the OS via Terminal
The Raspberry Pi OS and programs are receiving updates/upgrades from time to time from their developers. To keep your system up to date, type the two commands below and press Enter.
sudo apt update
sudo apt full-upgrade
Overclocking via Terminal
Overclocking is the process of running a hardware component higher (or faster) than what is the default. The processor of the Raspberry Pi 4 Model B can be overclocked. But precautions should be taken when overclocking because it can lead to crashes, data corruption, and damaged hardware.
To overclock the processor, we need to edit the config.txt file. Open your Terminal and execute the command below.
sudo nano /boot/config.txtThis will open the file for editing. Inside the file, find this part:
#uncomment to overclock the arm. 700 MHz is
the default.
#arm_freq=800
And change to this:
#uncomment to overclock the arm. 700 MHz is
the default.
over_voltage=2
arm_freq=1750
Save the file by CTRL+O and close by CTRL+X. Reboot the Raspberry Pi by entering the following in Terminal.
sudo rebootAfter the Raspberry Pi restarts, the processor will be running at 1750 MHz (or 1.75GHz).
Viewing Performance Monitor via Terminal
If you want to see the performance of your Raspberry Pi, you can view the resource monitor by typing the terminal command below.
sudo htopShutdown the Raspberry Pi via Terminal
Like any other OS, the Raspberry Pi OS also needs to be shutdown gracefully to avoid corrupting files and errors. You can shut down the Raspberry Pi via CLI by typing the command below in the terminal then press Enter.
sudo shutdown -h nowYou can learn more about the Raspberry Pi CLI by reading the February 2019 issue of the MagPi magazine (the official Raspberry Pi magazine) from this link.
Optional Headless Setup
After writing the OS image to the microSD card, you now have two options. The first option is to connect an HDMI display, USB keyboard, and USB mouse, as described earlier. The second option is to do some additional steps for a headless setup. A headless setup means the Raspberry Pi board is accessed remotely, and it doesn’t have a display, mouse, and keyboard connected to it. For further reading about the headless setup, you can follow this link.
Add Necessary Files for a Headless Setup
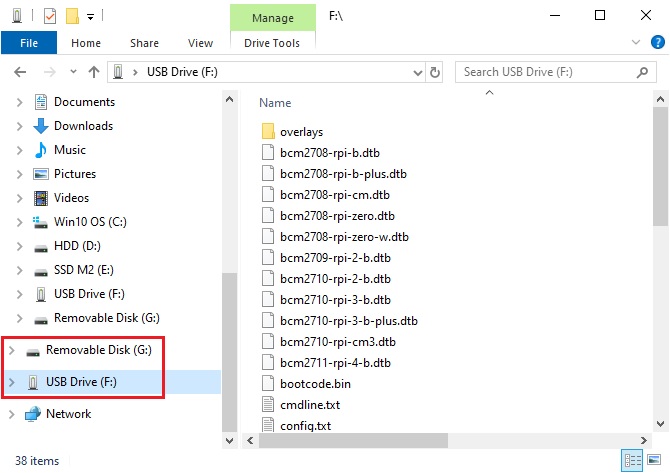
After writing the OS image, we need to add some files in the root of the microSD card to enable SSH and automatically connect to a WiFi Router (if you will use wireless-LAN). Remove and re-insert the microSD to have the new partitions detected. You should now have two partitions detected. If you are running on Windows OS, one of the partitions will not be readable in Windows Explorer, and the other partition will be readable. The readable partition is the root directory. Select the root directory to see the contents.
Edit config.txt File to Force HDMI Output
To view the Raspberry Pi OS desktop remotely, we need to configure the OS to force HDMI output even without an HDMI display connected. In the root of the microSD card, find and open in notepad the file config.txt. Find inside this file the line #hdmi_force_hotplug=1. Enable this parameter by removing the hashtag #. Save and close the file.
For further reading about the contents of the config.txt file, click this link.
Enable SSH
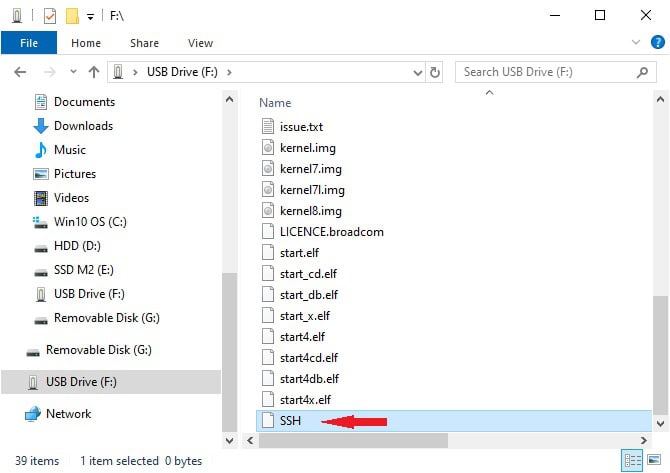
SSH is short for Secure Shell. To enable SSH, we need to put a blank file named “SSH” (without file extensions) in the root of the microSD card. The easiest way to do this is to create a new notepad document and rename it to “SSH” and delete the file extension “.txt”.
There are other ways to remotely access a Raspberry Pi aside from SSH. You can read it up at the official raspberrypi.org website by going here.
Automatically Connect to Wifi on First Boot
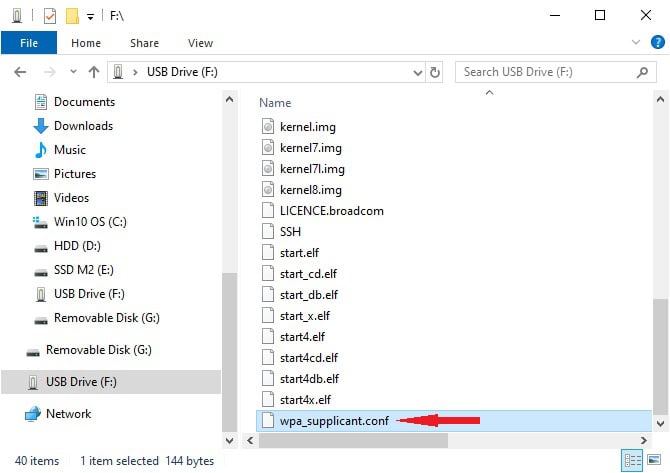
For our Raspberry Pi board to automatically connect to wifi on the first boot-up, we need to add the file wpa_supplicant.conf to the root of the microSD card. The wpa_supplicant.conf file contains the SSID and password of the wifi we want to connect to.
Create a new text document containing the text below.
ctrl_interface=DIR=/var/run/wpa_supplicant GROUP=netdev
update_config=1
country=<Insert 2 letter ISO 3166-1 country code here>

network={
 ssid="<Name of your wireless LAN>"
 psk="<Password for your wireless LAN>"
}
A list of values for the two-letter ISO 3166-1 country code can be found in this Wikipedia link. After inserting the correct text for the country, ssid and psk, save the file as wpa_supplicant.conf. Copy this file over to the root of the microSD card.
After installing the necessary files, we can now insert the microSD card to the Raspberry Pi 4 Model B. Supply power via the USB-C connector. Our Raspberry Pi will boot from the microSD card, activate SSH, and connect to the wifi specified in the wpa_supplicant.conf file. Because we don’t have a display, mouse, and keyboard connected to the Raspberry Pi board, we need to access it remotely via VNC.
Connecting via SSH
To connect to our Raspberry Pi via SSH, we need to use a software called an SSH Client. I use PuTTY to do this and you can download it from this link.
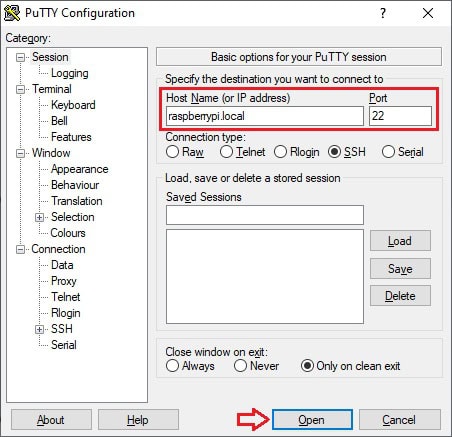
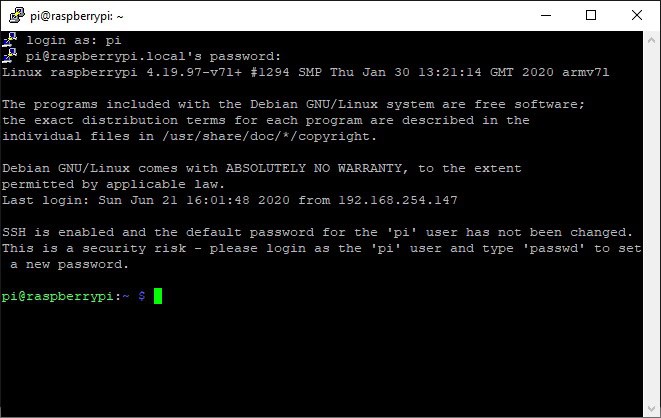
Open PuTTY and put raspberrypi.local in the Host Name textbox and make sure Port is set to 22. Click Open at the bottom of the window, and a command-line interface (CLI) should pop-up asking for log-in credentials. The default log-in username is pi, and the default password is raspberry. After successful log-in, a message will show reminding you that you need to change your password for security reasons, including instructions on how to do it. It is highly advisable to do so. The last line will be the default prompt pi@raspberrypi:~ $
Connecting via VNC
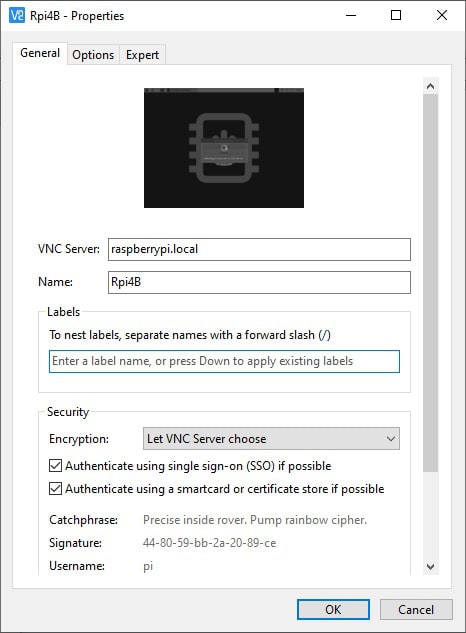
Another way to connect to our headless setup is by using a VNC Viewer. By using VNC, we can see and interact with the Desktop GUI of the Raspberry Pi OS. I use Real VNC Viewer, and you can download it by following this link.
To connect via VNC, open your VNC Viewer. Create a new connection and put raspberrypi.local as the Host Name and put a descriptive label in the Name textbox. Click OK. Open your newly created connection and log in to the Raspberry Pi OS desktop. At this point, we are already working with the Raspberry Pi remotely via the Desktop GUI.
For any questions related to this topic, do leave a comment below and we’ll be happy to help!


