In this tutorial, we are going to make an Arduino send an email when the temperature of thermistor crosses a threshold value. Let’s get started!

There are many ways you can access different web services with the Arduino and an ESP8266 WiFi transceiver. But perhaps the easiest is using IFTTT.
For an introduction to IFTTT, web requests, and Webhooks, see our article How to Send Text Messages With an Arduino.
Preparing the Hardware
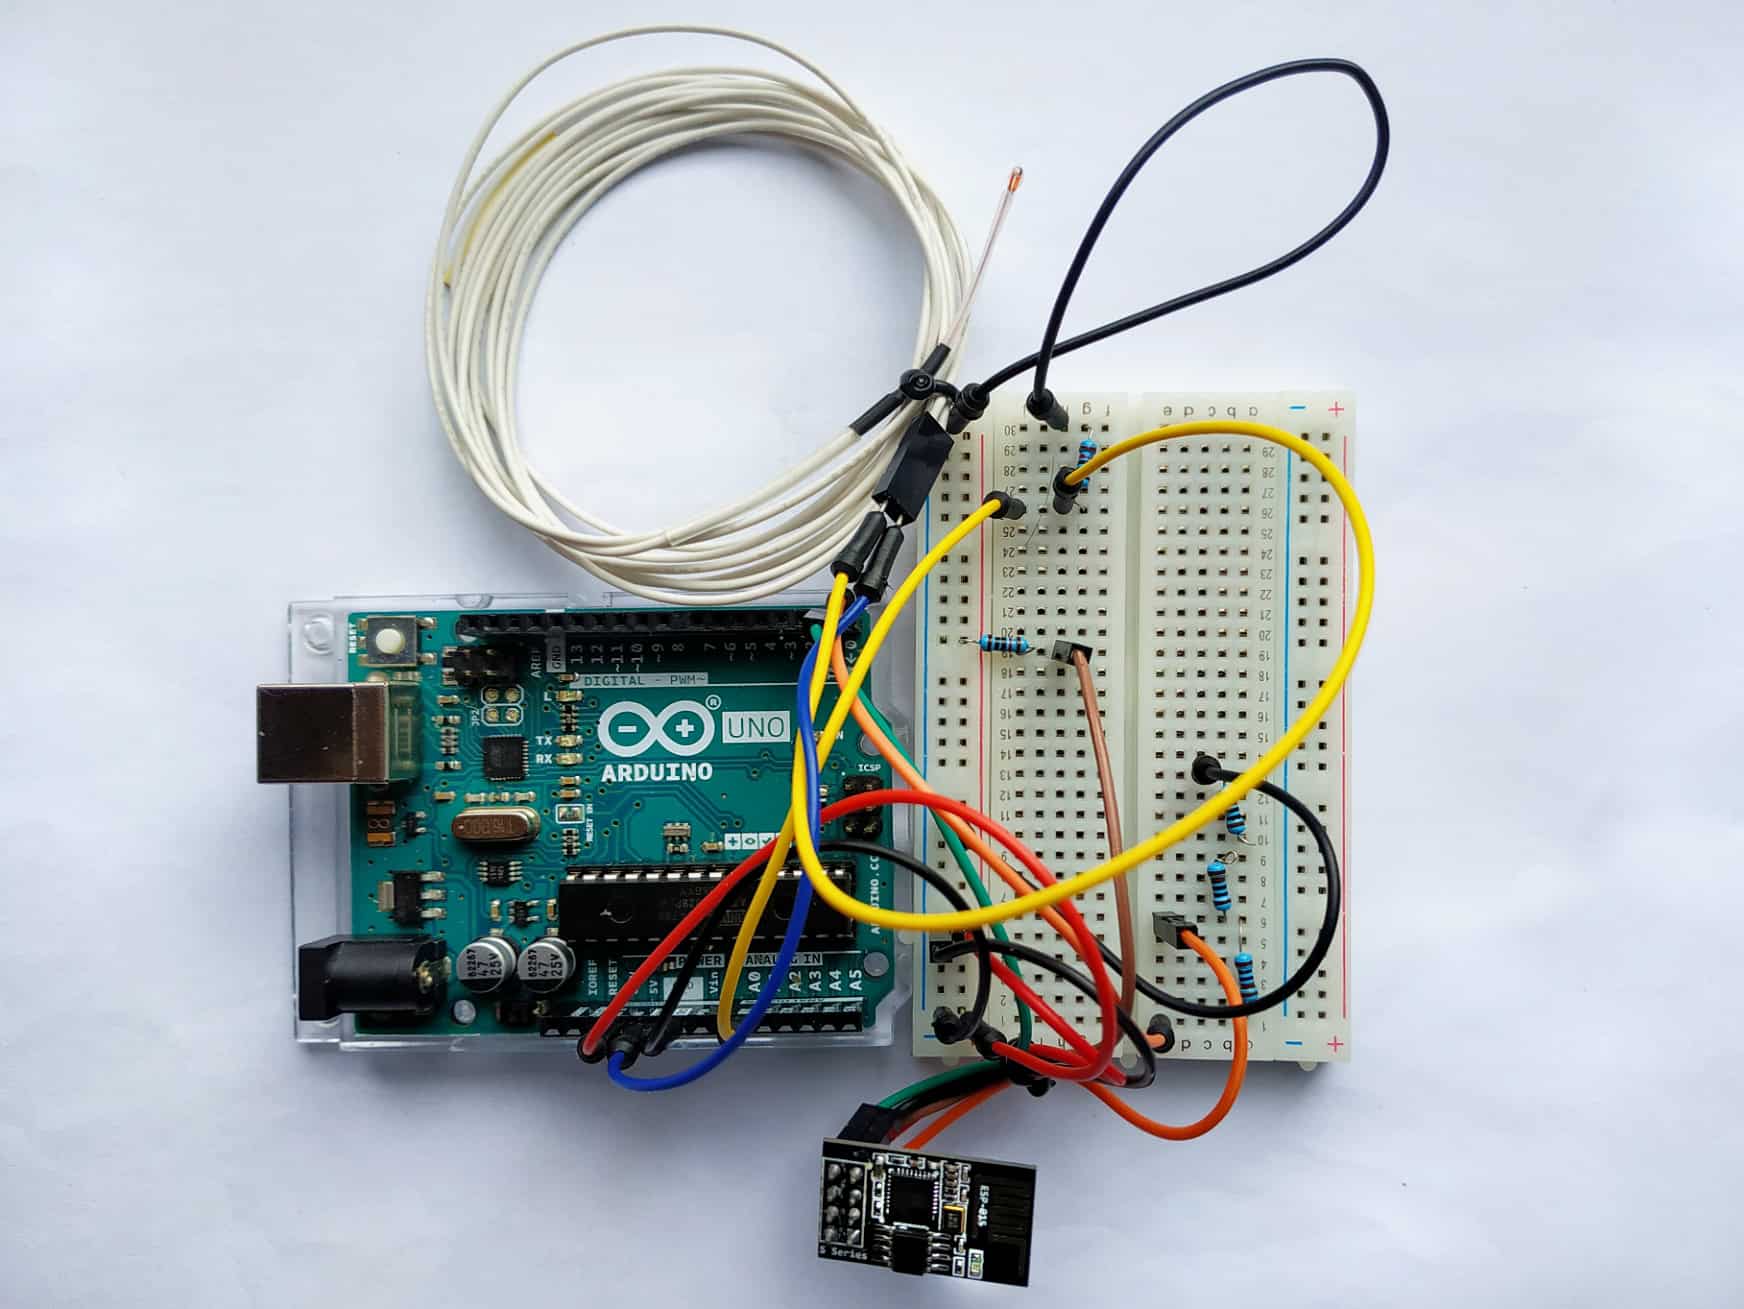
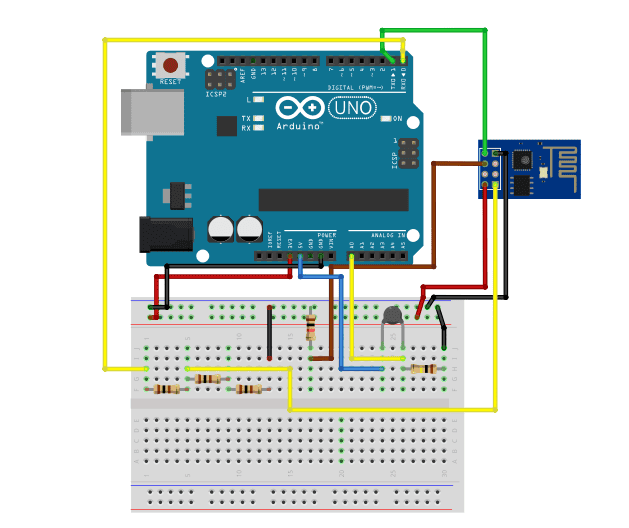
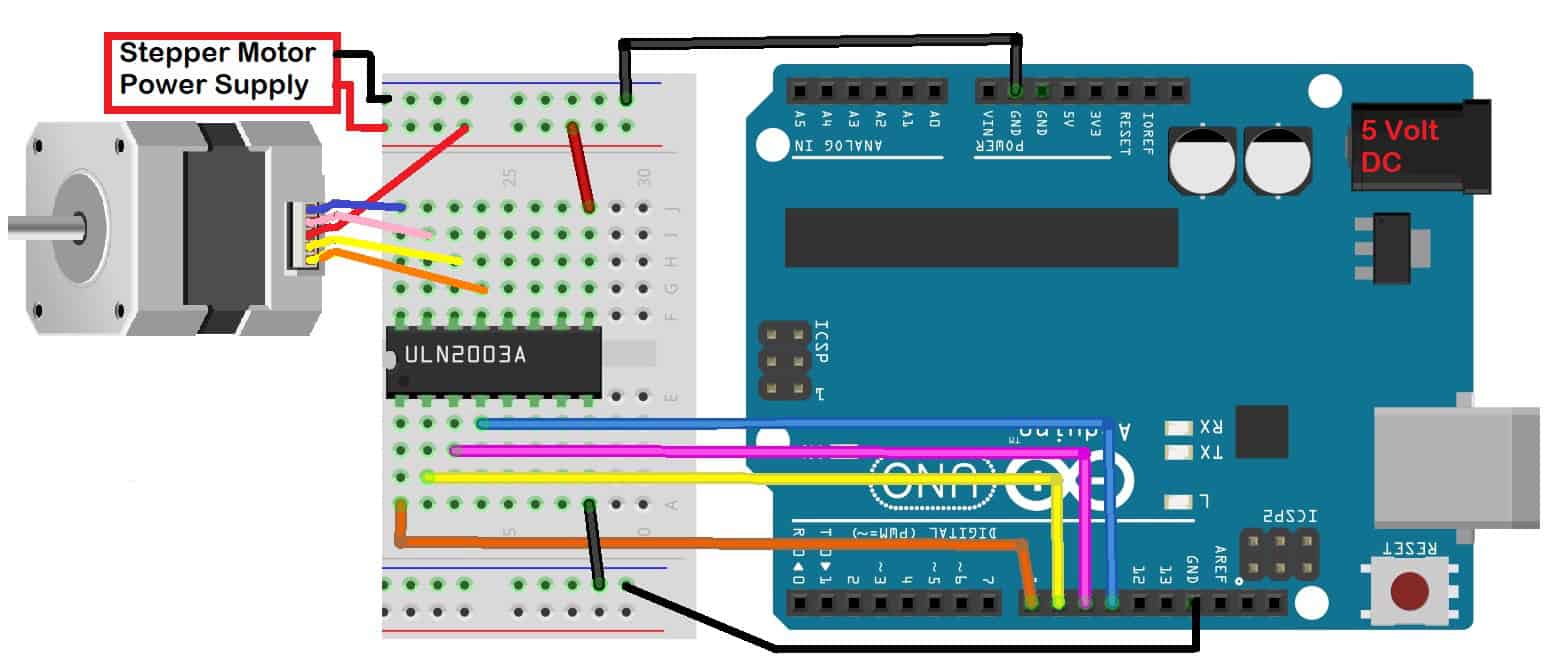
To start our little demonstration, connect the following parts as shown below:
- Arduino UNO
- ESP8266-01 module
- 100 kΩ thermistor
- 1 x 100 kΩ resistor
- 3 x 1 kΩ resistor
- 1 x 10 kΩ resistor
- Jumper wires
- Breadboard
We’ve only been using Arduino UNO as an external programmer in the previous articles, but this time we are going to do some branching out. Aside from using it as a programmer, we will use the UNO to interface with the thermistor. It will be easier this way since thermistors are analog sensors and the ESP-01’s analog pins are not exposed. The Arduino UNO, on the other hand, has 5 analog pins. It is safe to say using them for this project is the best option. Now to set up an IFTTT connection…
Setting Up IFTTT
First, go to the IFTTT website and create an account.
Once logged in, go to the top right toolbar on your homepage and select create. This directs you to a page where you can start creating an Applet.

Then, set a condition by clicking “+ This”.

Next, search for “webhooks”:

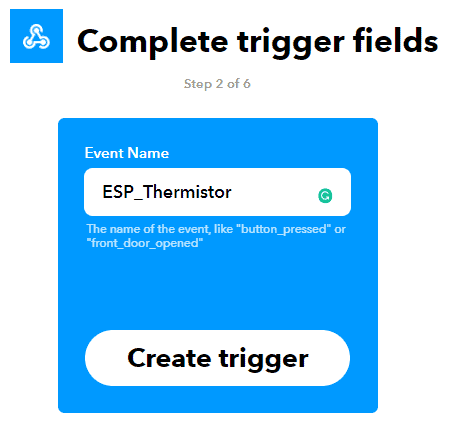
Under Webhooks, choose to receive a web request and name the event. In this case, we name it ESP_Thermistor. After that, click ‘Create trigger’
Now to set the action, click “+ That”.

Then, since we want to use Email notifications, select “Email” when it says “Choose action service”:

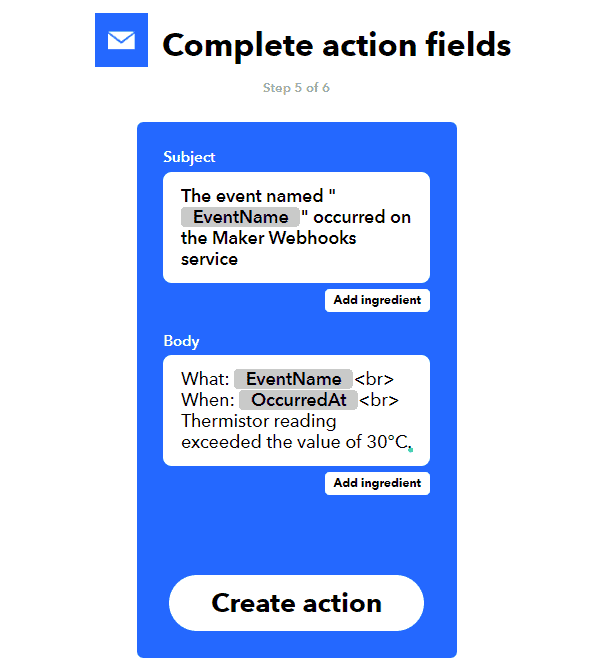
Next, write the message by completing the action fields. There are convenient variables you can use to compose your email: EventName which contains the name of the event; OccurredAt which displays the date and time when the event is triggered, and; Value that can contain any number you want to send to the IFTTT server.
Lastly, check whether you have put the correct details.
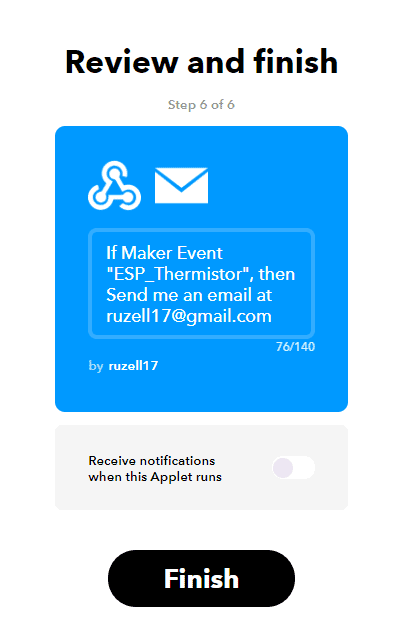
By now, the Applet is all fired up and ready to go.
Acquiring the Key
As mentioned before, to trigger the Applet recipe, we need the key along with the event name on our HTTP request. To obtain your unique IFTTT key, go to the homepage and search for Webhooks on the top-left search bar. You can find Webhooks under services.

Now on the Webhooks page, click the Documentation link at the top-right corner of the page.

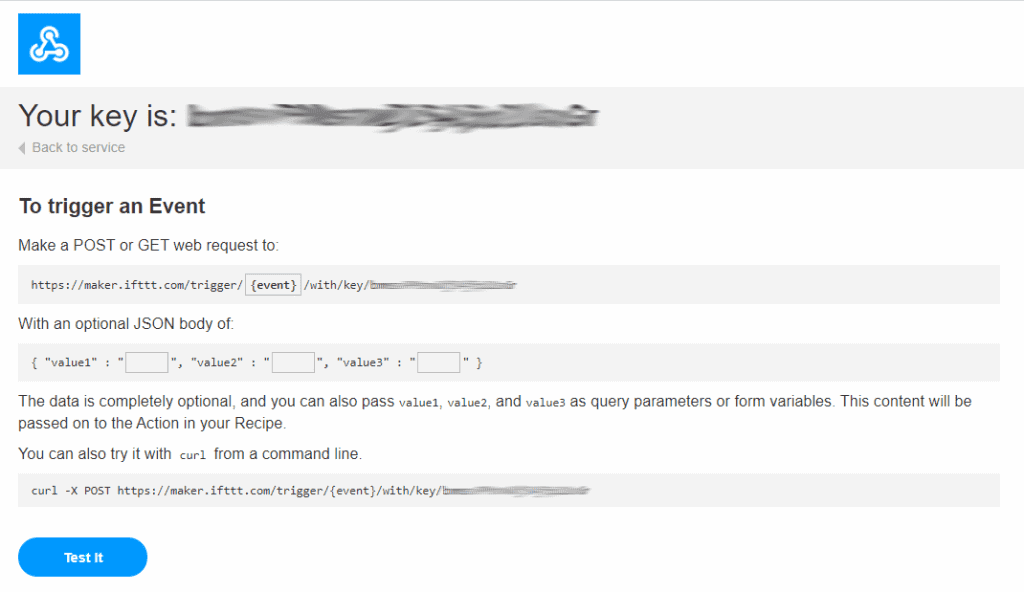
Finally, a page that contains your personal key, and the complete web request for your event appears. This key is unique to every IFTTT account. By including the event name with it, you can trigger an IFTTT action via Webhooks. Now let’s proceed with our code.
Code
We are going to use two sketches for this project. First, a program for the Arduino that reads thermistor values then transmits them to the ESP-01 via serial communication. Then a program for the ESP-01 that receives these values then toggles a GET request to IFTTT when the value is too high. Copy the sketches on your Arduino IDE and save them on different files.
For the Arduino UNO:
#include "SerialTransfer.h"
#include <SoftwareSerial.h>
#define ThermistorPin 0

int Vo;
float R1 = 1000;
float logR2, R2, T;
float c1 = 1.009249522e-03, c2 = 2.378405444e-04, c3 = 2.019202697e-07;

SoftwareSerial mySerial(2, 3); // RX, TX
SerialTransfer myTransfer;

void setup() {
  Serial.begin(115200);
  mySerial.begin(9600);
  myTransfer.begin(mySerial);
}

void loop() {

  Vo = analogRead(ThermistorPin);
  R2 = R1*(1023.0 / (float)Vo - 1.0);
  logR2 = log(R2);
  T = (1.0 / (c1 + c2*logR2 + c3*logR2*logR2*logR2));
  T = T - 273.15;

  //Serial.print("Temperature: ");
  Serial.println(T);
  //Serial.println(" C");

    myTransfer.txObj(T, sizeof(T));
    myTransfer.sendData(sizeof(T));
    delay(5000);
}
For the ESP8266-01 module:
#include <ESP8266WiFi.h>
#include "SerialTransfer.h"

SerialTransfer myTransfer;

const char* ssid     = "WiFi Name";
const char* password = "WiFi password";

const char* resource = "https://maker.ifttt.com/trigger/ESP_Thermistor/with/key/bmsvPMsnwDjS4j5p2UsxGr";
const char* server = "maker.ifttt.com";

void setup() {
  Serial.begin(115200);
  myTransfer.begin(Serial);
  WiFi.begin(ssid, password);
  Serial.print("Connecting to ");
  Serial.print(ssid); Serial.println(" ...");

  int i = 0;
  while (WiFi.status() != WL_CONNECTED) {
    delay(1000);
    Serial.print(++i); Serial.print(' ');
  }
  Serial.println('\n');
  Serial.println("Connection established!");
  Serial.print("IP address:\t");
  Serial.println(WiFi.localIP());
}

void loop()
{
  if(myTransfer.available())
  {
    float T;
    myTransfer.rxObj(T, sizeof(T));

    if (T>30)
    {
      WiFiClient client;

      client.print(String("GET ") + resource +
                      " HTTP/1.1\r\n" +
                      "Host: " + server + "\r\n" +
                      "Connection: close\r\n\r\n");

      int timeout = 5 * 10; // 5 seconds
      while(!!!client.available() && (timeout-- > 0))
      {
        delay(100);
      }
      while(client.available())
      {
        Serial.write(client.read());
      }
      client.stop();
    }
    else
    {
      return;
    }
  }
}
Code Explanation
Unlike other temperature sensors, thermistors are a little complicated to interface with an Arduino. Fortunately, CircuitBasics have done a tutorial explaining this from soup to nuts. Check the article using this link and come back here for the next part.
Now that we’re done with the sensor, the next problem to solve is sending the values to the ESP-01 using serial. Serial communication with Arduino, despite being handy, is very problematic with float values. Serial communication only sends one character at a time plus it requires you to convert everything to strings first. Honestly, I was about to publish this with a significantly longer code before I found the SerialTransfer.h library (download it here). This library is heaven-sent. Why? Take a look at this.
A sketch that sends a float value via serial:
#include "SerialTransfer.h"

SerialTransfer myTransfer;

void setup()
{
  Serial.begin(115200);
  myTransfer.begin(Serial);
}

void loop()
{
  float myFloat = 25.25;
  myTransfer.txObj(myFloat, sizeof(myFloat));
  myTransfer.sendData(sizeof(myFloat));
  delay(100);
}
A sketch that receives a float value via serial:
#include "SerialTransfer.h"

SerialTransfer myTransfer;

void setup()
{
  Serial.begin(115200);
  myTransfer.begin(Serial);
}

void loop()
{
  if(myTransfer.available())
  {
    float myFloat;

    Serial.print("New Data: ");
    myTransfer.rxObj(myFloat, sizeof(myFloat));
    Serial.println(myFloat);
  }
  else if(myTransfer.status < 0)
  {
    Serial.print("ERROR: ");
    Serial.println(myTransfer.status);
  }
}
That’s less than 20 lines to send a float value, and a little more than that to receive it and check for errors! Until now, I’m still amazed. This library cuts up our code a scale hitherto undreamt of.
These are the important lines from the library:
SerialTransfer myTransfer;which creates a SerialTransfer instance called myTransfer;
myTransfer.begin(Serial);which starts serial communication using baud rate Serial; and
  myTransfer.txObj(myFloat, sizeof(myFloat));
  myTransfer.sendData(sizeof(myFloat));
which creates an object specifically made for the myFloat value and sends it in a packet right for its size.
After transmitting the data, we now move on to the code for the ESP-01.
myTransfer.rxObj(myFloat, sizeof(myFloat));On the other end of the communication line, use this to receive the float value.
const char* ssid     = "WiFi Name";
const char* password = "WiFi password";

const char* resource = "https://maker.ifttt.com/trigger/YOUR EVENT NAME HERE/with/key/YOUR KEY HERE";
const char* server = "maker.ifttt.com";
Next, concatenate strings to contain your WiFi name, password, web request URL, and the IFTTT maker server.
    if (T>30)
    {
      WiFiClient client;

      client.print(String("GET ") + resource +
                      " HTTP/1.1\r\n" +
                      "Host: " + server + "\r\n" +
                      "Connection: close\r\n\r\n");

      int timeout = 5 * 10; // 5 seconds
      while(!!!client.available() && (timeout-- > 0))
      {
        delay(100);
      }
      while(client.available())
      {
        Serial.write(client.read());
      }
      client.stop();
    }
    else
    {
      return;
    }
This sends an HTTP GET request to the IFTTT server when the value of T exceeds 30. We use GET since we simply need to activate the trigger. We will use POST when we need to write a value to the IFTTT server. For instance, sending an email notification with the current temperature rating from the sensor.
Demonstration
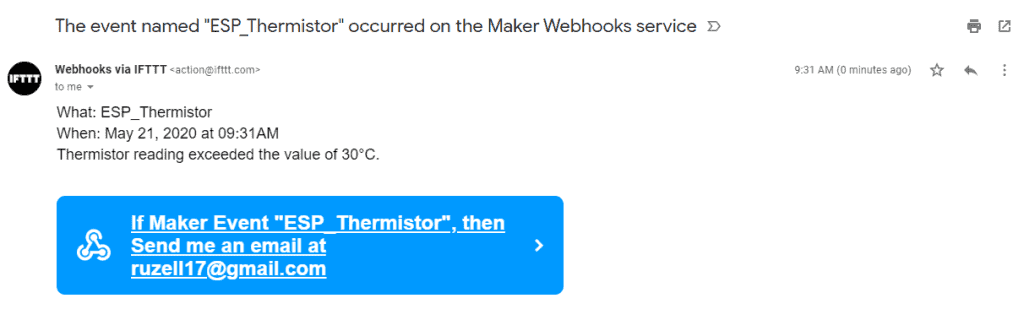
After using a lighter to heat up the thermistor, I received an email from the device. The project has hit the home run!
That’s it for this tutorial, see you at the next one! Leave a comment below if you have questions about anything…


Hi,
In the parts list there are 3 x 1k resistors,
On the left side of the headboard there are 3 1k resistors connected in series.
My question is, why is only one resistors in use?
Nice catch. There should be a wire connecting the last 1k resistor to the ground. I’ll add it now. Thanks!
Hi Ruzell,
I realize it would add so extra work, but an actual schematic would be a great help.🙂
Thank You.
Could you please give an example with POST? Thanks,
For POST requests, it’s much easier to just use web client libraries. I used them to post a tweet using IFTTT in this article: https://www.circuitbasics.com/how-to-send-tweets-with-an-arduino/
I tried to compile the ESP code and got error with generic ESP8266 board.
I have: http://arduino.esp8266.com/stable/package_esp8266com_index.json loaded into preferences.
And I have the ESP8266 Community version 2.7.4 Board Manager loaded.
The only thing that sounds close on the list is the Generic ESP8622.
Any suggestions?
Try downgrading your board library to version 2.5.0.
I tried to upload the ESP code but I keep receiving an error that says “failed to connect to ESP8266: timed out waiting for packet header”. I downgraded the library to 2.5.0 which didn’t fix the problem.
Is it possible the ESP might have issues connecting to the Wifi? If so, can I adapt it with an Ethernet shield? Any help is appreciated.