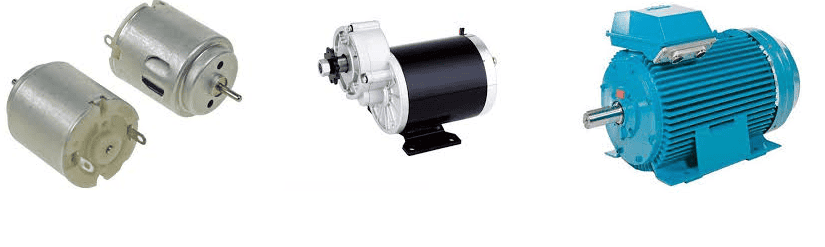
A DC motor converts electrical current into mechanical energy. Its invention in the early 19th century provided a new mechanism to drive machinery. Fast forward to the 21st century and the DC motor has undergone rapid scientific and industrial advances. Today, they come in many different shapes, sizes, and specifications for a wide variety of applications.

In this tutorial, we will learn how DC motors work, how to connect them to a Raspberry Pi, and how to create a Graphical User Interface to control the speed and direction of one or two DC motors.
How DC Motors Work
A DC motor comprises the following basic parts:
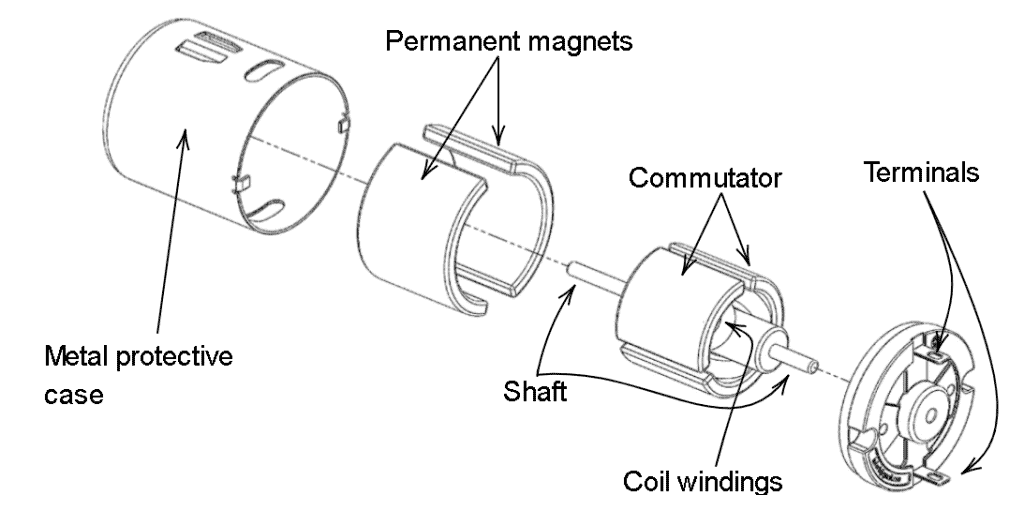
DC motors work from the interaction between electricity and magnetism. An electric current flowing through a coil of wire (the commutator) creates a magnetic field. When this magnetic field is placed in an external magnetic field created by the permanent magnets, the coil experiences a force that spins the motor. This force is proportional to both the current flowing in the coils and the strength of the external magnetic field.
Why DC Motors Need a Motor Driver
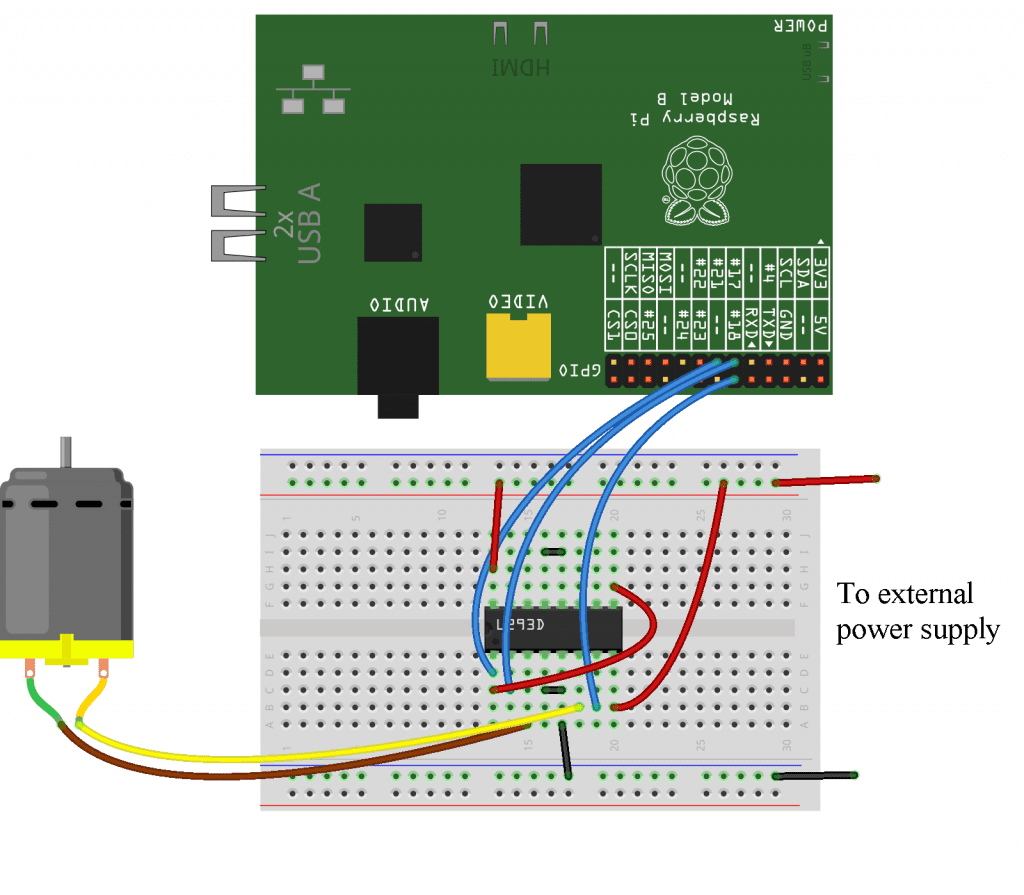
The Raspberry Pi’s GPIO pins can only provide a current of 16mA per pin, which is not enough to power a DC motor. To provide the current required by the motor, we need to use a motor driver. We will use the common and reliable L293D H-bridge motor driver. This motor driver will power the motors from a separate power supply and control the motors based on signals from the Raspberry Pi.
How to Control a DC Motor With the Raspberry Pi
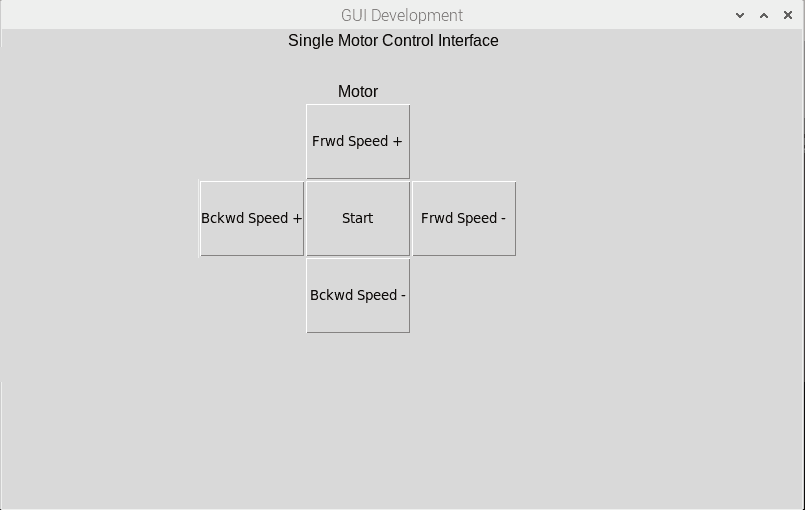
In this project we will design a graphical user interface (GUI) using the Guizero library to control the speed and direction of a DC motor.
These are the parts you need:
- Raspberry Pi
- Breadboard
- Breadboard power supply
- 9V power supply
- Jumper wires
- DC motor
- L293D motor driver
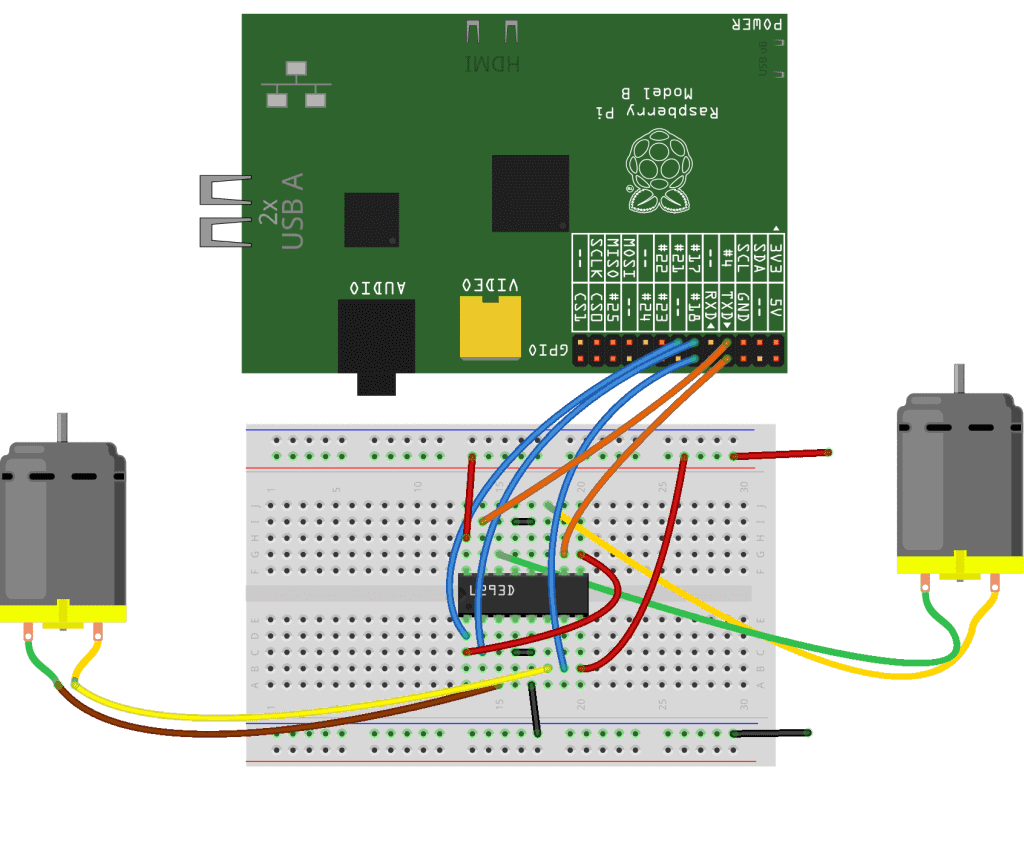
Once you have all of the parts, connect the circuit following the wiring diagram below.
Python Code to Control One Motor
from time import sleep
from guizero import App, Text, PushButton
from gpiozero import Motor, LED

motor = Motor(17,18)
motorSwitch = LED(27)

app = App(title="GUI Development", layout="grid", height=600, width=800)
message = Text(app, text="Single Motor Control Interface", grid=[4,0])

motorSpeedForward = 0
motorSpeedBackward = 0

def toggleSwitch():
    if button0.text=="Start":
       motorSwitch.on()
       button0.text="Stop"
    elif button0.text == "Stop":
         motorSwitch.off()
         button0.text = "Start"

def forwardSpeedIncrease():
    global motorSpeedForward
    motor.forward(speed=motorSpeedForward)
    print("Increased speed of motor backward. Current speed = "+ str(motorSpeedForward))
    motorSpeedForward += 0.1
    if motorSpeedForward >= 1:
        motorSpeedForward = 1

def forwardSpeedReduce():
    global motorSpeedForward
    motor.forward(speed=motorSpeedForward)
    print("Reduce speed of motor forward. Current speed = "+ str(motorSpeedForward))
    motorSpeedForward -= 0.1
    if motorSpeedForward <= 0:
        motorSpeedForward = 0

def backwardSpeedIncrease():
    global motorSpeedBackward
    motor.forward(speed=motorSpeedBackward)
    print("Increased speed of motor backward. Current speed = "+ str(motorSpeedBackward))
    motorSpeedBackward += 0.1
    if motorSpeedBackward >= 1:
        motorSpeedBackward = 1

def backwardSpeedReduce():
    global motorSpeedBackward
    motor.backward(speed=motorSpeedBackward)
    print("Reduce speed of motor backward. Current speed = "+ str(motorSpeedBackward))
    motorSpeedBackward -= 0.1
    if motorSpeedBackward <= 0:
        motorSpeedBackward = 0

Text(app, "Motor",grid=[2,1])
button0 = PushButton(app, command=toggleSwitch, text="Start", width=10,height=3, grid=[2,4])
button1 = PushButton(app, command=forwardSpeedIncrease, text="Frwd Speed +", width=10,height=3, grid=[2,3])
button2 = PushButton(app, command=backwardSpeedReduce, text="Bckwd Speed -", width=10,height=3, grid=[2,5])
button3 = PushButton(app, command=backwardSpeedIncrease, text = "Bckwd Speed +", width=10,height=3, grid=[1,4])
button4 = PushButton(app, command=forwardSpeedReduce, text="Frwd Speed -", width=10, height=3, grid=[3,4])

app.display()
Code Description
In the first three lines, we import the necessary libraries for the project. For GUI development, we will need the guizero library. And from the gpiozero library, we will import the motor class and the LED class. We need the LED class because it provides a simple way to control the enable pin of the driver. This will enable us to start and stop the motor.
Alternatively, you can write Python code to control the GPIO pins for the motor signals and the enable pin so that you can do away with the gpiozero library. I have only used this library because we only write a few lines of code that are easy to understand and follow.
We connected the L293D’s motor control pins to GPIO17 and GPIO18 of the Raspberry Pi. Now we create an instance of the motor class with motor = Motor(17,18) and motorSwitch = LED(27). The Enable pin control is connected to GPIO27.
Next, we initialize two variables called motorSpeedForward and motorSpeedBackward to control the speed of the motor.
The gpiozero library has functions to control the direction of the motor. To move the motor forward, use motor.forward(). To move the motor backwards, use motor.backward(). These functions take the speed of the motor as a parameter. The speed can be any number between 0 (full off), and 1 (max speed).
In the program above we make the motor spin forwards with this:
motor.forward(speed=motorSpeedForward)We make the motor spin backwards with this:
motor.backward(speed=motorSpeedBackward)We can also increase and decrease the speed of the motor in the code by doing some math with the motorSpeedForward and motorSpeedBackward variables. In each speed function above, we do compound addition and compound subtraction on the variables to change their value and increase or decrease the speed of the motor in forward and backwards spinning conditions.
Each function performs a mathematical operation depending on what it’s supposed to do. Most importantly, we increment/decrement the variables for the motor speed by a factor of 0.1, and we keep the variables between 0 and 1.
Lastly, we call the function app.display() to run the GUI.
Code for the GUI
The code for the GUI is at the top and bottom of the program above. For example, this is the code to make a bare-bones GUI:
from time import sleep
from guizero import App, Text, PushButton
import sys

app = App(title="GUI Development")
message = Text(app, text="Motor Control GUI")

app.display()
After defining the functions for the motor, we then create our user interface and call the above functions when a user clicks the corresponding button.
The buttons are programmed with this code:
Text(app, "Motor",grid=[2,1])
button0 = PushButton(app, command=toggleSwitch, text="Start", width=10,height=3, grid=[2,4])
button1 = PushButton(app, command=forwardSpeedIncrease, text="Frwd Speed +", width=10,height=3, grid=[2,3])
button2 = PushButton(app, command=backwardSpeedReduce, text="Bckwd Speed -", width=10,height=3, grid=[2,5])
button3 = PushButton(app, command=backwardSpeedIncrease, text = "Bckwd Speed +", width=10,height=3, grid=[1,4])
button4 = PushButton(app, command=forwardSpeedReduce, text="Frwd Speed -", width=10, height=3, grid=[3,4])
Control Two Motors With the Raspberry Pi
In this project, we will use a GUI to control the speed and direction of two DC motors. To do this, we only need to make minor modifications to the code above.
These are the parts you will need:
- Raspberry Pi
- Jumper wires
- Breadboard
- L293D motor controller
- Two DC motors
- External power supply
- 9v power supply
Once you have all of the parts, connect the motors following this wiring diagram:
Python Code to Control Two Motors
In this program we use the robot class from the gpiozero library. Everything else remains the same as the previous code.
from time import sleep
from guizero import App, Text, PushButton
from gpiozero import Robot, LED

motor = Robot(left=(4, 14), right=(17, 18))
motorSwitch = LED(27)

app = App(title="GUI Development", layout="grid", height=600, width=800)
message = Text(app, text="Dual Motor Control Interface", grid=[4,0])

motorSpeedForward = 0
motorSpeedBackward = 0

def toggleSwitch():
    if button0.text=="Start":
       motorSwitch.on()
       button0.text="Stop"
    elif button0.text == "Stop":
         motorSwitch.off()
         button0.text = "Start"

def forwardSpeedIncrease():
    global motorSpeedForward
    motor.forward(speed=motorSpeedForward)
    print("Increased speed of motor backward. Current speed = "+ str(motorSpeedForward))
    motorSpeedForward += 0.1
    if motorSpeedForward >= 1:
        motorSpeedForward = 1

def forwardSpeedReduce():
    global motorSpeedForward
    motor.forward(speed=motorSpeedForward)
    print("Reduce speed of motor forward. Current speed = "+ str(motorSpeedForward))
    motorSpeedForward -= 0.1
    if motorSpeedForward <= 0:
        motorSpeedForward = 0

def backwardSpeedIncrease():
    global motorSpeedBackward
    motor.forward(speed=motorSpeedBackward)
    print("Increased speed of motor backward. Current speed = "+ str(motorSpeedBackward))
    motorSpeedBackward += 0.1
    if motorSpeedBackward >= 1:
        motorSpeedBackward = 1

def backwardSpeedReduce():
    global motorSpeedBackward
    motor.backward(speed=motorSpeedBackward)
    print("Reduce speed of motor backward. Current speed = "+ str(motorSpeedBackward))
    motorSpeedBackward -= 0.1
    if motorSpeedBackward <= 0:
        motorSpeedBackward = 0

Text(app, "Motor",grid=[2,1])
button0 = PushButton(app, command=toggleSwitch, text="Start", width=10,height=3, grid=[2,4])
button1 = PushButton(app, command=forwardSpeedIncrease, text="Frwd Speed +", width=10,height=3, grid=[2,3])
button2 = PushButton(app, command=backwardSpeedReduce, text="Bckwd Speed -", width=10,height=3, grid=[2,5])
button3 = PushButton(app, command=backwardSpeedIncrease, text = "Bckwd Speed +", width=10,height=3, grid=[1,4])
button4 = PushButton(app, command=forwardSpeedReduce, text="Frwd Speed -", width=10, height=3, grid=[3,4])

app.display()
That’s all we need to change to control the two motors! Hope this has helped you get started using DC motors on the Raspberry Pi. Be sure to leave a comment below if you have questions about anything!