If you plan on using an LCD with your Raspberry Pi, there’s a good chance you’ll need to program it in Python at some point. Python is probably the most popular programming language for coding on the Raspberry Pi, and many of the projects and examples you’ll find are written in Python.

In this tutorial, I’ll show you how to connect your LCD and program it in Python, using the RPLCD library. I’ll start with showing you how to connect it in either 8 bit mode or 4 bit mode. Then I’ll explain how to install the library, and provide examples for printing and positioning text, clearing the screen, and controlling the cursor. I’ll also give you examples for scrolling text, creating custom characters, printing data from a sensor, and displaying the date, time, and IP address of your Pi.
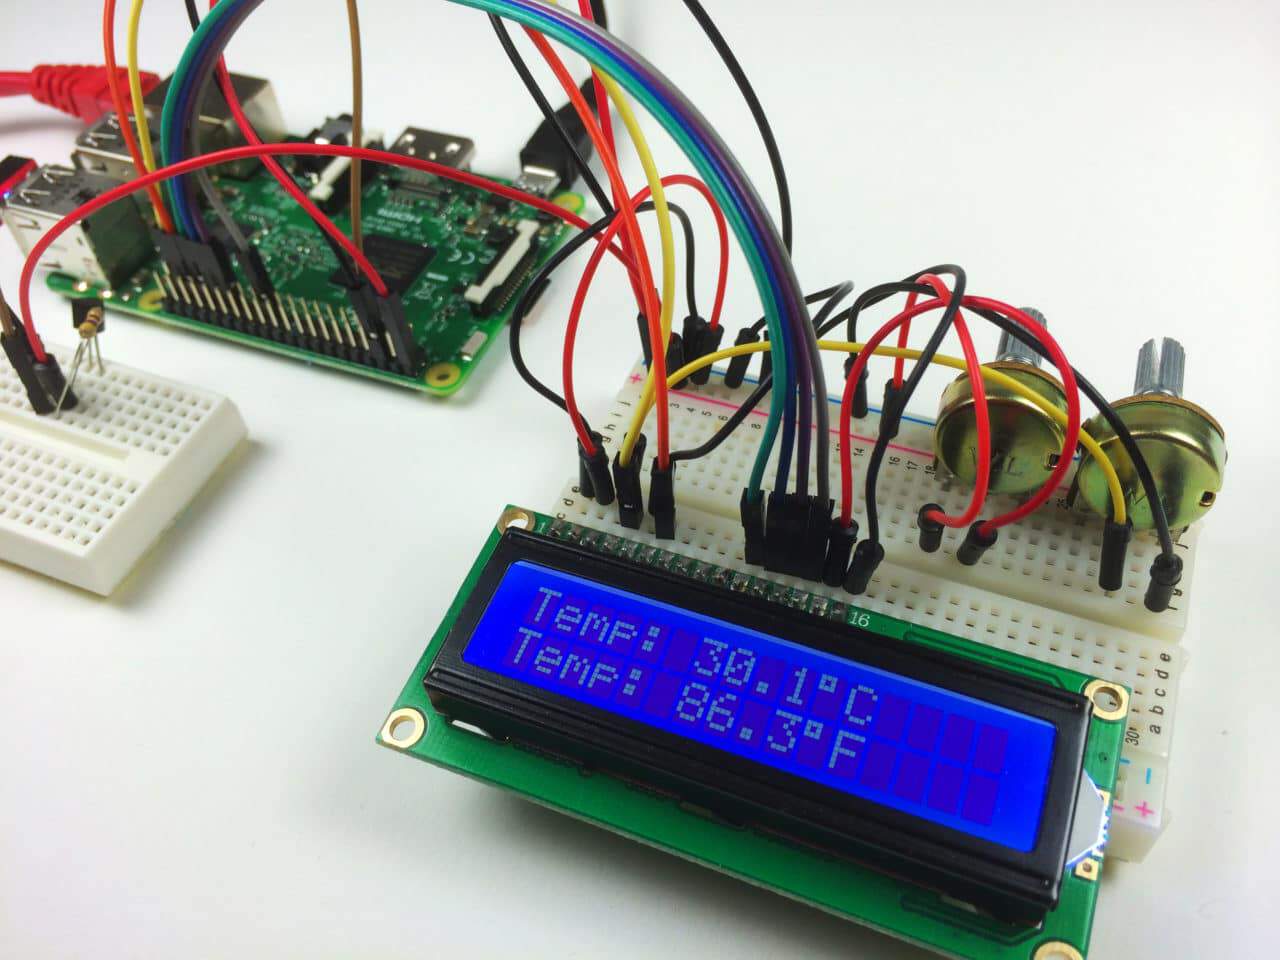
I’m using a 16X2 LCD display here, but the examples will work with any LCD that uses the Hitachi HD44780 driver.
You can also connect the LCD via I2C, which uses only two wires, but it requires some extra hardware. Check out our article, How to Setup an I2C LCD on the Raspberry Pi to see how.
I also go over how to program the LCD with C in another article, but for now let’s focus on Python…
Here is the video version of this tutorial, where you can watch all of the example programs below in real time:
Connecting the LCD
There are two ways to connect the LCD to your Raspberry Pi – in 4 bit mode or 8 bit mode. 4 bit mode uses 6 GPIO pins, while 8 bit mode uses 10. Since it uses up less pins, 4 bit mode is the most common method, but I’ll explain how to set up and program the LCD both ways.
Each character and command is sent to the LCD as a byte (8 bits) of data. In 8 bit mode, the byte is sent all at once through 8 data wires, one bit per wire. In 4 bit mode, the byte is split into two sets of 4 bits – the upper bits and lower bits, which are sent one after the other over 4 data wires.
Theoretically, 8 bit mode transfers data about twice as fast as 4 bit mode, since the entire byte is sent all at once. However, the LCD driver takes a relatively long time to process the data, so no matter which mode is being used, we don’t really notice a difference in data transfer speed between 8 bit and 4 bit modes.
Wiring the LCD in 8 Bit Mode
To connect your LCD in 8 bit mode set it up like this:

The backlight and contrast potentiometers are 10K Ohms, but they can be substituted with 1K to 3K Ohm resistors if you want.
Wiring the LCD in 4 Bit Mode
To connect the LCD to your Raspberry Pi in 4 bit mode, set it up like this:
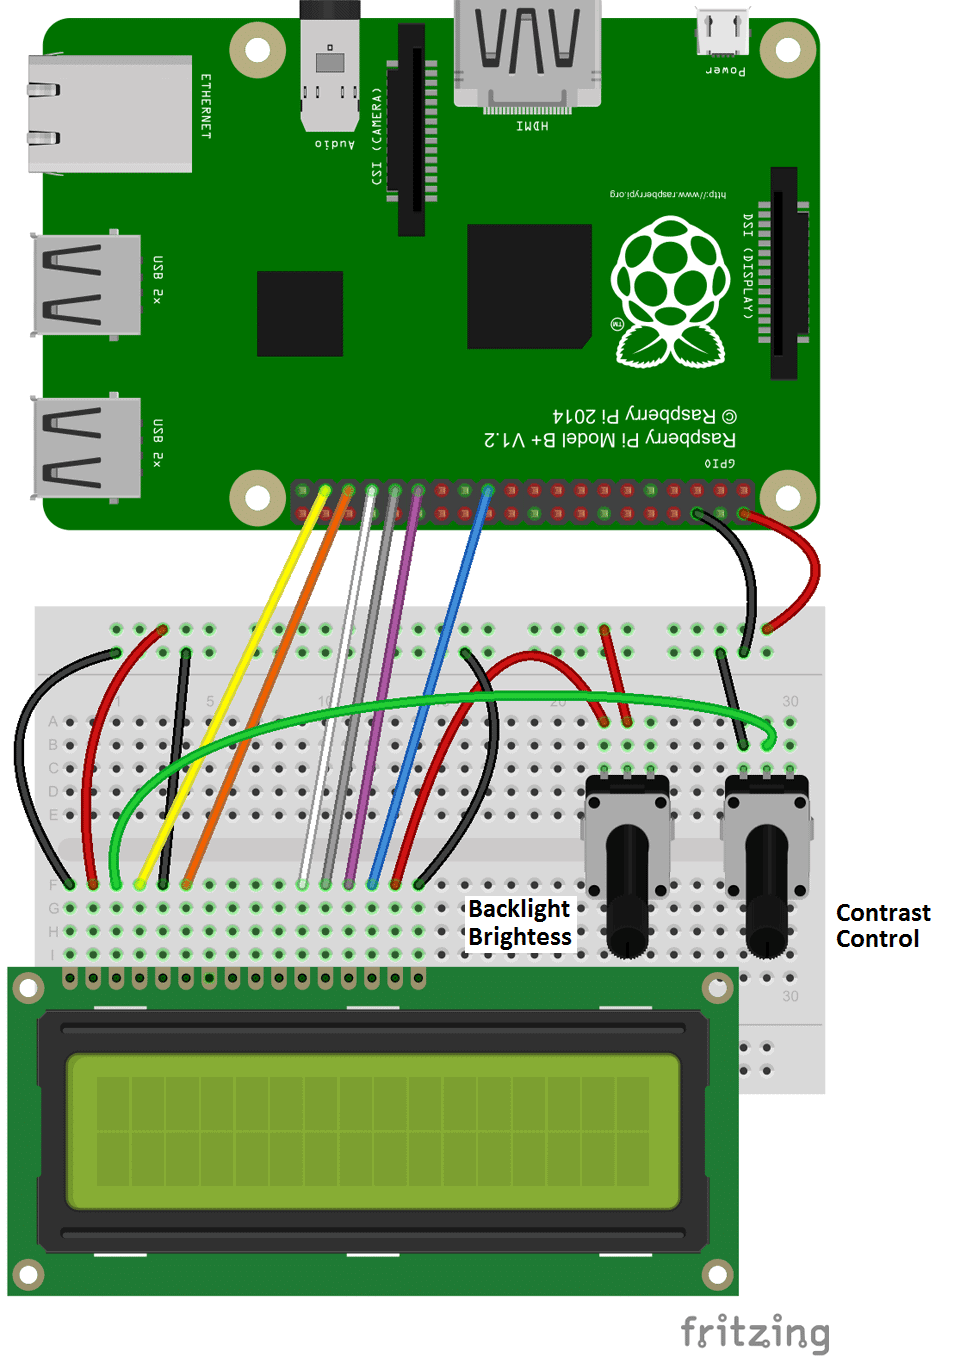
The potentiometers here can also be substituted with 1K or 3K Ohm resistors.
Programming the LCD With Python
If this is your first time writing and running a Python program, you might want to read How to Write and Run a Python Program on the Raspberry Pi, which will explain everything you need to know to run the examples below.
We’ll be using a Python library that provides a lot of useful functions. Its called the RLPCD library, and was written by Danilo Bargen.
Installing the RPLCD Library
The RPLCD library can be installed from the Python Package Index, or PIP. It might already be installed on your Pi, but if not, enter this at the command prompt to install it:
sudo apt-get install python-pip
After you get PIP installed, install the RPLCD library by entering:
sudo pip install RPLCD
The example programs below use the Raspberry Pi’s physical pin numbers, not the BCM or GPIO numbers. I’m assuming you have your LCD connected the way it is in the diagrams above, but I’ll show you how to change the pin connections if you need to.
Write to the Display in 8 Bit Mode
Let’s start with a simple program that will display “Hello world!” on the LCD. If you have a different sized LCD than the 16×2 I’m using (like a 20×4), change the number of columns and rows in line 2 of the code. cols= sets the number of columns, and rows= sets the number of rows. You can also change the pins used for the LCD’s RS, E, and data pins. The data pins are set as pins_data=[D0, D1, D2, D3, D4, D5, D6, D7].
Text strings are written to the display using the lcd.write_string() function:
from RPLCD import CharLCD
lcd = CharLCD(cols=16, rows=2, pin_rs=37, pin_e=35, pins_data=[40, 38, 36, 32, 33, 31, 29, 23])
lcd.write_string(u'Hello world!')
Write to the Display in 4 Bit Mode
In 4 bit mode, only LCD pins D4, D5, D6, and D7 are used for data. These are set in pins_data=[D4, D5, D6, D7] on line 2 below:
from RPLCD import CharLCD
lcd = CharLCD(cols=16, rows=2, pin_rs=37, pin_e=35, pins_data=[33, 31, 29, 23])
lcd.write_string(u'Hello world!')
Position the Text
The text can be positioned anywhere on the screen using lcd.cursor_pos = (ROW, COLUMN). The rows are numbered starting from zero, so the top row is row 0, and the bottom row is row 1. Similarly, the columns are numbered starting at zero, so for a 16×2 LCD the columns are numbered 0 to 15. For example, the code below places “Hello world!” starting at the bottom row, fourth column:
from RPLCD import CharLCD
lcd = CharLCD(cols=16, rows=2, pin_rs=37, pin_e=35, pins_data=[33, 31, 29, 23])

lcd.cursor_pos = (1, 3)
lcd.write_string(u'Hello world!')
Clear the Screen
The function lcd.clear() will clear the screen. The following code will print “Hello world!” to the screen for two seconds before clearing it:
import time
from RPLCD import CharLCD
lcd = CharLCD(cols=16, rows=2, pin_rs=37, pin_e=35, pins_data=[33, 31, 29, 23])

lcd.write_string(u'Hello world!')
time.sleep(2)
lcd.clear()
Blinking Text
Combining lcd.clear() and time.sleep() in a while loop will produce a blinking text effect:
import time
from RPLCD import CharLCD
lcd = CharLCD(cols=16, rows=2, pin_rs=37, pin_e=35, pins_data=[33, 31, 29, 23])

while True:
    lcd.write_string(u"Hello world!")
    time.sleep(1)
    lcd.clear()
    time.sleep(1)
Press Ctrl-C to exit the program.
Turn the Cursor On and Off
The RPLCD library provides several functions for controlling the cursor. You can have a block cursor, an underline cursor, or a blinking cursor. Use the following functions to set the cursor:
- Blinking block cursor:
lcd.cursor_mode = CursorMode.blink - Line cursor:
lcd.cursor_mode = CursorMode.line - Cursor off:
lcd.cursor_mode = CursorMode.hide
The code below places a blinking cursor after the last character of text:
from RPLCD import CharLCD
from RPLCD import CursorMode
lcd = CharLCD(cols=16, rows=2, pin_rs=37, pin_e=35, pins_data=[33, 31, 29, 23])

lcd.write_string(u'Hello world!')

lcd.cursor_mode = CursorMode.blink
#lcd.cursor_mode = CursorMode.line
#lcd.cursor_mode = CursorMode.hide
Line Breaks
Text will automatically wrap to the next line if the length of the text is greater than the column length of your LCD. You can also control where the text string breaks to the next line by inserting \n\r where you want the break to occur. The code below will print “Hello” to the top row, and “world!” to the bottom row.
from RPLCD import CharLCD
lcd = CharLCD(cols=16, rows=2, pin_rs=37, pin_e=35, pins_data=[33, 31, 29, 23])

lcd.write_string(u'Hello\n\rworld!')
Print the Date and Time
This program will display the date and time on the LCD:
from RPLCD import CharLCD
import time
lcd = CharLCD(cols=16, rows=2, pin_rs=37, pin_e=35, pins_data=[33, 31, 29, 23])


while True:
    lcd.write_string("Time: %s" %time.strftime("%H:%M:%S"))

    lcd.cursor_pos = (1, 0)
    lcd.write_string("Date: %s" %time.strftime("%m/%d/%Y"))
Print Your IP Address
This program will print the IP address of your ethernet connection to the LCD. To print the IP of your WiFi connection, just change eth0 in line 19 to wlan0:
from RPLCD import CharLCD
import socket
import fcntl
import struct

lcd = CharLCD(cols=16, rows=2, pin_rs=37, pin_e=35, pins_data=[33, 31, 29, 23])

def get_ip_address(ifname):
    s = socket.socket(socket.AF_INET, socket.SOCK_DGRAM)
    return socket.inet_ntoa(fcntl.ioctl(
        s.fileno(),
        0x8915,
        struct.pack('256s', ifname[:15])
    )[20:24])

lcd.write_string("IP Address:")

lcd.cursor_pos = (1, 0)
lcd.write_string(get_ip_address('eth0'))
Custom Characters
Each character on the LCD is an array of 5×8 of pixels. You can create any pattern or character you can think of, and display it on the screen as a custom character. Check out this website for an interactive tool that creates the bit array used to define custom characters.
First we define the character in lines 4 to 12 of the code below. Then we use the function lcd.create_char(0-7, NAME) to store the character in the LCD’s CGRAM memory. Up to 8 (0-7) characters can be stored at a time. To print the custom character, we use lcd.write_string(unichr(0)), where the number in unichr() is the memory location (0-7) defined in lcd.create_char().
Printing a Single Custom Character
Take a look at this code, which prints a single smiley face character to the display:
from RPLCD import CharLCD, cleared, cursor
lcd = CharLCD(cols=16, rows=2, pin_rs=37, pin_e=35, pins_data=[33, 31, 29, 23])

smiley = (
    0b00000,
    0b01010,
    0b01010,
    0b00000,
    0b10001,
    0b10001,
    0b01110,
    0b00000,
)
lcd.create_char(0, smiley)
lcd.write_string(unichr(0))
Printing Multiple Custom Characters
This program will print the Greek letters omega, pi, and mu, along with symbols for temperature (a thermometer) and humidity (a water drop):
from RPLCD import CharLCD, cleared, cursor
lcd = CharLCD(cols=16, rows=2, pin_rs=37, pin_e=35, pins_data=[33, 31, 29, 23])

omega = (
    0b00000,
    0b01110,
    0b10001,
    0b10001,
    0b10001,
    0b01010,
    0b11011,
    0b00000,
)

pi = (
    0b00000,
    0b00000,
    0b11111,
    0b01010,
    0b01010,
    0b01010,
    0b10011,
    0b00000,
)

mu = (
    0b00000,
    0b10010,
    0b10010,
    0b10010,
    0b10010,
    0b11101,
    0b10000,
    0b10000,
)

drop = (
    0b00100,
    0b00100,
    0b01010,
    0b01010,
    0b10001,
    0b10001,
    0b10001,
    0b01110,
)

temp = (
    0b00100,
    0b01010,
    0b01010,
    0b01110,
    0b01110,
    0b11111,
    0b11111,
    0b01110,
)

lcd.create_char(0, omega)
lcd.create_char(1, pi)
lcd.create_char(2, mu)
lcd.create_char(3, drop)
lcd.create_char(4, temp)

lcd.write_string(unichr(0))
lcd.write_string(unichr(1))
lcd.write_string(unichr(2))
lcd.write_string(unichr(3))
lcd.write_string(unichr(4))
Scrolling Text
This program scrolls text from right to left in an infinite loop:
framebuffer = [
    '',
    '',
]

def write_to_lcd(lcd, framebuffer, num_cols):
    lcd.home()
    for row in framebuffer:
        lcd.write_string(row.ljust(num_cols)[:num_cols])
        lcd.write_string('\r\n')

from RPLCD import CharLCD
lcd = CharLCD(cols=16, rows=2, pin_rs=37, pin_e=35, pins_data=[33, 31, 29, 23])
write_to_lcd(lcd, framebuffer, 16)

import time
long_string = 'This string is too long to fit'

def loop_string(string, lcd, framebuffer, row, num_cols, delay=0.5): #DELAY= CONTROLS THE SPEED OF SCROLL
    padding = ' ' * num_cols
    s = padding + string + padding
    for i in range(len(s) - num_cols + 1):
        framebuffer[row] = s[i:i+num_cols]
        write_to_lcd(lcd, framebuffer, num_cols)
        time.sleep(delay)

while True:
    loop_string(long_string, lcd, framebuffer, 1, 16)
You can change the scroll speed on line 19 where it says delay=0.5.
Print Data from a Sensor
To demonstrate how to print data from a sensor, here’s a program that displays the temperature from a DS18B20 Digital Temperature Sensor. There is some set up to do before you can get this to work on the Raspberry Pi, so check out our tutorial on the DS18B20 to see how.
In general, you take the input variable from your sensor and convert it to an integer to perform any calculations. Then convert the result to a string, and output the string to the display using lcd.write_string(sensor_data()):
import os
import glob
import time
from RPLCD import CharLCD

lcd = CharLCD(cols=16, rows=2, pin_rs=37, pin_e=35, pins_data=[33, 31, 29, 23])

os.system('modprobe w1-gpio')
os.system('modprobe w1-therm')

base_dir = '/sys/bus/w1/devices/'
device_folder = glob.glob(base_dir + '28*')[0]
device_file = device_folder + '/w1_slave'

def read_temp_raw():
    f = open(device_file, 'r')
    lines = f.readlines()
    f.close()
    return lines

#CELSIUS CALCULATION
def read_temp_c():
    lines = read_temp_raw()
    while lines[0].strip()[-3:] != 'YES':
        time.sleep(0.2)
        lines = read_temp_raw()
    equals_pos = lines[1].find('t=')
    if equals_pos != -1:
        temp_string = lines[1][equals_pos+2:]
        temp_c = int(temp_string) / 1000.0 # TEMP_STRING IS THE SENSOR OUTPUT, MAKE SURE IT'S AN INTEGER TO DO THE MATH
        temp_c = str(round(temp_c, 1)) # ROUND THE RESULT TO 1 PLACE AFTER THE DECIMAL, THEN CONVERT IT TO A STRING
        return temp_c

#FAHRENHEIT CALCULATION
def read_temp_f():
    lines = read_temp_raw()
    while lines[0].strip()[-3:] != 'YES':
        time.sleep(0.2)
        lines = read_temp_raw()
    equals_pos = lines[1].find('t=')
    if equals_pos != -1:
        temp_string = lines[1][equals_pos+2:]
        temp_f = (int(temp_string) / 1000.0) * 9.0 / 5.0 + 32.0 # TEMP_STRING IS THE SENSOR OUTPUT, MAKE SURE IT'S AN INTEGER TO DO THE MATH
        temp_f = str(round(temp_f, 1)) # ROUND THE RESULT TO 1 PLACE AFTER THE DECIMAL, THEN CONVERT IT TO A STRING
        return temp_f

while True:

    lcd.cursor_pos = (0, 0)
    lcd.write_string("Temp: " + read_temp_c() + unichr(223) + "C")
    lcd.cursor_pos = (1, 0)
    lcd.write_string("Temp: " + read_temp_f() + unichr(223) + "F")
Well, that about covers most of what you’ll need to get started programming your LCD with Python. Try combining the programs to get some interesting effects. You can display data from multiple sensors by printing and clearing the screen or positioning the text. You can also make fun animations by scrolling custom characters.
If you have any problems or questions, just leave a comment below. And be sure to subscribe if you’d like to get an email notification when we publish new articles. Ok, talk to you next time!


thanks for your explanation, it has been a great help to verify my “programming” skills on the Raspberry Pi 2 & 3. Certainly not everybody will start from scratch reading all your contributions (like me).
I stumbled via a well known search engine into this wealth of great information and succesfully hacked my way through it. Perhaps you may want to add a hint that these scripts will only work with Python 2.7 and the pin allocation is neither BCM or GPIO but physical position ? Or did I miss something ?
Thanks again, hoping to find more attractive help from your webpages when I have made my next steps.
Jos
Glad you found it helpful! I’ll make it a little more clear that the pin numbers are the physical pin locations, not the BCM or GPIO numbers.
Many thanks for an excellent blog on how to set up an LCD display with a raspberry pi. I had tried 3 other “how to”s without success but following your well set out explanation I was able to get my LCD up and running without any hitches, first time!
Thanks a lot
Henry
great tutorial and video! I am attempting the same setup with an i2c interface module. The backlight illuminates, however the text does not display. Here are my configurations any suggestions are greatly appreciated.
https://fruanc.wordpress.com/2016/11/02/i2c-interface-module-w-16×2-lcd-connected-to-pi-zero/
Have you found the I2C address of your LCD? The code or library you’re running will probably have a line where you need to put the address of your LCD. It might look something like this: ADDRESS = 0x27
This tutorial might help:
https://www.circuitbasics.com/raspberry-pi-i2c-lcd-set-up-and-programming/
Print Date and Time on LCD does not work in Python 2.7. and PIXEL OS.
while True:
lcd.write_string(“Time: %s” %time.strftime(“%H:%M:%S”)) gives an error and no data is displayed on LCD.
Any help would be appreciated.
Peter
how to combine print date&time’s program and data from the sensor’s program.?
I have done the same setup but my lcd16x2 is displaying black blocks instead of displaying seven segment display..Plz suggest what should I do
tryng to light up the LCD I get
/usr/local/lib/python2.7/dist-packages/RPLCD/lcd.py:213: RuntimeWarning: This channel is already in use, continuing anyway. Use GPIO.setwarnings(False) to disable warnings.
GPIO.setup(pin, GPIO.OUT) — and the LCD stays dark
Any ideas
it is not working for me..i have checked connection twice…
Nice, i tried this and now are the pir sensors which i had connected broken…
It worked! Thanks for your help. Two problems:
1. It only works in 8 bit mode and displays “HelloWorld” not “Hello World” ie. although I included a space between the two words it does not display properly.
2. “Hello World” only works once! I have to completely reboot to enable it to run a second time.
Any hints?
getting error help me
Traceback (most recent call last):
File “DHT_LCD.py”, line 15, in
lcd = CharLCD(cols=16, rows=2, pin_rs=37, pin_e=35, pins_data=[33, 31, 29, 23])
File “/usr/local/lib/python2.7/dist-packages/RPLCD/__init__.py”, line 14, in __init__
super(CharLCD, self).__init__(*args, **kwargs)
File “/usr/local/lib/python2.7/dist-packages/RPLCD/gpio.py”, line 95, in __init__
‘must be either GPIO.BOARD or GPIO.BCM’ % numbering_mode)
ValueError: Invalid GPIO numbering mode: numbering_mode=None, must be either GPIO.BOARD or GPIO.BCM
EVEN i AM GETTING THE SAME ERROR
Try This:
from RPLCD import CharLCD
from RPi import GPIO
lcd = CharLCD(numbering_mode=GPIO.BOARD,cols=16, rows=2, pin_rs=37, pin_e=35, pins_data=[33, 31, 29, 23])
lcd.write_string(u’Hello world!’)
Don’t Forget the second line import GPIO !
I had this problem too, wheere it says lcd = CharLCD(cols=16, rows=2, pin_rs=37, pin_e=35, pins_data=[33, 31, 29, 23]) add into it
numbering_mode=GPIO.BOARD so then it will look like this lcd = CharLCD(numbering_mode=GPIO.BOARD, cols=16, rows=2, pin_rs=37, pin_e=35, pins_data=[33, 31, 29, 23])
You can try:
from RPLCD.gpio import CharLCD
from RPi import GPIO
lcd = CharLCD(cols=16, rows=2, pin_rs=15, pin_rw=18, pin_e=16, pins_data=[21, 22, 23, 24], numbering_mode=GPIO.BOARD)
lcd.write_string(‘Hello world’)
It is not working
In /usr/local/lib/python2.7/dist-packages/RPLCD/gpio.py change “numbering_mode” from “none” to “GPIO.BOARD”
I tried to change but not able to save the same, getting error “File not writable”
Please help
It is showing me error number 13:permission denied
run it as sudo, like:
sudo python file.py
it’s coz u r trying to interact with the hardware
Thank you. it works.
any success? i am getting the same error :/
This article will assist the internet people for building up new web site or even a weblog from start
to end.
I wrote a program for raspberry Pi 3:
from RPLCD import CharLCD
import time
while True:
lcd = CharLCD(cols=16, rows=2, pin_rs=24, pin_e=26, pins_data=[32, 36, 38, 40])
lcd.write_string(u”Hello World”)
time.sleep(1)
lcd.clear()
I am getting below error with that program and my LCD screen is constantly blank without any text:
Traceback (most recent call last):
File “./IRsensors.py”, line 208, in
lcd = CharLCD(cols=16, rows=2, pin_rs=24, pin_e=26, pins_data=[32, 36, 38, 40])
File “/usr/local/lib/python2.7/dist-packages/RPLCD/__init__.py”, line 14, in __init__
super(CharLCD, self).__init__(*args, **kwargs)
File “/usr/local/lib/python2.7/dist-packages/RPLCD/gpio.py”, line 95, in __init__
‘must be either GPIO.BOARD or GPIO.BCM’ % numbering_mode)
ValueError: Invalid GPIO numbering mode: numbering_mode=None, must be either GPIO.BOARD or GPIO.BCM
Please help me fix it
Hi. In the latest version, the numbering mode must be explicitly specified.
First, use `import RPi.GPIO as GPIO`.
Then either add `numbering_mode=GPIO.BOARD` or `numbering_mode=GPIO.BCM` to the arguments when creating the CharLCD instance. The numbering mode is important, search on Google/DuckDuckGo to learn about the differences between the two numbering modes.
I don’t know if someone suffered deciding using Python3. I did it, the solution is
instead of use:
sudo apt-get install python-pip
sudo pip install RPLCD
try with:
sudo apt-get install python3-pip
sudo pip3 install RPLCD
Thanks, Edgar. Your recomendations are very useful. My code began working correctly after installing new pip version. For Python 3 to all commands should add number “3”.
Have you used lcd’s assembled with trackpads? Do you have a tutorial on how to use these types of lcds with raspberry pi?
Thank you
I did everything but it is showing an error about setting the GPIO numbering mode
It works!
import RPLCD as RPLCD
from RPLCD import CharLCD
import RPi.GPIO as GPIO
lcd=CharLCD(cols=16, rows=2, pin_rs=26, pin_e=19, pins_data=[13, 6, 5 ,11], numbering_mode=GPIO.BCM)
lcd.write_string(u’Hello world!’)
I have been searching for information on locxal
business lisitng and found this site. Very useful information !
I would like to introduce a website https://businesslistingtips.wordpress.com/ whicdh
also provides tips on local business listing.
I need more suggestion from great people here.
Thanks!
Hi
Thanks for writing this tutorial!
Last summer I released version 1.0.0 which changed a few APIs. Most notably, the enums like CursorMode or ShiftMode have been removed in favor of string based APIs. The full changelog is here: https://github.com/dbrgn/RPLCD/blob/master/CHANGELOG.md
It would be great if you could either add a note that people should `pip install RPLCD==0.9.0` or if you could update the tutorial :)
Thanks,
Danilo
I do not even know how I ended up right here, however I assumed this put up was once good.
I do not realize who you’re but certainly you’re
going to a famous blogger if you happen to are not already.
Cheers!
Wow! I hadn’t considered all that. Your blog post very is thought-provoking as well as it inspired me
to think in different ways. Great job. Please visit my blog about DPR Korea.
i have some error. pleasew help
Traceback (most recent call last):
File “lcd.py”, line 2, in
lcd = CharLCD(cols=16, rows=2, pin_rs=37, pin_e=35, pins_data=[33, 31, 29, 23])
TypeError: this constructor takes no arguments
Can you post the first line of your lcd.py file? How do you import CharLCD?
It should be “from RPLCD.gpio import CharLCD” if you use GPIO (parallel) mode
thank you it is work !!!
Traceback (most recent call last):
File “lcd5.py”, line 2, in
lcd = CharLCD(cols=16, rows=2, pin_rs=37, pin_e=35, pins_data=[33, 31, 29, 23])
TypeError: this constructor takes no arguments
what is the error?
After reading this tutorial and having to hack together stuff from the comments… Here’s what I have working for Python 3…
to install use:
sudo apt-get install python3-pip
sudo pip3 install RPLCD
then…
import RPLCD as RPLCD
from RPLCD.gpio import CharLCD
import RPi.GPIO as GPIO
import time
GPIO.setwarnings(False)
lcd = CharLCD(numbering_mode=GPIO.BCM, cols=16, rows=2, pin_rs=25, pin_e=24, pins_data=[23, 17, 18, 22])
lcd.clear()
lcd.write_string(‘Hello World!!’)
time.sleep(2)
lcd.clear()
print(‘LCD CLeared’)
You’ll have to change the pin numbers of course, but that finally got things working for me.
Good luck!
am New for Raspberry pi, Just Beginner, i have already Tryed 16*4 Display with raspberry – not sucess, now try this code and muthed, any specific Brands 16*4 display only will work
or all 16*4 display will work ?
is Possible to use 16 x 4 Display with 4 bit mode operation ?
I get this warning message
/usr/local/lib/python2.7/dist-packages/RPLCD/gpio.py:132: RuntimeWarning: This channel is already in use, continuing anyway. Use GPIO.setwarnings(False) to disable warnings.
GPIO.setup(pin, GPIO.OUT)
This is my program
import RPLCD as RPLCD
from RPLCD.gpio import CharLCD
import RPi.GPIO as GPIO
lcd = CharLCD(cols=16, rows=2, pin_rs=37, pin_e=35, pins_data=[33, 31, 29, 23], numbering_mode=GPIO.BOARD)
lcd.write_string(‘Hello world!’)
Maybe something wrong with library? Thanks.
hi
I want display distance data from the HC-RS04 ultrasonic sensor.I have combined the sensor code with LCD code. I can print distance data but I can not display distance data on LCD. my code work to display massage but it can not display data. I have also tried to convert the data but it steel not work. the data is float (in decimal) I convert it to int.
lcd_write_string(int(distance data))
I tried also the following code:
lcd_write_string(str(int(distance data)))
it doesnt work!
Any help???
Do you see any error message when running the code?
Did you wire up the LCD correctly?
Maybe check out https://rplcd.readthedocs.io/en/stable/ and go through the “getting started” guide.
The data displays as array. I mean the data displays continuously in the both row on the display
For Ex. The distance data on display locks like this:
234cm456cm654cm543cm876cm
I want the data changes in same position
234 cm
456 cm
654 cm
….
Then you need to reset the cursor position with the `cursor_pos` property, or by using `home()`.
Please read the docs! They should describe all you need to know. If something isn’t clear from the docs, open an issue on Github. https://rplcd.readthedocs.io/en/stable/usage.html
Traceback (most recent call last):
File “lcd1.py”, line 2, in
lcd = CharLCD(cols=16, rows=2, pin_rs=37, pin_e=35, pins_data=[33, 31, 29, 23])
TypeError: this constructor takes no arguments
I’m using number_mode=GPIO.BCM and Hello World works fine. The IP printout gets an error:
struct.error: argument for ‘s’ must be a bytes object
RPLCD fail to import CursorMode
The CursorMode has been removed 2 years ago. See https://www.circuitbasics.com/raspberry-pi-lcd-set-up-and-programming-in-python/#li-comment-22837.
Please read the docs (https://rplcd.readthedocs.io/en/stable/) on how to use RPLCD.
How can i display the content of an email into the LCD screen ? Can anyone help?
Hi,while trying to set up the LCD on the Raspberry pi 3 B+ modell i get these message when i enter the command:
sudo pip install RPLCD
message i get:Requirement already satisfied:RPLCD in /usr/local/lib/python2.7/dist-packages. So i can,t get the temperatures displayed on the Lcd. Please how can i fix this problem.
I get this, please help!
Traceback (most recent call last):
File “test.py”, line 2, in
lcd = CharLCD(cols=20, rows=4, pin_rs=37, pin_e=35, pins_data=[40, 38, 36, 32, 33, 31, 29, 23])
TypeError: this constructor takes no arguments
from RPLCD.gpio import CharLCD
import RPi.GPIO as GPIO
lcd = CharLCD(numbering_mode=GPIO.BOARD, cols=16, rows=2, pin_rs=37, pin_e=35, pins_data=[33, 31, 29, 23])
lcd.write_string(‘Hello World.’)
For my problem below, I added the 2 lines:
from RPLCD.gpio import CharLCD
import RPi.GPIO as GPIO
and now I get invalid syntax in the 2nd line at ‘as’ above.
Thanks
Ignore ths above post as I had a typo in the 2nd line, and still get the same mumbering error as below
I ran the python code for ‘Print Data from a sensor’ in Thonny, and I get this error:
Run TempC.py
Traceback (most recent call last):
File “/home/pi/Downloads/TempC.py”, line 6, in
lcd = CharLCD(cols=16, rows=2, pin_rs=37, pin_e=35, pins_data=[33, 31, 295, 23])
File “/usr/local/lib/python3.5/dist-packages/RPLCD/__init__.py”, line 14, in __new__
return GpioCharLCD(*args, **kwargs)
File “/usr/local/lib/python3.5/dist-packages/RPLCD/gpio.py”, line 114, in __init__
‘for more details.’ % numbering_mode)
ValueError: Invalid GPIO numbering mode: numbering_mode=None, must be either GPIO.BOARD or GPIO.BCM.
See https://gist.github.com/dbrgn/77d984a822bfc9fddc844f67016d0f7e for more details.
I have tried the GPIO numbers on the board: rs=26, e=19, and data pins: 13, 6, 5, 11
but I still get the same error.
Thanks
I had another typo in the line beginning with lcd=, which I corrected and now I get this:
Traceback (most recent call last):
File “/home/pi/Downloads/TempC.py”, line 8, in
lcd = CharLCD(cols=16, rows=2, pin_rs=37, pin_e=35, pins_data=[33, 31, 29, 23])
File “/usr/local/lib/python3.5/dist-packages/RPLCD/gpio.py”, line 114, in __init__
‘for more details.’ % numbering_mode)
ValueError: Invalid GPIO numbering mode: numbering_mode=None, must be either GPIO.BOARD or GPIO.BCM.
See https://gist.github.com/dbrgn/77d984a822bfc9fddc844f67016d0f7e for more details.
Why please.
I did, but could not edit my post, thanks
I have that that there were other errors in the code and I have had to # them out:
#os.system(‘modprobe w1-gpio’)
#os.system(‘modprobe w1-therm’)
Also another error here:
device_folder = glob.glob(base_dir + ’28*’)[0]
device_file = device_folder + ‘/w1_slave’
which I changed to
device_folder = glob.glob(base_dir + 00**)[0]
device_file = device_folder + ‘/w1_bus_master1’
for my system.
I know this is for the DS18B20 sensor, but I am trying to get a BMP280 sensor to work, but it is not defined.
So I added:
import board
and now get other errors about numbering mode and
GPIO.setmode(self.numbering_mode)
Value error: a different mode has already been set!
Hi, nice projects :)
i can base your page to make the same projects but with banana pi?
thank you
Why show me error:-
lcd = CharLCD(cols=16,rows=2,pin_rs=37, pin_e=35, pins_data=[33, 31, 29, 23])
TypeError: this constructor takes no arguments
Why show me error:–
lcd = CharLCD(cols=16,rows=2,pin_rs=37, pin_e=35, pins_data=[33, 31, 29, 23])
TypeError: this constructor takes no arguments
framebuffer = [
”,
”,
]
def write_to_lcd(lcd, framebuffer, num_cols):
lcd.home()
for row in framebuffer:
lcd.write_string(row.ljust(num_cols)[:num_cols])
lcd.write_string(‘\r\n’)
from RPLCD import CharLCD
lcd = CharLCD(cols=16, rows=2, pin_rs=37, pin_e=35, pins_data=[33, 31, 29, 23])
write_to_lcd(lcd, framebuffer, 16)
import time
long_string = ‘This string is too long to fit’
def loop_string(string, lcd, framebuffer, row, num_cols, delay=0.5): #DELAY= CONTROLS THE SPEED OF SCROLL
padding = ‘ ‘ * num_cols
s = padding + string + padding
for i in range(len(s) – num_cols + 1):
framebuffer[row] = s[i:i+num_cols]
write_to_lcd(lcd, framebuffer, num_cols)
time.sleep(delay)
while True:
loop_string(long_string, lcd, framebuffer, 1, 16)
hello circuit basics i love the work u guys do.
i try testing my lcd but i the code did not run i got and error.
/usr/bin/ld: /tmp/cc3K9Tzg.o: in function `main’:
lcdtest.c:(.text+0x68): undefined reference to `lcdInit’
/usr/bin/ld: lcdtest.c:(.text+0x78): undefined reference to `lcdPuts’
collect2: error: ld returned 1 exit status
hello i love the work u guys do
i tried tedting my lcd but i got errors
/usr/bin/ld: /tmp/cc3K9Tzg.o: in function `main’:
lcdtest.c:(.text+0x68): undefined reference to `lcdInit’
/usr/bin/ld: lcdtest.c:(.text+0x78): undefined reference to `lcdPuts’
collect2: error: ld returned 1 exit status
Nice tutorial. It’s quite complete. I had to deal with the newer .BCM mode, but it’s working great. I only implemented the contract pot. Will the backlight pot turn off the display off completely? I’d like to programatically turn the display on/off. I think I’ll need a little more circuitry.
I am getting this error, any ideas?
lcd.write_string(‘Hello World!’)
^
SyntaxError: invalid character in identifier