Logical operators give you another element of control over the flow of your program. Also known as Boolean operators, they can be very powerful when used inside the condition of an if statement or while loop. In this article we will discuss the three most common logical operators – AND, OR, and NOT.

We’ll also see how to use logical operators in conditional statements to test multiple variables for a condition at the same time. Finally we will look at a practical example that uses a logical operator to oscillate the voltage state of a digital pin on the Arduino.
Watch the video for this tutorial here:
The AND Logical Operator
The AND logical operator evaluates two variables and returns a true value only when both variables are true. It’s written with two ampersands (&&).
The easiest way to visualize logical operations is with a truth table. This truth table shows how the AND operator works:
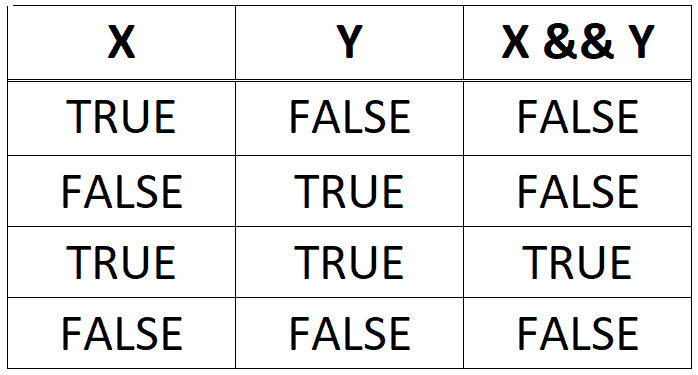
Say we have two variables, x and y. If x is true and y is false, the outcome of the AND operator is false. Similarly, if x is false and y is true, the outcome is false. And if both x and y are false, the outcome is false.
Only when both x and y are true, does the outcome of AND become true. So how can we use this? Say we want to make an if statement that is only executed when two variables are less than five. We would use the AND operator in the condition of an if statement like this:
if(x<5 && y<5) {
}
The condition will only be true when x is less than five and y is less than five. You can have as many AND operators in a condition as you want. Using multiple AND operators in a conditional statement allows you to test many variables at the same time. The conditional statement will only execute when all of them are true.
The OR Logical Operator
The OR operator is written with two vertical bars (||).
The vertical bar key is usually found above the Enter key on most keyboards. With the OR operator, if any of the variables are true, the outcome will be true. This is a truth table for the OR operator:
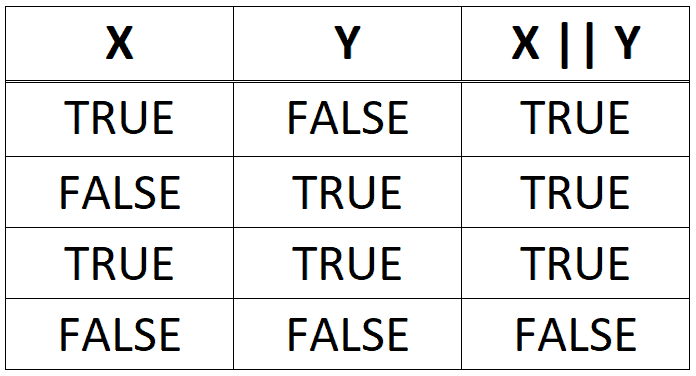
If x is true and y is false, the outcome will be true. If x is false and y is true, the outcome will still be true. If both x and y are true, the outcome will also be true. Only if both x and y are false will the outcome be false.
It only takes one of the variables to be true for the outcome to be true. For example, using the OR operator in the condition of an if statement like this:
if(x<5 || y<5) {
}
The condition will be true if either x is less than five, or y is less than five. So if any variable is less than five, the condition will be true and the code in the body of the if statement will be executed. You can have as many OR operators as you want in a conditional statement, allowing for multiple variables to be tested at the same time.
The NOT Logical Operator
The NOT operator is written with an exclamation point (!).
The NOT operator makes a true statement false, and a false statement true:
- !true = false
- !false = true
The NOT operator can be used to exclude a number or variable in a condition. For example, if you need an if statement to execute on every value of x except the number five, you could write the condition like this:
if(x != 5) {
}
The NOT operator can be used in other places too, for example to switch the voltage state of a digital pin. Take a look at the standard Arduino code for switching the voltage state of a digital pin (pin 13) high and low:
digitalWrite(13, HIGH);
  delay(1000);
  digitalWrite(13, LOW);
  delay(1000);
With a NOT operator, this code can be reduced to just two lines:
digitalWrite(13, !digitalRead(13));
delay(1000);
Here we use digitalRead(13) with a NOT operator in front of it. With this code, the Arduino will first read the voltage state of pin 13. If pin 13 is high, digitalRead(13) will return a high value. The NOT operator makes the high value low, so the digitalWrite() function will switch pin 13 to a low voltage state.
The next time through the loop, the digitalRead() function will measure a low value at pin 13. But the NOT operator makes the argument in the digitalWrite() function high. So pin 13 is set to a high voltage state.
This makes pin 13 alternate between high and low voltage states. You can test it by connecting an LED to pin 13. The LED should blink on and off once per second.
Thanks for reading! If you have a question about anything, feel free to leave a comment below.