Radio frequency identification (RFID) devices are an essential part of almost all physical security systems. RFID cards and card readers are used to restrict access to buildings or rooms. In this context, the RFID card stores a unique identification number that is wirelessly detected by a RFID card reader attached to a wall. If the RFID card’s identification number matches an identification number from a stored list of authorized cards, the door is unlocked and the cardholder can enter the room.

RFID devices operate at high-frequency from 3MHz to 30MHz. But most RFID devices usually operate at 13.56MHz.
In this tutorial, we will use the RC522 RFID card reader and the Raspberry Pi to trigger a 5V relay when an RFID card’s identification number matches a number stored on the Raspberry Pi.

How RFID Card Readers and Writers Work
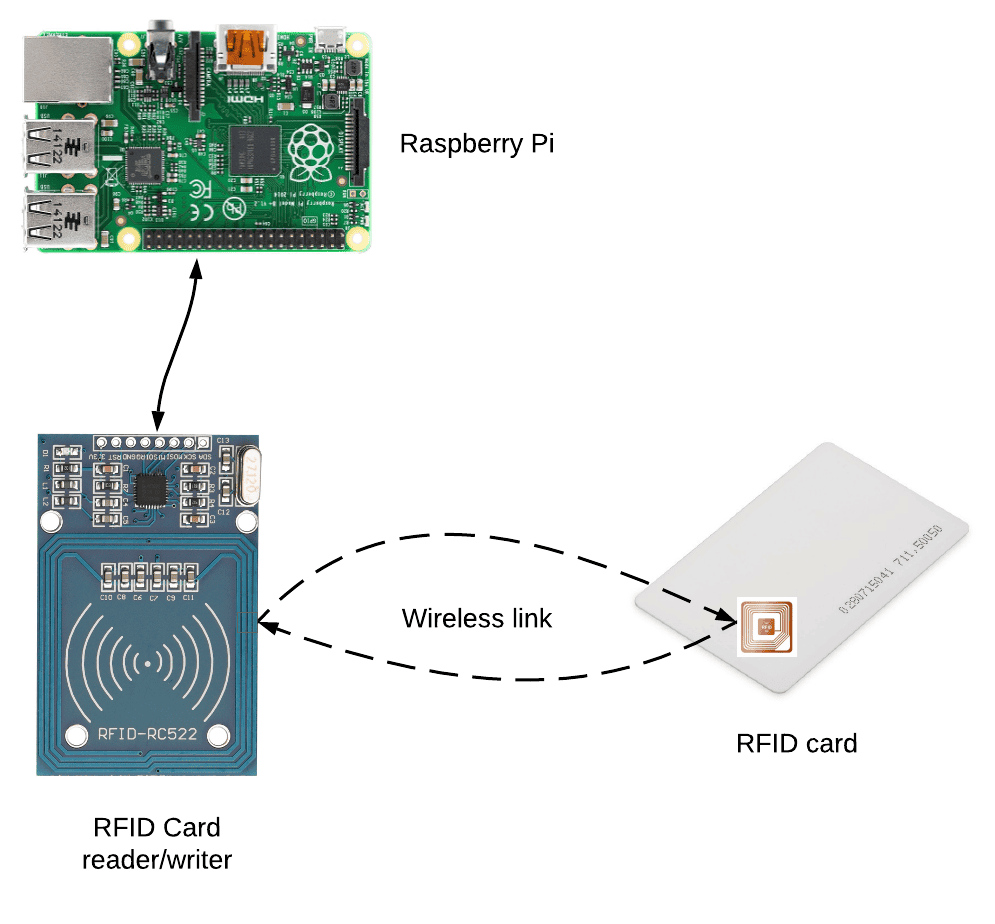
The RFID system we are going to build in this tutorial comprises three components: a Raspberry Pi, an RFID card reader, and an RFID card:
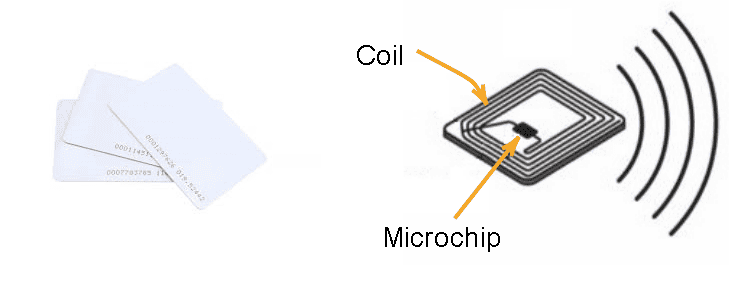
All RFID cards and tags have two components – an IC that stores the unique identification number and a coil of wire that acts as the radio frequency antenna:
The RFID card reader also has a coil of copper wire. This coil creates a magnetic field when a current flows through it. When the RFID card is placed near the card reader, the magnetic field from the card reader induces a current in the card’s wire coil. This current is enough to power the card’s onboard IC. The card reader can then read the unique identification number on the card. The card’s identification number is then transmitted from the card reader to a microcontroller or microprocessor like the Raspberry Pi.
The RFID card reader we are going to use can also write identification information to RFID cards or tags. This is useful for creating new RFID cards.
How to Connect the RFID Card Reader/Writer to the Raspberry Pi
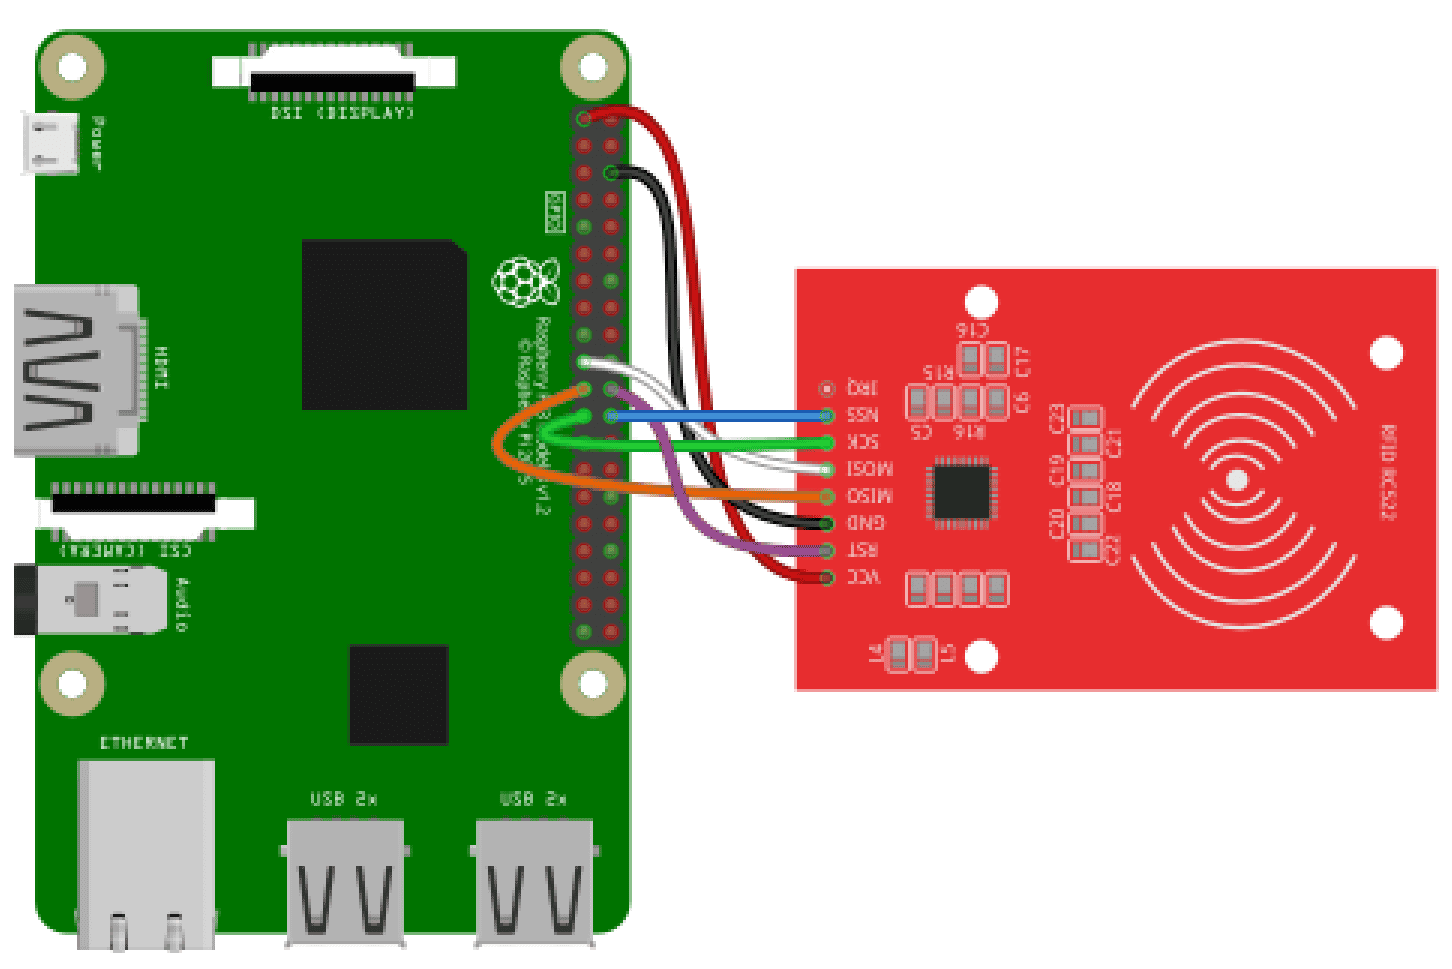
We will use SPI to interface the Raspberry Pi with the RFID card reader.
These are the parts you will need:
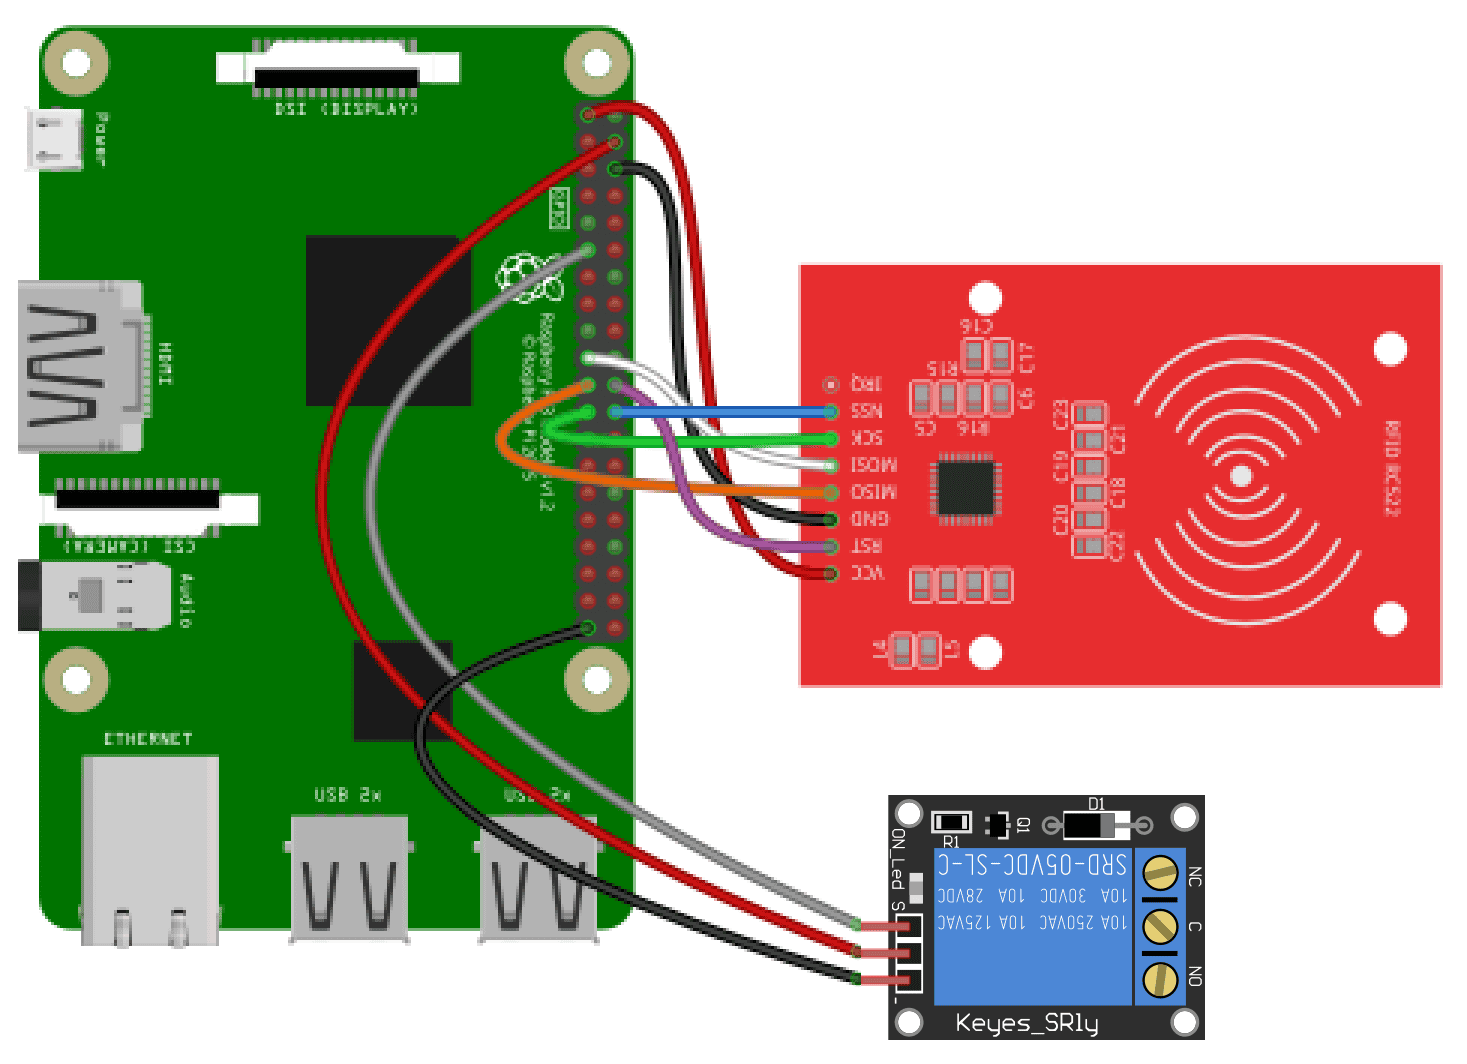
Follow the wiring diagram below to connect the RFID card reader to the Raspberry Pi:
How to Program the RFID Card Reader with Python
Before we get started programming, make sure the SPI interface is enabled on your Raspberry Pi. You also need to install pip3 with this command:
sudo apt-get -y install python3-pipThen, install the MFRC522 Python library with the following command:
sudo pip3 install mfrc522Code to Read the RFID Card
Our first step will be to read the information on the RFID card. To do this, connect the components as shown in the diagram above. Then, create a Python file rfidReader.py and paste the following code.
import RPi.GPIO as GPIO
from mfrc522 import SimpleMFRC522

rfid = SimpleMFRC522()

while True:
        id, text = rfid.read()
        print(id)
        print(text)
First, we import the necessary modules. Then we use rfid = SimpleMFRC522() to create a new object which we will call RFID. To read the RFID card date, we call the read() function and store its output in the variables id and text.
Finally, we print the ID and text of the card to the terminal with print(id) and print(text), respectively.
We have placed this code in an infinite loop, which means that the Raspberry Pi will continuously read the output from the RFID module.
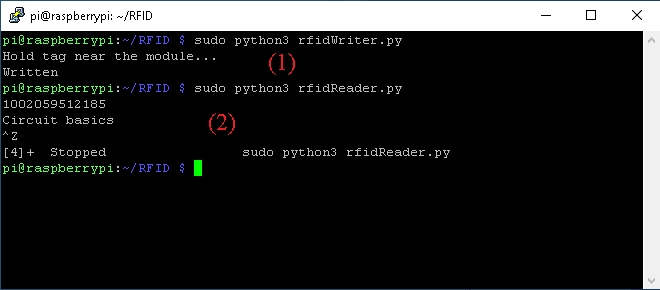
Run the Python code above by entering the command sudo python3 rfidReader.py in the terminal.
You should see something like this being printed to the terminal:
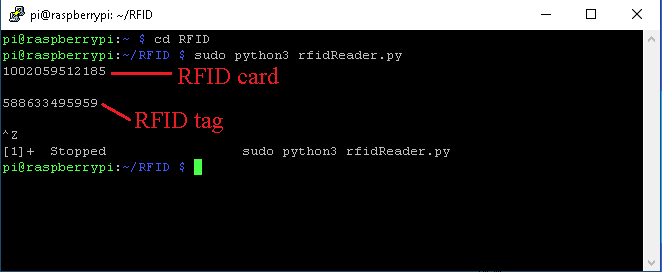
This tells us that our RFID card has the ID 1002059512185 while the RFID tag has the ID 588633495959.
Code to Write to the RFID Card
To write information on the RFID card, we use another method of the RFID object: rfid.write(). We can see how this works in the code below. We create a file called rfidWriter.py and paste the code below.
import RPi.GPIO as GPIO
from mfrc522 import SimpleMFRC522

rfid = SimpleMFRC522()

try:
        print("Hold tag near the module...")
        rfid.write("Circuit basics")
        print("Written")
finally:
        GPIO.cleanup()
A notable difference between rfidReader.py and rfidWriter.py is that we do not have a while loop in the latter. This is mainly because we do not want to write the same information on different cards. So we execute the code above as many times as we want to write to different cards. Everything else stays the same, except that we invoke the rfid.write("Circuit basics") when we bring the card closer to the RFID writer. In this case, we write the string Circuit basics to the card.
To see if this operation has been successful, we read the information on the RFID card by re-running the sudo python3 rfidReader.py command. The output should be the same as shown below.
5V Relay Controlled by an RFID Card
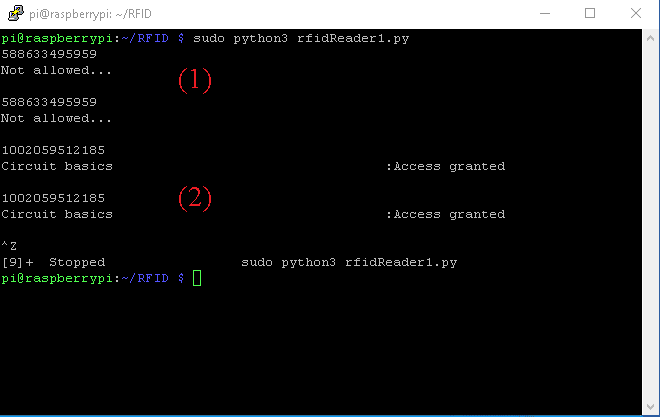
Finally, we will use the card’s unique ID number to trigger a 5V relay when a card with a registered ID is detected.
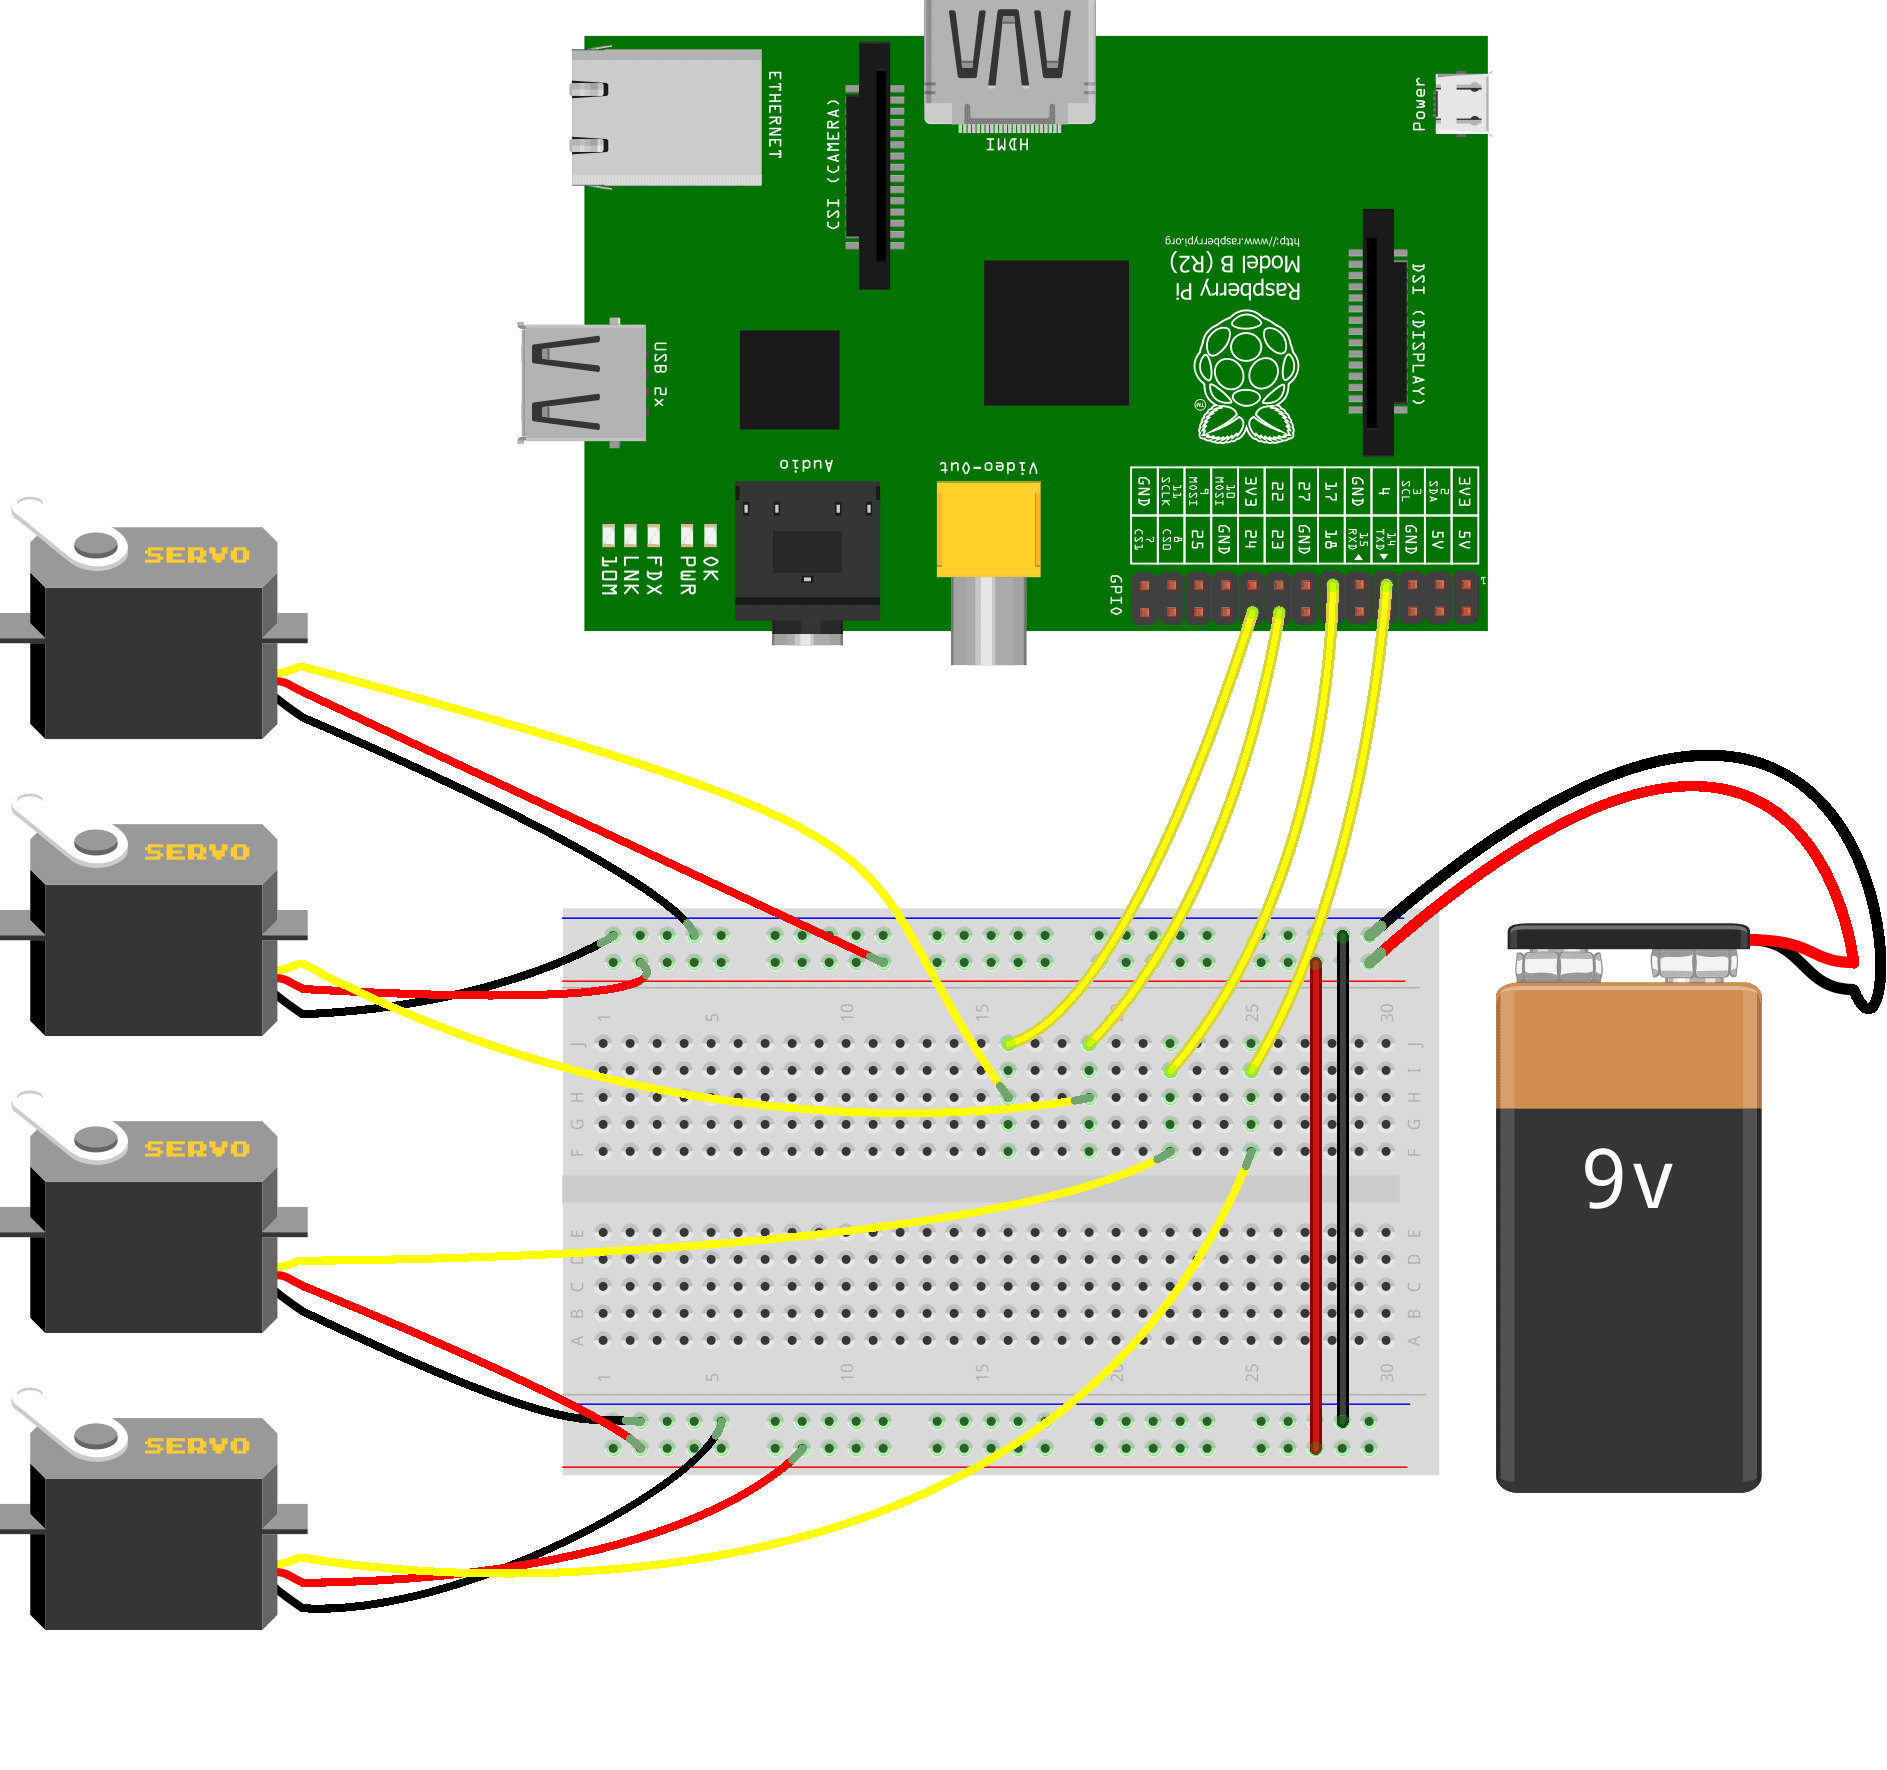
Once you have all of the parts, connect the circuit like this:
Then, run the following Python code on the Raspberry Pi:
import RPi.GPIO as GPIO
from mfrc522 import SimpleMFRC522
import time

GPIO.setwarnings(False)
GPIO.setmode(GPIO.BCM)
GPIO.setup(17, GPIO.OUT)

rfid= SimpleMFRC522()
channel = 17

def relay_on(pin):
    GPIO.output(pin,GPIO.HIGH)

def relay_off(pin):
    GPIO.output(pin,GPIO.LOW)

while True:
      id, text = rfid.read()
      print(id)

      if id == 1002059512185:
        relay_on(channel)
        print(text+":Access granted")
        time.sleep(5)
        relay_off(channel)

      else:
        relay_off(channel)
        print("Not allowed...")
Code Description
Instead of using the LED library to control the GPIO, we declare GPIO pin 17 as an output (GPIO.setup(17, GPIO.OUT)) and we write two functions that turn ON and OFF our output pin: relay_on(pin) and relay_off(pin), respectively. We modify the original rfidReader.py to constantly check the ID of each detected card using the line if id == 1002059512185. If the ID of the detected card matches with the ID in our program, we switch ON the relay; otherwise, we keep it OFF.
Hope this helps you get started using RFID card readers and writers on the Raspberry Pi. They really are very useful devices! Leave a comment below if you have any questions.

Hello,
My name is Rashelle Azaula and I am an Computer Engineering student creating a project for my Senior Design class, and I am inquiring to see if my team and I can use your diagram that consists of the Raspberry Pi connecting to the RFID card? We will be sure to put you as our reference. Thank you so much and look forward to hearing from you.
Regards,
Rashelle Azaula