
In microcontroller systems where resources are constrained, developers invest a lot of time and resources to produce efficient code. The main objective is to improve the overall performance of the system. The article we present here explores various techniques to optimize our Arduino code. We categorize these techniques into general techniques and advanced techniques. We will give a general description of each method, and then we will take a look at some examples.

In the context of Arduino programming, code optimization is a method of improving the code to produce an efficient program. The idea is to improve certain aspects of the program, such as program size, memory consumption, execution time, throughput, and power consumption. Ideally, an optimized program is smaller in format, consumes less memory, has a lower execution time, and consumes less power. These are important design considerations that should be taken into account when writing code for the application in resource-constrained embedded systems. But the most crucial parameter of code optimization is that its output must be the same as the output of the non-optimized code.
Considerations in Optimizing Code
There are a few factors, however, which developers should consider before optimizing their code. One of the biggest challenges is to know what and when to optimize. For example, if the problem statement is to develop an Arduino program for monitoring the level of water in a tank, optimization is unnecessary because you are not likely to exceed the Arduino’s limits in any way. Furthermore, the process of code optimization costs money and time. Therefore, you should optimize the code that really needs optimization.
Having said that, if other solutions such as using a bigger Arduino are not feasible, then you can consider code optimization as an option for your project. In this article, the author will focus on techniques for optimizing code on the popular Arduino Uno. The methods we are going to discuss here can also be applied to other Arduino boards.
Why Optimizing Code is Important
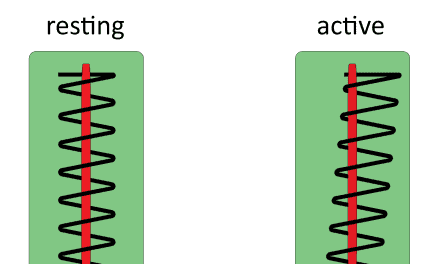
We learned in the previous article that some data is created when executing an Arduino program. This data is related to function calls and interrupt routines. Problems may arise when the sketch or the generated data require more space than the designated size. When this happens, the Arduino program may fail in different ways. Hence, there is a need to optimize the code and avoid a situation as shown in the diagram (b) below.

As we have mentioned earlier in this article, code optimization produces faster code. This result is not only necessary for performing calculations but also for executing input-output operations. For instance, these operations may include communicating with external sensors or merely updating the status of the analog and digital pins. It is necessary for applications that demand tighter control or applications which require faster feedback loops, such as automatic control systems.
In short, these are the benefits of optimizing your Arduino code:
- Code runs faster
- Better code readability
- Code maintenance
- Saves memory
Techniques for Code Optimization
The diagram below shows the different techniques developers use to optimize their code on the Arduino. Some of the techniques are language-independent, and some are tailored to work only on the Arduino.
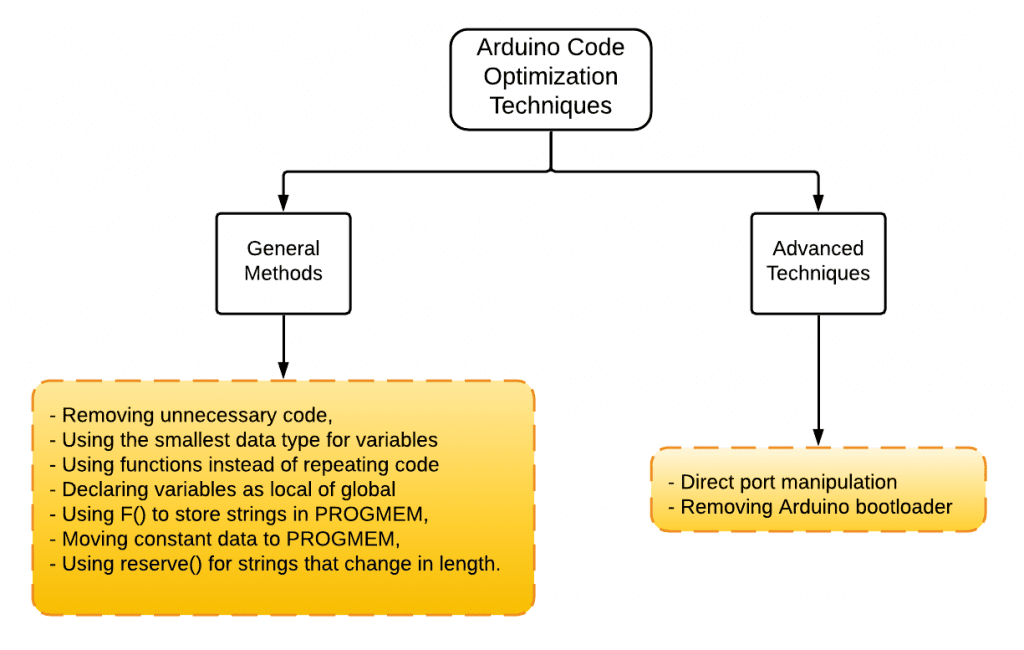
Removing Unnecessary Code
Unnecessary code in this context refers to any unused functions, libraries, or variables that you may have included in your sketch. Even though they are not used in the sketch, they still occupy some space in memory. Therefore, it is necessary to remove such dead code in your sketch to free up some memory. It is simple to check for any unused variables in your sketch; here is an example.
void setup() {
  pinMode(LED_BUILTIN, OUTPUT);
  int myPin = 10;
}

void loop() {
  digitalWrite(LED_BUILTIN, HIGH);
  delay(500);
  digitalWrite(LED_BUILTIN, LOW);
  delay(500);
}
The unused integer variable (myPin), flags a warning in the message section of the Arduino IDE as shown below, and you can remove the unused variable.
C:\Users\Dell\Documents\Arduino\sketch_may28a\sketch_may28a.ino: In function 'void setup()':
C:\Users\Dell\Documents\Arduino\sketch_may28a\sketch_may28a.ino:7:7: warning: unused variable 'myPin' [-Wunused-variable]

   int myPin = 10;
       ^~~~~
Using Smaller Data Types
In the context of computer programming, a variable is a way of naming and storing a value in memory for later use. It consists of a type, a name and optionally, an initial value. Primarily, we need to understand the data types for representing variables in an Arduino sketch.
| Data Type | Size (bits) | Values |
| bool | 8 | 1 or 0 |
| char | 8 | -128 to127 |
| unsigned char, byte | 8 | 0 to 255 |
| short, int | 16 | -327768 to 32767 |
| unsigned int, word | 16 | 0 to 65535 |
| long | 32 | -2147483648 to 2147483648 |
| unsigned long | 32 | 0 to 4294967295 |
| float, double | 32 | 1.175e-38 to 3.402e38 |
As we can see from the table above, different data types have different sizes. Therefore, one should always use a data type that has the smallest range to accommodate the data. It is also advantageous to have a rough idea of the scope of your data because using more extensive data types results in a larger sketch size.
Using Functions Instead of Repeating Code
We can demonstrate this principle by using an example of an SOS Morse Code distress signal. Three dots represent S, and O is represented by three dashes. So, SOS in Morse Code will be 3 dots, 3 dashes, and 3 dots. In our implementation, each dot is 250 milliseconds long, and each dash is 1000 milliseconds long. This is a perfect example since the Morse Code contains code that repeats at regular intervals.
void setup()
{
  pinMode(LED_BUILTIN, OUTPUT);
}

void loop()
{
  digitalWrite(LED_BUILTIN, HIGH);
  delay(250);
  digitalWrite(LED_BUILTIN, LOW);
  delay(250);
  digitalWrite(LED_BUILTIN, HIGH);
  delay(250);
  digitalWrite(LED_BUILTIN, LOW);
  delay(250);
  digitalWrite(LED_BUILTIN, HIGH);
  delay(250);
  digitalWrite(LED_BUILTIN, LOW);
  delay(250);
  digitalWrite(LED_BUILTIN, HIGH);
  delay(1000);
  digitalWrite(LED_BUILTIN, LOW);
  delay(250);
  digitalWrite(LED_BUILTIN, HIGH);
  delay(1000);
  digitalWrite(LED_BUILTIN, LOW);
  delay(250);
  digitalWrite(LED_BUILTIN, HIGH);
  delay(1000);
  digitalWrite(LED_BUILTIN, LOW);
  delay(250);
  digitalWrite(LED_BUILTIN, HIGH);
  delay(250);
  digitalWrite(LED_BUILTIN, LOW);
  delay(250);
  digitalWrite(LED_BUILTIN, HIGH);
  delay(250);
  digitalWrite(LED_BUILTIN, LOW);
  delay(250);
  digitalWrite(LED_BUILTIN, HIGH);
  delay(250);
  digitalWrite(LED_BUILTIN, LOW);
  delay(250);
  delay(3000);
}
This can be re-written as:
void setup()
{
  pinMode(LED_BUILTIN, OUTPUT);
}

void loop()
{
  dot(); dot(); dot();
  dash(); dash(); dash();
  dot(); dot(); dot();
  delay(3000);
}

void dot()
{
  digitalWrite(LED_BUILTIN, HIGH);
  delay(250);
  digitalWrite(LED_BUILTIN, LOW);
  delay(250);
}

void dash()
{
  digitalWrite(LED_BUILTIN, HIGH);
  delay(1000);
  digitalWrite(LED_BUILTIN, LOW);
  delay(250);
}
Using functions for this problem results in about 200 bytes of memory savings. This is mainly because a single instance of the function is created in memory. And when the function is called again, the CPU loads the code again from its location in memory, without having to re-create the variables.
Using Local Variables Instead of Global Variables
For us to understand the benefits of using local variables, we need to know how the Arduino treats the local and global variables. But firstly, a variable is called a Global Variable if it is declared before the setup() and loop() functions. While a Local Variable is a variable that we can maintain and call within a function.
A global variable can be accessed by any function within the sketch, whereas a local variable is only visible within that function only. The effects of these variables on the functionality of the program are beyond the scope of this article since we are only interested in the potential performance issues of global versus local variables.
Heap Versus Stack
Global variables are allocated to the heap, while the local variables are allocated to the stack. The difference between these two locations is the speed of access, or generally, the number of machine instructions required to complete a task. Because of the different architectures of these two systems, the stack has higher access times compared to the heap. As a result, it is faster to access local variables than global variables.
Since global variables are declared before any function, this means that they are assigned only once. This value is kept for the entire duration of your program, whereas the local variables are allocated when your application executes a particular function. That value is then deallocated when the program completes executing the function. This means that the size of the global variables remain the same throughout your program, while the capacity of local variables varies.
To conclude, we can use local variables to optimize the Arduino code since the speed of access, and memory size directly affects the overall performance of the Arduino. In the future, we hope to investigate the effect of Dynamic Memory Allocation on the performance of the Arduino code.
F() Strings
Printing a lot of strings on the serial monitor or to an LCD display consumes a lot of RAM. To save the precious RAM, such strings can be saved on the Flash memory instead. To achieve this, the Arduino employs the F() macro. This simple, yet powerful solution forces the compiler to put the enclosed string in PROGMEM. Here is an example: Serial.print("Optimizing Code");
We can represent this code as: Serial.print(F("Optimizing Code"));
Including such a macro on these two words "Optimizing Code" , can save as much as 16 bytes. However, the F() macro only works on string literals.
Moving Constant Data to PROGMEM
In general, the Arduino stores variables in SRAM. AS we have noticed earlier, the size of these variables can change during program execution. To avoid running out of RAM, we need to control the data that goes into this memory block. To achieve this, we use the PROGMEM keyword to store the data in program memory instead of RAM. It is particularly useful for data that never changes, such as constants. The drawback, however, is that this is slower; but the bigger picture is that we save RAM. Here is an example of PROGMEM implementation.
Before PROGMEM implementation:
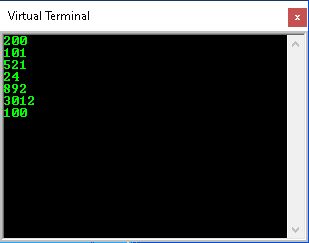
const int16_t chars[] = {200, 101, 521, 24, 892, 3012, 100};After PROGMEM implementation:
const int16_t chars[] PROGMEM = {200, 101, 521, 24, 892, 3012, 100};To read the variable from program memory, we use the following code:
void ReadData() {
  unsigned int displayInt;

  for (byte k = 0; k < 7; k++) {
    displayChars = pgm_read_word_near(chars + k);
    Serial.println(displayChars);
  }
  Serial.println();
}
The for loop in the code above assumes that you know the size of the data in your variable. However, if this information is not available at hand, you can replace the for loop with the code below:
for (byte k = 0; k < (sizeof(chars) / sizeof(chars[0])); k++) {
    displayInt = pgm_read_word_near(chars + k);
    Serial.println(displayInt);
  }
And we get the following values:
Using reserve() for Strings
Another method to optimize the Arduino code is to manage the memory of strings that grow in size. To do so, we use the reserve() function to pre-allocate memory for such strings. If we do not control this, errors that relate to memory fragmentation may occur, resulting in reduced performance. Here is the code for implementing the reserve() function.
  String string;
  string.reserve(50);
To use this correctly, we declare a variable of type String, and then pass on the number of bytes in memory to store this string.
Advanced techniques
Direct Port Manipulation
We can program the Arduino using pure C since the software is based on the avr-gcc compiler, and the hardware is based on Atmel AVR microcontrollers. Each pin on the microcontroller consists of the following register bits: PINxn, DDxn, and PORTxn. A detailed description of these register bits can be found from the Atmega datasheet.
Two main improvements can be brought by direct port manipulation of your Arduino. Firstly, its speed. Direct port control results in much faster I/O control, thereby saving a couple of microseconds. Secondly, direct port control reduces the amount of memory your sketch will use. For example, the two code snippets below implement a simple LED blink program. The first one uses Arduino digitalWrite() functions, while the second uses direct port control in pure C.
void setup() {
  pinMode(LED_BUILTIN, OUTPUT);
}

void loop() {
  digitalWrite(LED_BUILTIN, HIGH);
  delay(1000);
  digitalWrite(LED_BUILTIN, LOW);
  delay(1000);
}
void setup() {
DDRB |= (1<<PD5);
}
void loop(){
PORTB |= (1<<PD5);
_delay_ms(1000);
PORTB &= !(1<<PD5);
_delay_ms(1000);
}The size of the second program is 488 bytes, compared with the digitalWrite() program, which takes about 924 bytes of memory. However, there is a lot of debate on whether direct port manipulation in pure C counts as a method of code optimization for the Arduino. The Arduino software was written to simplify the process of microcontroller programming. The libraries “hide” this low-level C from us. Therefore, reverting to pure C can be seen as negating the purpose of using Arduino. The author has only mentioned this technique to demonstrate the memory aspects of pure C compared to the Arduino style.
Removing the Bootloader
The Arduino prototyping platform simplifies the process of transferring your code to the microcontroller. It simplifies this process by using firmware, instead of an external programmer. This firmware is called the bootloader, and it takes about 2000 bytes of flash memory. When all the options have been exhausted, then you can consider bypassing the bootloader. You can either use the Arduino as ISP or use an external programmer to “burn” your code without using the bootloader. When the microcontroller on the Arduino is programmed this way, the new image will overwrite the bootloader, thereby leaving more space for your sketch.
Hope this article has given you some ideas on how to optimize your Arduino code! Feel free to leave a comment below if you have any questions or want to add anything.


void loop(){
PORTB |= (1<<PD5);
_delay_ms(1000);
PORTB &= !(1<<PD5);
_delay_ms(1000);
}
should read:
void loop(){
PORTB |= (1<<PD5);
_delay_ms(1000);
PORTB &= ~(1<<PD5); <<<<<<<<<<<< Note the '~'
_delay_ms(1000);
}
-327768 Extra 7 I think