We are witnessing the dawn of a new era in computing and how we communicate on the internet. Not so long ago, human-to-human communication was the main form of communication on the internet. But recently, objects or things can now be uniquely identified and addressed for ubiquitous communication, independent of human beings.

In this article, we will learn how to send DHT22 humidity and temperature sensor readings to the cloud using the Raspberry Pi. We will build a project and demonstrate two different methods for sending sensor data to the cloud with a Raspberry Pi using the ThingSpeak cloud platform.
What is ThingSpeak?
ThingSpeak is an IoT platform in the cloud that provides sensor data collection services, transmission, processing, visualization, and analytics on the cloud by using API keys. Furthermore, it provides these services in real-time, which means that users can operate their services for monitoring and control applications in real-time. Potential application areas for sensor monitoring and control with ThingSpeak include:
- Air quality monitoring
- Energy monitoring
- Smart farming
- Traffic monitoring
- Weather station
Because of the cost-saving feature and reliability offered by such platforms, a number of big IoT companies are opting to purchase the services offered by IoT providers such as ThingSpeak. Instead of building their own IoT platforms, a move to cloud-based infrastructure offers unparalleled benefits for companies, big or small.
ThingSpeak and Sensor Data
There are two methods for saving sensor readings in ThingSpeak—either in a public channel or a private channel. A channel consists of eight fields for data storage, three fields for recording the geophysical location, and a status field. To access these services, a user needs to be signed in. Integration with MATLAB guarantees users access to rich visualization and sensor data analytics tools. The platform accepts raw sensor data and users use equations and algorithms to transform that data into a usable form. It is advantageous to perform any data processing on the cloud due to a number of reasons:
- Most IoT projects are battery-powered so processing data costs energy
- Processing data may slow down the micro-controllers
- Increase microcontroller sleep time
Connecting the Raspberry Pi to ThingSpeak
The Raspberry Pi needs an internet connection to connect to ThingSpeak. Here are some of the ways to do this:
In this tutorial, we will demonstrate two ways of connecting your Raspberry Pi to ThingSpeak. First, we will demonstrate a wired ethernet connection and then the ESP8266 method. We find it convenient to use the ESP8266 WiFi module in some applications since we can connect the module to our mobile hotspot. A wired connection, however, will require access to the existing network hardware.
Connecting to ThingSpeak Over Ethernet
The first method uses a wired ethernet connection. In this set-up, we use a LAN cable to connect the Raspberry Pi to the internet. Then, we write a Python script that makes HTTP requests to access and retrieve data from the internet. There are several libraries that we can use to open the URLs. In this tutorial, we are going to use the urllib2 library to send the data to ThingSpeak. Here is an example of sending sensor values to ThingSpeak.
import sys
import Adafruit_DHT as dht
import urllib2

myAPI = 'IUKV2ZRBQW9MV407Q'
ThingsURL = 'https://api.thingspeak.com/update?api_key=%s' % myAPI

def DHT22_data():
	humidity, temperature = dht.read_retry(dht.DHT22, 23)
	return humi, temp

humidity, temp = DHT22_data()
if isinstance(humidity, float) and isinstance(temp, float):
	humi = '%.2f' % humidity
	temp = '%.2f' % temp

	coms = urllib2.urlopen(ThingsURL + '&field1=%s&field2=%s' % (temp, humi))
	print coms.read()
	coms.close()
else:
	print 'Error'
Code Explanation
import sys, import Adafruit_DHT as dht, import urllib2: Importing python modules for our program blocks to work.'https://api.thingspeak.com/update?api_key=%s' % myAPI: This is the first part of the URL that we need to post the data. The URL format will be discussed in detail under the section about sending sensor data to ThingSpeak.def DHT22_data(): Our function to read the sensor data and compute the temperature and humidity values.coms = urllib2.urlopen(ThingsURL + '&field1=%s&field2=%s' % (temp, humi)): The second part of the URL, which includes the field name and the respective sensor values.
Connecting to ThingSpeak Over WiFi
The second method we will demonstrate uses the ESP8622 WiFi module. But before we start writing code to connect our Raspberry Pi to ThingSpeak via the ESP8622 module, it is always a best practice to test the system at the unit level. For the Raspberry Pi, we need to make sure that the UART port is able to transmit and receive the data. Then, for our ESP8266, we need to make sure that the module responds correctly to our AT commands. Finally, we need to test if the DHT22 sensor is measuring the parameters correctly. Once we pass this test, then we know we have done the heavy work, and we are good to go.
Configuring the Raspberry Pi UART Port
The following is a diagram of the Raspberry Pi GPIO pins. Through this interface, we connect different peripheral devices to our Raspberry Pi depending on the application area.
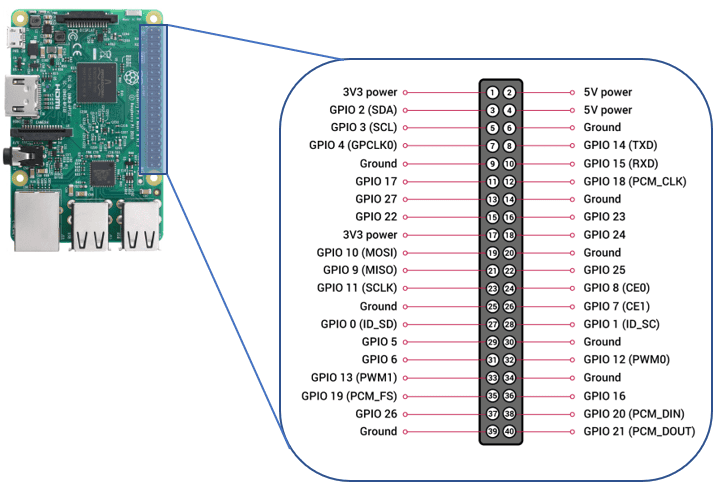
From the diagram, the Raspberry Pi’s transmit pin is GPIO 14, while it is connected to header pin number 8. Consecutively, the receive pin is GPIO 15, which is connected to header pin number 10. To connect to the ESP8622 module, we connect the ‘TXD’ of the Raspberry Pi to the ‘RDX’ of the WiFi module, and vice versa. One critical connection here is the link between the ground of the Raspberry Pi to the ground of the ESP module. This is to ensure a reliable serial connection between our devices.
Enabling the Raspberry Pi Serial Port
By default, the Raspberry Pi’s Linux console uses the primary UART port. For us to use it for connecting other serial devices, we would need to reconfigure Raspberry Pi OS. Here are the steps to do it:
- In the terminal window, start the Raspberry Pi configuration tool by typing the following command:
sudo raspi-config. This will take you to a manual with different selection options. - Select option 5 for
interfacing options. - Select option 6 for the
serialsettings. - When you are asked:
Would you like a login shell to be accessible over serial?, chooseNO. - Again, when you are asked:
Would you like the serial port hardware to be enabled?, chooseYES. - Select finish and reboot the Raspberry Pi.
Using Python for GPIO Control
After configuring the UART hardware, the next step is to use a programming language for serial communication. Raspberry Pi OS supports different programming languages, but for ease-of-use, we will be using Python for serial communication. Download and install the required packages. You can refer to this link for help with python installation. The following code sends the AT command “AT” to the ESP WiFi module. If the module is configured correctly, the module responds with an “OK”. Steps to configure the ESP firmware can be found on this link.
import serial
import time
port = serial.Serial("/dev/ttyAMA0", baudrate=115200, timeout=3.0)
def ReadLine(port):
	read_string = ""
	read_string = port.read(1000)
	return read_string

ModuleConnected=True;
while ModuleConnected:
	port.write("AT\r\n")
	inData=ReadLine(port)
	print(inData)
	if "OK" not in inData :
		print("Module not found.")
		time.sleep(20)
	else :
		print("Device connected.")
		isConnected=False
Code Explanation
import serialandimport time: The two main python modules we need in this program for serial communication and time-related functions, respectively.port = serial.Serial("/dev/ttyAMA0", baudrate=115200, timeout=3.0)for initializing the serialport (ttyAMA0)with a baud rate of115200.ModuleConnected=True;for checking a valid response from the module. This is necessary because, at times, the module responds with an “ERROR” message, so it’s important to check the status of the WiFi module.port.write("AT\r\n"): This is the command python uses to send commands to the module. Note that the important character to be included is the carriage return “\r.” This is equivalent to pressing enter on a terminal application such as minicom or screen.inData=ReadLine(port)andprint(inData): Two functions we use to read data from the serial port and display that data on our terminal.- Finally,
if "OK" not in inDatais a function we use for error control. Basically, this line of code checks to see if the ESP WiFi has responded with an “OK.” If an error has occurred, we resend the AT command until we get the correct response.
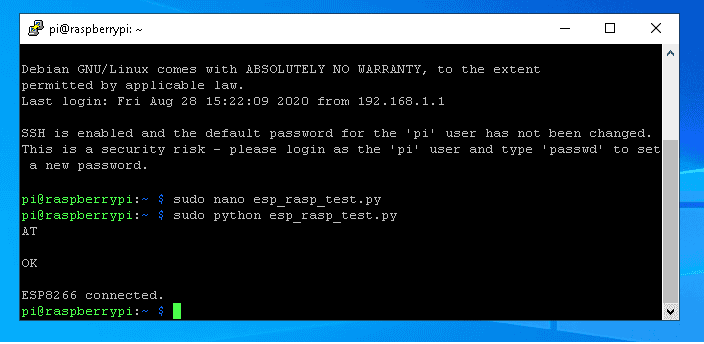
If everything has gone according to the plan, we should obtain an out like the one shown in the diagram below. Here, we use a terminal program, Putty, on the laptop to connect to our Raspberry Pi through an Ethernet cable. We save our code to a file called esp_rasp_test.py, and then run that program by using the command sudo python esp_rasp_test.py.
DHT22 Temperature and Humidity Test
Another important test that we need to perform is for the DHT22 temperature and humidity sensor. We will use python to read data from the sensor and print out the corresponding values on our terminal. For this task, we will use the following code:
import Adafruit_DHT
DHT_SENSOR = Adafruit_DHT.DHT22
DHT_PIN = 4

while True:
	humidity, temperature = Adafruit_DHT.read_retry(DHT_SENSOR, DHT_PIN)

	if humidity is not None and temperature is not None:
		print("Temp={0:0.1f}*C Humidity={1:0.1f}%".format(temperature, humidity))
	else:
		print("Failed to read from sensor")
Code Explanation
import Adafruit_DHT: Here, we import the DHT22 sensor library from Adafruit and assign pin 4 on the Raspberry Pi to read the sensor output.humidity, temperature = Adafruit_DHT.read_retry(DHT_SENSOR,DHT_PIN): A function that we use to parse humidity and temp readings from the sensor.print("Temp={0:0.1f}*C Humidity={1:0.1f}%".format(temperature, humidity)): Finally, we display the resulting sensor values on our terminal.
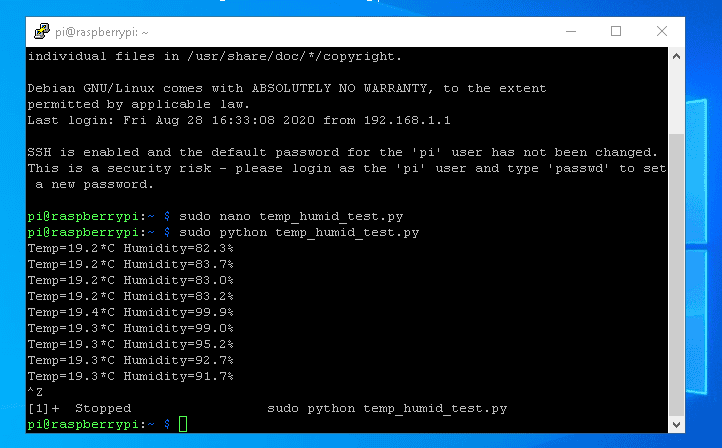
If the connection was successful, we should be able to get the following output on our terminal.
Sending Sensor Data to ThingSpeak
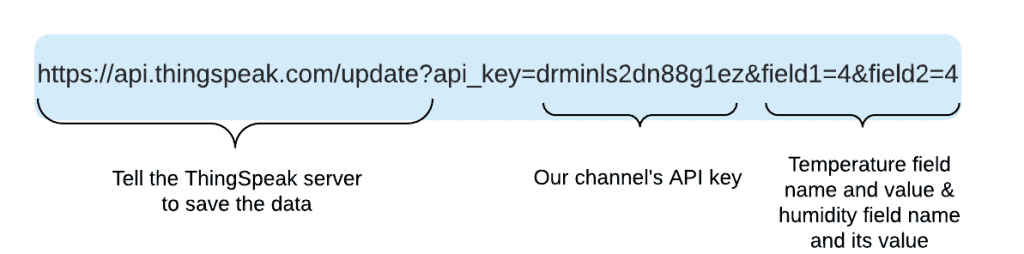
To send the sensor data to our ThingSpeak channel, firstly, we need to obtain the channel’s write API key. Then we will need the sensor values to write. For this tutorial, we have two sensor variables—temperature and humidity. So we need to have two fields: field1 and field2. Send this information in a single URL using the following format: https://api.thingspeak.com/update?api_key=drminls2dn88g1ez&field1=4&field2=4. The URL description is shown in the diagram below:
Graphing Sensor Data on ThingSpeak
There are two ways to graph sensor data on ThingSpeak. The first method involves writing our own custom code that displays our data on MATLAB plots. For the second method, we select the graph we want to use from a selection of in-built templates. The selection includes graphs like:
- 2D line-plot
- Correlated data plot
- 2D line plot with two y-axis
- Discrete sequence data plot
- Histogram
- Compass plot
- Area plot
It does not matter, however, which method we use to graph our sensor data. The two methods require at least three important parameters: the channel ID, Field ID, and the Read API key. We write a function that reads data from our channel using our Read API key. Finally, we display the information from the selected field ID. We will then demonstrate how to use an in-built template to graph our sensor data. Details of using our own custom code to graph the sensor values can be found here.
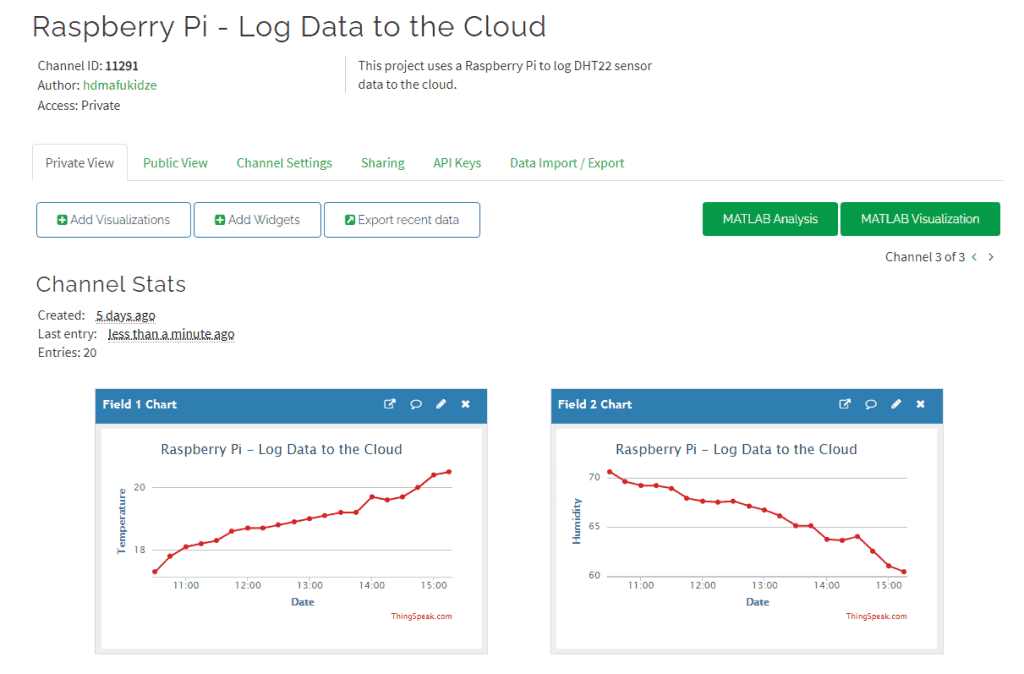
To access ThingSpeak’s in-built plots, first, we click on MATLAB Visualization button. This takes us to another window where we select the type of plot we want. So, we create a 2-D line plot with y-axes on both left and right sides. It is a common practice to visualize these parameters on the same plot such that we can note their variation as a function of time. Click on the create button and then edit the MATLAB code with your channel’s details.
MATLAB Code for 2D Line Plotting
The following is the in-built MATLAB code.
readChannelID = [];
fieldID1 = [];
fieldID2 = [];

readAPIKey = '';

[data1, time1] = thingSpeakRead(readChannelID, 'Field', fieldID1, 'NumPoints', 30, 'ReadKey', readAPIKey);
[data2, time2] = thingSpeakRead(readChannelID, 'Field', fieldID2, 'NumPoints', 30, 'ReadKey', readAPIKey);

yyaxis left;
plot(time1, data1)

yyaxis right;
plot(time2, data2);
All you need to do now is to replace the missing details with your channel’s information: readChannelID = []; fieldID1 = []; fieldID2 = []; readAPIKey = ''; For my channel, the complete code will look like the following:
readChannelID = 1100284;
fieldID1 = 1;
fieldID2 = 2;

readAPIKey = 'BYW21LCLBF2UAF5SA';

[data1, time1] = thingSpeakRead(readChannelID, 'Field', fieldID1, 'NumPoints', 30, 'ReadKey', readAPIKey);
[data2, time2] = thingSpeakRead(readChannelID, 'Field', fieldID2, 'NumPoints', 30, 'ReadKey', readAPIKey);

yyaxis left;
plot(time1, data1)

yyaxis right;
plot(time2, data2);
Setting Threshold Limits
ThingSpeak has the option for users to set-up alerts on their channels. Alerts warn us when our sensor readings go beyond certain thresholds. This is one of ThingSpeak’s main selling points because to provide a full-fledged IoT platform, users need to be able to interact and respond to their sensor data. Here are the steps we need to follow to set threshold limits.
- From your ThingSpeak dashboard, click on “My Profile”, and then scroll down the page and copy the Alerts API Key.
2. Next, return to your channel’s dashboard and select “MATLAB Analysis”

3. Select the Custom (No starter code) and click create. On the next page, paste the following lines of code. Use the Alert API Key which you have obtained above.
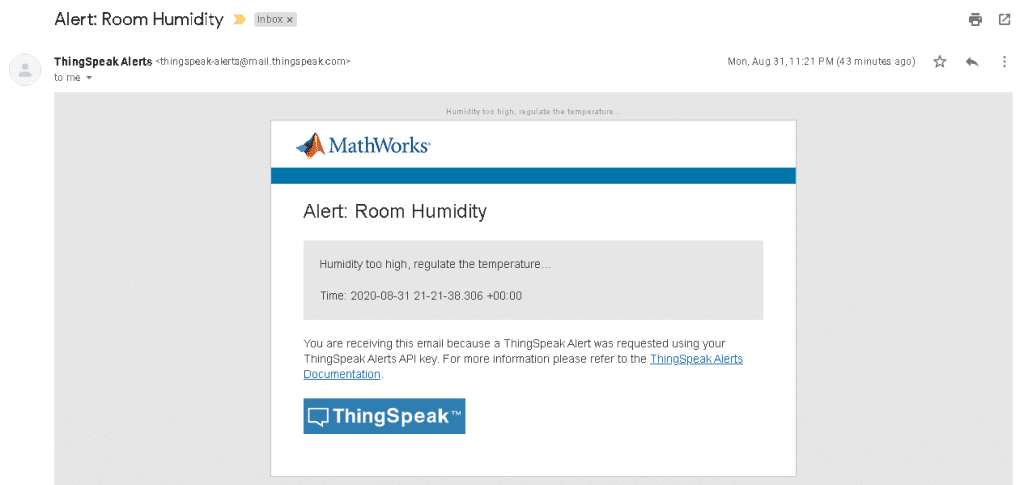
alert_body = 'Humidity too high, regulate the temperature...';alert_subject = 'Room humidity';alert_api_key = 'TAK5NZV7NM4NU27B1FXG';alert_url= "https://api.thingspeak.com/alerts/send";jsonmessage = sprintf(['{"subject": "%s", "body": "%s"}'], alert_subject,alert_body);options = weboptions("HeaderFields", {'Thingspeak-Alerts-API-Key', alert_api_key; 'Content-Type','application/json'});result = webwrite(alert_url, jsonmessage, options);4. Finally, we create a React that will be connected to the Analysis created above. To do that, click on Apps, then select React. Below is what the form looks like.

If everything has been set-up correctly, we should receive an email when the humidity goes beyond a certain threshold.
Sample Project
For this sample project, we will connect the DHT22 sensor to the Raspberry Pi and upload the temperature and humidity values to ThingSpeak every 15 minutes. We will set up a 2D plot to visualize the sensor values (humidity and temperature vs time) and send an email when the humidity drops below a certain value.
Components
- Raspberry Pi
- Ethernet cable
- DHT22 temperature and humidity sensor
- ESP8266 WiFi module
- ESP8266 breadboard adapter (optional)
- Jumper wires
- Breadboard power supply
- Breadboard
- 10k resistor
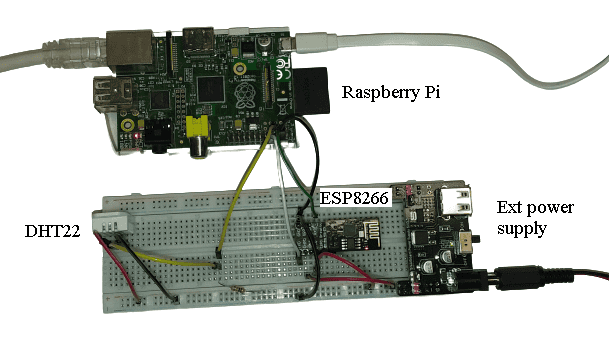
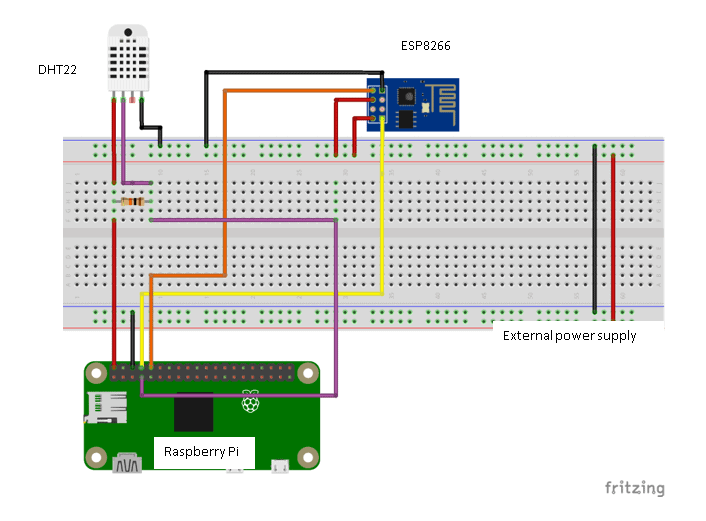
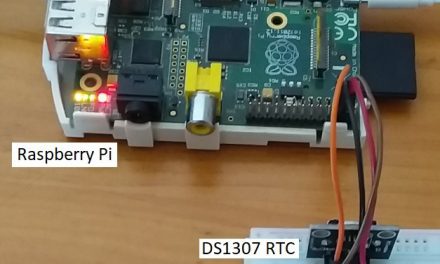
Circuit Diagram
When we connect our ESP8266 module to the Raspberry Pi, there is no need to convert the logic levels because all the devices’ serial ports operate at logic level 3.3v. The DHT sensor is connected to 5v, and then the Raspberry Pi Tx pin is connected to the ESP Rx pin and vice versa. We then connect the DHT22 sensor’s signal pin to Raspberry Pi pin 4.
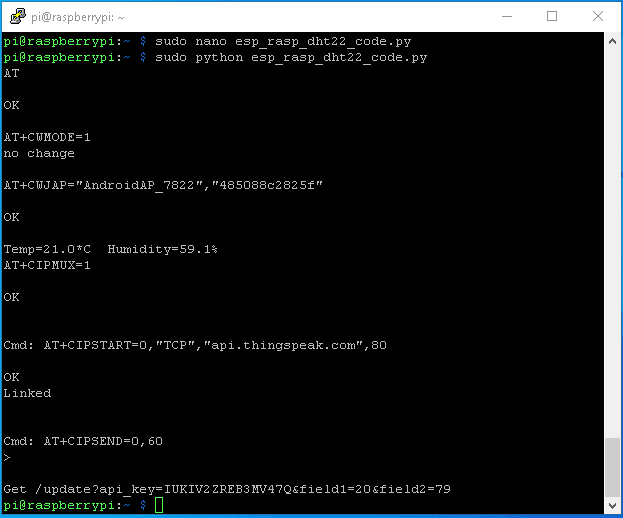
The following code uses the ESP8266 WiFi module to connect the Raspberry Pi to ThingSpeak.
import serial
from time import *
import datetime, string
import Adafruit_DHT

Host = "api.thingspeak.com"
Port = "80"
API="IUKIV2ZREByERH7V47Q"
field1 = "field1"
field2 = "field2"

DHT_SENSOR = Adafruit_DHT.DHT22
DHT_PIN = 4

port = serial.Serial("/dev/ttyAMA0", baudrate=115200, timeout=3.0)
def readlineCR(port):
	rv = ""
	rv = port.read(1000)
	return rv

# ----------------------------------------
def wifiCommand( sCmd, waitTm=1, sTerm='OK' ):
	lp = 0
	ret = ""

	print
	print "Cmd: %s" % sCmd
	port.flushInput()
	port.write( sCmd + "\r\n" )
	ret = port.readline()
	sleep( 0.2 )
	while( lp < waitTm ):
		while( port.inWaiting() ):
			ret = port.readline().strip( "\r\n" )
			print ret
			lp = 0
		if( ret == sTerm ): break
		if( ret == 'ERROR' ): break
		sleep( 1 )
		lp += 1
	return ret

# ------------------------------------------

isConnected=True;
while isConnected:
	port.write("AT\r\n")
	returnedData=readlineCR(port)
	print(returnedData)
	if "OK" not in returnedData :
		time.sleep(20)
	else :
		isConnected=False

	port.write("AT+CWMODE=1\r\n")
	returnedData=readlineCR(port)
	print(returnedData)

	port.write("AT+CWJAP=\"AndroidAP_7822\",\"485088c2825f\"\r\n")
	returnedData=readlineCR(port)
	print(returnedData)

	humidity, temperature = Adafruit_DHT.read_retry(DHT_SENSOR, DHT_PIN)

	if humidity is not None and temperature is not None:
    	    print("Temp={0:0.1f}*C  Humidity={1:0.1f}%".format(temperature, humidity))
        else :
            print("Failed to retrieve data from humidity sensor")

	port.write("AT+CIPMUX=1\r\n")
	returnedData=readlineCR(port)
	print(returnedData)

	wifiCommand("AT+CIPSTART=0,\"TCP\",\""+ Host+"\","+Port,15,"OK")
	returnedData=readlineCR(port)
	print(returnedData)

	cmd="Get /update?api_key="+API+"&"+field1+"="+str(20)+"&"+field2+"="+str(79)
	cmdLn=str(len(cmd)+4)
	wifiCommand("AT+CIPSEND=0,"+cmdLn,4,">")
	returnedData=readlineCR(port)
	print(returnedData)

	port.write(cmd)
	port.write('\r')
	returnedData=readlineCR(port)
	print(returnedData)
	break
Code Explanation
port = serial.Serial("/dev/ttyAMA0", baudrate=115200, timeout=3.0)for initializing the serial port.def wifiCommand( sCmd, waitTm=1, sTerm='OK' ):A function that will allow us to send the AT commands to the ESP moduleisConnected=True; while isConnected:This check is critical. At times, the ESP module can fail to respond due to several reasons. We need to make sure that the module is available and ready to accept new commands.port.write("AT+CWMODE=1\r\n")for setting our module in STA mode.port.write("AT+CWJAP=\"AndroidAP_7822\",\"485056854yhc2825f\"\r\n"): We use this command to connect to our access point. Here, we include our mobile hotspot name and password.humidity, temperature = Adafruit_DHT.read_retry(DHT_SENSOR, DHT_PIN): This is the function that we use to read and calculate the humidity and temperature values.port.write("AT+CIPMUX=1\r\n"): Here, we configure our WiFi module to connect automatically to the Wi-Fi network.wifiCommand("AT+CIPSTART=0,\"TCP\",\""+ Host+"\","+Port,15,"OK"): We use thewifiCommandfunction to initiate a TCP connection to ThingSpeak.com with port 80.cmd="Get /update?api_key="+API+"&"+field1+"="+str(20)+"&"+field2+"="+str(79): This is the URL that we use to post our sensor data to ThingSpeak. It contains all the required fields and information about our channel.- Finally, we use
breakto exit the loop because we want to send this data only once per time.
Terminal Output
Scheduling Tasks with Cron
To send the data from the Raspberry Pi to ThingSpeak every 15 minutes, we need to create a script on the Raspberry Pi that runs every 15 minutes. For that, we will need to set up a cronjob on our Raspberry Pi. The cron is a powerful tool in Linux, which is used to schedule scripts to run periodically and at fixed intervals. To set up one, type sudo crontab -e on your Raspberry Pi terminal. Add the following line of code to schedule a task that runs every 15 mins: *15/ * * * * sudo python /home/pi/rasp_dht22_thingspeak.py. In this case, the python program that I want to run every 15 minutes is called rasp_dht22_thingspeak.py, and it is located in the directory /home/pi.
We have shown two methods of sending temperature and humidity values from a Raspberry Pi to the cloud. We demonstrated using a direct internet connection and with an ESP8266 WiFi module. We also created a React that will send an email when the humidity goes above 80%. Lastly, we created a cron job that will automatically run the Python script every 15 minutes.
Thanks for reading and be sure to leave a comment below if you have questions about anything!


