Although it is often enough to use a single Arduino to read from a sensor and display the result in the serial window or on an LCD screen, sometimes this is just not enough, and you may want to split the task between 2 Arduinos. An example of this might be an Arduino sensing the rotation of a fuel flow meter turbine blades in a standby emergency diesel motor, (a fairly busy task), and then sending this as a periodic flow rate to a second Arduino in a control room.

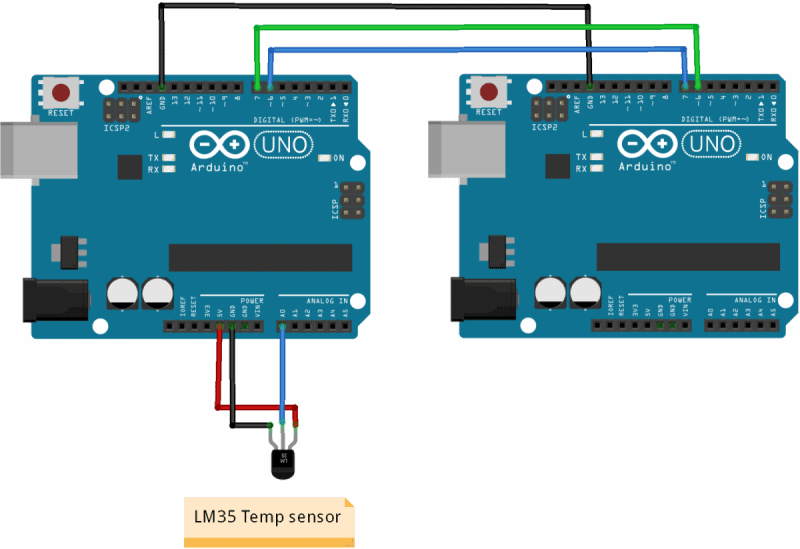
In this tutorial, we are going to use an LM35 temperature sensor connected to one Arduino and then use a 3-wire connection (transmit, receive, and common ground) to relay this data to a second Arduino some distance away. If this distance is more than 10m, the wires should be twisted.
How the LM35 Works
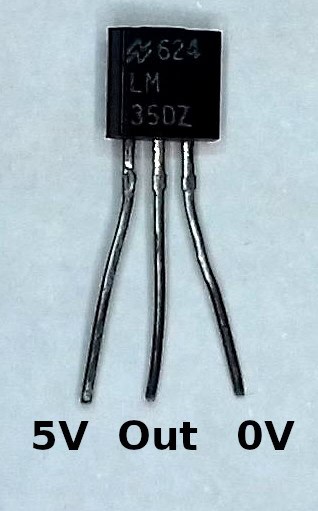
The LM35 is a 3-pin temperature sensor. The outer 2 pins are connected to a supply voltage anywhere from 4V to 30V. The center Out pin is a voltage source giving 10mV per degree Celsius. In other words, 25 degrees C will produce 250mV on the Out pin. This is an analog voltage and so must be connected to an analog pin on the Arduino. The temperature range is -55 to +150 degrees C. The Arduino can convert this to a temperature in deg C as follows:
float tempC = analogRead(LM35_pin)tempC = (tempC*500)/1023
or if you want it in Farenheight, convert as follows: tempF = (tempC*1.8) + 32.
Connecting Two Arduinos
Now, let’s try to build that LM35 and two Arduinos.
It might seem obvious to connect the Arduinos’ two serial ports together (data pins 0 and 1). However, if you will do this, your signal would clash with trying to program the Arduino from the USB port as well as the serial window which by default uses these pins. So instead, we will use the SoftwareSerial library that comes as default with the Arduino IDE and it will create a completely independent set of serial ports for us to use. We will connect the LM35 to the remote unit and a battery and the 3-wire link.
Some sage advice: never wire up anything other than a mains device with mains “cab-tyre” (blue, brown, green) cable.
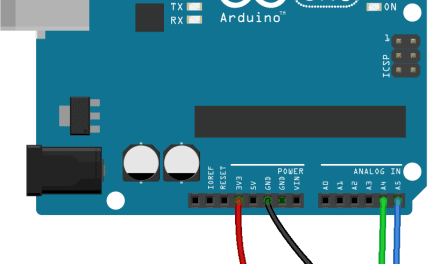
For the local Arduino, just a power supply or battery, or the power from the USB port will do. The result will be showing on the serial monitor but you could use an LCD display.
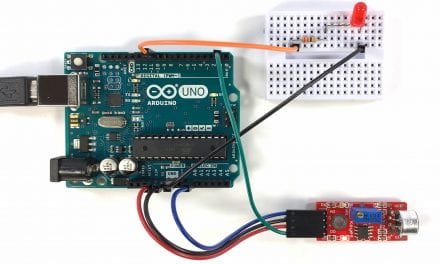
How to Wire Up the LM35 to Two Arduinos
These are the parts you will need to connect the two Arduinos and the LM35 temperature sensor:
Note that the TX of one Arduino goes to the RX of the other and vice versa.

If you want to learn more about the Arduino, check out our Ultimate Guide to the Arduino video course. You’ll learn basic to advanced Arduino programming and circuit building techniques that will prepare you to build any project.
Installing the Libraries
There is no library required for the LM35 and the SoftwareSerial library is already available as a default installed library.
Something to be aware of, the buffer size in the standard library is fairly small (64 bytes) and if you transmit long strings, you will see them truncated (ends cut off). This can be fixed by editing the SoftwareSerial.h file in C:\Arduino\hardware\arduino\avr\libraries\SoftwareSerial\src but don’t do this unless you know what you are doing. (Make a copy of the file first!)
Note on Serial Comms: It is often easy to forget that serial ports (UARTS) are going to communicate asynchronously. This means data arriving at the receiver will be in its own time and not in time with the Arduino loop.
Arduino Code for the Master
Note that I am avoiding the problematic Arduino String object and using C-type char strings for greater stability. I have added a green LED to both to show the boards are running.
//Transmitter Code
 #include <SoftwareSerial.h>
 SoftwareSerial link(2, 3); // Rx, Tx
 byte lm35Pin = A0;
 float lm35V = 0;
 float tempC = 0;
 byte greenLED = 12;
 char text[20] ;
 char charVal[6];

  void setup()
  {
    link.begin(9600);
    Serial.begin(9600);
    pinMode(greenLED, OUTPUT);
  }

  void loop()
  {
   strcat(text, "Temp is: "); //append to empty string
   digitalWrite(greenLED, HIGH);
   delay(10);
   digitalWrite(greenLED, LOW);
   lm35V = analogRead(lm35Pin);
   tempC = (lm35V/1023) * 500;
   //this is a float we want it as a c-string:
   dtostrf(tempC, 5, 1, charVal);
   //5 is min width, 1 is precision; float value is copied to charVal
   strcat(text, charVal); //append the value
   text[16] = 0; //terminate the cstring
   strcat(text, "C");  //append a C
   Serial.println(text); //print to local screen for debug
   link.println(text);

   delay(200);
  }
Arduino Code for the Slave
Take note of the first 4 commented outlines in the loop(). If you need to debug the connection, un-comment them and comment out the rest of the loop() code to get it up and running.
 //Receiver code
 #include <SoftwareSerial.h>
 SoftwareSerial link(2, 3); // Rx, Tx

  byte greenLED = 12;
  char cString[20];
  byte chPos = 0;
  byte ch = 0;
  char dataStr[6];

  void setup()
  {
    link.begin(9600); //setup software serial
    Serial.begin(9600);    //setup serial monitor
    pinMode(greenLED, OUTPUT);
  }

  void loop()
  {
 // if (link.available())
 //     Serial.write(link.read());
 // if (Serial.available())
 //     link.write(Serial.read());


   while(link.available())
   {
    //read incoming char by char:
     ch = link.read();
     cString[chPos] = ch;
     chPos++;

   digitalWrite(greenLED, HIGH); //flash led to show data is arriving
   delay(10);
   digitalWrite(greenLED, LOW);
   }
   cString[chPos] = 0; //terminate cString
   chPos = 0;

   Serial.print(cString);
  }
Using the Project and Output of the Serial Window
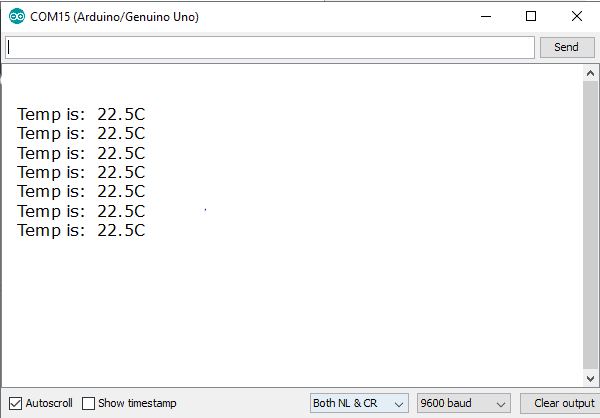
If all has been wired correctly, pinch the LM35 with your fingers to make it change temperature. The serial window should show the following:
Hope this helps you figure out how to communicate between two Arduinos! Feel free to leave a comment below if you have any questions!


Graham, a good article, particularly because it doesn’t use the Strings functions and so is a good example for beginners. The use of ‘floats’ could be avoided to by multiplying the measured result by 100 making it an integer value, assuming only 2 decimal places of the measurement are required. Then, on the receiving end the received value is divided by 100 prior to displaying it.
There is also an old Arduino library ‘EasyTransfer’ that works well with this type of connection.
Twisting the wires… I’ve used cat 5 cable, one pair tx and ground, another pair rx and ground. connect the grounds together at the ends. You can use the other two pairs to carry power to the remote unit.
I’m trying to communicate between two arduinos using pot(connected with the transmitter) and servo(connected with receiver ) but not working in my case
I could not get the code to work, has anyone else verified it? From what I have read off of the arduino website the software serial function does not work with the UNO. Additionally the author has the two board wired via pins 6 and 7, but pins 2 and 3 are used in the code. I have since tried it both ways with no success.